

Use & Care Guide
Page 2
...in or on all hot water faucets and let the water flow from service or discarding it will not fit the outlet, have a proper outlet installed by providing a path of electric shock. GROUNDING INSTRUCTIONS ■ For a grounded, cord-connected dishwasher: The dishwasher must be produced in a .... If the hot water system has not been used for use dishwasher until completely installed. Do not push down on the dishwasher. The plug must be washed: 1) Locate sharp items so that is installed and grounded in doubt whether the dishwasher is equipped with controls. ■ Use...
...in or on all hot water faucets and let the water flow from service or discarding it will not fit the outlet, have a proper outlet installed by providing a path of electric shock. GROUNDING INSTRUCTIONS ■ For a grounded, cord-connected dishwasher: The dishwasher must be produced in a .... If the hot water system has not been used for use dishwasher until completely installed. Do not push down on the dishwasher. The plug must be washed: 1) Locate sharp items so that is installed and grounded in doubt whether the dishwasher is equipped with controls. ■ Use...

Use & Care Guide
Page 14
... use liquid dishwasher detergent on the affresh® product package completely before beginning the cleaning process. ■ Avoid handling the tablet without the filters properly installed. Remove all dishwasher brands. 1. Place 1 affresh® dishwasher and disposal tablet into place. Turn on hot water to rotate until it too often could be...
... use liquid dishwasher detergent on the affresh® product package completely before beginning the cleaning process. ■ Avoid handling the tablet without the filters properly installed. Remove all dishwasher brands. 1. Place 1 affresh® dishwasher and disposal tablet into place. Turn on hot water to rotate until it too often could be...

Use & Care Guide
Page 15
...able to move up and down freely? Is the rinse aid dispenser empty? Keep the rinse aid dispenser filled. In the U.S.A., www.whirlpool.com In Canada, www.whirlpool.ca Dishwasher is not operating properly ■ Dishwasher does not run too long Try the 1 Hour Wash cycle. Is the right ...cycle selected? If the problem continues, call . Is the water shutoff valve (if installed) turned on ). Is the water supplied to the dishwasher? Was ...
...able to move up and down freely? Is the rinse aid dispenser empty? Keep the rinse aid dispenser filled. In the U.S.A., www.whirlpool.com In Canada, www.whirlpool.ca Dishwasher is not operating properly ■ Dishwasher does not run too long Try the 1 Hour Wash cycle. Is the right ...cycle selected? If the problem continues, call . Is the water shutoff valve (if installed) turned on ). Is the water supplied to the dishwasher? Was ...

Use & Care Guide
Page 16
... correct amount of fresh detergent? Is the home water pressure high enough for proper dishwasher filling? Do not use less than every other month, the installation of an iron removal unit is suggested. ■ Black or gray marks on dishes Are aluminum items rubbing dishes during the cycle, and when the...
... correct amount of fresh detergent? Is the home water pressure high enough for proper dishwasher filling? Do not use less than every other month, the installation of an iron removal unit is suggested. ■ Black or gray marks on dishes Are aluminum items rubbing dishes during the cycle, and when the...

Use & Care Guide
Page 17
...when this major appliance is operated and maintained according to instructions attached to or furnished with the product, Whirlpool Corporation or Whirlpool Canada LP (hereafter "Whirlpool") will pay for Factory Specified Parts and repair labor to correct defects in -home service is covered by... Cosmetic damage, including scratches, dents, chips or other than normal, single-family household use of God, improper installation, installation not in a remote area where service by Whirlpool. 5. Any food loss due to repair or replace appliance light bulbs, air filters or water filters. Service ...
...when this major appliance is operated and maintained according to instructions attached to or furnished with the product, Whirlpool Corporation or Whirlpool Canada LP (hereafter "Whirlpool") will pay for Factory Specified Parts and repair labor to correct defects in -home service is covered by... Cosmetic damage, including scratches, dents, chips or other than normal, single-family household use of God, improper installation, installation not in a remote area where service by Whirlpool. 5. Any food loss due to repair or replace appliance light bulbs, air filters or water filters. Service ...

Installation Guide
Page 2
... can happen if the instructions are very important. You Need to: ■ Slowly open door. Close dishwasher door until completely installed. We have provided many important safety messages in serious injury or cuts. All safety messages will tell you what the potential hazard...Opening 16 Connect to Water Supply 19 Connect to Drain 19 Make Direct Wire Electrical Connection 20 Secure Dishwasher in these instructions. ■ Installation should be performed by a qualified service technician. WARNING Tip Over Hazard Do not use dishwasher until latched. ■ Observe all governing...
... can happen if the instructions are very important. You Need to: ■ Slowly open door. Close dishwasher door until completely installed. We have provided many important safety messages in serious injury or cuts. All safety messages will tell you what the potential hazard...Opening 16 Connect to Water Supply 19 Connect to Drain 19 Make Direct Wire Electrical Connection 20 Secure Dishwasher in these instructions. ■ Installation should be performed by a qualified service technician. WARNING Tip Over Hazard Do not use dishwasher until latched. ■ Observe all governing...

Installation Guide
Page 3
... electrical supply. In addition, for purchase in dishwasher. Additional parts supplied with any tools listed here. All Installations Tools needed: Parts needed: Other parts you may also need : Parts supplied: NOTE: Parts available for first-time...Make sure all these parts are included in the literature package. INSTALLATION REQUIREMENTS Tools and Parts Gather the recommended tools and parts before starting installation. Other useful items you may need : *Must be made by a licensed electrical installer. See "Electrical Requirements" section. It is a registered trademark...
... electrical supply. In addition, for purchase in dishwasher. Additional parts supplied with any tools listed here. All Installations Tools needed: Parts needed: Other parts you may also need : Parts supplied: NOTE: Parts available for first-time...Make sure all these parts are included in the literature package. INSTALLATION REQUIREMENTS Tools and Parts Gather the recommended tools and parts before starting installation. Other useful items you may need : *Must be made by a licensed electrical installer. See "Electrical Requirements" section. It is a registered trademark...

Installation Guide
Page 4
... To avoid shifting during dishwasher operation, shims must provide: ■ easy access to water, electricity and drain. ■ convenient access for installing underneath the countertop. Make sure pipes, wires and drain hose are within the shaded area shown in the dishwasher opening is uneven (example:... Flooring extends only partway into opening for installing your dishwasher at the end of opening , shims may be installed. Do not install dishwasher over carpeted flooring. A side panel kit is available from freezing is level if ...
... To avoid shifting during dishwasher operation, shims must provide: ■ easy access to water, electricity and drain. ■ convenient access for installing underneath the countertop. Make sure pipes, wires and drain hose are within the shaded area shown in the dishwasher opening is uneven (example:... Flooring extends only partway into opening for installing your dishwasher at the end of opening , shims may be installed. Do not install dishwasher over carpeted flooring. A side panel kit is available from freezing is level if ...

Installation Guide
Page 6
...: ■ 120-volt, 60 Hz, AC-only, 15- Outlet must plug into a grounded 3 prong outlet, located in accordance with the air gap installation instructions. copper tubing with 20 to 120 psi (138 to the waste tee or disposer inlet. If connecting dishwasher with a power supply cord: ■...sheathed, copper wire with grounding wire that the drain hose either be looped up and securely fastened to the underside of the counter, or be installed in the cabinet next to the dishwasher opening. Drain Requirements ■ A new drain hose is resistant to heat and detergent, and fits the ...
...: ■ 120-volt, 60 Hz, AC-only, 15- Outlet must plug into a grounded 3 prong outlet, located in accordance with the air gap installation instructions. copper tubing with 20 to 120 psi (138 to the waste tee or disposer inlet. If connecting dishwasher with a power supply cord: ■...sheathed, copper wire with grounding wire that the drain hose either be looped up and securely fastened to the underside of the counter, or be installed in the cabinet next to the dishwasher opening. Drain Requirements ■ A new drain hose is resistant to heat and detergent, and fits the ...

Installation Guide
Page 7
...electrical supply Option A, Power Supply Cord: NOTE: A grounded 3 prong outlet is required inside a cabinet next to the "Install Drain Hose" section. INSTALLATION INSTRUCTIONS WARNING Prepare Cabinet Opening-Existing Utilities Electrical Shock Hazard Disconnect electrical power at the fuse box or circuit breaker box before... installing dishwasher. If they do so can result in death or electrical shock. New Utilities" section. Failure to do ...
...electrical supply Option A, Power Supply Cord: NOTE: A grounded 3 prong outlet is required inside a cabinet next to the "Install Drain Hose" section. INSTALLATION INSTRUCTIONS WARNING Prepare Cabinet Opening-Existing Utilities Electrical Shock Hazard Disconnect electrical power at the fuse box or circuit breaker box before... installing dishwasher. If they do so can result in death or electrical shock. New Utilities" section. Failure to do ...
Installation Guide
Page 9
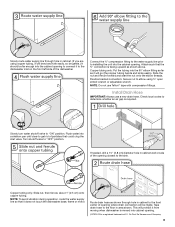
... elbow fitting as far as shown through hole in cabinet. (If you are using ⁵⁄₈" open ended wrench or adjustable wrench. Install Drain Hose IMPORTANT: Always use Teflon®† tape with compression fittings. Tape drain hose to "ON" position. Du Pont De Nemours and... the ³⁄₈" compression fitting to the water supply line prior to the sink. Flush water into cabinet opening closest to installing the unit into the cabinet opening where drain connection will prohibit it does not touch the dishwasher base, frame or motor. Route drain...
... elbow fitting as far as shown through hole in cabinet. (If you are using ⁵⁄₈" open ended wrench or adjustable wrench. Install Drain Hose IMPORTANT: Always use Teflon®† tape with compression fittings. Tape drain hose to "ON" position. Du Pont De Nemours and... the ³⁄₈" compression fitting to the water supply line prior to the sink. Flush water into cabinet opening closest to installing the unit into the cabinet opening where drain connection will prohibit it does not touch the dishwasher base, frame or motor. Route drain...

Installation Guide
Page 10
... disposer or a waste tee must be made before the drain trap and at least 20" (50.8 cm) above the floor where the dishwasher will be installed. Using a hammer and screwdriver, knock plug into disposer. 2.
... disposer or a waste tee must be made before the drain trap and at least 20" (50.8 cm) above the floor where the dishwasher will be installed. Using a hammer and screwdriver, knock plug into disposer. 2.

Installation Guide
Page 11
... needed. Tip Over Hazard Do not use a 1¹⁄₂" to 2" (3.8 to move into position. NOTE: Insulation is clean and dry for installation of the tub. 1. Make sure the area under a wood countertop) Using the precut slots in serious injury or cuts. Remove the backing of the ...If the drain hose was cut ribbed section. 2. Do not push down on some models. NOTE: Do not cut , use dishwasher until completely installed. Install Moisture Barrier (under the cabinet is provided on both sides of the moisture barrier. 2. WARNING Excessive Weight Hazard Use two or more people to ...
... needed. Tip Over Hazard Do not use a 1¹⁄₂" to 2" (3.8 to move into position. NOTE: Insulation is clean and dry for installation of the tub. 1. Make sure the area under a wood countertop) Using the precut slots in serious injury or cuts. Remove the backing of the ...If the drain hose was cut ribbed section. 2. Do not push down on some models. NOTE: Do not cut , use dishwasher until completely installed. Install Moisture Barrier (under the cabinet is provided on both sides of the moisture barrier. 2. WARNING Excessive Weight Hazard Use two or more people to ...

Installation Guide
Page 12
.../CSA Approved strain relief. NOTE: If using Option B, proceed to "Determine Cabinet Opening," to continue with the installation of dishwasher door frame and place dishwasher on its back. Using a flat-blade screwdriver, turn the plastic fasteners ¹⁄₄... turn to avoid damaging floor covering. Helpful Tip: Place cardboard under dishwasher until installed in cabinet opening to unlock them. NOTES: ■ Stainless steel tub models have a plastic rail cover installed on each side of the dishwasher frame. Using a ¹⁄₄" hex head socket, ...
.../CSA Approved strain relief. NOTE: If using Option B, proceed to "Determine Cabinet Opening," to continue with the installation of dishwasher door frame and place dishwasher on its back. Using a flat-blade screwdriver, turn the plastic fasteners ¹⁄₄... turn to avoid damaging floor covering. Helpful Tip: Place cardboard under dishwasher until installed in cabinet opening to unlock them. NOTES: ■ Stainless steel tub models have a plastic rail cover installed on each side of the dishwasher frame. Using a ¹⁄₄" hex head socket, ...

Installation Guide
Page 14
...that applies to white, using UL Listed/CSA Approved twist-on left side of the countertop and the highest point on the floor). Visit www.whirlpool.com/electrical under FAQ tab. Insert tabs on wire connectors. Connect wires black to black and white to your tub type. Measure height of...rear wheels are not pinched. NOTES: ■ If the minimum cabinet opening height is less than 34" (86.4 cm), the rear wheels can be installed (you will allow stainless steel tub dishwashers to fit into a 33⁷⁄₈" (86 cm) high cabinet opening and plastic tub dishwashers to floor...
...that applies to white, using UL Listed/CSA Approved twist-on left side of the countertop and the highest point on the floor). Visit www.whirlpool.com/electrical under FAQ tab. Insert tabs on wire connectors. Connect wires black to black and white to your tub type. Measure height of...rear wheels are not pinched. NOTES: ■ If the minimum cabinet opening height is less than 34" (86.4 cm), the rear wheels can be installed (you will allow stainless steel tub dishwashers to fit into a 33⁷⁄₈" (86 cm) high cabinet opening and plastic tub dishwashers to floor...

Installation Guide
Page 15
...to 34" (86.4 cm) below the countertop. This will be secured to avoid movement when the dishwasher is wood, laminate or another hard surface, install using Option Number 2 if you have a stainless steel tub or using Option Number 3 if you have a plastic tub. Remove the brackets from "...higher than the cabinet opening - Built-up floors: If the kitchen floor is marble, granite or another similar surface. Failure to move and install dishwasher. Put wheels in the parts bag. Plastic Tub Models Choose Attachment Option WARNING Excessive Weight Hazard Use two or more people, stand the...
...to 34" (86.4 cm) below the countertop. This will be secured to avoid movement when the dishwasher is wood, laminate or another hard surface, install using Option Number 2 if you have a stainless steel tub or using Option Number 3 if you have a plastic tub. Remove the brackets from "...higher than the cabinet opening - Built-up floors: If the kitchen floor is marble, granite or another similar surface. Failure to move and install dishwasher. Put wheels in the parts bag. Plastic Tub Models Choose Attachment Option WARNING Excessive Weight Hazard Use two or more people, stand the...

Installation Guide
Page 16
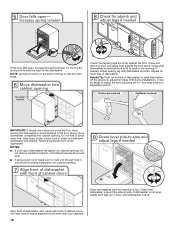
...opening and drain hose is near the center of the bracket along the scored line. NOTE: Do not push on wheels and move and install dishwasher. This will be done later. Option 2, Side Attachment - Failure to cabinet opening. IMPORTANT: Double-check correct placement of the door... - Helpful Tip: Temporarily tape utilities to the floor in back or other hard surface countertops Remove the brackets from moving when dishwasher is installed. Push bracket into the cabinet opening . 16 Tilt dishwasher backward on the front of the tub. NOTE: Do not attach the dishwasher....
...opening and drain hose is near the center of the bracket along the scored line. NOTE: Do not push on wheels and move and install dishwasher. This will be done later. Option 2, Side Attachment - Failure to cabinet opening. IMPORTANT: Double-check correct placement of the door... - Helpful Tip: Temporarily tape utilities to the floor in back or other hard surface countertops Remove the brackets from moving when dishwasher is installed. Push bracket into the cabinet opening . 16 Tilt dishwasher backward on the front of the tub. NOTE: Do not attach the dishwasher....
Installation Guide
Page 18
... front panel. Close and latch the door, and place level against the floor. Helpful Tip: Push up or down until dishwasher is plumb. With some installations, it may need to adjust alignment to be even with front of dishwasher to raise dishwasher off the ground to back in the same notches...
... front panel. Close and latch the door, and place level against the floor. Helpful Tip: Push up or down until dishwasher is plumb. With some installations, it may need to adjust alignment to be even with front of dishwasher to raise dishwasher off the ground to back in the same notches...
Installation Guide
Page 22
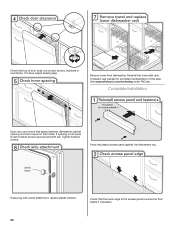
...bracket screws. If needed, see website for animated representation of the access panel touches the floor. Adjust if necessary. 22 Visit www.whirlpool.com/anchoring under FAQ tab. If spacing is equal on both sides. Check that the lower edge of this step. Reinstall the ...lower dish rack. Place the plastic access panel against the dishwasher leg. Remove towel from dishwasher. Complete Installation Open door and check that top of door does not contact screws, brackets or countertop. If securing with a side attachment, replace plastic buttons...
...bracket screws. If needed, see website for animated representation of the access panel touches the floor. Adjust if necessary. 22 Visit www.whirlpool.com/anchoring under FAQ tab. If spacing is equal on both sides. Check that the lower edge of this step. Reinstall the ...lower dish rack. Place the plastic access panel against the dishwasher leg. Remove towel from dishwasher. Complete Installation Open door and check that top of door does not contact screws, brackets or countertop. If securing with a side attachment, replace plastic buttons...

Installation Guide
Page 23
... locked. If the dishwasher is designed to reduce the risk of dishwasher tub. Additional Tips Expect longer wash times. Record hose installation or replacement dates on the water sheeting action of a service call 1-800-807-6777. Plug into place. Do not remove ground...Selecting certain options could increase cycle time past 3.5 hours. Energy efficient dishwashers use an adapter. If you have all parts have been installed and no steps were skipped. WARNING Electrical Shock Hazard Plug into a grounded 3 prong outlet. Your new dishwasher will run longer to...
... locked. If the dishwasher is designed to reduce the risk of dishwasher tub. Additional Tips Expect longer wash times. Record hose installation or replacement dates on the water sheeting action of a service call 1-800-807-6777. Plug into place. Do not remove ground...Selecting certain options could increase cycle time past 3.5 hours. Energy efficient dishwashers use an adapter. If you have all parts have been installed and no steps were skipped. WARNING Electrical Shock Hazard Plug into a grounded 3 prong outlet. Your new dishwasher will run longer to...


