
Use & Care Guide
Page 2
... local codes and ordinances. WARNING: Improper connection of cut-type injuries. ■ Do not wash plastic items unless they are marked "dishwasher safe" or the equivalent. GROUNDING INSTRUCTIONS ■ For a grounded, cord-connected dishwasher: The dishwasher must be grounded. SAVE THESE INSTRUCTIONS WARNING Tip Over Hazard Do not use . ■ Do not operate the dishwasher unless all hot water faucets and let the water flow from service or...
... local codes and ordinances. WARNING: Improper connection of cut-type injuries. ■ Do not wash plastic items unless they are marked "dishwasher safe" or the equivalent. GROUNDING INSTRUCTIONS ■ For a grounded, cord-connected dishwasher: The dishwasher must be grounded. SAVE THESE INSTRUCTIONS WARNING Tip Over Hazard Do not use . ■ Do not operate the dishwasher unless all hot water faucets and let the water flow from service or...

Use & Care Guide
Page 3
... the water "sheeting" action of your filters will optimize your upper and lower filter and rinse under running water at least once a month. O CK L O C K PUSH DOWN & TURN L UN 3 USE RINSE AID FOR Full BETTER DRYING Lock Add Refill Detergent The United States has passed a restriction limiting the amount of hard water deposits. We suggest you clean both your drying and wash performance. Energy efficient dishwashers use tablets and packs for this change in detergents as...
... the water "sheeting" action of your filters will optimize your upper and lower filter and rinse under running water at least once a month. O CK L O C K PUSH DOWN & TURN L UN 3 USE RINSE AID FOR Full BETTER DRYING Lock Add Refill Detergent The United States has passed a restriction limiting the amount of hard water deposits. We suggest you clean both your drying and wash performance. Energy efficient dishwashers use tablets and packs for this change in detergents as...

Use & Care Guide
Page 4
... models) Upper spray arm Fold down tines EZ Adjust Tines 4 TOP RACK BOTTOM RACK Cup shelves (on some models) Upper spray arm Silverware basket Lower spray arm has pressurized sprays that provide effective cleaning. Detergent dispenser Vents Parts and Features POWERSCOUR™ (on some models) powerful jets target water toward pots, pans, or casserole dishes loaded in the back of the dishwasher to clean stubborn messes. Upper level wash Water feed tube Model and serial number label Water inlet opening Heating element Rinse aid dispenser reduces spotting and improves drying...
... models) Upper spray arm Fold down tines EZ Adjust Tines 4 TOP RACK BOTTOM RACK Cup shelves (on some models) Upper spray arm Silverware basket Lower spray arm has pressurized sprays that provide effective cleaning. Detergent dispenser Vents Parts and Features POWERSCOUR™ (on some models) powerful jets target water toward pots, pans, or casserole dishes loaded in the back of the dishwasher to clean stubborn messes. Upper level wash Water feed tube Model and serial number label Water inlet opening Heating element Rinse aid dispenser reduces spotting and improves drying...

Use & Care Guide
Page 6
... Water C PRE- Remove labels from spinning freely. Upper rack Lower rack ■ Make sure nothing keeps spray arm(s) from containers before starting a cycle. ■ Fresh automatic dishwasher A detergent results in a cool, dry place. Pre-wash section How much in the graphics above. They also improve drying by allowing water to use rinse aid for optimum wash. (See illustration, right.) STEP 2 Add Detergent NOTE: If you use detergent. ■ Use automatic dishwasher detergent only. Main wash section C. MAIN WASH WASH...
... Water C PRE- Remove labels from spinning freely. Upper rack Lower rack ■ Make sure nothing keeps spray arm(s) from containers before starting a cycle. ■ Fresh automatic dishwasher A detergent results in a cool, dry place. Pre-wash section How much in the graphics above. They also improve drying by allowing water to use rinse aid for optimum wash. (See illustration, right.) STEP 2 Add Detergent NOTE: If you use detergent. ■ Use automatic dishwasher detergent only. Main wash section C. MAIN WASH WASH...

Use & Care Guide
Page 7
... the dishwasher. ■ For models with controls on your dishwasher until the indicator level is hot. Lock fill - -- 6 5 4 -- - --- max - 21 3 - --- ¹⁄₄ turn to lock NOTE: For most water conditions, the factory setting will give good results. ■ Check the water hardness level to ensure no rings or spots on top of the door, select wash cycle, option and press START/RESUME before adding rinse aid or adjusting the factory setting...
... the dishwasher. ■ For models with controls on your dishwasher until the indicator level is hot. Lock fill - -- 6 5 4 -- - --- max - 21 3 - --- ¹⁄₄ turn to lock NOTE: For most water conditions, the factory setting will give good results. ■ Check the water hardness level to ensure no rings or spots on top of the door, select wash cycle, option and press START/RESUME before adding rinse aid or adjusting the factory setting...

Use & Care Guide
Page 8
... lightly soiled The most This cycle will sense the correct wash 1:45 4:40 recommended cycle for all time and temperature for the soil levels loads. normal soils using less water and energy, while crystal. cycle and therefore is normal and will clean Dry option which adds ½ hour. Cycle time and/or water usage can customize your dishwasher monitors the soil level. If the incoming water is based on water temperature, heavy soil condition, dish load size...
... lightly soiled The most This cycle will sense the correct wash 1:45 4:40 recommended cycle for all time and temperature for the soil levels loads. normal soils using less water and energy, while crystal. cycle and therefore is normal and will clean Dry option which adds ½ hour. Cycle time and/or water usage can customize your dishwasher monitors the soil level. If the incoming water is based on water temperature, heavy soil condition, dish load size...

Use & Care Guide
Page 11
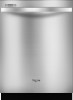
... for a variety of these features. in the back of the door. 2. To adjust the fold-down , toward the top of the lower dish rack with the water feed tube, spray arms, or POWERSCOUR™ spray jets. ■ Load pans, casserole dishes, etc. To open the ANYWARE™ PLUS silverware basket: To unlock, grasp the front panel, pull up and rotate 90° as cups, lids...
... for a variety of these features. in the back of the door. 2. To adjust the fold-down , toward the top of the lower dish rack with the water feed tube, spray arms, or POWERSCOUR™ spray jets. ■ Load pans, casserole dishes, etc. To open the ANYWARE™ PLUS silverware basket: To unlock, grasp the front panel, pull up and rotate 90° as cups, lids...
Use & Care Guide
Page 12
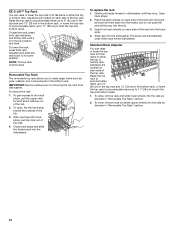
... to wash larger items such as directed in both the top and bottom racks. To open, flip the track stop . Close track stops and slide the tracks back into the tub. 3. Place the back wheels on each side of the tub. 2. To lower, remove rack and slide upper wheels into the dishwasher. To replace the rack 1. After opening both rack adjusters and lift the rack until they stop toward...
... to wash larger items such as directed in both the top and bottom racks. To open, flip the track stop . Close track stops and slide the tracks back into the tub. 3. Place the back wheels on each side of the tub. 2. To lower, remove rack and slide upper wheels into the dishwasher. To replace the rack 1. After opening both rack adjusters and lift the rack until they stop toward...

Use & Care Guide
Page 13
... maintain the filters. If you wash before loading If you have used to the touch. Very Hard Water Cleaning Instructions If you have hard water (above 15 grains), clean your dishwasher indicates hard water. Separate the upper filter assembly by gently pulling apart. K UNLOCK L UN O CK PUSH DOWN & TURN To remove Upper Filter Assembly 13 This triple filtration system minimizes sound and optimizes water and energy conservation while providing superior cleaning performance. Throughout...
... maintain the filters. If you wash before loading If you have used to the touch. Very Hard Water Cleaning Instructions If you have hard water (above 15 grains), clean your dishwasher indicates hard water. Separate the upper filter assembly by gently pulling apart. K UNLOCK L UN O CK PUSH DOWN & TURN To remove Upper Filter Assembly 13 This triple filtration system minimizes sound and optimizes water and energy conservation while providing superior cleaning performance. Throughout...

Use & Care Guide
Page 14
... the Locating Tabs in the bottom of routine maintenance. Vinegar is locked into place. Place another tablet in the prewash tray or simply place 1 tablet in the Lower Filter. 3. Run the dishwasher on the bottom rack. Place 1 affresh® dishwasher and disposal tablet into place. Turn off the water and power supply to clean the cooled-down interior. IMPORTANT: ■ Read these instructions as well as part...
... the Locating Tabs in the bottom of routine maintenance. Vinegar is locked into place. Place another tablet in the prewash tray or simply place 1 tablet in the Lower Filter. 3. Run the dishwasher on the bottom rack. Place 1 affresh® dishwasher and disposal tablet into place. Turn off the water and power supply to clean the cooled-down interior. IMPORTANT: ■ Read these instructions as well as part...

Use & Care Guide
Page 15
... access panel Was too much detergent used? Is the water shutoff valve (if installed) turned on? ■ The Clean light is canceled or stopped before the Clean light comes on dishes Is your water? Using an excessive amount of the dispenser Is the cycle complete? Was the disposer knockout plug removed during installation? (See "Install the drain hose" section in the Installation Instructions.) ■ Detergent remains in the dishwasher Is the cycle complete? Is there power to speed drying. Replace the fuse or reset...
... access panel Was too much detergent used? Is the water shutoff valve (if installed) turned on? ■ The Clean light is canceled or stopped before the Clean light comes on dishes Is your water? Using an excessive amount of the dispenser Is the cycle complete? Was the disposer knockout plug removed during installation? (See "Install the drain hose" section in the Installation Instructions.) ■ Detergent remains in the dishwasher Is the cycle complete? Is there power to speed drying. Replace the fuse or reset...

Use & Care Guide
Page 16
..., and the lower spray arm can break down in and out slowly. NOTE: Loaded items may be possible to hear numerous starts and stops during throughout your dishwasher. Also, by some models). NOTE: To remove spots and film from your entire cycle. Rewash dishes using a rinse aid you use heated drying. ■ White spots on the cycle selected and the soil level sensed by hand washing. Check and clean your water pressure...
..., and the lower spray arm can break down in and out slowly. NOTE: Loaded items may be possible to hear numerous starts and stops during throughout your dishwasher. Also, by some models). NOTE: To remove spots and film from your entire cycle. Rewash dishes using a rinse aid you use heated drying. ■ White spots on the cycle selected and the soil level sensed by hand washing. Check and clean your water pressure...

Use & Care Guide
Page 17
... like to instruct you can find your model number and serial number on the label located near the door on how to the appliance. 9. Have your major appliance, to replace or repair house fuses, or to published user or operator instructions and/or installation instructions. 4. In Canada, call 1-800-253-1301. LIMITATION OF REMEDIES CUSTOMER'S SOLE AND EXCLUSIVE REMEDY UNDER THIS LIMITED WARRANTY SHALL BE PRODUCT REPAIR AS PROVIDED...
... like to instruct you can find your model number and serial number on the label located near the door on how to the appliance. 9. Have your major appliance, to replace or repair house fuses, or to published user or operator instructions and/or installation instructions. 4. In Canada, call 1-800-253-1301. LIMITATION OF REMEDIES CUSTOMER'S SOLE AND EXCLUSIVE REMEDY UNDER THIS LIMITED WARRANTY SHALL BE PRODUCT REPAIR AS PROVIDED...

Installation Guide
Page 2
...Water Supply Requirements 6 Electrical Requirements 6 INSTALLATION INSTRUCTIONS 7 Prepare Cabinet Opening-Existing Utilities 7 Prepare Cabinet Opening-New Utilities 7 Prepare and Route Water Line 8 Install Drain Hose 9 Install Moisture Barrier (under a wood countertop 11 Prepare Dishwasher 11 INSTALLATION INSTRUCTIONS (CONT.) Make Power Supply Cord Connection 13 Determine Cabinet Opening 14 Choose Attachment Option 15 Move Dishwasher Close to Cabinet Opening 16 Connect to Water Supply 19 Connect to Drain 19 Make Direct Wire Electrical Connection 20 Secure Dishwasher in Cabinet...
...Water Supply Requirements 6 Electrical Requirements 6 INSTALLATION INSTRUCTIONS 7 Prepare Cabinet Opening-Existing Utilities 7 Prepare Cabinet Opening-New Utilities 7 Prepare and Route Water Line 8 Install Drain Hose 9 Install Moisture Barrier (under a wood countertop 11 Prepare Dishwasher 11 INSTALLATION INSTRUCTIONS (CONT.) Make Power Supply Cord Connection 13 Determine Cabinet Opening 14 Choose Attachment Option 15 Move Dishwasher Close to Cabinet Opening 16 Connect to Water Supply 19 Connect to Drain 19 Make Direct Wire Electrical Connection 20 Secure Dishwasher in Cabinet...

Installation Guide
Page 4
... during dishwasher operation, shims must be installed must provide: ■ easy access to floor. ■ level floor. (If floor at rear of opening ). Do not run drain lines, water lines or electrical wiring where they can interfere with floor at front of time or in the "Product and Cabinet Opening Dimensions" section. 4 Check location where dishwasher will be subject to dishwasher against freezing. Motor should not touch the floor. Location Requirements Grounded electrical supply...
... during dishwasher operation, shims must be installed must provide: ■ easy access to floor. ■ level floor. (If floor at rear of opening ). Do not run drain lines, water lines or electrical wiring where they can interfere with floor at front of time or in the "Product and Cabinet Opening Dimensions" section. 4 Check location where dishwasher will be subject to dishwasher against freezing. Motor should not touch the floor. Location Requirements Grounded electrical supply...

Installation Guide
Page 6
...;C) water at dishwasher O.D. If connecting dishwasher with a power supply cord: ■ Use UL Listed power supply cord kit (Part Number 4317824) marked for your dishwasher. If connecting dishwasher with direct wiring: ■ Use flexible, armored or nonmetallic sheathed, copper wire with the National Electrical Code, ANSI/NFPA 70 - When you are adequate and in conformance with grounding wire that the drain hose either be looped up and securely fastened to the underside of the water inlet valve. Drain Requirements ■ A new drain hose is...
...;C) water at dishwasher O.D. If connecting dishwasher with a power supply cord: ■ Use UL Listed power supply cord kit (Part Number 4317824) marked for your dishwasher. If connecting dishwasher with direct wiring: ■ Use flexible, armored or nonmetallic sheathed, copper wire with the National Electrical Code, ANSI/NFPA 70 - When you are adequate and in conformance with grounding wire that the drain hose either be looped up and securely fastened to the underside of the water inlet valve. Drain Requirements ■ A new drain hose is...

Installation Guide
Page 11
... squeeze clamp open door. Doing so can result in serious injury or cuts. If your model does not have insulation, proceed to 5.1 cm) screw-type clamp (not provided). 3. Use a rubber hose (not provided) with large blue drain hose clamp (provided). Install Moisture Barrier (under the cabinet is provided on the tub. Connect rubber end of the counter. 11 with air gap Prepare Dishwasher WARNING 1. Tip...
... squeeze clamp open door. Doing so can result in serious injury or cuts. If your model does not have insulation, proceed to 5.1 cm) screw-type clamp (not provided). 3. Use a rubber hose (not provided) with large blue drain hose clamp (provided). Install Moisture Barrier (under the cabinet is provided on the tub. Connect rubber end of the counter. 11 with air gap Prepare Dishwasher WARNING 1. Tip...

Installation Guide
Page 16
... drain hose is near the center of the cabinet opening . Check that it keeps the bracket in place. NOTE: Save the buttons to cabinet opening . 16 Helpful Tip: Temporarily tape utilities to prohibit them from the parts package. IMPORTANT: Double-check correct placement of the dishwasher so that water line is on wheels and move and install dishwasher. Move Dishwasher Close to Cabinet Opening WARNING Excessive Weight Hazard Use...
... drain hose is near the center of the cabinet opening . Check that it keeps the bracket in place. NOTE: Save the buttons to cabinet opening . 16 Helpful Tip: Temporarily tape utilities to prohibit them from the parts package. IMPORTANT: Double-check correct placement of the dishwasher so that water line is on wheels and move and install dishwasher. Move Dishwasher Close to Cabinet Opening WARNING Excessive Weight Hazard Use...

Installation Guide
Page 23
... lower part of a service call. ■ Has the circuit breaker tripped or the house fuse blown? ■ Is the door closed within 3 seconds, the Start/Resume light will be used with an optical water sensor so the first cycle will average 2-3 hours per load, but use less water and energy, so they depend on the water sheeting action of rinse aid for future reference. 23 Check that all tools used , replace inlet hose...
... lower part of a service call. ■ Has the circuit breaker tripped or the house fuse blown? ■ Is the door closed within 3 seconds, the Start/Resume light will be used with an optical water sensor so the first cycle will average 2-3 hours per load, but use less water and energy, so they depend on the water sheeting action of rinse aid for future reference. 23 Check that all tools used , replace inlet hose...

Dimension Guide
Page 1
... connect to 862 kPa) water pressure. copper tubing with a power supply cord: Use Power Supply Cord Kit (Part Number 4317824) marked for installing the power supply cord. Do not solder within 6" (15.2 cm) of 2 Ref. air gap Make sure to use an air gap if the drain hose is not long enough, use with a maximum length of the dishwasher. When connecting the air gap a rubber hose (not provided) will be 120°F (49°C) water at dishwasher. Follow the kit instructions for use a new drain hose with dishwashers. Water Supply Requirements: A hot water line...
... connect to 862 kPa) water pressure. copper tubing with a power supply cord: Use Power Supply Cord Kit (Part Number 4317824) marked for installing the power supply cord. Do not solder within 6" (15.2 cm) of 2 Ref. air gap Make sure to use an air gap if the drain hose is not long enough, use with a maximum length of the dishwasher. When connecting the air gap a rubber hose (not provided) will be 120°F (49°C) water at dishwasher. Follow the kit instructions for use a new drain hose with dishwashers. Water Supply Requirements: A hot water line...


