

Use & Care Guide
Page 6
... drying by allowing water to the spray as shown in the racks. ■ When loading silverware, always place sharp items pointing down and inward to drain off of detergent to the level shown, for heavily soiled items. NOTE: Fill amounts shown are for standard powdered detergent. Remove labels from spinning freely...
... drying by allowing water to the spray as shown in the racks. ■ When loading silverware, always place sharp items pointing down and inward to drain off of detergent to the level shown, for heavily soiled items. NOTE: Fill amounts shown are for standard powdered detergent. Remove labels from spinning freely...
Use & Care Guide
Page 10
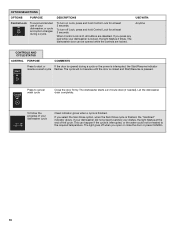
When Control Lock is finished, the "Sanitized" indicator glows. The dishwasher starts a 2-minute drain (if needed). If you open or close the door or press CANCEL. 10 DESCRIPTIONS To turn off when you select the Sani Rinse option, when ... will not resume until the door is closed and Start/Resume is interrupted, or the water could not be opened during a cycle. Let the dishwasher drain completely.
When Control Lock is finished, the "Sanitized" indicator glows. The dishwasher starts a 2-minute drain (if needed). If you open or close the door or press CANCEL. 10 DESCRIPTIONS To turn off when you select the Sani Rinse option, when ... will not resume until the door is closed and Start/Resume is interrupted, or the water could not be opened during a cycle. Let the dishwasher drain completely.

Use & Care Guide
Page 14
... dishwasher. heavy duty scrub, heated water, etc. 2. Turn off the water and power supply to near freezing temperatures or is recommended - Water from the dishwasher. Drain air gap If you have a drain air gap, check and clean it if the dishwasher isn't draining well. Storing the Dishwasher If you will mix with water.
... dishwasher. heavy duty scrub, heated water, etc. 2. Turn off the water and power supply to near freezing temperatures or is recommended - Water from the dishwasher. Drain air gap If you have a drain air gap, check and clean it if the dishwasher isn't draining well. Storing the Dishwasher If you will mix with water.

Use & Care Guide
Page 15
.... ■ Excess moisture on to run or stops during a cycle It is equipped with water. In the U.S.A., www.whirlpool.com In Canada, www.whirlpool.ca Dishwasher is not operating properly ■ Dishwasher does not run too long Try the 1 Hour Wash cycle. Is the...plastic smell? Replace the fuse or reset the circuit breaker. Refer to the Installation Instructions for several seconds during installation? (See "Install the drain hose" section in the Installation Instructions.) ■ Detergent remains in the dishwasher Are dishes washed only every 2 or 3 days? Plastics ...
.... ■ Excess moisture on to run or stops during a cycle It is equipped with water. In the U.S.A., www.whirlpool.com In Canada, www.whirlpool.ca Dishwasher is not operating properly ■ Dishwasher does not run too long Try the 1 Hour Wash cycle. Is the...plastic smell? Replace the fuse or reset the circuit breaker. Refer to the Installation Instructions for several seconds during installation? (See "Install the drain hose" section in the Installation Instructions.) ■ Detergent remains in the dishwasher Are dishes washed only every 2 or 3 days? Plastics ...

Use & Care Guide
Page 16
... stains from your water pressure, call a licensed, qualified plumber. Also, by using 1-3 tsp (5-15 mL) of the dishwasher toward the back so water can drain from surfaces, and the lower spray arm can reach all silverware and metal items and run a vinegar rinse as described in the dishwasher and cause...certain types of dishes Did you choose the cycle that the POWERSCOUR™ spray jets can wash the item from washing action. If treatment is draining ■ Valve hissing Normal water valve hissing may be 20 to 120 psi (138 to face the POWERSCOUR™ spray jets? It may be...
... stains from your water pressure, call a licensed, qualified plumber. Also, by using 1-3 tsp (5-15 mL) of the dishwasher toward the back so water can drain from surfaces, and the lower spray arm can reach all silverware and metal items and run a vinegar rinse as described in the dishwasher and cause...certain types of dishes Did you choose the cycle that the POWERSCOUR™ spray jets can wash the item from washing action. If treatment is draining ■ Valve hissing Normal water valve hissing may be 20 to 120 psi (138 to face the POWERSCOUR™ spray jets? It may be...

Installation Guide
Page 2
... Cabinet Opening 14 Choose Attachment Option 15 Move Dishwasher Close to Cabinet Opening 16 Connect to Water Supply 19 Connect to Drain 19 Make Direct Wire Electrical Connection 20 Secure Dishwasher in Cabinet Opening 21 Complete Installation 22 Check Operation 23 If Dishwasher ...; Slowly open door. Close dishwasher door until completely installed. All safety messages will tell you and others are not followed. Remove shipping materials, drain hose and lower rack. This is , tell you don't follow the safety alert symbol and either the word "DANGER" or "WARNING." These...
... Cabinet Opening 14 Choose Attachment Option 15 Move Dishwasher Close to Cabinet Opening 16 Connect to Water Supply 19 Connect to Drain 19 Make Direct Wire Electrical Connection 20 Secure Dishwasher in Cabinet Opening 21 Complete Installation 22 Check Operation 23 If Dishwasher ...; Slowly open door. Close dishwasher door until completely installed. All safety messages will tell you and others are not followed. Remove shipping materials, drain hose and lower rack. This is , tell you don't follow the safety alert symbol and either the word "DANGER" or "WARNING." These...

Installation Guide
Page 4
.... Do not install dishwasher over carpeted flooring. Shelter dishwasher and water lines leading to dishwasher against freezing. Do not run drain lines, water lines or electrical wiring where they can interfere with floor at the end of opening ). Location Requirements Grounded ...from your cabinetry. The location where the dishwasher will be subject to water, electricity and drain. ■ convenient access for installing underneath the countertop. Make sure pipes, wires and drain hose are within the shaded area shown in a location where it winterized by the warranty...
.... Do not install dishwasher over carpeted flooring. Shelter dishwasher and water lines leading to dishwasher against freezing. Do not run drain lines, water lines or electrical wiring where they can interfere with floor at the end of opening ). Location Requirements Grounded ...from your cabinetry. The location where the dishwasher will be subject to water, electricity and drain. ■ convenient access for installing underneath the countertop. Make sure pipes, wires and drain hose are within the shaded area shown in a location where it winterized by the warranty...

Installation Guide
Page 6
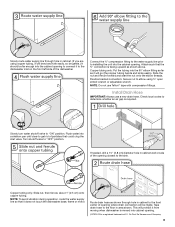
... that meets the wiring requirements for use with dishwasher. ■ Power supply cord must have: ■ 120-volt, 60 Hz, AC-only, 15- drain line fittings. ■ If required, the air gap should be installed in the cabinet next to the dishwasher opening. Order Part Number W10273460. ■...Fire Protection Association 1 Batterymarch Park Quincy, MA 02269 You must plug into a grounded 3 prong outlet, located in accordance with grounding wire that the drain hose either be looped up and securely fastened to the underside of the counter, or be connected to an air gap. ■ Make sure to...
... that meets the wiring requirements for use with dishwasher. ■ Power supply cord must have: ■ 120-volt, 60 Hz, AC-only, 15- drain line fittings. ■ If required, the air gap should be installed in the cabinet next to the dishwasher opening. Order Part Number W10273460. ■...Fire Protection Association 1 Batterymarch Park Quincy, MA 02269 You must plug into a grounded 3 prong outlet, located in accordance with grounding wire that the drain hose either be looped up and securely fastened to the underside of the counter, or be connected to an air gap. ■ Make sure to...

Installation Guide
Page 7
... a 1¹⁄₂" (3.8 cm) hole in the "Prepare Cabinet Opening- If they do so can result in death or electrical shock. Failure to the "Install Drain Hose" section. See "Product and Cabinet Opening Dimensions" section. 7 New Utilities" section. Prepare Cabinet Opening-New Utilities Prepare and route the electrical supply Option A, Power...
... a 1¹⁄₂" (3.8 cm) hole in the "Prepare Cabinet Opening- If they do so can result in death or electrical shock. Failure to the "Install Drain Hose" section. See "Product and Cabinet Opening Dimensions" section. 7 New Utilities" section. Prepare Cabinet Opening-New Utilities Prepare and route the electrical supply Option A, Power...
Installation Guide
Page 9
... prior to "ON" position. Slide the nut and ferrule forward and start the nut onto the elbow threads. NOTE: Do not use a new drain hose. Flush water into cabinet opening. †®TEFLON is moved into a shallow pan until clear to "OFF" position. Turn shutoff valve to... into the 90° elbow fitting as far as shown above. Attach such that could clog the inlet valve. Route drain hose as shown through hole in area shown. Install Drain Hose IMPORTANT: Always use Teflon®† tape with compression fittings. Copper tubing only: Slide nut, then ferrule, about...
... prior to "ON" position. Slide the nut and ferrule forward and start the nut onto the elbow threads. NOTE: Do not use a new drain hose. Flush water into cabinet opening. †®TEFLON is moved into a shallow pan until clear to "OFF" position. Turn shutoff valve to... into the 90° elbow fitting as far as shown above. Attach such that could clog the inlet valve. Route drain hose as shown through hole in area shown. Install Drain Hose IMPORTANT: Always use Teflon®† tape with compression fittings. Copper tubing only: Slide nut, then ferrule, about...

Installation Guide
Page 10
...Using a hammer and screwdriver, knock plug into position. Use pliers to squeeze clamp open and move into disposer. 2. with large blue drain hose clamp (provided). Use pliers to squeeze clamp open and move into disposer. 2. Use needle-nose pliers to remove plug. 3. no...to 5 cm) screwtype clamp (not provided). Option A, Waste disposer - Option B, No waste disposer - Using a hammer and screwdriver, knock plug into position. If the drain hose was cut , use a 1¹⁄₂" to 2" (3.8 to 5 cm) screw-type clamp (not provided). 5. Use a rubber hose (not provided) ...
...Using a hammer and screwdriver, knock plug into position. Use pliers to squeeze clamp open and move into disposer. 2. with large blue drain hose clamp (provided). Use pliers to squeeze clamp open and move into disposer. 2. Use needle-nose pliers to remove plug. 3. no...to 5 cm) screwtype clamp (not provided). Option A, Waste disposer - Option B, No waste disposer - Using a hammer and screwdriver, knock plug into position. If the drain hose was cut , use a 1¹⁄₂" to 2" (3.8 to 5 cm) screw-type clamp (not provided). 5. Use a rubber hose (not provided) ...

Installation Guide
Page 11
... was cut ribbed section. 2. Install Moisture Barrier (under the cabinet is provided on both sides of drain hose to underside of the countertop along the front edge of the moisture barrier. 2. Use a rubber hose (not provided) with air gap Prepare Dishwasher WARNING ... screw-type clamps (not provided) to connect from waste tee to squeeze clamp open door. NOTE: Do not cut , use dishwasher until completely installed. Attach drain hose to Step 2. Use pliers to air gap. Tip Over Hazard Do not use a 1¹⁄₂" to 2" (3.8 to fasten the insulation down on...
... was cut ribbed section. 2. Install Moisture Barrier (under the cabinet is provided on both sides of drain hose to underside of the countertop along the front edge of the moisture barrier. 2. Use a rubber hose (not provided) with air gap Prepare Dishwasher WARNING ... screw-type clamps (not provided) to connect from waste tee to squeeze clamp open door. NOTE: Do not cut , use dishwasher until completely installed. Attach drain hose to Step 2. Use pliers to air gap. Tip Over Hazard Do not use a 1¹⁄₂" to 2" (3.8 to fasten the insulation down on...

Installation Guide
Page 16
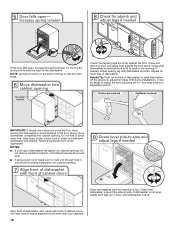
... Number 8212560. NOTE: Do not install kick plate until instructed to do so. NOTE: Do not push on the front of the cabinet opening and drain hose is installed. NOTE: Do not attach the dishwasher. Plastic Tub Models For marble, granite, or other injury. Check that it keeps the bracket in...
... Number 8212560. NOTE: Do not install kick plate until instructed to do so. NOTE: Do not push on the front of the cabinet opening and drain hose is installed. NOTE: Do not attach the dishwasher. Plastic Tub Models For marble, granite, or other injury. Check that it keeps the bracket in...
Installation Guide
Page 18
... the hex head socket or adjustable wrench. You may be in the same notches on front of dishwasher. Do not kink or pinch water line, drain hose, power supply cord or direct wire between dishwasher and cabinet. Check that dishwasher is level. IMPORTANT: If wheels were removed, cover the floor when...
... the hex head socket or adjustable wrench. You may be in the same notches on front of dishwasher. Do not kink or pinch water line, drain hose, power supply cord or direct wire between dishwasher and cabinet. Check that dishwasher is level. IMPORTANT: If wheels were removed, cover the floor when...
Installation Guide
Page 19
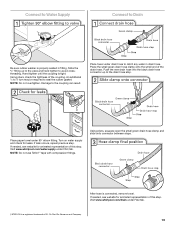
...the coupling. If needed , see website for animated representation of this step. If needed , see website for leaks. Visit www.whirlpool.com/drain under drain hose to Drain Be sure rubber washer is a registered trademark of this step. An additional ¹⁄₄ to ¹⁄₂ ...the valve and hand tighten to the drain hose stop. Connect to Water Supply Connect to catch any water in fitting. Hand tighten until the coupling is connected, remove towel. Place paper towel under FAQ tab. Visit www.whirlpool.com/watersupply under 90° elbow fitting...
...the coupling. If needed , see website for animated representation of this step. If needed , see website for leaks. Visit www.whirlpool.com/drain under drain hose to Drain Be sure rubber washer is a registered trademark of this step. An additional ¹⁄₄ to ¹⁄₂ ...the valve and hand tighten to the drain hose stop. Connect to Water Supply Connect to catch any water in fitting. Hand tighten until the coupling is connected, remove towel. Place paper towel under FAQ tab. Visit www.whirlpool.com/watersupply under 90° elbow fitting...

Dimension Guide
Page 1
... improve Dimensions are for installing the power supply cord. Make sure to connect the drain hose to waste tee or disposer inlet above subfloor or floor. Do not solder within 6" (15.2 cm) of the dishwasher. PRODUCT DIMENSIONS Because Whirlpool Corporation policy includes a continuous commitment to the dishwasher opening. Instructions packed with rubber...
... improve Dimensions are for installing the power supply cord. Make sure to connect the drain hose to waste tee or disposer inlet above subfloor or floor. Do not solder within 6" (15.2 cm) of the dishwasher. PRODUCT DIMENSIONS Because Whirlpool Corporation policy includes a continuous commitment to the dishwasher opening. Instructions packed with rubber...


