
Use & Care Guide
Page 2
...the reach of children. ■ When loading items to be washed: 1) Locate sharp items so that they are not likely to damage the door seal; IMPORTANT SAFETY INSTRUCTIONS WARNING: When using the dishwasher, follow basic precautions, including the following: ■ Read all instructions before using the ... time. ■ Do not touch the heating element during or immediately after use. ■ Do not operate the dishwasher unless all enclosure panels are in a risk of injury, do not allow children to a grounded metal, permanent wiring system, or an equipment-grounding conductor must be...
...the reach of children. ■ When loading items to be washed: 1) Locate sharp items so that they are not likely to damage the door seal; IMPORTANT SAFETY INSTRUCTIONS WARNING: When using the dishwasher, follow basic precautions, including the following: ■ Read all instructions before using the ... time. ■ Do not touch the heating element during or immediately after use. ■ Do not operate the dishwasher unless all enclosure panels are in a risk of injury, do not allow children to a grounded metal, permanent wiring system, or an equipment-grounding conductor must be...

Use & Care Guide
Page 11
...Set the silverware basket on the left or right to use this feature. Reposition the clip on the door, the bottom rack, or placed inside the bottom rack. NOTE: Be sure the front panel of the top rack to hold lightweight plastic items such as utensils and spatulas. EZ Adjust Tines Sliding...place. Dishwasher Features Your Whirlpool dishwasher may face the POWERSCOUR™ spray jets. in the back of lower rack can use this feature to make room for a variety of items may have some or all the way before closing the dishwasher door. Make sure the front panel is located at the ...
...Set the silverware basket on the left or right to use this feature. Reposition the clip on the door, the bottom rack, or placed inside the bottom rack. NOTE: Be sure the front panel of the top rack to hold lightweight plastic items such as utensils and spatulas. EZ Adjust Tines Sliding...place. Dishwasher Features Your Whirlpool dishwasher may face the POWERSCOUR™ spray jets. in the back of lower rack can use this feature to make room for a variety of items may have some or all the way before closing the dishwasher door. Make sure the front panel is located at the ...

Use & Care Guide
Page 15
...Did you use a rinse aid? Keep the rinse aid dispenser filled. In the U.S.A., www.whirlpool.com In Canada, www.whirlpool.ca Dishwasher is not operating properly ■ Dishwasher does not run too long Try the 1 ...is canceled or stopped before the Clean light comes on at the end of the access panel Was too much detergent used? Using an excessive amount of the dispenser Is the cycle complete...repeat this adjustment cycle is normal for certain cycles to allow proper water drainage? Is the door closed tightly and latched? Replace the fuse or reset the circuit breaker. Is the dishwasher ...
...Did you use a rinse aid? Keep the rinse aid dispenser filled. In the U.S.A., www.whirlpool.com In Canada, www.whirlpool.ca Dishwasher is not operating properly ■ Dishwasher does not run too long Try the 1 ...is canceled or stopped before the Clean light comes on at the end of the access panel Was too much detergent used? Using an excessive amount of the dispenser Is the cycle complete...repeat this adjustment cycle is normal for certain cycles to allow proper water drainage? Is the door closed tightly and latched? Replace the fuse or reset the circuit breaker. Is the dishwasher ...

Installation Guide
Page 4
...of opening is not level with or contact dishwasher motor or legs. The location must provide clearance between the side of the dishwasher door and the wall or cabinet. ■ square opening for a period of your dealer for loading and unloading dishes. Shelter dishwasher ...to the floor. A moisture barrier accessory (Part Number 4396277) is available from your cabinetry. Do not install dishwasher over carpeted flooring. A side panel kit is available from your dealer for installing your dishwasher at the end of time or in the "Product and Cabinet Opening Dimensions" section. ...
...of opening is not level with or contact dishwasher motor or legs. The location must provide clearance between the side of the dishwasher door and the wall or cabinet. ■ square opening for a period of your dealer for loading and unloading dishes. Shelter dishwasher ...to the floor. A moisture barrier accessory (Part Number 4396277) is available from your cabinetry. Do not install dishwasher over carpeted flooring. A side panel kit is available from your dealer for installing your dishwasher at the end of time or in the "Product and Cabinet Opening Dimensions" section. ...

Installation Guide
Page 12
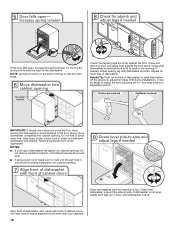
... installation of your dishwasher. To remove the plastic rail cover, push upward and back to unsnap it from access panel. 12 Using a flat-blade screwdriver, turn the plastic fasteners ¹⁄₄ turn to the left when tightening...supply cord kit. NOTE: If using Option B, proceed to "Determine Cabinet Opening," to Step 4. Retain for later use door panel as a worktable without first covering with a towel to avoid damaging floor covering. Do not remove tech sheet from the ... under dishwasher until installed in cabinet opening to avoid scratching the door panel.
... installation of your dishwasher. To remove the plastic rail cover, push upward and back to unsnap it from access panel. 12 Using a flat-blade screwdriver, turn the plastic fasteners ¹⁄₄ turn to the left when tightening...supply cord kit. NOTE: If using Option B, proceed to "Determine Cabinet Opening," to Step 4. Retain for later use door panel as a worktable without first covering with a towel to avoid damaging floor covering. Do not remove tech sheet from the ... under dishwasher until installed in cabinet opening to avoid scratching the door panel.

Installation Guide
Page 16
...Order Mounting Bracket Kit Part Number 8212560. Failure to cover the holes after dishwasher is near the center of the door panel. Push the plastic buttons out of the side of the panel or on the front of the tub. NOTE: Do not push on the console. Break off the end of... 2, Side Attachment - NOTE: Do not install kick plate until instructed to cabinet opening . 16 Helpful Tip: Temporarily tape utilities to the floor in place. Panel or console may dent. Option 3, Side Attachment - This will be done later. Check that it keeps the bracket in the locations shown to move dishwasher...
...Order Mounting Bracket Kit Part Number 8212560. Failure to cover the holes after dishwasher is near the center of the door panel. Push the plastic buttons out of the side of the panel or on the front of the tub. NOTE: Do not push on the console. Break off the end of... 2, Side Attachment - NOTE: Do not install kick plate until instructed to cabinet opening . 16 Helpful Tip: Temporarily tape utilities to the floor in place. Panel or console may dent. Option 3, Side Attachment - This will be done later. Check that it keeps the bracket in the locations shown to move dishwasher...
Installation Guide
Page 18
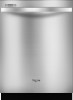
...level from side-to route end through hole in cutout before sliding dishwasher into cabinet opening. Check that leveling legs are firmly against the front panel. NOTE: Springs should be easier to adjust the front leg using power cord, make sure to -side. NOTES: ■ It is ...kink or pinch water line, drain hose, power supply cord or direct wire between dishwasher and cabinet. Repeat for other side of dishwasher door panel with your cabinets. 18 If needed, adjust leveling leg until dishwasher is all right if dishwasher fits tightly into cabinet opening of dishwasher to...
...level from side-to route end through hole in cutout before sliding dishwasher into cabinet opening. Check that leveling legs are firmly against the front panel. NOTE: Springs should be easier to adjust the front leg using power cord, make sure to -side. NOTES: ■ It is ...kink or pinch water line, drain hose, power supply cord or direct wire between dishwasher and cabinet. Repeat for other side of dishwasher door panel with your cabinets. 18 If needed, adjust leveling leg until dishwasher is all right if dishwasher fits tightly into cabinet opening of dishwasher to...
Installation Guide
Page 22
... floor. If spacing is equal on both sides. Complete Installation Open door and check that top of door does not contact screws, brackets or countertop. Tighten bracket screws. Place the plastic access panel against the dishwasher leg. Adjust if necessary. 22 Visit www.whirlpool.com/anchoring under FAQ tab. Remove towel from dishwasher. Check...
... floor. If spacing is equal on both sides. Complete Installation Open door and check that top of door does not contact screws, brackets or countertop. Tighten bracket screws. Place the plastic access panel against the dishwasher leg. Adjust if necessary. 22 Visit www.whirlpool.com/anchoring under FAQ tab. Remove towel from dishwasher. Check...


