Whirlpool WDT730PAHV Support and Manuals
Get Help and Manuals for this Whirlpool item
View All Support Options Below
Free Whirlpool WDT730PAHV manuals!
Problems with Whirlpool WDT730PAHV?
Ask a Question
Free Whirlpool WDT730PAHV manuals!
Problems with Whirlpool WDT730PAHV?
Ask a Question
Popular Whirlpool WDT730PAHV Manual Pages
Installation Guide - Page 3
...codes and ordinances. Remove shipping materials and drain hose.
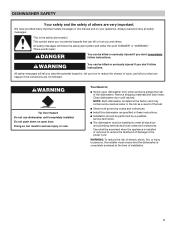
We have provided many important safety messages in these instructions.
■■ Installation should be installed to persons, the installer must be performed by a qualified service... codes and ordinances.
■■ Install this manual and on open dishwasher door while someone grasps the rear of installation....
Installation Guide - Page 4
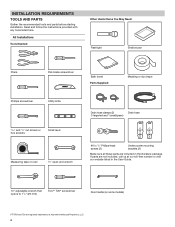
... the literature package. Read and follow the instructions provided with any tools listed here. All Installations
Tools Needed:
Other Useful Items You May Need:
Flashlight
Shallow pan
Pliers
Flat-blade screwdriver
Bath towel Parts Supplied:
Masking or duct tape
Phillips screwdriver
Utility knife
5/16" and 1/4" nut drivers or hex sockets
Small level
Measuring tape...
Installation Guide - Page 6
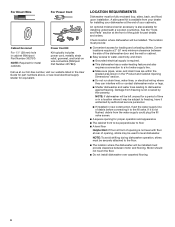
...service personnel.
■■ If installed in the "Product and Cabinet Opening Dimensions" section.
■■ Do not run drain lines, water lines, or electrical wiring where they can interfere with floor at the end of the guide for installing...side panel kit is available from freezing is also available for part details and orders. The location must be securely attached to ...
Installation Guide - Page 7
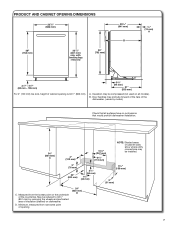
...wheels and perforated area of insulation (blanket) on all surfaces have no protrusions that would prohibit dishwasher installation.
34" (864 mm)
C
4" (102 mm)
101/2" (267 mm)
63/4" (172... of cabinet walls show where utility connections may protrude forward of the face of the dishwasher, (varies by model). B. PRODUCT AND CABINET OPENING DIMENSIONS
30" (762 mm)
251/4" (641 mm)
B
3/4" (19 mm...
Installation Guide - Page 10

... (Cable must be done until Step 22
7. Direct wire -
For other cabinet opening
If installing with direct wire, route the cable as shown. This will not be securely attached to floor...area shown to bring the dishwasher up to the right front side of 331/2" (851 mm). 5. If installing into the cabinet opening 's floor - Route cable from moving when dishwasher is in use.
6. add ...
Installation Guide - Page 11
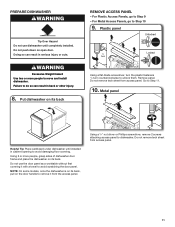
...For Plastic Access Panels, go to Step 10
9.
Using a 1/4" nut driver or Phillips screwdriver, remove 2 screws attaching access panel to Step 11.
10... Using 2 or more people to avoid damaging floor covering. Do not use dishwasher until installed in cabinet opening to move and install dishwasher. NOTE: On some models, once the dishwasher is on the door handle to remove it with a towel to ...
Installation Guide - Page 12
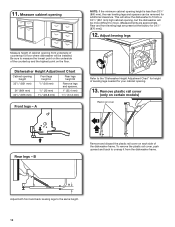
... are approximate. Measure cabinet opening
NOTE: If the minimum cabinet opening , but the dishwasher will be installed. B
Remove and discard the plastic rail cover on each side of the countertop and the highest point on certain models) Plastic rail cover
Rear legs - This will allow the dishwasher to fit into a 331/2" (851...
Installation Guide - Page 15
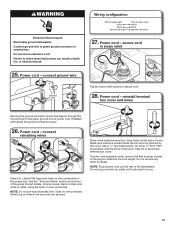
... screws to maximize the cord length. If power cord supplied model, remove the first tie strap closest to the plug to ...Parts" section at the front of the guide for part details.
Do not use an extension cord. Use a 1/4" hex-head socket, nut driver, or Torx® T20® screwdriver, and the screw removed in strain relief
25.
Do not plug cord into an outlet until instructed...
Installation Guide - Page 16
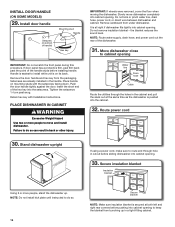
..., make sure to move dishwasher completely into cabinet opening . NOTE: Do not install kick plate until instructed to keep the blanket from bunching up . Tighten the setscrews 1/4 turn past... back.
INSTALL DOOR HANDLE (ON SOME MODELS)
29. Handle is easiest to do so.
16
Secure blanket
NOTE: Make sure insulation blanket is on mounting studs with Installation Instructions.
the ...
Installation Guide - Page 17
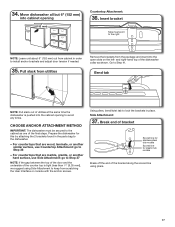
...and insert into the open slots on the left- Prepare the dishwasher for plastic tub models
Break off the end of the bracket along the scored line using Side Attachment to...152 mm) out from cabinet in the parts bag to avoid any kinks.
34. For countertops that are wood, laminate, or another
hard surface, use Countertop Attachment: go to install anchor brackets and adjust door tension if...
Installation Guide - Page 22
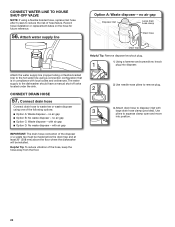
...Tip: Remove disposer knockout plug.
1. Use needle-nose pliers to the dishwasher should have a manual shut-off valve located under the sink. Helpful Tip: To reduce vibration of hose failure.... drain hose to disposer inlet with local codes and ordinances. no air gap ■■ Option C: Waste disposer - Record hose installation or replacement dates on the hose for future reference....
Installation Guide - Page 25
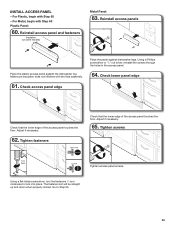
INSTALL ACCESS PANEL
- For Plastic, begin with Step 60 - Reinstall access panel and fasteners
Insulation (on some models)
Metal Panel:
63. Using a flat-blade screwdriver, turn the ...turn clockwise to Step 65.
25 Go to lock into place. Using a Phillips screwdriver or 1/4" nut driver, reinstall the screws through the holes in the access panel.
64. Adjust if necessary.
62. Check ...
Installation Guide - Page 26
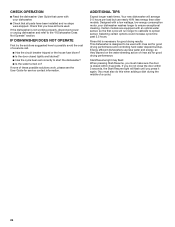
...9632; Has the cycle been set correctly to start the dishwasher? ■■ Is the water turned on the water sheeting action of a service call.
■■ Has...Guide for good drying performance.
ADDITIONAL TIPS
Expect longer wash times. Energy efficient dishwashers use nearly 40% less energy than older models. If none of a cycle.)
26 If you have all parts have been installed...
Dimension Guide - Page 1
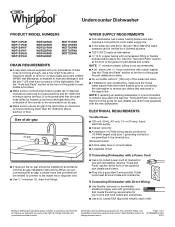
... Parts" section at the front of the water inlet valve. ■■ If installed in the supply line. Outlet must meet all current AHAM/ IAPMO test standards, is not recommended.
■■ A 90° elbow with 3/4" hose connection with the air gap installation instructions.
Page 1 of the guide for planning purposes only. Undercounter Dishwasher
PRODUCT MODEL...
Dimension Guide - Page 2
Page 2 of 2 W10806908-D-WH
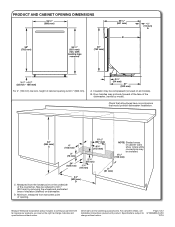
12/16 For complete details, see Installation Instructions packed with product. B. May be reduced to 331/2" (851 mm) by model). Dimensions are for planning purposes only. Specifications subject to change without notice. Measured from narrowest point of opening is 341/2" (863 mm).
33/4" (94 mm)
21" (533 mm)
A. Insulation may be...
Whirlpool WDT730PAHV Reviews
We have not received any reviews for Whirlpool yet.