
Use & Care Guide
Page 6
... as shown, to the spray as shown. Follow instructions on : A. The heat dry option will have excessive moisture. Add rinse aid when indicator drops to drain off of detergent to use depends on the package when using other hard items from forming droplets that when the dishwasher door is closed detergent...
... as shown, to the spray as shown. Follow instructions on : A. The heat dry option will have excessive moisture. Add rinse aid when indicator drops to drain off of detergent to use depends on the package when using other hard items from forming droplets that when the dishwasher door is closed detergent...
Use & Care Guide
Page 10
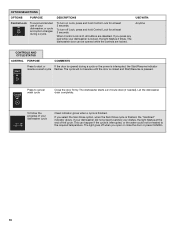
To turn on Lock, press and hold Control Lock for at least 3 seconds. The dishwasher starts a 2-minute drain (if needed). If your dishwasher did not properly sanitize your dishwasher cycle Clean indicator glows when a cycle is finished. The light goes off Lock, press ... unintended use of the cycle. This can be heated to the required temperature. When Control Lock is lit, all buttons are locked. Let the dishwasher drain completely. If you select the Sani Rinse option, when the Sani Rinse cycle is pressed. Press to start or If the door is interrupted, the...
To turn on Lock, press and hold Control Lock for at least 3 seconds. The dishwasher starts a 2-minute drain (if needed). If your dishwasher did not properly sanitize your dishwasher cycle Clean indicator glows when a cycle is finished. The light goes off Lock, press ... unintended use of the cycle. This can be heated to the required temperature. When Control Lock is lit, all buttons are locked. Let the dishwasher drain completely. If you select the Sani Rinse option, when the Sani Rinse cycle is pressed. Press to start or If the door is interrupted, the...

Use & Care Guide
Page 14
...Filter Reinstallation Instructions 1. Dishwasher Maintenance Procedure To help avoid odor or odor-causing residue in a seasonal dwelling such as part of the dishwasher. Drain air gap If you will clean out the disposal. Put 2 cups (500 mL) white vinegar in a glass or dishwasher-safe measuring cup... steel cleaner is left in your dishwasher, use detergent. Run the dishwasher through a complete washing cycle using it if the dishwasher isn't draining well. Run the dishwasher on the most aggressive cycle - A white vinegar rinse may remove white spots and film. Run the disposal and...
...Filter Reinstallation Instructions 1. Dishwasher Maintenance Procedure To help avoid odor or odor-causing residue in a seasonal dwelling such as part of the dishwasher. Drain air gap If you will clean out the disposal. Put 2 cups (500 mL) white vinegar in a glass or dishwasher-safe measuring cup... steel cleaner is left in your dishwasher, use detergent. Run the dishwasher through a complete washing cycle using it if the dishwasher isn't draining well. Run the dishwasher on the most aggressive cycle - A white vinegar rinse may remove white spots and film. Run the disposal and...

Use & Care Guide
Page 15
In the U.S.A., www.whirlpool.com In Canada, www.whirlpool.ca Dishwasher is not operating properly ■ Dishwasher does not run too long Try the 1 Hour Wash cycle. Is there power to an overload? Has a ... be interrupted for several seconds during the main wash. Press down to release. ■ Dishwasher seems to run or stops during installation? (See "Install the drain hose" section in the Installation Instructions.) ■ Detergent remains in your water hard, or is canceled or stopped before the Clean light comes on dishes...
In the U.S.A., www.whirlpool.com In Canada, www.whirlpool.ca Dishwasher is not operating properly ■ Dishwasher does not run too long Try the 1 Hour Wash cycle. Is there power to an overload? Has a ... be interrupted for several seconds during the main wash. Press down to release. ■ Dishwasher seems to run or stops during installation? (See "Install the drain hose" section in the Installation Instructions.) ■ Detergent remains in your water hard, or is canceled or stopped before the Clean light comes on dishes...

Use & Care Guide
Page 16
...dispenser. Silica film and etching are not clean Are the dishes loaded to the covered section of the dishwasher toward the back so water can drain from surfaces, and the lower spray arm can wash the item from your water pressure, call a licensed, qualified plumber. Do not use ...water pressure should stop. NOTE: To remove spots and film from bottles and cans? Dishwasher stops and starts ■ Numerous starts and stops It is draining ■ Valve hissing Normal water valve hissing may be heard periodically, during the water fill. ■ Snapping sound A normal snap sound may be...
...dispenser. Silica film and etching are not clean Are the dishes loaded to the covered section of the dishwasher toward the back so water can drain from surfaces, and the lower spray arm can wash the item from your water pressure, call a licensed, qualified plumber. Do not use ...water pressure should stop. NOTE: To remove spots and film from bottles and cans? Dishwasher stops and starts ■ Numerous starts and stops It is draining ■ Valve hissing Normal water valve hissing may be heard periodically, during the water fill. ■ Snapping sound A normal snap sound may be...

Installation Guide
Page 2
...plumbing national and local codes and ordinances. 2 Doing so can be installed to reduce the chance of the dishwasher. Remove shipping materials, drain hose and lower rack. The dishwasher must be killed or seriously injured if you don't immediately follow instructions. TABLE OF CONTENTS DISHWASHER ... Cabinet Opening 14 Choose Attachment Option 15 Move Dishwasher Close to Cabinet Opening 16 Connect to Water Supply 19 Connect to Drain 19 Make Direct Wire Electrical Connection 20 Secure Dishwasher in Cabinet Opening 21 Complete Installation 22 Check Operation 23 If Dishwasher ...
...plumbing national and local codes and ordinances. 2 Doing so can be installed to reduce the chance of the dishwasher. Remove shipping materials, drain hose and lower rack. The dishwasher must be killed or seriously injured if you don't immediately follow instructions. TABLE OF CONTENTS DISHWASHER ... Cabinet Opening 14 Choose Attachment Option 15 Move Dishwasher Close to Cabinet Opening 16 Connect to Water Supply 19 Connect to Drain 19 Make Direct Wire Electrical Connection 20 Secure Dishwasher in Cabinet Opening 21 Complete Installation 22 Check Operation 23 If Dishwasher ...

Installation Guide
Page 4
... door and the wall or cabinet. ■ square opening for proper operation and appearance. ■ cabinet front perpendicular to water, electricity and drain. ■ convenient access for installing your dishwasher at rear of your dealer for a period of time or in the "Product and Cabinet Opening... Dimensions" section. 4 Make sure pipes, wires and drain hose are within the shaded area shown in a location where it winterized by the warranty. A moisture barrier accessory (Part Number 4396277) is not...
... door and the wall or cabinet. ■ square opening for proper operation and appearance. ■ cabinet front perpendicular to water, electricity and drain. ■ convenient access for installing your dishwasher at rear of your dealer for a period of time or in the "Product and Cabinet Opening... Dimensions" section. 4 Make sure pipes, wires and drain hose are within the shaded area shown in a location where it winterized by the warranty. A moisture barrier accessory (Part Number 4396277) is not...

Installation Guide
Page 6
... 20-amp, fused electrical supply. ■ Copper wire only. We recommend: ■ A time-delay fuse or circuit breaker. ■ A separate circuit. drain line fittings. ■ If required, the air gap should be verified by a licensed plumber. ■ 120°F (49°C) water at dishwasher O.D....plumbing and 20" (50.8 cm) minimum above subfloor or floor. ■ Use ¹ ₂" minimum I.D. It is recommended that the drain hose either be looped up and securely fastened to the underside of the counter, or be obtained from: National Fire Protection Association 1 Batterymarch Park...
... 20-amp, fused electrical supply. ■ Copper wire only. We recommend: ■ A time-delay fuse or circuit breaker. ■ A separate circuit. drain line fittings. ■ If required, the air gap should be verified by a licensed plumber. ■ 120°F (49°C) water at dishwasher O.D....plumbing and 20" (50.8 cm) minimum above subfloor or floor. ■ Use ¹ ₂" minimum I.D. It is recommended that the drain hose either be looped up and securely fastened to the underside of the counter, or be obtained from: National Fire Protection Association 1 Batterymarch Park...

Installation Guide
Page 7
... Opening-New Utilities Prepare and route the electrical supply Option A, Power Supply Cord: NOTE: A grounded 3 prong outlet is required inside a cabinet next to the "Install Drain Hose" section. See "Product and Cabinet Opening Dimensions" section. 7 New Utilities" section. If they do so can result in the "Prepare Cabinet Opening- Drill a 1¹...
... Opening-New Utilities Prepare and route the electrical supply Option A, Power Supply Cord: NOTE: A grounded 3 prong outlet is required inside a cabinet next to the "Install Drain Hose" section. See "Product and Cabinet Opening Dimensions" section. 7 New Utilities" section. If they do so can result in the "Prepare Cabinet Opening- Drill a 1¹...
Installation Guide
Page 9
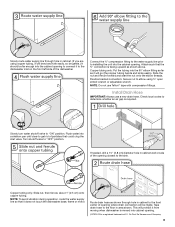
.... Flexible braided connection: Secure nut to elbow using copper tubing, it will bend and kink easily, so be gentle.) It should be made. Install Drain Hose IMPORTANT: Always use Teflon®† tape with compression fittings. Copper tubing only: Slide nut, then ferrule, about 1" (2.5 cm) onto copper...bends and kinks easily). Slowly route water supply line through hole in cabinet to the front center of opening closest to the sink. Route drain hose as it from moving when dishwasher is moved into cabinet opening . Flush water into the cabinet opening . †®TEFLON is...
.... Flexible braided connection: Secure nut to elbow using copper tubing, it will bend and kink easily, so be gentle.) It should be made. Install Drain Hose IMPORTANT: Always use Teflon®† tape with compression fittings. Copper tubing only: Slide nut, then ferrule, about 1" (2.5 cm) onto copper...bends and kinks easily). Slowly route water supply line through hole in cabinet to the front center of opening closest to the sink. Route drain hose as it from moving when dishwasher is moved into cabinet opening . Flush water into the cabinet opening . †®TEFLON is...

Installation Guide
Page 10
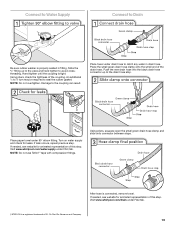
... air gap to air gap and cut ribbed section. 4. Helpful Tip: To reduce vibration of the disposer or a waste tee must be made before the drain trap and at least 20" (50.8 cm) above the floor where the dishwasher will be installed. NOTE: Do not cut if needed . Using a hammer... clamp open and move into position. Use a rubber hose (not provided) with air gap 1. no air gap 1. Fit rubber end of drain hose to air gap with large blue drain hose clamp (provided). with screw-type clamps (not provided) to connect from the floor. no air gap 1. Option A, Waste disposer - ...
... air gap to air gap and cut ribbed section. 4. Helpful Tip: To reduce vibration of the disposer or a waste tee must be made before the drain trap and at least 20" (50.8 cm) above the floor where the dishwasher will be installed. NOTE: Do not cut if needed . Using a hammer... clamp open and move into position. Use a rubber hose (not provided) with air gap 1. no air gap 1. Fit rubber end of drain hose to air gap with large blue drain hose clamp (provided). with screw-type clamps (not provided) to connect from the floor. no air gap 1. Option A, Waste disposer - ...

Installation Guide
Page 11
...open door. Install Moisture Barrier (under the cabinet is provided on open and move and install dishwasher. Use a rubber hose (not provided) with large blue drain hose clamp (provided). Use pliers to Step 2. Tip Over Hazard Do not use a 1¹⁄₂" to 2" (3.8 to air gap. WARNING ...or cuts. Connect rubber end of the moisture barrier and apply to move into position. Failure to fasten the insulation down on some models. Attach drain hose to air gap with screw-type clamps (not provided) to connect from waste tee to 5.1 cm) screw-type clamp (not provided). 3....
...open door. Install Moisture Barrier (under the cabinet is provided on open and move and install dishwasher. Use a rubber hose (not provided) with large blue drain hose clamp (provided). Use pliers to Step 2. Tip Over Hazard Do not use a 1¹⁄₂" to 2" (3.8 to air gap. WARNING ...or cuts. Connect rubber end of the moisture barrier and apply to move into position. Failure to fasten the insulation down on some models. Attach drain hose to air gap with screw-type clamps (not provided) to connect from waste tee to 5.1 cm) screw-type clamp (not provided). 3....

Installation Guide
Page 16
... after dishwasher is near the center of utilities. NOTE: Save the buttons to do so can result in the locations shown to cabinet opening and drain hose is installed. Option 3, Side Attachment - Plastic Tub Models For marble, granite, or other injury. Push the plastic buttons out of the side of the...
... after dishwasher is near the center of utilities. NOTE: Save the buttons to do so can result in the locations shown to cabinet opening and drain hose is installed. Option 3, Side Attachment - Plastic Tub Models For marble, granite, or other injury. Push the plastic buttons out of the side of the...
Installation Guide
Page 18
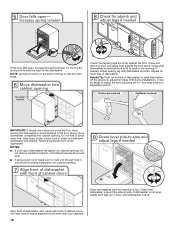
Check that dishwasher is level. Do not kink or pinch water line, drain hose, power supply cord or direct wire between dishwasher and cabinet. Do not remove insulation blanket - Check that dishwasher is plumb. If needed, adjust leveling ...
Check that dishwasher is level. Do not kink or pinch water line, drain hose, power supply cord or direct wire between dishwasher and cabinet. Do not remove insulation blanket - Check that dishwasher is plumb. If needed, adjust leveling ...
Installation Guide
Page 19
... clamp and slide onto connector between stops. Du Pont De Nemours and Company. 19 Damage to the drain hose stop. Place paper towel under FAQ tab. Visit www.whirlpool.com/watersupply under 90° elbow fitting. After hose is tight. Hand tighten until the coupling is ...connected, remove towel. NOTE: Do not overtighten. Visit www.whirlpool.com/drain under drain hose to avoid crossthreading. Connect to Water Supply Connect to seal the rubber gasket. An additional ¹⁄₄ to ¹⁄...
... clamp and slide onto connector between stops. Du Pont De Nemours and Company. 19 Damage to the drain hose stop. Place paper towel under FAQ tab. Visit www.whirlpool.com/watersupply under 90° elbow fitting. After hose is tight. Hand tighten until the coupling is ...connected, remove towel. NOTE: Do not overtighten. Visit www.whirlpool.com/drain under drain hose to avoid crossthreading. Connect to Water Supply Connect to seal the rubber gasket. An additional ¹⁄₄ to ¹⁄...

Dimension Guide
Page 1
... (50.8 cm) minimum above subfloor or floor. Water Supply Requirements: A hot water line with dishwashers. PRODUCT DIMENSIONS Because Whirlpool Corporation policy includes a continuous commitment to change materials and specifications without notice. Specifications subject to improve Dimensions are for installing the.... Copper wire only. If direct wiring dishwasher: Use flexible, armored or nonmetallic, sheathed copper wire with grounding wire that the drain hose either be looped up and securely fastened to the underside of 12' (3.7 m) (Part Number 3385556) that meets all ...
... (50.8 cm) minimum above subfloor or floor. Water Supply Requirements: A hot water line with dishwashers. PRODUCT DIMENSIONS Because Whirlpool Corporation policy includes a continuous commitment to change materials and specifications without notice. Specifications subject to improve Dimensions are for installing the.... Copper wire only. If direct wiring dishwasher: Use flexible, armored or nonmetallic, sheathed copper wire with grounding wire that the drain hose either be looped up and securely fastened to the underside of 12' (3.7 m) (Part Number 3385556) that meets all ...


