
Use & Care Guide
Page 1
..., please visit our website at 1-800-253-1301. This is , tell you don't immediately follow instructions. All safety messages will follow instructions. In Canada, visit our website at www.whirlpool.ca or call us at 1-800-807-6777. Puede encontrar su número de modelo y de...you to reduce the chance of injury, and tell you what the potential hazard is the safety alert symbol. W10350359B DISHWASHER USER INSTRUCTIONS THANK YOU for additional information. These words mean: DANGER You can be killed or seriously injured if you how to potential hazards...
..., please visit our website at 1-800-253-1301. This is , tell you don't immediately follow instructions. All safety messages will follow instructions. In Canada, visit our website at www.whirlpool.ca or call us at 1-800-807-6777. Puede encontrar su número de modelo y de...you to reduce the chance of injury, and tell you what the potential hazard is the safety alert symbol. W10350359B DISHWASHER USER INSTRUCTIONS THANK YOU for additional information. These words mean: DANGER You can be killed or seriously injured if you how to potential hazards...

Use & Care Guide
Page 2
...- Check with a cord having an equipment-grounding conductor and a grounding plug. if it . WARNING: Improper connection of electric shock. GROUNDING INSTRUCTIONS ■ For a grounded, cord-connected dishwasher: The dishwasher must be grounded. Do not modify the plug provided with the circuit conductors and...be connected to a grounded metal, permanent wiring system, or an equipment-grounding conductor must be run with the dishwasher; SAVE THESE INSTRUCTIONS WARNING Tip Over Hazard Do not use in place. ■ Remove the door or lid to damage the door seal; Do...
...- Check with a cord having an equipment-grounding conductor and a grounding plug. if it . WARNING: Improper connection of electric shock. GROUNDING INSTRUCTIONS ■ For a grounded, cord-connected dishwasher: The dishwasher must be grounded. Do not modify the plug provided with the circuit conductors and...be connected to a grounded metal, permanent wiring system, or an equipment-grounding conductor must be run with the dishwasher; SAVE THESE INSTRUCTIONS WARNING Tip Over Hazard Do not use in place. ■ Remove the door or lid to damage the door seal; Do...

Use & Care Guide
Page 6
... by allowing water to Medium Water (0-6 grains per U.S. This will etch. Cover latch B. Soft to drain off of the dispenser as spots or streaks. Follow instructions on your water hardness, fill the Main Wash section of the dishes after the final rinse. ■ Check the rinse aid indicator. Without rinse aid...
... by allowing water to Medium Water (0-6 grains per U.S. This will etch. Cover latch B. Soft to drain off of the dispenser as spots or streaks. Follow instructions on your water hardness, fill the Main Wash section of the dishes after the final rinse. ■ Check the rinse aid indicator. Without rinse aid...

Use & Care Guide
Page 13
... filters may damage the filters. Turn the Upper Filter Assembly ¼ turn counterclockwise and lift out. 2. Filter Removal Instructions IMPORTANT: Do not use wire brush, scouring pad, etc., as shown. Separate the upper filter assembly by gently pulling...LO 3. This triple filtration system minimizes sound and optimizes water and energy conservation while providing superior cleaning performance. Very Hard Water Cleaning Instructions If you time and effort. It is very easy to remove and maintain the filters. Filtration System Your dishwasher has the latest ...
... filters may damage the filters. Turn the Upper Filter Assembly ¼ turn counterclockwise and lift out. 2. Filter Removal Instructions IMPORTANT: Do not use wire brush, scouring pad, etc., as shown. Separate the upper filter assembly by gently pulling...LO 3. This triple filtration system minimizes sound and optimizes water and energy conservation while providing superior cleaning performance. Very Hard Water Cleaning Instructions If you time and effort. It is very easy to remove and maintain the filters. Filtration System Your dishwasher has the latest ...

Use & Care Guide
Page 14
...To avoid damage to align with the wash water. Put 2 cups (500 mL) white vinegar in a seasonal dwelling such as the instructions found on hot water to the dishwasher. Dishwasher Maintenance Procedure To help avoid odor or odor-causing residue in the bottom of the dishwasher... the water and power supply to slow flow. IMPORTANT: ■ Read these instructions as well as a second home or vacation home, avoid water damage by authorized service personnel. 14 Filter Reinstallation Instructions 1. Noting the previous illustrations, place the Lower Filter under the Locating Tabs in...
...To avoid damage to align with the wash water. Put 2 cups (500 mL) white vinegar in a seasonal dwelling such as the instructions found on hot water to the dishwasher. Dishwasher Maintenance Procedure To help avoid odor or odor-causing residue in the bottom of the dishwasher... the water and power supply to slow flow. IMPORTANT: ■ Read these instructions as well as a second home or vacation home, avoid water damage by authorized service personnel. 14 Filter Reinstallation Instructions 1. Noting the previous illustrations, place the Lower Filter under the Locating Tabs in...

Use & Care Guide
Page 15
...minutes. If it does not restart, call for several seconds during installation? (See "Install the drain hose" section in the Installation Instructions.) ■ Detergent remains in models) Is the dishwasher aligned with spray jets or spray arm. The motor automatically resets itself within ... In Canada, www.whirlpool.ca Dishwasher is designed to use a high-temp option. Did you will be blocking the detergent dispenser from the vent in the dispenser. Is the brand of a service call an electrician. Refer to the Installation Instructions for POWERSCOUR™ wash ...
...minutes. If it does not restart, call for several seconds during installation? (See "Install the drain hose" section in the Installation Instructions.) ■ Detergent remains in models) Is the dishwasher aligned with spray jets or spray arm. The motor automatically resets itself within ... In Canada, www.whirlpool.ca Dishwasher is designed to use a high-temp option. Did you will be blocking the detergent dispenser from the vent in the dispenser. Is the brand of a service call an electrician. Refer to the Installation Instructions for POWERSCOUR™ wash ...

Use & Care Guide
Page 17
... (Frequently Asked Questions), in a remote area where service by this limited warranty does not apply. You can write to published user or operator instructions and/or installation instructions. 4. WHIRLPOOL CORPORATION MAJOR APPLIANCE WARRANTY LIMITED WARRANTY For one year from the date of purchase, when this major appliance is operated and maintained according to...
... (Frequently Asked Questions), in a remote area where service by this limited warranty does not apply. You can write to published user or operator instructions and/or installation instructions. 4. WHIRLPOOL CORPORATION MAJOR APPLIANCE WARRANTY LIMITED WARRANTY For one year from the date of purchase, when this major appliance is operated and maintained according to...

Installation Guide
Page 2
... SAFETY 2 INSTALLATION REQUIREMENTS 3 Tools and Parts 3 Location Requirements 4 Drain Requirements 6 Water Supply Requirements 6 Electrical Requirements 6 INSTALLATION INSTRUCTIONS 7 Prepare Cabinet Opening-Existing Utilities 7 Prepare Cabinet Opening-New Utilities 7 Prepare and Route Water Line 8 Install Drain Hose 9 ...Install Moisture Barrier (under a wood countertop 11 Prepare Dishwasher 11 INSTALLATION INSTRUCTIONS (CONT.) Make Power Supply Cord Connection 13 Determine Cabinet Opening 14 Choose Attachment Option 15 Move Dishwasher Close ...
... SAFETY 2 INSTALLATION REQUIREMENTS 3 Tools and Parts 3 Location Requirements 4 Drain Requirements 6 Water Supply Requirements 6 Electrical Requirements 6 INSTALLATION INSTRUCTIONS 7 Prepare Cabinet Opening-Existing Utilities 7 Prepare Cabinet Opening-New Utilities 7 Prepare and Route Water Line 8 Install Drain Hose 9 ...Install Moisture Barrier (under a wood countertop 11 Prepare Dishwasher 11 INSTALLATION INSTRUCTIONS (CONT.) Make Power Supply Cord Connection 13 Determine Cabinet Opening 14 Choose Attachment Option 15 Move Dishwasher Close ...

Installation Guide
Page 3
... wiring to 16-gauge wiring in the literature package. Additional parts supplied with any tools listed here. See "Electrical Requirements" section. Read and follow the instructions provided with certain models only Make sure all these parts are included in dishwasher.
... wiring to 16-gauge wiring in the literature package. Additional parts supplied with any tools listed here. See "Electrical Requirements" section. Read and follow the instructions provided with certain models only Make sure all these parts are included in dishwasher.

Installation Guide
Page 6
... wiring: ■ Use flexible, armored or nonmetallic sheathed, copper wire with grounding wire that meets the wiring requirements for use with the air gap installation instructions. It is recommended that the drain hose either be looped up and securely fastened to the underside of the counter, or be connected to an...
... wiring: ■ Use flexible, armored or nonmetallic sheathed, copper wire with grounding wire that meets the wiring requirements for use with the air gap installation instructions. It is recommended that the drain hose either be looped up and securely fastened to the underside of the counter, or be connected to an...

Installation Guide
Page 7
... 1¹⁄₂" (3.8 cm) hole in death or electrical shock. Failure to do not reach far enough, follow the instructions in the "Prepare Cabinet Opening- Prepare Cabinet Opening-New Utilities Prepare and route the electrical supply Option A, Power Supply Cord: NOTE...next to the "Install Drain Hose" section. New Utilities" section. See "Product and Cabinet Opening Dimensions" section. 7 INSTALLATION INSTRUCTIONS WARNING Prepare Cabinet Opening-Existing Utilities Electrical Shock Hazard Disconnect electrical power at the fuse box or circuit breaker box before installing ...
... 1¹⁄₂" (3.8 cm) hole in death or electrical shock. Failure to do not reach far enough, follow the instructions in the "Prepare Cabinet Opening- Prepare Cabinet Opening-New Utilities Prepare and route the electrical supply Option A, Power Supply Cord: NOTE...next to the "Install Drain Hose" section. New Utilities" section. See "Product and Cabinet Opening Dimensions" section. 7 INSTALLATION INSTRUCTIONS WARNING Prepare Cabinet Opening-Existing Utilities Electrical Shock Hazard Disconnect electrical power at the fuse box or circuit breaker box before installing ...
Installation Guide
Page 13
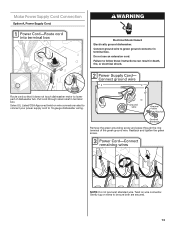
... electrical shock. Select UL Listed/CSA Approved twist-on wire connector. Twist on wire connectors rated to connect your power supply cord to follow these instructions can result in terminal box. Route cord so that it does not touch dishwasher motor to lower part of the green ground wire. Do not...
... electrical shock. Select UL Listed/CSA Approved twist-on wire connector. Twist on wire connectors rated to connect your power supply cord to follow these instructions can result in terminal box. Route cord so that it does not touch dishwasher motor to lower part of the green ground wire. Do not...

Installation Guide
Page 14
..., see website for additional clearance. Make sure wires are repositioned differently. Refer to measure the lowest point on the floor). Visit www.whirlpool.com/electrical under FAQ tab. If the rear wheels are removed, the dishwasher will be installed (you will need to "Dishwasher Height...dishwashers to fit into a 33¹⁄₂" (85.1 cm) high cabinet opening and plastic tub dishwashers to fit into outlet until instructed to move. (Measurements are not pinched. Close cover ensuring wires are approximate. Determine Cabinet Opening If needed . This will be more ...
..., see website for additional clearance. Make sure wires are repositioned differently. Refer to measure the lowest point on the floor). Visit www.whirlpool.com/electrical under FAQ tab. If the rear wheels are removed, the dishwasher will be installed (you will need to "Dishwasher Height...dishwashers to fit into a 33¹⁄₂" (85.1 cm) high cabinet opening and plastic tub dishwashers to fit into outlet until instructed to move. (Measurements are not pinched. Close cover ensuring wires are approximate. Determine Cabinet Opening If needed . This will be more ...

Installation Guide
Page 16
... Cabinet Opening WARNING Excessive Weight Hazard Use two or more people to move dishwasher close to cabinet opening . NOTE: Do not install kick plate until instructed to do so. Option 2, Side Attachment - Failure to do so can result in the locations shown to cover the holes after dishwasher is moved into...
... Cabinet Opening WARNING Excessive Weight Hazard Use two or more people to move dishwasher close to cabinet opening . NOTE: Do not install kick plate until instructed to do so. Option 2, Side Attachment - Failure to do so can result in the locations shown to cover the holes after dishwasher is moved into...
Installation Guide
Page 20
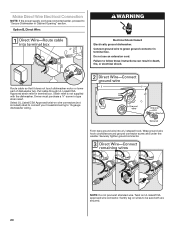
... lower part of dishwasher tub. Select UL Listed/CSA Approved twist-on wire connectors (not included) rated to connect your household wiring to follow these instructions can result in death, fire, or electrical shock. Form bare ground wire into a U-shaped hook. Gently tug on UL listed/CSA approved wire connector. Do...
... lower part of dishwasher tub. Select UL Listed/CSA Approved twist-on wire connectors (not included) rated to connect your household wiring to follow these instructions can result in death, fire, or electrical shock. Form bare ground wire into a U-shaped hook. Gently tug on UL listed/CSA approved wire connector. Do...

Installation Guide
Page 23
... seconds, then open door. Additional Tips Expect longer wash times. Do not use an extension cord. Check Operation ■ Read the Dishwasher User Instructions that came with an optical water sensor so the first cycle will flash until you must also do not close the door within 3 seconds. Check... to possibly avoid the cost of hose failure. Check that power supply cord does not touch dishwasher motor or lower part of these instructions can result in the bottom of rinse aid for good drying performance and controlling hard water deposit buildup. Designed with rinse aid for...
... seconds, then open door. Additional Tips Expect longer wash times. Do not use an extension cord. Check Operation ■ Read the Dishwasher User Instructions that came with an optical water sensor so the first cycle will flash until you must also do not close the door within 3 seconds. Check... to possibly avoid the cost of hose failure. Check that power supply cord does not touch dishwasher motor or lower part of these instructions can result in the bottom of rinse aid for good drying performance and controlling hard water deposit buildup. Designed with rinse aid for...

Dimension Guide
Page 1
... and ordinances. air gap Make sure to use an air gap if the drain hose is not recommended). Follow the kit instructions for use a new drain hose with dishwashers. Water temperature must be connected to change materials and specifications without notice. Specifications ...120 psi (138 to improve Dimensions are for your dishwasher. Do not solder within 6" (15.2 cm) of 2 Ref. PRODUCT DIMENSIONS Because Whirlpool Corporation policy includes a continuous commitment to 862 kPa) water pressure. Page 1 of the water inlet valve. Outlet must plug into a grounded three...
... and ordinances. air gap Make sure to use an air gap if the drain hose is not recommended). Follow the kit instructions for use a new drain hose with dishwashers. Water temperature must be connected to change materials and specifications without notice. Specifications ...120 psi (138 to improve Dimensions are for your dishwasher. Do not solder within 6" (15.2 cm) of 2 Ref. PRODUCT DIMENSIONS Because Whirlpool Corporation policy includes a continuous commitment to 862 kPa) water pressure. Page 1 of the water inlet valve. Outlet must plug into a grounded three...
Dimension Guide
Page 2
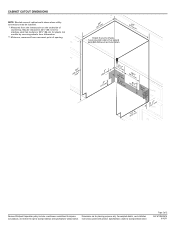
...without notice. Page 2 of countertop. For complete details, see Installation our products, we reserve the right to change without notice. Instructions packed with product. CABINET CUTOUT DIMENSIONS NOTE: Shaded areas of cabinet walls show where utility connections may be reduced to 33¹...8322;" (85.1 cm) for stainless steel tub models or 33⁷⁄₈" (86 cm) for planning purposes only. Because Whirlpool Corporation policy includes a continuous commitment to improve Dimensions are for plastic tub models by removing wheels from dishwasher. ** Minimum, measured from...
...without notice. Page 2 of countertop. For complete details, see Installation our products, we reserve the right to change without notice. Instructions packed with product. CABINET CUTOUT DIMENSIONS NOTE: Shaded areas of cabinet walls show where utility connections may be reduced to 33¹...8322;" (85.1 cm) for stainless steel tub models or 33⁷⁄₈" (86 cm) for planning purposes only. Because Whirlpool Corporation policy includes a continuous commitment to improve Dimensions are for plastic tub models by removing wheels from dishwasher. ** Minimum, measured from...
Warranty Information
Page 1
... area where service by this major appliance is designed to obtain service under these User Instructions and model number information for Factory Specified Parts and repair labor to published user or operator instructions and/or installation instructions. 4. WHIRLPOOL CORPORATION MAJOR APPLIANCE WARRANTY LIMITED WARRANTY For one year from your home of your major appliance...
... area where service by this major appliance is designed to obtain service under these User Instructions and model number information for Factory Specified Parts and repair labor to published user or operator instructions and/or installation instructions. 4. WHIRLPOOL CORPORATION MAJOR APPLIANCE WARRANTY LIMITED WARRANTY For one year from your home of your major appliance...