
User Manual
Page 3
APPENDIX TROUBLESHOOTING 18 CLEANING THE W4207 HD MONITOR 20 SPECIFICATIONS 20 ii INSTALLATION PACKAGE CONTENTS 4 FRONT VIEW OF THE W4207 HD MONITOR 5 REAR VIEW OF THE W4207 HD MONITOR 5 SIDE VIEW OF THE W4207 HD MONITOR 6 REMOTE CONTROL 8 INSTALLATION 9 3. English CONTENTS 1. OSD FUNCTION OSD FUNCTION 12 PICTURE 13 PC PARAMETERS 14 AUDIO 15 PICTURE-IN-PICTURE 17 GENERAL SETTINGS 17 4. PRODUCT SAFETY SAFETY GUIDELINES 2 PRODUCT SAFETY INSTRUCTIONS 3 2.
APPENDIX TROUBLESHOOTING 18 CLEANING THE W4207 HD MONITOR 20 SPECIFICATIONS 20 ii INSTALLATION PACKAGE CONTENTS 4 FRONT VIEW OF THE W4207 HD MONITOR 5 REAR VIEW OF THE W4207 HD MONITOR 5 SIDE VIEW OF THE W4207 HD MONITOR 6 REMOTE CONTROL 8 INSTALLATION 9 3. English CONTENTS 1. OSD FUNCTION OSD FUNCTION 12 PICTURE 13 PC PARAMETERS 14 AUDIO 15 PICTURE-IN-PICTURE 17 GENERAL SETTINGS 17 4. PRODUCT SAFETY SAFETY GUIDELINES 2 PRODUCT SAFETY INSTRUCTIONS 3 2.
User Manual
Page 6
...emits smoke, abnormal noise, or a strange odor, immediately turn it off and contact the Westinghouse Service Center. 3 Keep this apparatus during lightning storms or when unused for future reference. ..., liquid has been spilled or objects have fallen into your LCD display with the apparatus. Other Notices • Avoid exposing the W4207 HD Monitor to direct sunlight or high temperatures. • ... plug. Protect the power cord from the remote control • Only use attachments/accessories specified by the manufacturer • If your W4207 HD Monitor will not be seriously injured if...
...emits smoke, abnormal noise, or a strange odor, immediately turn it off and contact the Westinghouse Service Center. 3 Keep this apparatus during lightning storms or when unused for future reference. ..., liquid has been spilled or objects have fallen into your LCD display with the apparatus. Other Notices • Avoid exposing the W4207 HD Monitor to direct sunlight or high temperatures. • ... plug. Protect the power cord from the remote control • Only use attachments/accessories specified by the manufacturer • If your W4207 HD Monitor will not be seriously injured if...

User Manual
Page 7
English 2 INSTALLATION Package Contents Your product package includes: • 42" Westinghouse LCD W4207 HD Monitor • Remote Control (with batteries) • Power Cord • User's Manual • Quick Connect Guide • Warranty Card 4
English 2 INSTALLATION Package Contents Your product package includes: • 42" Westinghouse LCD W4207 HD Monitor • Remote Control (with batteries) • Power Cord • User's Manual • Quick Connect Guide • Warranty Card 4
User Manual
Page 8
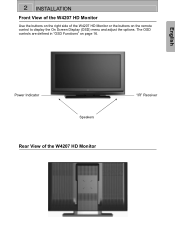
Power Indicator Speakers Rear View of the W4207 HD Monitor or the buttons on page 16. English 2 INSTALLATION Front View of the W4207 HD Monitor Use the buttons on the right side of the W4207 HD Monitor "IR" Receiver 5 The OSD controls are defined in "OSD Functions" on the remote control to display the On Screen Display (OSD) menu and adjust the options.
Power Indicator Speakers Rear View of the W4207 HD Monitor or the buttons on page 16. English 2 INSTALLATION Front View of the W4207 HD Monitor Use the buttons on the right side of the W4207 HD Monitor "IR" Receiver 5 The OSD controls are defined in "OSD Functions" on the remote control to display the On Screen Display (OSD) menu and adjust the options.
User Manual
Page 11
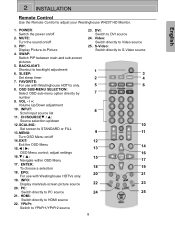
...your Westinghouse W4207 HD Monitor. CH/SOURCET / S: Source selection up/down 12. SLEEP: Set sleep timer 7. VOL - / +: Volume Up/Down adjustment 10. MENU: Turn OSD Menu on/off 3. INFO: Display main/sub-screen picture source 20. 2 INSTALLATION Remote Control Use the Remote Control... to backlight adjustment 6. adjust settings 16. PIP: Display Picture-In-Picture 4. OSD SUB-MENU SELECTION: Select OSD sub-menu option ...
...your Westinghouse W4207 HD Monitor. CH/SOURCET / S: Source selection up/down 12. SLEEP: Set sleep timer 7. VOL - / +: Volume Up/Down adjustment 10. MENU: Turn OSD Menu on/off 3. INFO: Display main/sub-screen picture source 20. 2 INSTALLATION Remote Control Use the Remote Control... to backlight adjustment 6. adjust settings 16. PIP: Display Picture-In-Picture 4. OSD SUB-MENU SELECTION: Select OSD sub-menu option ...
User Manual
Page 12
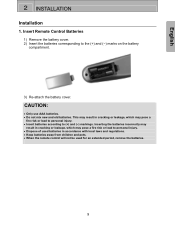
CAUTION: • Only use AAA batteries. • Do not mix new and old batteries. Insert Remote Control Batteries 1) Remove the battery cover. 2) Insert the batteries corresponding to (+) and (−) markings. English 2 INSTALLATION Installation 1. Inserting the batteries incorrectly... may result in accordance with local laws and regulations. • Keep batteries away from children and pets. • When the remote control will not be used batteries in cracking or leakage, which may pose a fire risk or lead to personal injury. • Insert batteries ...
CAUTION: • Only use AAA batteries. • Do not mix new and old batteries. Insert Remote Control Batteries 1) Remove the battery cover. 2) Insert the batteries corresponding to (+) and (−) markings. English 2 INSTALLATION Installation 1. Inserting the batteries incorrectly... may result in accordance with local laws and regulations. • Keep batteries away from children and pets. • When the remote control will not be used batteries in cracking or leakage, which may pose a fire risk or lead to personal injury. • Insert batteries ...

User Manual
Page 14
Select an input source for questions on how to set the PC timing mode to the resolution of the W4207 HD Monitor or the Input key on the remote control. 11 Turn on the right side of the computer. For the best picture quality, set this timing mode. 6. Turn on the cable box... or satellite receiver If using the OSD menu or remote control To display the change the input source, press the Input button on your computer's graphic card user guide for the W4207 HD Monitor using a DVI or HDMI connection, the cable box or satellite receiver will auto...
Select an input source for questions on how to set the PC timing mode to the resolution of the W4207 HD Monitor or the Input key on the remote control. 11 Turn on the right side of the computer. For the best picture quality, set this timing mode. 6. Turn on the cable box... or satellite receiver If using the OSD menu or remote control To display the change the input source, press the Input button on your computer's graphic card user guide for the W4207 HD Monitor using a DVI or HDMI connection, the cable box or satellite receiver will auto...
User Manual
Page 15
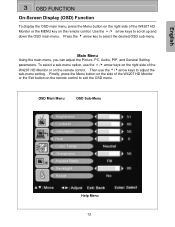
... Menu OSD Sub-Menu Help Menu 12 English 3 OSD FUNCTION On-Screen Display (OSD) Function To display the OSD main menu, press the Menu button on the right side of the W4207 HD Monitor or the MENU key on the remote control to adjust the sub-menu setting. Main Menu Using the main menu... the 4 arrow key to scroll up and down the OSD main menu. Then use the ▲ /▼ arrow keys on the right side of the W4207 HD Monitor or the Exit button on the remote control. Finally, press the Menu button on the side of the...
... Menu OSD Sub-Menu Help Menu 12 English 3 OSD FUNCTION On-Screen Display (OSD) Function To display the OSD main menu, press the Menu button on the right side of the W4207 HD Monitor or the MENU key on the remote control to adjust the sub-menu setting. Main Menu Using the main menu... the 4 arrow key to scroll up and down the OSD main menu. Then use the ▲ /▼ arrow keys on the right side of the W4207 HD Monitor or the Exit button on the remote control. Finally, press the Menu button on the side of the...
User Manual
Page 21
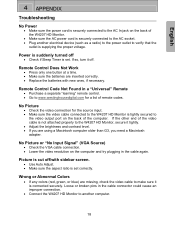
.... • Lower the video resolution on the back of the computer. If so, turn it is connected securely. Remote Control Code Not Found in a "Universal" Remote • Purchase a separate "learning" remote control. • Go to make sure it off. Wrong or Abnormal Colors • If any colors (red, ...are missing, check the video cable to www.westinghousedigital.com for the source input. • Make sure the video cable connected to the W4207 HD Monitor is tightly secured to verify that the outlet is supplying the proper voltage. English 4 APPENDIX Troubleshooting No Power • Make ...
.... • Lower the video resolution on the back of the computer. If so, turn it is connected securely. Remote Control Code Not Found in a "Universal" Remote • Purchase a separate "learning" remote control. • Go to make sure it off. Wrong or Abnormal Colors • If any colors (red, ...are missing, check the video cable to www.westinghousedigital.com for the source input. • Make sure the video cable connected to the W4207 HD Monitor is tightly secured to verify that the outlet is supplying the proper voltage. English 4 APPENDIX Troubleshooting No Power • Make ...
User Manual
Page 22
No Sound • Check the audio connection. • Press MUTE on the remote control, so that the S-Video and Composite AV input share the same audio source. How Can I Find More Help? • Log on to: www.westinghousedigital.com • Contact Westinghouse Customer Service at (866) 287-5555 or write us at [email protected] 19 English 4 APPENDIX Troubleshooting (cont'd) AUDIO Interconnection Issues • Remember that MUTE disappears from the screen. • Press the Volume + (Up) key on the remote control. .
No Sound • Check the audio connection. • Press MUTE on the remote control, so that the S-Video and Composite AV input share the same audio source. How Can I Find More Help? • Log on to: www.westinghousedigital.com • Contact Westinghouse Customer Service at (866) 287-5555 or write us at [email protected] 19 English 4 APPENDIX Troubleshooting (cont'd) AUDIO Interconnection Issues • Remember that MUTE disappears from the screen. • Press the Volume + (Up) key on the remote control. .


