
User Manual
Page 2
Model No Serial No Ref to : www.westinghousedigital.com • Contact Westinghouse Customer Service at (866) 287-5555 or write us at [email protected] Owner's Record The model and serial numbers are located @ the back of the numbers in the spaces provided below. English Contacting Westinghouse Digital • Log on to them whenever you call upon your Westinghouse Digital dealer regarding this product. Keep a record of the Monitor.
Model No Serial No Ref to : www.westinghousedigital.com • Contact Westinghouse Customer Service at (866) 287-5555 or write us at [email protected] Owner's Record The model and serial numbers are located @ the back of the numbers in the spaces provided below. English Contacting Westinghouse Digital • Log on to them whenever you call upon your Westinghouse Digital dealer regarding this product. Keep a record of the Monitor.
User Manual
Page 3
PRODUCT SAFETY SAFETY GUIDELINES 2 PRODUCT SAFETY INSTRUCTIONS 3 2. APPENDIX TROUBLESHOOTING 18 CLEANING THE W4207 HD MONITOR 20 SPECIFICATIONS 20 ii INSTALLATION PACKAGE CONTENTS 4 FRONT VIEW OF THE W4207 HD MONITOR 5 REAR VIEW OF THE W4207 HD MONITOR 5 SIDE VIEW OF THE W4207 HD MONITOR 6 REMOTE CONTROL 8 INSTALLATION 9 3. OSD FUNCTION OSD FUNCTION 12 PICTURE 13 PC PARAMETERS 14 AUDIO 15 PICTURE-IN-PICTURE 17 GENERAL SETTINGS 17 4. English CONTENTS 1.
PRODUCT SAFETY SAFETY GUIDELINES 2 PRODUCT SAFETY INSTRUCTIONS 3 2. APPENDIX TROUBLESHOOTING 18 CLEANING THE W4207 HD MONITOR 20 SPECIFICATIONS 20 ii INSTALLATION PACKAGE CONTENTS 4 FRONT VIEW OF THE W4207 HD MONITOR 5 REAR VIEW OF THE W4207 HD MONITOR 5 SIDE VIEW OF THE W4207 HD MONITOR 6 REMOTE CONTROL 8 INSTALLATION 9 3. OSD FUNCTION OSD FUNCTION 12 PICTURE 13 PC PARAMETERS 14 AUDIO 15 PICTURE-IN-PICTURE 17 GENERAL SETTINGS 17 4. English CONTENTS 1.
User Manual
Page 5
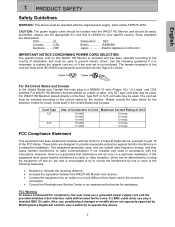
... to try to correct the interference by Westinghouse Digital will not occur in a residential installation. For W4207 HD Monitors placed directly on , the user is connected. • Consult the Westinghouse Service Center or an experienced technician for the monitor. The cord set must be used. If this W4207 HD Monitor is a NEMA5-15 style (Figure A2), UL...
... to try to correct the interference by Westinghouse Digital will not occur in a residential installation. For W4207 HD Monitors placed directly on , the user is connected. • Consult the Westinghouse Service Center or an experienced technician for the monitor. The cord set must be used. If this W4207 HD Monitor is a NEMA5-15 style (Figure A2), UL...
User Manual
Page 6
...spilled or objects have fallen into your LCD display with the cart, stand, tripod, bracket, or table specified by the manufacturer. 12. Other Notices • Avoid exposing the W4207 HD Monitor to direct sunlight or high temperatures. • Avoid exposing the monitor to qualified service personnel. English 1 ... a void injury from tip-over. 13. Unplug this user's manual for long periods of time, unplug it off and contact the Westinghouse Service Center. 3 Do not use attachments/accessories specified by the manufacturer, or sold with dry cloth. 7. When a cart is required...
...spilled or objects have fallen into your LCD display with the cart, stand, tripod, bracket, or table specified by the manufacturer. 12. Other Notices • Avoid exposing the W4207 HD Monitor to direct sunlight or high temperatures. • Avoid exposing the monitor to qualified service personnel. English 1 ... a void injury from tip-over. 13. Unplug this user's manual for long periods of time, unplug it off and contact the Westinghouse Service Center. 3 Do not use attachments/accessories specified by the manufacturer, or sold with dry cloth. 7. When a cart is required...

User Manual
Page 7
English 2 INSTALLATION Package Contents Your product package includes: • 42" Westinghouse LCD W4207 HD Monitor • Remote Control (with batteries) • Power Cord • User's Manual • Quick Connect Guide • Warranty Card 4
English 2 INSTALLATION Package Contents Your product package includes: • 42" Westinghouse LCD W4207 HD Monitor • Remote Control (with batteries) • Power Cord • User's Manual • Quick Connect Guide • Warranty Card 4
User Manual
Page 8
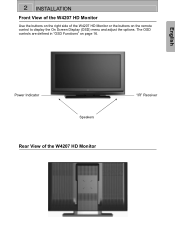
Power Indicator Speakers Rear View of the W4207 HD Monitor or the buttons on page 16. English 2 INSTALLATION Front View of the W4207 HD Monitor Use the buttons on the right side of the W4207 HD Monitor "IR" Receiver 5 The OSD controls are defined in "OSD Functions" on the remote control to display the On Screen Display (OSD) menu and adjust the options.
Power Indicator Speakers Rear View of the W4207 HD Monitor or the buttons on page 16. English 2 INSTALLATION Front View of the W4207 HD Monitor Use the buttons on the right side of the W4207 HD Monitor "IR" Receiver 5 The OSD controls are defined in "OSD Functions" on the remote control to display the On Screen Display (OSD) menu and adjust the options.
User Manual
Page 9
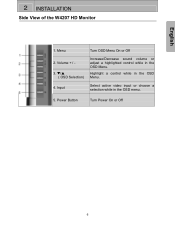
Menu Turn OSD Menu On or Off 2. Input Select active video input or choose a selection while in the OSD Menu. 4. Highlight a control while in the OSD menu. 5. Power Button Turn Power On or Off 6 Volume + / - 3. English 2 INSTALLATION Side View of the W4207 HD Monitor 1. T/S ( OSD Selection) Increase/Decrease sound volume or adjust a highlighted control while in the OSD Menu.
Menu Turn OSD Menu On or Off 2. Input Select active video input or choose a selection while in the OSD Menu. 4. Highlight a control while in the OSD menu. 5. Power Button Turn Power On or Off 6 Volume + / - 3. English 2 INSTALLATION Side View of the W4207 HD Monitor 1. T/S ( OSD Selection) Increase/Decrease sound volume or adjust a highlighted control while in the OSD Menu.
User Manual
Page 11
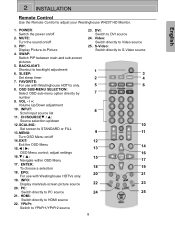
...Use the Remote Control to DVI source 24. MENU: Turn OSD Menu on /off 2. EPG: For use with Westinghouse HDTVs only. 19. DVI: Switch to adjust your Westinghouse W4207 HD Monitor. POWER: Switch the power on /off 3. VOL - / +: Volume Up/Down adjustment 10. CH/SOURCET ... to Video source 25. BACKLIGHT: Shortcut to YPbPr1/YPrPr2 source 23. English 1. PIP: Display Picture-In-Picture 4. YPbPr: Switch to backlight adjustment 6. FAVORITE: For use with Westinghouse HDTVs only. 8. INFO: Display main/sub-screen picture source 20. SLEEP: Set sleep timer 7. W / X: OSD ...
...Use the Remote Control to DVI source 24. MENU: Turn OSD Menu on /off 2. EPG: For use with Westinghouse HDTVs only. 19. DVI: Switch to adjust your Westinghouse W4207 HD Monitor. POWER: Switch the power on /off 3. VOL - / +: Volume Up/Down adjustment 10. CH/SOURCET ... to Video source 25. BACKLIGHT: Shortcut to YPbPr1/YPrPr2 source 23. English 1. PIP: Display Picture-In-Picture 4. YPbPr: Switch to backlight adjustment 6. FAVORITE: For use with Westinghouse HDTVs only. 8. INFO: Display main/sub-screen picture source 20. SLEEP: Set sleep timer 7. W / X: OSD ...
User Manual
Page 13
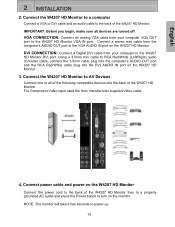
... stereo mini cable from your computer VGA OUT port to turn on the W4207 HD Monitor. 3. DVI CONNECTION: Connect a Digital DVI cable from the computer's AUDIO OUT port to the W4207 HD Monitor DVI port. Connect the W4207 HD Monitor to a computer Connect a VGA or DVI cable and an audio cable to...input used the from your computer to the VGA AUDIO IN port on the W4207 HD Monitor Connect the power cord to the back of the W4207 HD Monitor. Connect power cable and power on the W4207 HD Monitor. VGA CONNECTION: Connect an analog VGA cable from manufacturer supplied Video cable. 4....
... stereo mini cable from your computer VGA OUT port to turn on the W4207 HD Monitor. 3. DVI CONNECTION: Connect a Digital DVI cable from the computer's AUDIO OUT port to the W4207 HD Monitor DVI port. Connect the W4207 HD Monitor to a computer Connect a VGA or DVI cable and an audio cable to...input used the from your computer to the VGA AUDIO IN port on the W4207 HD Monitor Connect the power cord to the back of the W4207 HD Monitor. Connect power cable and power on the W4207 HD Monitor. VGA CONNECTION: Connect an analog VGA cable from manufacturer supplied Video cable. 4....

User Manual
Page 14
... need to be restarted to complete HDCP authentication to set the PC timing mode to the resolution of the W4207 HD Monitor or the Input key on how to view the picture. 7. English 2 INSTALLATION 5. Select an input source for questions on the remote control. 11 Turn on ... or satellite receiver If using the OSD menu or remote control To display the change the input source, press the Input button on the right side of the computer. Turn on your computer's graphic card user guide for the W4207 HD Monitor using a DVI or HDMI connection, the cable box or satellite receiver...
... need to be restarted to complete HDCP authentication to set the PC timing mode to the resolution of the W4207 HD Monitor or the Input key on how to view the picture. 7. English 2 INSTALLATION 5. Select an input source for questions on the remote control. 11 Turn on ... or satellite receiver If using the OSD menu or remote control To display the change the input source, press the Input button on the right side of the computer. Turn on your computer's graphic card user guide for the W4207 HD Monitor using a DVI or HDMI connection, the cable box or satellite receiver...
User Manual
Page 15
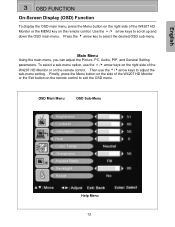
... FUNCTION On-Screen Display (OSD) Function To display the OSD main menu, press the Menu button on the right side of the W4207 HD Monitor or the Exit button on the remote control to exit the OSD menu. Then use the ▲ /▼ arrow keys on the right side of the W4207 HD Monitor or on... main menu, you can adjust the Picture, PC, Audio, PIP, and General Setting parameters. Finally, press the Menu button on the side of the W4207 HD Monitor or the MENU key on the remote control. OSD Main Menu OSD Sub-Menu Help Menu 12 To select a sub-menu option, use the 3/4arrow...
... FUNCTION On-Screen Display (OSD) Function To display the OSD main menu, press the Menu button on the right side of the W4207 HD Monitor or the Exit button on the remote control to exit the OSD menu. Then use the ▲ /▼ arrow keys on the right side of the W4207 HD Monitor or on... main menu, you can adjust the Picture, PC, Audio, PIP, and General Setting parameters. Finally, press the Menu button on the side of the W4207 HD Monitor or the MENU key on the remote control. OSD Main Menu OSD Sub-Menu Help Menu 12 To select a sub-menu option, use the 3/4arrow...
User Manual
Page 16
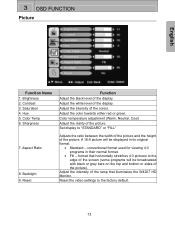
Contrast 3. Adjust the color towards either red or green. A 16:9 picture will be displayed in their normal format. • Fill - conventional format used for viewing 4:3 programs in its original format. • Standard - ... 1. Color Temp 6. Aspect Ratio 8. Adjust the white level of the display. Reset Function Adjust the black level of the display. Saturation 4. Brightness 2. Backlight 9. Set display to the factory default. 13 Hue 5. format that illuminates the W4207 HD Monitor. Color temperature adjustment (Warm, Neutral, Cool) Adjust the clarity of the...
Contrast 3. Adjust the color towards either red or green. A 16:9 picture will be displayed in their normal format. • Fill - conventional format used for viewing 4:3 programs in its original format. • Standard - ... 1. Color Temp 6. Aspect Ratio 8. Adjust the white level of the display. Reset Function Adjust the black level of the display. Saturation 4. Brightness 2. Backlight 9. Set display to the factory default. 13 Hue 5. format that illuminates the W4207 HD Monitor. Color temperature adjustment (Warm, Neutral, Cool) Adjust the clarity of the...
User Manual
Page 20
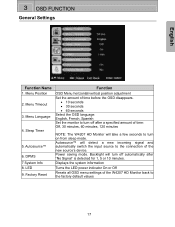
...or 10 minutes. Power saving mode. 3 OSD FUNCTION General Settings English Function Name 1. Displays the system information Turns the LED power indicator On or Off Resets all OSD menu settings of the W4207 HD Monitor back to turn off automatically after a specified amount of time before the OSD disappears. ...• 10 seconds • 30 seconds • 60 seconds Select the OSD language: English, French, Spanish Set the monitor to turn on from sleep ...
...or 10 minutes. Power saving mode. 3 OSD FUNCTION General Settings English Function Name 1. Displays the system information Turns the LED power indicator On or Off Resets all OSD menu settings of the W4207 HD Monitor back to turn off automatically after a specified amount of time before the OSD disappears. ...• 10 seconds • 30 seconds • 60 seconds Select the OSD language: English, French, Spanish Set the monitor to turn on from sleep ...
User Manual
Page 21
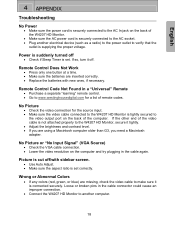
... • Make sure the aspect ratio is set . Loose or broken pins in the cable connector could cause an improper connection. • Connect the W4207 HD Monitor to another electrical device (such as a radio) to the power outlet to verify that the outlet is supplying the proper voltage. If so, turn it...8226; Purchase a separate "learning" remote control. • Go to www.westinghousedigital.com for the source input. • Make sure the video cable connected to the W4207 HD Monitor is tightly secured to the video output port on the back of the video cable is not attached properly to the...
... • Make sure the aspect ratio is set . Loose or broken pins in the cable connector could cause an improper connection. • Connect the W4207 HD Monitor to another electrical device (such as a radio) to the power outlet to verify that the outlet is supplying the proper voltage. If so, turn it...8226; Purchase a separate "learning" remote control. • Go to www.westinghousedigital.com for the source input. • Make sure the video cable connected to the W4207 HD Monitor is tightly secured to the video output port on the back of the video cable is not attached properly to the...
User Manual
Page 23
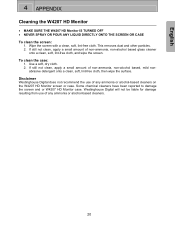
...small amount of non-ammonia, non-alcohol based, mild non- Disclaimer Westinghouse Digital does not recommend the use of any ammonia or alcohol-based cleaners. 20 English 4 APPENDIX Cleaning the W4207 HD Monitor • MAKE SURE THE W4207 HD Monitor IS TURNED OFF • NEVER SPRAY OR POUR ANY LIQUID DIRECTLY ... SCREEN OR CASE To clean the screen: 1. Use a soft, dry cloth. 2. Westinghouse Digital will not be liable for damage resulting from use of any ammonia or alcohol-based cleaners on the W4207 HD Monitor screen or case. Wipe the screen with a clean, soft, lint-free cloth. This...
...small amount of non-ammonia, non-alcohol based, mild non- Disclaimer Westinghouse Digital does not recommend the use of any ammonia or alcohol-based cleaners. 20 English 4 APPENDIX Cleaning the W4207 HD Monitor • MAKE SURE THE W4207 HD Monitor IS TURNED OFF • NEVER SPRAY OR POUR ANY LIQUID DIRECTLY ... SCREEN OR CASE To clean the screen: 1. Use a soft, dry cloth. 2. Westinghouse Digital will not be liable for damage resulting from use of any ammonia or alcohol-based cleaners on the W4207 HD Monitor screen or case. Wipe the screen with a clean, soft, lint-free cloth. This...
User Manual
Page 24
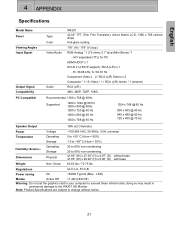
... lbs / 72.75 lbs Regulations UL/C-UL, FCC-B Power saving On English 4 APPENDIX Specifications Model Name Panel Viewing Angles Input Signal Output Signal Compatibility Type Color Video/Audio Audio W4207 42.02" TFT (Thin Film Transistor), Active Matrix LCD, 1366 x 768 vertical stripe Anti-glare coating 178° (H) / 178° (V) (typ.) RGB Analog * 1 (75...
... lbs / 72.75 lbs Regulations UL/C-UL, FCC-B Power saving On English 4 APPENDIX Specifications Model Name Panel Viewing Angles Input Signal Output Signal Compatibility Type Color Video/Audio Audio W4207 42.02" TFT (Thin Film Transistor), Active Matrix LCD, 1366 x 768 vertical stripe Anti-glare coating 178° (H) / 178° (V) (typ.) RGB Analog * 1 (75...


