User Manual
Page 2
...Monitor 7 Rear View of the HD Video Monitor 7 Side View of the HD Video Monitor 8 Remote Control 10 Installation 11 OSD Functions PICTURE PARAMETERS: Brightness / Contrast / Saturation / Hue / Color Temp / Sharpness / Aspect Ratio / Backlight / Reset 15 PC PARAMETERS: Auto ...Adjust / Clock / Phase / Position 16 AUDIO SETTINGS: Volume / Bass / Treble / Balance / Mute / Speaker / Reset 17 PICTURE-IN-PICTURE: Display Mode / Main Source / PIP Source / Swap / PIP Position / PIP Size / Audio From..... 18 GENERAL SETTINGS: Menu Position / Menu Timeout / Language /...
...Monitor 7 Rear View of the HD Video Monitor 7 Side View of the HD Video Monitor 8 Remote Control 10 Installation 11 OSD Functions PICTURE PARAMETERS: Brightness / Contrast / Saturation / Hue / Color Temp / Sharpness / Aspect Ratio / Backlight / Reset 15 PC PARAMETERS: Auto ...Adjust / Clock / Phase / Position 16 AUDIO SETTINGS: Volume / Bass / Treble / Balance / Mute / Speaker / Reset 17 PICTURE-IN-PICTURE: Display Mode / Main Source / PIP Source / Swap / PIP Position / PIP Size / Audio From..... 18 GENERAL SETTINGS: Menu Position / Menu Timeout / Language /...
User Manual
Page 12
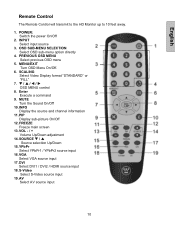
...HDMI source input 18. AV Select AV source input 10 SOURCE T / S Source selection Up/Down 15. INPUT Select input source 3. SCALING Select Video Display format "STANDARD" or "FILL" 7. YPbPr Select YPbPr1 / YPbPr2 source input 16. VGA Select VGA source input 17. MENU/EXIT Turn OSD Menu On/...MENU SELECTION Select OSD sub-menu option directly 4. T / S / W / X OSD MENU control 8. S-Video Select S-Video source input 19. PIP Display sub-picture On/Off 12. English Remote Control The Remote Control will transmit to the HD Monitor up to 10 feet away. 1. POWER: Switch the power On...
...HDMI source input 18. AV Select AV source input 10 SOURCE T / S Source selection Up/Down 15. INPUT Select input source 3. SCALING Select Video Display format "STANDARD" or "FILL" 7. YPbPr Select YPbPr1 / YPbPr2 source input 16. VGA Select VGA source input 17. MENU/EXIT Turn OSD Menu On/...MENU SELECTION Select OSD sub-menu option directly 4. T / S / W / X OSD MENU control 8. S-Video Select S-Video source input 19. PIP Display sub-picture On/Off 12. English Remote Control The Remote Control will transmit to the HD Monitor up to 10 feet away. 1. POWER: Switch the power On...
User Manual
Page 15
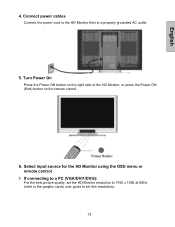
Select input source for the HD Monitor using the OSD menu or remote control 7. English 4. Turn Power On Press the Power ON button on the right side of the HD Monitor, or press the Power ON (Red) button on the remote control. 6. If connecting to a PC (VGA/DVI1/DVI2): For the best picture quality, set the HD Monitor resolution to 1920 x 1080 at 60Hz (refer to the graphic card's user guide to a properly grounded AC outlet. 5. Connect power cables Connect the power cord to the HD Monitor then to set this resolution). 13
Select input source for the HD Monitor using the OSD menu or remote control 7. English 4. Turn Power On Press the Power ON button on the right side of the HD Monitor, or press the Power ON (Red) button on the remote control. 6. If connecting to a PC (VGA/DVI1/DVI2): For the best picture quality, set the HD Monitor resolution to 1920 x 1080 at 60Hz (refer to the graphic card's user guide to a properly grounded AC outlet. 5. Connect power cables Connect the power cord to the HD Monitor then to set this resolution). 13
User Manual
Page 17
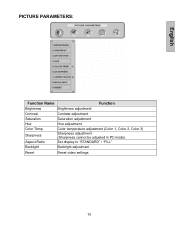
PICTURE PARAMETERS: English Function Name Function Brightness Brightness adjustment Contrast Contrast adjustment Saturation Saturation adjustment Hue Hue adjustment Color Temp Sharpness Aspect Ratio Color temperature adjustment (Color 1, Color 2, Color 3) Sharpness adjustment (Sharpness cannot be adjusted in PC mode) Set display to "STANDARD" / "FILL" Backlight Backlight adjustment Reset Reset video settings 15
PICTURE PARAMETERS: English Function Name Function Brightness Brightness adjustment Contrast Contrast adjustment Saturation Saturation adjustment Hue Hue adjustment Color Temp Sharpness Aspect Ratio Color temperature adjustment (Color 1, Color 2, Color 3) Sharpness adjustment (Sharpness cannot be adjusted in PC mode) Set display to "STANDARD" / "FILL" Backlight Backlight adjustment Reset Reset video settings 15


