
User Manual
Page 2
OSD FUNCTION OSD FUNCTION 12 PICTURE 13 PC PARAMETERS 14 AUDIO 15 PICTURE-IN-PICTURE 17 GENERAL SETTINGS 17 4. English CONTENTS 1. APPENDIX TROUBLESHOOTING 18 CLEANING THE 1080P MONITOR 20 SPECIFICATIONS 20 i INSTALLATION PACKAGE CONTENTS 4 FRONT VIEW OF THE 1080PMONITOR 5 REAR VIEW OF THE 1080P MONITOR 5 SIDE VIEW OF THE 1080P MONITOR 6 REMOTE CONTROL 8 INSTALLATION 9 3. PRODUCT SAFETY SAFETY GUIDELINES 2 PRODUCT SAFETY INSTRUCTIONS 3 2.
OSD FUNCTION OSD FUNCTION 12 PICTURE 13 PC PARAMETERS 14 AUDIO 15 PICTURE-IN-PICTURE 17 GENERAL SETTINGS 17 4. English CONTENTS 1. APPENDIX TROUBLESHOOTING 18 CLEANING THE 1080P MONITOR 20 SPECIFICATIONS 20 i INSTALLATION PACKAGE CONTENTS 4 FRONT VIEW OF THE 1080PMONITOR 5 REAR VIEW OF THE 1080P MONITOR 5 SIDE VIEW OF THE 1080P MONITOR 6 REMOTE CONTROL 8 INSTALLATION 9 3. PRODUCT SAFETY SAFETY GUIDELINES 2 PRODUCT SAFETY INSTRUCTIONS 3 2.
User Manual
Page 4
... the instructions. Cord Type SJT SVT Size of Conductors in Cord 18 AWG 16 AWG 14 AWG 18 AWG 17 AWG Maximum Current Rating of destination and must be used , use a grounded power supply cord and the provided shielded video interface cable with the original power supply, part number FSP273-4F01. This equipment generates, uses, and can be determined by turning the equipment off and on, the user is...
... the instructions. Cord Type SJT SVT Size of Conductors in Cord 18 AWG 16 AWG 14 AWG 18 AWG 17 AWG Maximum Current Rating of destination and must be used , use a grounded power supply cord and the provided shielded video interface cable with the original power supply, part number FSP273-4F01. This equipment generates, uses, and can be determined by turning the equipment off and on, the user is...
User Manual
Page 5
... noise, or a strange odor, immediately turn it and remove the batteries from being walked on the 1080p Monitor. Clean only with the apparatus. Use only with the cart, stand, tripod, bracket, or table specified by the manufacturer. • Avoid touching the screen. Servicing is used for long periods of time, unplug it off and contact the Westinghouse Service Center. 3 Other Notices • Avoid...
... noise, or a strange odor, immediately turn it and remove the batteries from being walked on the 1080p Monitor. Clean only with the apparatus. Use only with the cart, stand, tripod, bracket, or table specified by the manufacturer. • Avoid touching the screen. Servicing is used for long periods of time, unplug it off and contact the Westinghouse Service Center. 3 Other Notices • Avoid...
User Manual
Page 6
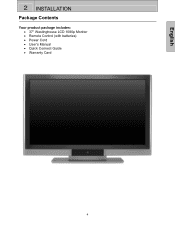
English 2 INSTALLATION Package Contents Your product package includes: • 37" Westinghouse LCD 1080p Monitor • Remote Control (with batteries) • Power Cord • User's Manual • Quick Connect Guide • Warranty Card 4
English 2 INSTALLATION Package Contents Your product package includes: • 37" Westinghouse LCD 1080p Monitor • Remote Control (with batteries) • Power Cord • User's Manual • Quick Connect Guide • Warranty Card 4
User Manual
Page 7
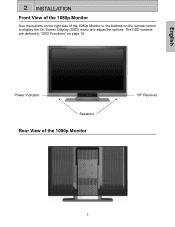
The OSD controls are defined in "OSD Functions" on the remote control to display the On Screen Display (OSD) menu and adjust the options. Power Indicator Speakers Rear View of the 1080p Monitor or the buttons on page 16. English 2 INSTALLATION Front View of the 1080p Monitor Use the buttons on the right side of the 1080p Monitor "IR" Receiver 5
The OSD controls are defined in "OSD Functions" on the remote control to display the On Screen Display (OSD) menu and adjust the options. Power Indicator Speakers Rear View of the 1080p Monitor or the buttons on page 16. English 2 INSTALLATION Front View of the 1080p Monitor Use the buttons on the right side of the 1080p Monitor "IR" Receiver 5
User Manual
Page 8
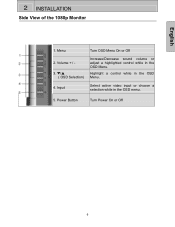
Highlight a control while in the OSD Menu. Power Button Turn Power On or Off 6 English 2 INSTALLATION Side View of the 1080p Monitor 1. Volume + / - 3. T/S ( OSD Selection) Increase/Decrease sound volume or adjust a highlighted control while in the OSD Menu. 4. Input Select active video input or choose a selection while in the OSD menu. 5. Menu Turn OSD Menu On or Off 2.
Highlight a control while in the OSD Menu. Power Button Turn Power On or Off 6 English 2 INSTALLATION Side View of the 1080p Monitor 1. Volume + / - 3. T/S ( OSD Selection) Increase/Decrease sound volume or adjust a highlighted control while in the OSD Menu. 4. Input Select active video input or choose a selection while in the OSD menu. 5. Menu Turn OSD Menu On or Off 2.

User Manual
Page 9
... 9. Service Port For Factory Use only. 10 8. 2 INSTALLATION English SIDE CONNECTORS 1 1. S-Video Connect to the Audio out (Green) on a computer. 10. VGA Audio-In Using a 3.5mm mini-jack cable, connect to an external video device such as a DVD player or gaming system. 13 12. HDMI Connect to an external audio amplifier. 9 7. Audio Out (Left / Right) Connect this jack. AV Video 6 Connect the composite video to an external video device such as a VCR. 5 4. YPbPr1 / Audio1 (Left / Right) Connect the component video to an external video...
... 9. Service Port For Factory Use only. 10 8. 2 INSTALLATION English SIDE CONNECTORS 1 1. S-Video Connect to the Audio out (Green) on a computer. 10. VGA Audio-In Using a 3.5mm mini-jack cable, connect to an external video device such as a DVD player or gaming system. 13 12. HDMI Connect to an external audio amplifier. 9 7. Audio Out (Left / Right) Connect this jack. AV Video 6 Connect the composite video to an external video device such as a VCR. 5 4. YPbPr1 / Audio1 (Left / Right) Connect the component video to an external video...
User Manual
Page 10
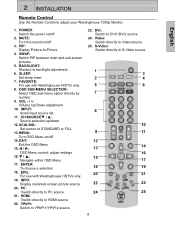
...number 9. ENTER: To choose a selection 18. PIP: Display Picture-In-Picture 4. SLEEP: Set sleep timer 7. INPUT: Scroll input source list 11. SCALING: Set screen to DVI1/DVI2 source 24. adjust settings 16. DVI: Switch to STANDARD or FILL 13. 2 INSTALLATION Remote Control Use the Remote Control to HDMI source 22. VOL - / +: Volume Up/Down adjustment 10. HDMI: Switch directly to adjust your Westinghouse 1080p Monitor. POWER: Switch the power on/off 14. FAVORITE: For use with Westinghouse HDTVs only. 8. CH/SOURCET / S: Source selection up/down 12. MENU: Turn OSD Menu...
...number 9. ENTER: To choose a selection 18. PIP: Display Picture-In-Picture 4. SLEEP: Set sleep timer 7. INPUT: Scroll input source list 11. SCALING: Set screen to DVI1/DVI2 source 24. adjust settings 16. DVI: Switch to STANDARD or FILL 13. 2 INSTALLATION Remote Control Use the Remote Control to HDMI source 22. VOL - / +: Volume Up/Down adjustment 10. HDMI: Switch directly to adjust your Westinghouse 1080p Monitor. POWER: Switch the power on/off 14. FAVORITE: For use with Westinghouse HDTVs only. 8. CH/SOURCET / S: Source selection up/down 12. MENU: Turn OSD Menu...

User Manual
Page 11
English 2 INSTALLATION Installation 1. Inserting the batteries incorrectly may result in cracking or leakage, which may pose a fire risk or lead to personal injury. • Dispose of used batteries in cracking or leakage, which may pose a fire risk or lead to personal injury. •...8722;) marks on the battery compartment. 3) Re-attach the battery cover. Insert Remote Control Batteries 1) Remove the battery cover. 2) Insert the batteries corresponding to (+) and (−) markings. CAUTION: • Only use AAA batteries. • Do not mix new and old batteries. This may result...
English 2 INSTALLATION Installation 1. Inserting the batteries incorrectly may result in cracking or leakage, which may pose a fire risk or lead to personal injury. • Dispose of used batteries in cracking or leakage, which may pose a fire risk or lead to personal injury. •...8722;) marks on the battery compartment. 3) Re-attach the battery cover. Insert Remote Control Batteries 1) Remove the battery cover. 2) Insert the batteries corresponding to (+) and (−) markings. CAUTION: • Only use AAA batteries. • Do not mix new and old batteries. This may result...
User Manual
Page 12
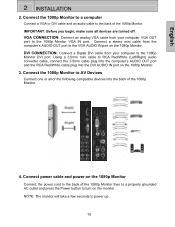
... Monitor VGA IN port. VGA CONNECTION: Connect an analog VGA cable from the computer's AUDIO OUT port to RCA Red/White (Left/Right) audio converter cable, connect the 3.5mm cable plug into the computer's AUDIO OUT port and the RCA Red/White cable plug into the back of the 1080p Monitor. Connect power cable and power on the 1080p Monitor Connect the power cord to the back of the following compatible devices into the DVI AUDIO IN port on the 1080p Monitor. DVI CONNECTION: Connect a Digital DVI cable...
... Monitor VGA IN port. VGA CONNECTION: Connect an analog VGA cable from the computer's AUDIO OUT port to RCA Red/White (Left/Right) audio converter cable, connect the 3.5mm cable plug into the computer's AUDIO OUT port and the RCA Red/White cable plug into the back of the 1080p Monitor. Connect power cable and power on the 1080p Monitor Connect the power cord to the back of the following compatible devices into the DVI AUDIO IN port on the 1080p Monitor. DVI CONNECTION: Connect a Digital DVI cable...
User Manual
Page 13
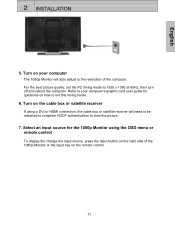
... picture. 7. Turn on your computer's graphic card user guide for the 1080p Monitor using a DVI or HDMI connection, the cable box or satellite receiver will auto adjust to 1920 x 1080 at 60Hz, then turn off and reboot the computer. Select an input source for questions on the cable box or satellite receiver If using the OSD menu or remote control To display the change the input source, press the Input button on the remote control. 11 Turn on how to set the PC timing mode...
... picture. 7. Turn on your computer's graphic card user guide for the 1080p Monitor using a DVI or HDMI connection, the cable box or satellite receiver will auto adjust to 1920 x 1080 at 60Hz, then turn off and reboot the computer. Select an input source for questions on the cable box or satellite receiver If using the OSD menu or remote control To display the change the input source, press the Input button on the remote control. 11 Turn on how to set the PC timing mode...
User Manual
Page 14
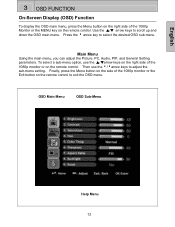
... the remote control. To select a sub-menu option, use the 3/4arrow keys to adjust the sub-menu setting. Main Menu Using the main menu, you can adjust the Picture, PC, Audio, PIP, and General Setting parameters. English 3 OSD FUNCTION On-Screen Display (OSD) Function To display the OSD main menu, press the Menu button on the right side of the 1080p monitor or the Exit button on the remote control to exit the OSD menu. Press...
... the remote control. To select a sub-menu option, use the 3/4arrow keys to adjust the sub-menu setting. Main Menu Using the main menu, you can adjust the Picture, PC, Audio, PIP, and General Setting parameters. English 3 OSD FUNCTION On-Screen Display (OSD) Function To display the OSD main menu, press the Menu button on the right side of the 1080p monitor or the Exit button on the remote control to exit the OSD menu. Press...
User Manual
Page 15
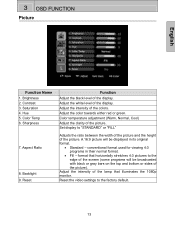
Hue 5. Adjust the white level of the picture. Adjust the color towards either red or green. Set display to "STANDARD" or "FILL" Adjusts the ratio between the width of the picture and the height of the display. conventional format used for viewing 4:3 programs in its original format. • Standard - Reset the video settings to the edge of the screen (some programs will be broadcasted with black or gray bars on the top and bottom...
Hue 5. Adjust the white level of the picture. Adjust the color towards either red or green. Set display to "STANDARD" or "FILL" Adjusts the ratio between the width of the picture and the height of the display. conventional format used for viewing 4:3 programs in its original format. • Standard - Reset the video settings to the edge of the screen (some programs will be broadcasted with black or gray bars on the top and bottom...

User Manual
Page 17
Speaker Select internal or external speakers 7. English 3 OSD FUNCTION Audio Function Name Function 1. Mute Turn audio On or Off 6. Treble Treble adjustment 4. Reset Reset audio settings 15 Balance Balance adjustment 5. Volume Volume adjustment 2. Bass Bass adjustment 3.
Speaker Select internal or external speakers 7. English 3 OSD FUNCTION Audio Function Name Function 1. Mute Turn audio On or Off 6. Treble Treble adjustment 4. Reset Reset audio settings 15 Balance Balance adjustment 5. Volume Volume adjustment 2. Bass Bass adjustment 3.

User Manual
Page 18
...Adjust sub-screen display size: Small, Medium, Large Select main screen or sub-screen audio source: Main, Sub The table below shows the functional combinations for PIP and SWAP (O - Sub Main AV S-Video YPbPr1 YPbPr2 VGA HDMI DVI-1 DVI-2 VGA O O X X X O O O INPUT/ PIP SOURCE CHART AV S-Video YPbPr1 YPbPr2 DVI-1 X X O O O X X O O O O O X X O O O X X O O O X X O O O O O O O O O O X O O O O O DVI-2 O O O O O X O X HDMI O O O O O X O X 16 PIP Position 6. Display Mode 2. PIP Size 7. PIP and Swap are functional). Swap 5. 3 OSD FUNCTION Picture...
...Adjust sub-screen display size: Small, Medium, Large Select main screen or sub-screen audio source: Main, Sub The table below shows the functional combinations for PIP and SWAP (O - Sub Main AV S-Video YPbPr1 YPbPr2 VGA HDMI DVI-1 DVI-2 VGA O O X X X O O O INPUT/ PIP SOURCE CHART AV S-Video YPbPr1 YPbPr2 DVI-1 X X O O O X X O O O O O X X O O O X X O O O X X O O O O O O O O O O X O O O O O DVI-2 O O O O O X O X HDMI O O O O O X O X 16 PIP Position 6. Display Mode 2. PIP Size 7. PIP and Swap are functional). Swap 5. 3 OSD FUNCTION Picture...
User Manual
Page 19
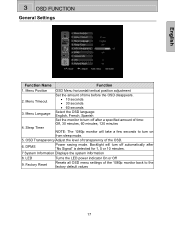
... monitor back to turn off after a specified amount of time: Off, 30 minutes, 60 minutes, 120 minutes NOTE: The 1080p monitor will turn on from sleep mode. 5. Menu Position 2. Backlight will take a few seconds to the factory default values 17 3 OSD FUNCTION General Settings English Function Name Function 1. LED 9. Menu Timeout 3. Factory Reset Turns the LED power indicator On or Off Resets all OSD menu settings of the OSD. 6. DPMS Power saving mode...
... monitor back to turn off after a specified amount of time: Off, 30 minutes, 60 minutes, 120 minutes NOTE: The 1080p monitor will turn on from sleep mode. 5. Menu Position 2. Backlight will take a few seconds to the factory default values 17 3 OSD FUNCTION General Settings English Function Name Function 1. LED 9. Menu Timeout 3. Factory Reset Turns the LED power indicator On or Off Resets all OSD menu settings of the OSD. 6. DPMS Power saving mode...
User Manual
Page 20
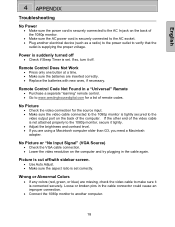
... the video connection for a list of remote codes. Wrong or Abnormal Colors • If any colors (red, green, or blue) are using a Macintosh computer older than G3, you need a Macintosh adapter. If so, turn it is supplying the proper voltage. Remote Control Code Not Found in a "Universal" Remote • Purchase a separate "learning" remote control. • Go to www.westinghousedigital.com for the source input. • Make sure the video cable connected to the 1080p monitor is set . Picture is...
... the video connection for a list of remote codes. Wrong or Abnormal Colors • If any colors (red, green, or blue) are using a Macintosh computer older than G3, you need a Macintosh adapter. If so, turn it is supplying the proper voltage. Remote Control Code Not Found in a "Universal" Remote • Purchase a separate "learning" remote control. • Go to www.westinghousedigital.com for the source input. • Make sure the video cable connected to the 1080p monitor is set . Picture is...
User Manual
Page 21
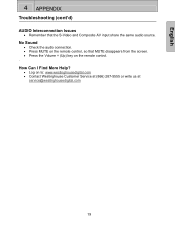
How Can I Find More Help? • Log on to: www.westinghousedigital.com • Contact Westinghouse Customer Service at (866) 287-5555 or write us at service@westinghousedigital.com 19 No Sound • Check the audio connection. • Press MUTE on the remote control, so that the S-Video and Composite AV input share the same audio source. English 4 APPENDIX Troubleshooting (cont'd) AUDIO Interconnection Issues • Remember that MUTE disappears from the screen. • Press the Volume + (Up) key on the remote control. .
How Can I Find More Help? • Log on to: www.westinghousedigital.com • Contact Westinghouse Customer Service at (866) 287-5555 or write us at service@westinghousedigital.com 19 No Sound • Check the audio connection. • Press MUTE on the remote control, so that the S-Video and Composite AV input share the same audio source. English 4 APPENDIX Troubleshooting (cont'd) AUDIO Interconnection Issues • Remember that MUTE disappears from the screen. • Press the Volume + (Up) key on the remote control. .
User Manual
Page 22
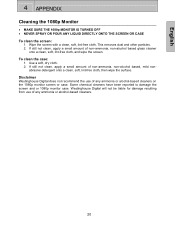
Disclaimer Westinghouse Digital does not recommend the use of any ammonia or alcohol-based cleaners. 20 This removes dust and other particles. 2. To clean the case: 1. Use a soft, dry cloth. 2. Westinghouse Digital will not be liable for damage resulting from use of any ammonia or alcohol-based cleaners on the 1080p monitor screen or case. Some chemical cleaners have been reported to damage...
Disclaimer Westinghouse Digital does not recommend the use of any ammonia or alcohol-based cleaners. 20 This removes dust and other particles. 2. To clean the case: 1. Use a soft, dry cloth. 2. Westinghouse Digital will not be liable for damage resulting from use of any ammonia or alcohol-based cleaners on the 1080p monitor screen or case. Some chemical cleaners have been reported to damage...
User Manual
Page 23
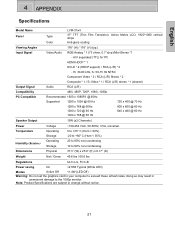
English 4 APPENDIX Specifications Model Name Panel Type Color LVM-37w3 37" TFT (Thin Film Transistor), Active Matrix LCD, 1920*1080 vertical stripe Anti-glare coating Viewing Angles 176° (H) / 176° (V) (typ.) Input Signal Video/Audio RGB Analog * 1 (75 ohms, 0.7 Vp-p)/Mini-Stereo *1 - fh: 30-80 kHz, fv: 50-75 Hz NTSC Component Video * 2 / RCA (L/R) Stereo * 2 Composite * 1 / S-Video * 1 / RCA (L/R) stereo * 1 (shared) Output Signal Audio RCA (L/R) Compatibility 480i, 480P, 720P, 1080i, 1080p PC Compatible Recommended...
English 4 APPENDIX Specifications Model Name Panel Type Color LVM-37w3 37" TFT (Thin Film Transistor), Active Matrix LCD, 1920*1080 vertical stripe Anti-glare coating Viewing Angles 176° (H) / 176° (V) (typ.) Input Signal Video/Audio RGB Analog * 1 (75 ohms, 0.7 Vp-p)/Mini-Stereo *1 - fh: 30-80 kHz, fv: 50-75 Hz NTSC Component Video * 2 / RCA (L/R) Stereo * 2 Composite * 1 / S-Video * 1 / RCA (L/R) stereo * 1 (shared) Output Signal Audio RCA (L/R) Compatibility 480i, 480P, 720P, 1080i, 1080p PC Compatible Recommended...


