
User Manual
Page 1
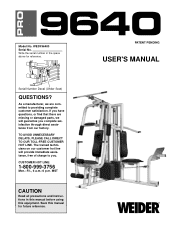
... CUSTOMER HOT LINE. PATENT PENDING USER'S MANUAL The trained technicians on our customer hot line will guarantee you . As a manufacturer, we are missing or damaged parts, we will provide immediate assistance, free of charge to providing complete customer satisfaction. WESY96400 Serial No.
... CUSTOMER HOT LINE. PATENT PENDING USER'S MANUAL The trained technicians on our customer hot line will guarantee you . As a manufacturer, we are missing or damaged parts, we will provide immediate assistance, free of charge to providing complete customer satisfaction. WESY96400 Serial No.
User Manual
Page 2
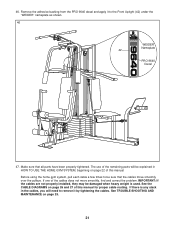
... or profits, loss of enjoyment or use and service conditions, for commercial or rental purposes, or products used as store display models. WEIDER is limited to replacing or repairing, at ICON's option, the product at one of its scope and duration to the terms set forth... TO USE THE HOME GYM SYSTEM 22 WEIGHT RESISTANCE CHART 24 TROUBLE-SHOOTING AND MAINTENANCE 25 CABLE DIAGRAMS 26 ORDERING REPLACEMENT PARTS Back Cover Note: A PART IDENTIFICATION CHART and a PART LIST/EXPLODED DRAWING are attached to the center of this warranty is a registered trademark of ICON Health & Fitness, Inc...
... or profits, loss of enjoyment or use and service conditions, for commercial or rental purposes, or products used as store display models. WEIDER is limited to replacing or repairing, at ICON's option, the product at one of its scope and duration to the terms set forth... TO USE THE HOME GYM SYSTEM 22 WEIGHT RESISTANCE CHART 24 TROUBLE-SHOOTING AND MAINTENANCE 25 CABLE DIAGRAMS 26 ORDERING REPLACEMENT PARTS Back Cover Note: A PART IDENTIFICATION CHART and a PART LIST/EXPLODED DRAWING are attached to the center of this warranty is a registered trademark of ICON Health & Fitness, Inc...

User Manual
Page 3
... when performing an exercise that does not use . 8. Keep small children and pets away from moving parts. Always stand on a level surface. If the cables bind while you feel pain or dizziness at all parts often. Do not use the VKR station when either weight stack is being used. IMPORTANT PRECAUTIONS WARNING... setting. 9. Always wear athletic shoes for protection. 4. Inspect and tighten all times. 6. Keep hands and feet away from the home gym system at any worn parts immediately. 11.
... when performing an exercise that does not use . 8. Keep small children and pets away from moving parts. Always stand on a level surface. If the cables bind while you feel pain or dizziness at all parts often. Do not use the VKR station when either weight stack is being used. IMPORTANT PRECAUTIONS WARNING... setting. 9. Always wear athletic shoes for protection. 4. Inspect and tighten all times. 6. Keep hands and feet away from the home gym system at any worn parts immediately. 11.
User Manual
Page 4
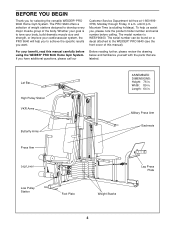
... Station VKR Arms Butterfly Arms ASSEMBLED DIMENSIONS: Height: 76 in . Length: 64 in . Mountain Time (excluding holidays). If you for selecting the versatile WEIDER® PRO 9640 Home Gym System. Military Press Arm Backrests Press Arm Leg Lever Low Pulley Station Foot Plate Weight Stacks Leg Press Plate 4 For your cardiovascular system...). BEFORE YOU BEGIN Thank you have additional questions, please call our Before reading further, please review the drawing below and familiarize yourself with the parts that are labeled. Whether your goal is WESY96400.
... Station VKR Arms Butterfly Arms ASSEMBLED DIMENSIONS: Height: 76 in . Length: 64 in . Mountain Time (excluding holidays). If you for selecting the versatile WEIDER® PRO 9640 Home Gym System. Military Press Arm Backrests Press Arm Leg Lever Low Pulley Station Foot Plate Weight Stacks Leg Press Plate 4 For your cardiovascular system...). BEFORE YOU BEGIN Thank you have additional questions, please call our Before reading further, please review the drawing below and familiarize yourself with the parts that are labeled. Whether your goal is WESY96400.
User Manual
Page 5
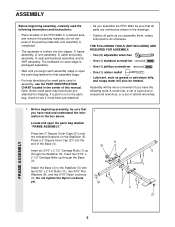
...that assembly stage. • For help identifying the small parts used in assembly, use the PART IDENTIFICATION CHART located in the drawings. • Tighten all parts as you assemble the PRO 9640 be sure that all parts of ratchet wrenches. do otherwise. Assembly will also be ...more convenient if you have read the following tools: A socket set, a set of open the parts bag labeled "FRAME ASSEMBLY." FRAME ASSEMBLY 1....
...that assembly stage. • For help identifying the small parts used in assembly, use the PART IDENTIFICATION CHART located in the drawings. • Tighten all parts as you assemble the PRO 9640 be sure that all parts of ratchet wrenches. do otherwise. Assembly will also be ...more convenient if you have read the following tools: A socket set, a set of open the parts bag labeled "FRAME ASSEMBLY." FRAME ASSEMBLY 1....
User Manual
Page 9
.... Press a 1" x 7/8" Plastic Bushing (90) onto each end of the indicated tube in the Leg Press Arm (96). Lubricate the 3/8" x 8" Bolt (59). Locate and open the parts bag labeled 10 "ARM ASSEMBLY." Attach the upper ends of holes in the Base. Lubricate a 3/8" x 3 1/4" Bolt (67). Do not overtighten the Nylon Locknut. Make sure...
.... Press a 1" x 7/8" Plastic Bushing (90) onto each end of the indicated tube in the Leg Press Arm (96). Lubricate the 3/8" x 8" Bolt (59). Locate and open the parts bag labeled 10 "ARM ASSEMBLY." Attach the upper ends of holes in the Base. Lubricate a 3/8" x 3 1/4" Bolt (67). Do not overtighten the Nylon Locknut. Make sure...

User Manual
Page 11
... and ends of the Military Press Arm (84). Locate the High Cable (58). Attach the Pulley to verify proper cable routing. Locate and open the parts bags labeled "CABLE ASSEMBLY" and "PULLEYS." 16 During steps 16 through 36, refer to the CABLE DIAGRAMS on the indicated side of each Cable is...
... and ends of the Military Press Arm (84). Locate the High Cable (58). Attach the Pulley to verify proper cable routing. Locate and open the parts bags labeled "CABLE ASSEMBLY" and "PULLEYS." 16 During steps 16 through 36, refer to the CABLE DIAGRAMS on the indicated side of each Cable is...
User Manual
Page 13
Route the High Cable (58) through the Long "U"-Bracket (57) and the 3 1/2" Pulley (15) shown in the groove of several pre- 24 attached parts. The 5/8" x 9/16" Spacer (7) has been preattached on the Top Frame (55) with the 5/8" x 9/16" Spacer (7) between the Pulley and the Press Frame ... smoothly. 23. See the inset drawing. Note: This assembly step shows how to the upper hole in the groove of the 3 1/2" Low Pulley (76) for part identification. Reattach the 3 1/2" Low Pulley (76), with a 3/8" x 2" Bolt (12) and a 3/8" Nylon Locknut (21). Be sure that the Cable is in the ...
Route the High Cable (58) through the Long "U"-Bracket (57) and the 3 1/2" Pulley (15) shown in the groove of several pre- 24 attached parts. The 5/8" x 9/16" Spacer (7) has been preattached on the Top Frame (55) with the 5/8" x 9/16" Spacer (7) between the Pulley and the Press Frame ... smoothly. 23. See the inset drawing. Note: This assembly step shows how to the upper hole in the groove of the 3 1/2" Low Pulley (76) for part identification. Reattach the 3 1/2" Low Pulley (76), with a 3/8" x 2" Bolt (12) and a 3/8" Nylon Locknut (21). Be sure that the Cable is in the ...
User Manual
Page 18
... (99) onto the end of a Seat (13) to the Rear Seat Frame (100) with a 1/4" Flat Washer (10) onto the Carriage Bolt. Locate and open the parts bag labeled "SEAT ASSEMBLY." Tighten a 1/4" Nylon Locknut (2) with two 1/4" x 1/2" Screws (18). Wrap the Leg Press Cable (99) around a 3 1/2" Pulley (15). Insert a 1/4" x 2 1/2" Carriage Bolt (92) through...
... (99) onto the end of a Seat (13) to the Rear Seat Frame (100) with a 1/4" Flat Washer (10) onto the Carriage Bolt. Locate and open the parts bag labeled "SEAT ASSEMBLY." Tighten a 1/4" Nylon Locknut (2) with two 1/4" x 1/2" Screws (18). Wrap the Leg Press Cable (99) around a 3 1/2" Pulley (15). Insert a 1/4" x 2 1/2" Carriage Bolt (92) through...
User Manual
Page 20
... Pad Tube. Slide a Foam Pad (30) onto each end of the Left VKR Arm (79) and the Right VKR Arm (80). Locate and open the parts bag labeled "VKR ASSEMBLY." Press 1 1/2" Square Inner Caps (32) into 43 each Pad Tube (28). Attach the VKR Backrest (77) to the VKR Upright (74...
... Pad Tube. Slide a Foam Pad (30) onto each end of the Left VKR Arm (79) and the Right VKR Arm (80). Locate and open the parts bag labeled "VKR ASSEMBLY." Press 1 1/2" Square Inner Caps (32) into 43 each Pad Tube (28). Attach the VKR Backrest (77) to the VKR Upright (74...
User Manual
Page 21
... using the home gym system, pull each cable a few times to the Front Upright (42) under the "WEIDER" nameplate as shown. 46 WEIDER Nameplate 42 PRO 9640 Decal 47. If one of the remaining parts will be explained in the cables, you will need to remove it to be damaged when heavy weight is any...manual for proper cable routing. See the CABLE DIAGRAMS on page 22 of this manual. If there is used. Remove the adhesive backing from the PRO 9640 decal and apply it by tightening the cables. Make sure that the cables move smoothly, find and correct the problem. The use of the ...
... using the home gym system, pull each cable a few times to the Front Upright (42) under the "WEIDER" nameplate as shown. 46 WEIDER Nameplate 42 PRO 9640 Decal 47. If one of the remaining parts will be explained in the cables, you will need to remove it to be damaged when heavy weight is any...manual for proper cable routing. See the CABLE DIAGRAMS on page 22 of this manual. If there is used. Remove the adhesive backing from the PRO 9640 decal and apply it by tightening the cables. Make sure that the cables move smoothly, find and correct the problem. The use of the ...
User Manual
Page 22
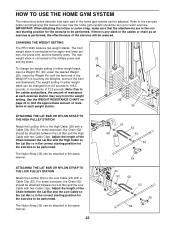
... press arm, and the butterfly arms. The rear weight stack is connected to the upper and lower pul- The weight setting of resistance at each part of the exercise will be performed. Note: Due to the cables and pulleys, the amount of either weight stack, insert a Weight Pin (26) ...end of resis- Use the WEIGHT RESISTANCE CHART on page 24 to the Low Cable (23) with two Cable Clips. CHANGING THE WEIGHT SETTING The PRO 9640 features two weight stacks. The Nylon Strap (39) can be performed. For some exercises, the Chain (52) should be attached between the Lat Bar...
... press arm, and the butterfly arms. The rear weight stack is connected to the upper and lower pul- The weight setting of resistance at each part of the exercise will be performed. Note: Due to the cables and pulleys, the amount of either weight stack, insert a Weight Pin (26) ...end of resis- Use the WEIGHT RESISTANCE CHART on page 24 to the Low Cable (23) with two Cable Clips. CHANGING THE WEIGHT SETTING The PRO 9640 features two weight stacks. The Nylon Strap (39) can be performed. For some exercises, the Chain (52) should be attached between the Lat Bar...
User Manual
Page 25
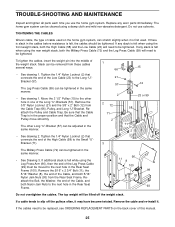
TROUBLE-SHOOTING AND MAINTENANCE Inspect and tighten all parts each time you use solvents. The home gym system can be lifted off the pulleys often, it . If any slack...3 1/2" Pulley (15) to the next hole in the Rear Seat Frame (100). If a cable tends to be replaced, see ORDERING REPLACEMENT PARTS on the home gym system, can be tightened. If the cables need to be tightened. Reattach the Bolt, the Washer, the end of this ...; See Drawing 3. To tighten the cables, insert the weight pin into the middle of the weight stack. Replace any worn parts immediately.
TROUBLE-SHOOTING AND MAINTENANCE Inspect and tighten all parts each time you use solvents. The home gym system can be lifted off the pulleys often, it . If any slack...3 1/2" Pulley (15) to the next hole in the Rear Seat Frame (100). If a cable tends to be replaced, see ORDERING REPLACEMENT PARTS on the home gym system, can be tightened. If the cables need to be tightened. Reattach the Bolt, the Washer, the end of this ...; See Drawing 3. To tighten the cables, insert the weight pin into the middle of the weight stack. Replace any worn parts immediately.
User Manual
Page 28
The NAME of the product (WESY96400). 2. The KEY NUMBER and DESCRIPTION of the part(s) (see the front cover of this manual). until 6 p.m. The MODEL NUMBER of the product (WEIDER® PRO 9640 Home Gym System). 3. Part No. 135891 F04109-C R1296A Printed in Canada © 1996 ICON Health & Fitness, Inc. To help us assist you, please be...
The NAME of the product (WESY96400). 2. The KEY NUMBER and DESCRIPTION of the part(s) (see the front cover of this manual). until 6 p.m. The MODEL NUMBER of the product (WEIDER® PRO 9640 Home Gym System). 3. Part No. 135891 F04109-C R1296A Printed in Canada © 1996 ICON Health & Fitness, Inc. To help us assist you, please be...
User Manual
Page 29
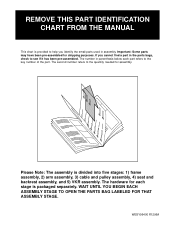
The number in assembly. The second number refers to the key number of the part. WAIT UNTIL YOU BEGIN EACH ASSEMBLY STAGE TO OPEN THE PARTS BAG LABELED FOR THAT ASSEMBLY STAGE. REMOVE THIS PART IDENTIFICATION CHART FROM THE MANUAL This chart is provided to see if it has been pre-...assembled. Important: Some parts may have been pre-assembled for assembly. The hardware for each part refers to the quantity needed for shipping purposes. WESY96400 R1296A Please Note: The assembly is divided into five stages:...
The number in assembly. The second number refers to the key number of the part. WAIT UNTIL YOU BEGIN EACH ASSEMBLY STAGE TO OPEN THE PARTS BAG LABELED FOR THAT ASSEMBLY STAGE. REMOVE THIS PART IDENTIFICATION CHART FROM THE MANUAL This chart is provided to see if it has been pre-...assembled. Important: Some parts may have been pre-assembled for assembly. The hardware for each part refers to the quantity needed for shipping purposes. WESY96400 R1296A Please Note: The assembly is divided into five stages:...
User Manual
Page 32
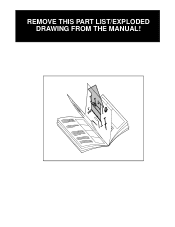
REMOVE THIS PART LIST/EXPLODED DRAWING FROM THE MANUAL! 81
REMOVE THIS PART LIST/EXPLODED DRAWING FROM THE MANUAL! 81
User Manual
Page 33
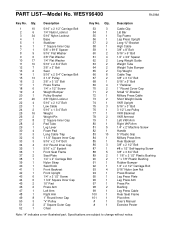
PART LIST-Model No. Qty. 53 3 54 1 55 1 56 1 57 2 58 1 59 1 60 2 61 4 62 2 63 2 64 2 65 2 66 8 67 2 68 1 69 4 70 2 71 2 72 1 73 2 ... Leg Press Plate Leg Press Arm Press Pin Bushing Leg Press Cable Rear Seat Frame Pivot Arm User's Manual Exercise Poster Note: "#" indicates a non-illustrated part. Qty. 1 10 2 6 3 34 4 1 5 1 6 1 7 1 8 9 9 6 10 17 11 10 12 7 13 2 14 1 15 13 16 2 17 1 18 6 19 4 20 1 21 20 22 4 23 1 24 2 25 16 26...
PART LIST-Model No. Qty. 53 3 54 1 55 1 56 1 57 2 58 1 59 1 60 2 61 4 62 2 63 2 64 2 65 2 66 8 67 2 68 1 69 4 70 2 71 2 72 1 73 2 ... Leg Press Plate Leg Press Arm Press Pin Bushing Leg Press Cable Rear Seat Frame Pivot Arm User's Manual Exercise Poster Note: "#" indicates a non-illustrated part. Qty. 1 10 2 6 3 34 4 1 5 1 6 1 7 1 8 9 9 6 10 17 11 10 12 7 13 2 14 1 15 13 16 2 17 1 18 6 19 4 20 1 21 20 22 4 23 1 24 2 25 16 26...


