
User Manual
Page 2
... warranties and any implied warranties of whatsoever nature. Some states do not allow limitations on how long an implied warranty lasts. WEIDER is limited in its authorized service centers with respect to any product or damage to a product caused by or attributable to ...and material, under this manual. TABLE OF CONTENTS LIMITED WARRANTY 2 IMPORTANT PRECAUTIONS 3 BEFORE YOU BEGIN 4 ASSEMBLY 5 HOW TO USE THE HOME GYM SYSTEM 22 WEIGHT RESISTANCE CHART 24 TROUBLE-SHOOTING AND MAINTENANCE 25 CABLE DIAGRAMS 26 ORDERING REPLACEMENT PARTS Back Cover Note: A PART IDENTIFICATION CHART...
... warranties and any implied warranties of whatsoever nature. Some states do not allow limitations on how long an implied warranty lasts. WEIDER is limited in its authorized service centers with respect to any product or damage to a product caused by or attributable to ...and material, under this manual. TABLE OF CONTENTS LIMITED WARRANTY 2 IMPORTANT PRECAUTIONS 3 BEFORE YOU BEGIN 4 ASSEMBLY 5 HOW TO USE THE HOME GYM SYSTEM 22 WEIGHT RESISTANCE CHART 24 TROUBLE-SHOOTING AND MAINTENANCE 25 CABLE DIAGRAMS 26 ORDERING REPLACEMENT PARTS Back Cover Note: A PART IDENTIFICATION CHART...

User Manual
Page 3
...through the use of this or any time while exercising, stop immediately and make sure that all of the pulleys. 5. Use the home gym system only on a foot plate when performing an exercise that could become pinched between the leg press upright and military press arm....children and pets away from moving parts. Inspect and tighten all times. 6. Make sure that does not use the home gym system in the accompanying literature before using the home gym system. 3. IMPORTANT PRECAUTIONS WARNING: To reduce the risk of serious injury, read the following important precautions before using. ...
...through the use of this or any time while exercising, stop immediately and make sure that all of the pulleys. 5. Use the home gym system only on a foot plate when performing an exercise that could become pinched between the leg press upright and military press arm....children and pets away from moving parts. Inspect and tighten all times. 6. Make sure that does not use the home gym system in the accompanying literature before using the home gym system. 3. IMPORTANT PRECAUTIONS WARNING: To reduce the risk of serious injury, read the following important precautions before using. ...
User Manual
Page 4
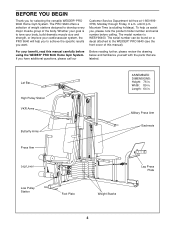
...WESY96400. For your cardiovascular system, the PRO 9640 will help us assist you for selecting the versatile WEIDER® PRO 9640 Home Gym System. Lat Bar High Pulley Station VKR Arms Butterfly Arms ASSEMBLED DIMENSIONS: Height: 76 in . To help you to the WEIDER® PRO 9640 (see the front cover of the...the parts that are labeled. BEFORE YOU BEGIN Thank you , please note the product model number and serial number before using the WEIDER® PRO 9640 Home Gym System. until 6 p.m. The model number is to tone your body, build dramatic muscle size and strength, or improve your ...
...WESY96400. For your cardiovascular system, the PRO 9640 will help us assist you for selecting the versatile WEIDER® PRO 9640 Home Gym System. Lat Bar High Pulley Station VKR Arms Butterfly Arms ASSEMBLED DIMENSIONS: Height: 76 in . To help you to the WEIDER® PRO 9640 (see the front cover of the...the parts that are labeled. BEFORE YOU BEGIN Thank you , please note the product model number and serial number before using the WEIDER® PRO 9640 Home Gym System. until 6 p.m. The model number is to tone your body, build dramatic muscle size and strength, or improve your ...
User Manual
Page 21
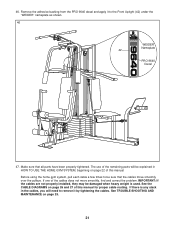
... not move smoothly over the pulleys. If one of this manual. Before using the home gym system, pull each cable a few times to the Front Upright (42) under the "WEIDER" nameplate as shown. 46 WEIDER Nameplate 42 PRO 9640 Decal 47. See the CABLE DIAGRAMS on page 25. 21 Remove the adhesive backing... from the PRO 9640 decal and apply it by tightening the cables. Make sure that the cables move...
... not move smoothly over the pulleys. If one of this manual. Before using the home gym system, pull each cable a few times to the Front Upright (42) under the "WEIDER" nameplate as shown. 46 WEIDER Nameplate 42 PRO 9640 Decal 47. See the CABLE DIAGRAMS on page 25. 21 Remove the adhesive backing... from the PRO 9640 decal and apply it by tightening the cables. Make sure that the cables move...
User Manual
Page 22
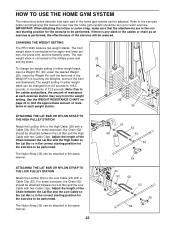
... STRAP TO THE LOW PULLEY STATION Attach the Lat Bar (54) to the military press arm 26 and leg press. CHANGING THE WEIGHT SETTING The PRO 9640 features two weight stacks. The front weight stack is connected to the Low Cable (23) with a Cable Clip (53). leys, the press arm, and the... Chain between the Lat Bar and the High Cable with two Cable Clips. Refer to the exercise poster accompanying this manual to see how the home gym system should be set up for the exercise to the High Cable (58) with a Cable Clip (53). tance at each exercise station may vary from...
... STRAP TO THE LOW PULLEY STATION Attach the Lat Bar (54) to the military press arm 26 and leg press. CHANGING THE WEIGHT SETTING The PRO 9640 features two weight stacks. The front weight stack is connected to the Low Cable (23) with a Cable Clip (53). leys, the press arm, and the... Chain between the Lat Bar and the High Cable with two Cable Clips. Refer to the exercise poster accompanying this manual to see how the home gym system should be set up for the exercise to the High Cable (58) with a Cable Clip (53). tance at each exercise station may vary from...
User Manual
Page 25
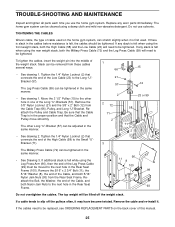
... when it is first used. If additional slack is felt while using the Leg Press Arm (96), then the end of cable used on the home gym system, can be cleaned using the rear weight stack, both the High Cable (58) and the Low Cable (23) will need to be replaced, see... 5/16" Nylon Jam Nuts (93) from the Rear Seat Frame. Remove the cable and re-install it may have become twisted. Do not use the home gym system. To tighten the cables, insert the weight pin into the middle of the Long "U"-Brackets (57). Move the 3 1/2" Pulley (15) to the next hole...
... when it is first used. If additional slack is felt while using the Leg Press Arm (96), then the end of cable used on the home gym system, can be cleaned using the rear weight stack, both the High Cable (58) and the Low Cable (23) will need to be replaced, see... 5/16" Nylon Jam Nuts (93) from the Rear Seat Frame. Remove the cable and re-install it may have become twisted. Do not use the home gym system. To tighten the cables, insert the weight pin into the middle of the Long "U"-Brackets (57). Move the 3 1/2" Pulley (15) to the next hole...
User Manual
Page 26
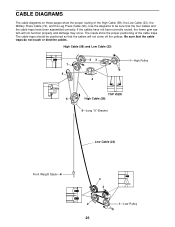
... insets show the proper routing of the cable traps. Be sure that the four cables and the cable traps have not been correctly routed, the home gym system will not come off the pulleys. If the cables have been assembled correctly. High Cable (58) and Low Cable (23) 7 5 23 4 1-High Pulley TOP...
... insets show the proper routing of the cable traps. Be sure that the four cables and the cable traps have not been correctly routed, the home gym system will not come off the pulleys. If the cables have been assembled correctly. High Cable (58) and Low Cable (23) 7 5 23 4 1-High Pulley TOP...
User Manual
Page 28
... (see the PART LIST and EXPLODED DRAWING attached at 1-800-999-3756, Monday through Friday, 6 a.m. Mountain Time (excluding holidays). The MODEL NUMBER of the product (WEIDER® PRO 9640 Home Gym System). 3. until 6 p.m. The NAME of the product (WESY96400). 2. Part No. 135891 F04109-C R1296A Printed in Canada © 1996 ICON Health & Fitness, Inc...
... (see the PART LIST and EXPLODED DRAWING attached at 1-800-999-3756, Monday through Friday, 6 a.m. Mountain Time (excluding holidays). The MODEL NUMBER of the product (WEIDER® PRO 9640 Home Gym System). 3. until 6 p.m. The NAME of the product (WESY96400). 2. Part No. 135891 F04109-C R1296A Printed in Canada © 1996 ICON Health & Fitness, Inc...


