
English Manual
Page 2
TABLE OF CONTENTS LIMITED WARRANTY 2 IMPORTANT PRECAUTIONS 3 BEFORE YOU BEGIN 4 ASSEMBLY 5 HOW TO USE THE TRAINING SYSTEM 21 WEIGHT RESISTANCE CHART 23 TROUBLE-SHOOTING AND MAINTENANCE 24 CABLE DIAGRAMS 25 ORDERING REPLACEMENT PARTS Back Cover Note: A PART IDENTIFICATION CHART and ...freight damage, abuse, misuse, improper or abnormal usage or repairs not provided by an ICON authorized service center, products used as store display models. WEIDER is a registered trademark of purchase. LIMITED WARRANTY ICON Health & Fitness, Inc. (ICON), warrants this product to be free from state to ...
TABLE OF CONTENTS LIMITED WARRANTY 2 IMPORTANT PRECAUTIONS 3 BEFORE YOU BEGIN 4 ASSEMBLY 5 HOW TO USE THE TRAINING SYSTEM 21 WEIGHT RESISTANCE CHART 23 TROUBLE-SHOOTING AND MAINTENANCE 24 CABLE DIAGRAMS 25 ORDERING REPLACEMENT PARTS Back Cover Note: A PART IDENTIFICATION CHART and ...freight damage, abuse, misuse, improper or abnormal usage or repairs not provided by an ICON authorized service center, products used as store display models. WEIDER is a registered trademark of purchase. LIMITED WARRANTY ICON Health & Fitness, Inc. (ICON), warrants this product to be free from state to ...
English Manual
Page 3
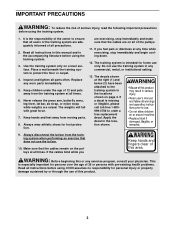
... read the following important precautions before using the training system. 3. Read all precautions. 2. Use the training system only on page 4. The weights will fall with pre-existing health problems. Read all times. 6. are adequately informed of all instructions in this manual and in any worn ...rental, or institutional setting. 13. Never release the press arm, butterfly arms, leg lever, lat bar, ab strap, or nylon strap while weights are on the pulleys at all instructions before using the training system. 1. If you Keep hands and fingers clear of this area. WARNING:...
... read the following important precautions before using the training system. 3. Read all precautions. 2. Use the training system only on page 4. The weights will fall with pre-existing health problems. Read all times. 6. are adequately informed of all instructions in this manual and in any worn ...rental, or institutional setting. 13. Never release the press arm, butterfly arms, leg lever, lat bar, ab strap, or nylon strap while weights are on the pulleys at all instructions before using the training system. 1. If you Keep hands and fingers clear of this area. WARNING:...
English Manual
Page 4
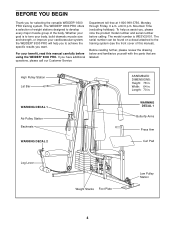
...Curl Pad Leg Lever Weight Stacks Foot Plate Low Pulley Station 4 The model number is to the training system (see the front cover of the body. Width: 64 in . For your goal is WESY29101. If you for selecting the versatile WEIDER® 9300 PRO training system. Whether... additional questions, please call our Customer Service Department toll-free at 1-800-999-3756, Monday through Friday, 6 a.m. The WEIDER® 9300 PRO offers a selection of weight stations designed to achieve the specific results you , please note the product model number and serial number before using the...
...Curl Pad Leg Lever Weight Stacks Foot Plate Low Pulley Station 4 The model number is to the training system (see the front cover of the body. Width: 64 in . For your goal is WESY29101. If you for selecting the versatile WEIDER® 9300 PRO training system. Whether... additional questions, please call our Customer Service Department toll-free at 1-800-999-3756, Monday through Friday, 6 a.m. The WEIDER® 9300 PRO offers a selection of weight stations designed to achieve the specific results you , please note the product model number and serial number before using the...
English Manual
Page 5
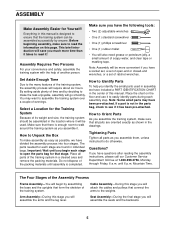
... will save you assemble them, unless instructed to do otherwise. If a part is designed to ensure that connect the arms to the weights. Tightening Parts Tighten all parts of the training system in individual bags. Before beginning assembly, make the task enjoyable, assembly will assemble ... Monday through Friday, 6 a.m. Note: Assembly will require about six hours. ASSEMBLY Make Assembly Easier for the Training System Because of its weight and size, the training system should be more time than it takes to read the information on the floor and use it to easily ...
... will save you assemble them, unless instructed to do otherwise. If a part is designed to ensure that connect the arms to the weights. Tightening Parts Tighten all parts of the training system in individual bags. Before beginning assembly, make the task enjoyable, assembly will assemble ... Monday through Friday, 6 a.m. Note: Assembly will require about six hours. ASSEMBLY Make Assembly Easier for the Training System Because of its weight and size, the training system should be more time than it takes to read the information on the floor and use it to easily ...

English Manual
Page 6
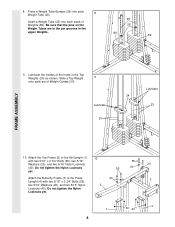
... read it! Hand tighten two 5/16" Nylon Locknuts (40) onto the Carriage Bolts. Be sure that you much more time than it takes to the Weight Base (14) with two 5/16" x 2 3/4" Bolts (55), two 5/16" Washers (20), and two 5/16" Nylon Locknuts (40). 2. Insert two 5/16" x 2 1/2" Carriage ...the Press Upright (4) onto the indicated 5/16" x 2 1/2" Carriage Bolts (49) in the indicated locations. Press two 2" Square Inner Caps (56) into the ends of the Weight Base. Attach the Butterfly Frame (3) to the Top Frame (2) with a 5/16" x 3" Bolt (91), 5/16" Washers (20), and a 5/16" Nylon Jam Nut (90...
... read it! Hand tighten two 5/16" Nylon Locknuts (40) onto the Carriage Bolts. Be sure that you much more time than it takes to the Weight Base (14) with two 5/16" x 2 3/4" Bolts (55), two 5/16" Washers (20), and two 5/16" Nylon Locknuts (40). 2. Insert two 5/16" x 2 1/2" Carriage ...the Press Upright (4) onto the indicated 5/16" x 2 1/2" Carriage Bolts (49) in the indicated locations. Press two 2" Square Inner Caps (56) into the ends of the Weight Base. Attach the Butterfly Frame (3) to the Top Frame (2) with a 5/16" x 3" Bolt (91), 5/16" Washers (20), and a 5/16" Nylon Jam Nut (90...

English Manual
Page 7
...), and a 5/16" Nylon Locknut (40). Insert the two 5/16" x 2 3/4" Bolts (55) 4 through the two indicated 5/16" Washers (20), and into the top of the Weight Guides with two 5/16" Nylon Locknuts (40). Attach the lower end of Curl Post (9). 40 8 56 20 40 55 9 20 FRAME ASSEMBLY 5. Slide eight... Weights (89) onto each of Weights. 7 89 Pin Grooves 27 89 Pin Grooves 27 23 23 7 Slide the Curl Post (9) onto the indicated 5/16" x 2 1/2" Carriage Bolts (49) ...
...), and a 5/16" Nylon Locknut (40). Insert the two 5/16" x 2 3/4" Bolts (55) 4 through the two indicated 5/16" Washers (20), and into the top of the Weight Guides with two 5/16" Nylon Locknuts (40). Attach the lower end of Curl Post (9). 40 8 56 20 40 55 9 20 FRAME ASSEMBLY 5. Slide eight... Weights (89) onto each of Weights. 7 89 Pin Grooves 27 89 Pin Grooves 27 23 23 7 Slide the Curl Post (9) onto the indicated 5/16" x 2 1/2" Carriage Bolts (49) ...
English Manual
Page 8
...2 3/4" Bolts (55), two 5/16" Washers (20), and two 5/16" Nylon Locknuts (40). 8. Be sure that the pins on the Weight Tubes are in the pin grooves in the Top Weights (24) as shown. Do not tighten the Nylon Locknuts yet. 55 20 55 20 Attach the Butterfly Frame (3) to the Ab...(20), and two 5/16" Nylon 2 Locknuts (40). Lubricate 23 Lubricate 24 23 10. Press a Weight Tube Bumper (26) into each Weight Tube (25). 8 Insert a Weight Tube (25) into each set of the holes in the upper Weights. 25 26 89 89 FRAME ASSEMBLY 9. Do not tighten the Nylon Locknuts yet. 1 40 40 4...
...2 3/4" Bolts (55), two 5/16" Washers (20), and two 5/16" Nylon Locknuts (40). 8. Be sure that the pins on the Weight Tubes are in the pin grooves in the Top Weights (24) as shown. Do not tighten the Nylon Locknuts yet. 55 20 55 20 Attach the Butterfly Frame (3) to the Ab...(20), and two 5/16" Nylon 2 Locknuts (40). Lubricate 23 Lubricate 24 23 10. Press a Weight Tube Bumper (26) into each Weight Tube (25). 8 Insert a Weight Tube (25) into each set of the holes in the upper Weights. 25 26 89 89 FRAME ASSEMBLY 9. Do not tighten the Nylon Locknuts yet. 1 40 40 4...
English Manual
Page 9
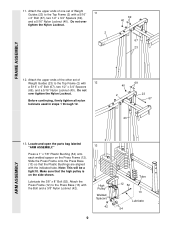
... Locknut (42). 13 High Pulley Welded Spacers 42 9 12 52 Tube 13 Lubricate 54 ARM ASSEMBLY Attach the upper ends of the other set of Weight Guides (23) to the Press Base (13) with a 5/16" x 6" Bolt (67), two 1/2" x 3/4" Spacers (69), and a 5/16" Nylon Locknut (40). Do not over tighten the Nylon...
... Locknut (42). 13 High Pulley Welded Spacers 42 9 12 52 Tube 13 Lubricate 54 ARM ASSEMBLY Attach the upper ends of the other set of Weight Guides (23) to the Press Base (13) with a 5/16" x 6" Bolt (67), two 1/2" x 3/4" Spacers (69), and a 5/16" Nylon Locknut (40). Do not over tighten the Nylon...

English Manual
Page 13
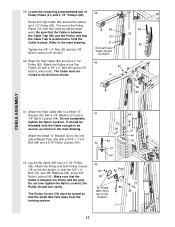
...). Thread a 5/16" Nylon Jam Nut (90) onto the Bolt. Be sure that the Cable is in the inset drawing. Attach the Pulley to the indicated Weight Tube (25) with a 1/4" Washer (37) and a 1/4" Nylon Locknut (44). Do not completely 32 tighten the Nylon Locknut. Slide one end of the Pulley and that...
...). Thread a 5/16" Nylon Jam Nut (90) onto the Bolt. Be sure that the Cable is in the inset drawing. Attach the Pulley to the indicated Weight Tube (25) with a 1/4" Washer (37) and a 1/4" Nylon Locknut (44). Do not completely 32 tighten the Nylon Locknut. Slide one end of the Pulley and that...
English Manual
Page 17
... the 3/8" Nylon Locknut (not shown). 40. as shown in this location 82 Post 73 85 38 1 17 Attach the Small "U" Bracket (32) to the indicated Weight Tube (25) with the 3/8" x 4" Bolt (73), two 3/8" Washers (38), and a 3/8" Nylon Locknut (42). Lay the Ab Cable (85) over tighten the Nylon Locknut; Route the...
... the 3/8" Nylon Locknut (not shown). 40. as shown in this location 82 Post 73 85 38 1 17 Attach the Small "U" Bracket (32) to the indicated Weight Tube (25) with the 3/8" x 4" Bolt (73), two 3/8" Washers (38), and a 3/8" Nylon Locknut (42). Lay the Ab Cable (85) over tighten the Nylon Locknut; Route the...

English Manual
Page 20
... been properly tightened. See TROUBLESHOOTING AND MAINTENANCE on page 21 of the Pad Tube. 50 78 29 15 16 28 29 78 51. Remove the 'WEIDER 9300 PRO' decal from the backing paper and apply the decal to the Seat (17) with a 1/4" Washer (37) and a 1/4" x 2 1/2" Machine Screw (64). Insert a 1/4" x 2 1/2" ...59). If one of this manual. Press two 3/4" Round Inner Caps (78) into a Seat Plate (41). Attach the Seat (17) to be damaged when heavy weight is any slack in HOW TO USE THE TRAINING SYSTEM, beginning on page 24. 20 MISC. Slide a 1/4" Washer (37) onto the 1/4 x 2 1/2" Carriage ...
... been properly tightened. See TROUBLESHOOTING AND MAINTENANCE on page 21 of the Pad Tube. 50 78 29 15 16 28 29 78 51. Remove the 'WEIDER 9300 PRO' decal from the backing paper and apply the decal to the Seat (17) with a 1/4" Washer (37) and a 1/4" x 2 1/2" Machine Screw (64). Insert a 1/4" x 2 1/2" ...59). If one of this manual. Press two 3/4" Round Inner Caps (78) into a Seat Plate (41). Attach the Seat (17) to be damaged when heavy weight is any slack in HOW TO USE THE TRAINING SYSTEM, beginning on page 24. 20 MISC. Slide a 1/4" Washer (37) onto the 1/4 x 2 1/2" Carriage ...
English Manual
Page 21
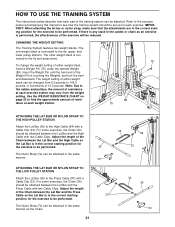
...system can be adjusted. Adjust the length of the exercise will be reduced. The Nylon Strap (72) can be changed from the weight setting. The other weight stack is performed, the effectiveness of the Chain between the Lat Bar and the High Cable so the Lat Bar is in the ... 72 Refer to the exercise poster accompanying this manual to see how the training system should be attached in increments of either weight stack, insert a Weight Pin (75) under the desired Weight (89). The Nylon Strap (72) can be attached between the Lat Bar and the Press Cable with a Cable Clip (33...
...system can be adjusted. Adjust the length of the exercise will be reduced. The Nylon Strap (72) can be changed from the weight setting. The other weight stack is performed, the effectiveness of the Chain between the Lat Bar and the High Cable so the Lat Bar is in the ... 72 Refer to the exercise poster accompanying this manual to see how the training system should be attached in increments of either weight stack, insert a Weight Pin (75) under the desired Weight (89). The Nylon Strap (72) can be attached between the Lat Bar and the Press Cable with a Cable Clip (33...
English Manual
Page 23
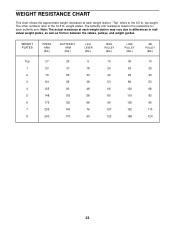
... refer to the 6.5 lb. The butterfly arm resistance listed is the resistance for each weight station. "Top" refers to the 12.5 lb. weight plates. WEIGHT RESISTANCE CHART This chart shows the approximate weight resistance at each weight station may vary due to differences in individual weight plates, as well as friction between the cables, pulleys, and...
... refer to the 6.5 lb. The butterfly arm resistance listed is the resistance for each weight station. "Top" refers to the 12.5 lb. weight plates. WEIGHT RESISTANCE CHART This chart shows the approximate weight resistance at each weight station may vary due to differences in individual weight plates, as well as friction between the cables, pulleys, and...
English Manual
Page 24
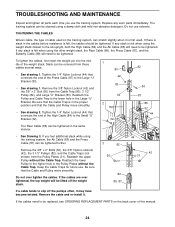
...detergent. If you use the training system. Remove the cable and re-install it may have become twisted. To tighten the cables, first insert the weight pin into the middle of the Press Cable (87) to be removed from these cables several ways: • See drawing 1. Remove the 3/8" ...training system, can stretch slightly when it is in the Large "U" Bracket. Slack can be tightened. Be sure that connects the end of the weight stack. Reattach the lower Pulley to the lower hole in the proper position and that the Cable and Pulley move smoothly. • See drawing ...
...detergent. If you use the training system. Remove the cable and re-install it may have become twisted. To tighten the cables, first insert the weight pin into the middle of the Press Cable (87) to be removed from these cables several ways: • See drawing 1. Remove the 3/8" ...training system, can stretch slightly when it is in the Large "U" Bracket. Slack can be tightened. Be sure that connects the end of the weight stack. Reattach the lower Pulley to the lower hole in the proper position and that the Cable and Pulley move smoothly. • See drawing ...

English Manual
Page 26
High Cable (84) High Pulley-1 4 2 3 Weight Stack-5 Rear Cable (86) 1-Top Frame 3 2 4-Weight Stack 26
High Cable (84) High Pulley-1 4 2 3 Weight Stack-5 Rear Cable (86) 1-Top Frame 3 2 4-Weight Stack 26
English Manual
Page 31
... 20 13 5/16" Washer 21 4 5" Plastic Grip 22 2 10" Pad 23 4 Weight Guide 24 2 Top Weight 25 2 Weight Tube 26 2 Weight Tube Bumper 27 4 Weight Bumper 28 2 Pad Tube 29 4 Foam Pad 30 1 Seat Knob 31 4 Pulley Plate...16" x 1 3/4" Bolt 69 8 1/2" x 3/4" Spacer 70 2 1" Round Inner Cap 71 2 3/8" x 2 1/4" Bolt 72 1 Nylon Strap 73 1 3/8" x 4" Bolt 74 2 Pulley Cover 75 2 Weight Pin 76 5 3/8" x 3 3/4" Bolt 77 1 5/16" x 2 3/4" Carriage Bolt 78 4 3/4" Round Inner Cap 79 1 3/8" x 2" Eyebolt 80 15 Cable Trap 81 2 "V" Pulley 82 20 3...
... 20 13 5/16" Washer 21 4 5" Plastic Grip 22 2 10" Pad 23 4 Weight Guide 24 2 Top Weight 25 2 Weight Tube 26 2 Weight Tube Bumper 27 4 Weight Bumper 28 2 Pad Tube 29 4 Foam Pad 30 1 Seat Knob 31 4 Pulley Plate...16" x 1 3/4" Bolt 69 8 1/2" x 3/4" Spacer 70 2 1" Round Inner Cap 71 2 3/8" x 2 1/4" Bolt 72 1 Nylon Strap 73 1 3/8" x 4" Bolt 74 2 Pulley Cover 75 2 Weight Pin 76 5 3/8" x 3 3/4" Bolt 77 1 5/16" x 2 3/4" Carriage Bolt 78 4 3/4" Round Inner Cap 79 1 3/8" x 2" Eyebolt 80 15 Cable Trap 81 2 "V" Pulley 82 20 3...


