
English Manual
Page 2
... date of purchase. You may also have other transportation charges prepaid, accompanied by ICON at one of its authorized service centers. WEIDER is not responsible or liable for indirect, special or consequential damages arising out of or in connection with the use or performance...apply to state. TABLE OF CONTENTS LIMITED WARRANTY 2 IMPORTANT PRECAUTIONS 3 BEFORE YOU BEGIN 4 ASSEMBLY 5 HOW TO USE THE TRAINING SYSTEM 21 WEIGHT RESISTANCE CHART 23 TROUBLE-SHOOTING AND MAINTENANCE 24 CABLE DIAGRAMS 25 ORDERING REPLACEMENT PARTS Back Cover Note: A PART IDENTIFICATION CHART and a PART ...
... date of purchase. You may also have other transportation charges prepaid, accompanied by ICON at one of its authorized service centers. WEIDER is not responsible or liable for indirect, special or consequential damages arising out of or in connection with the use or performance...apply to state. TABLE OF CONTENTS LIMITED WARRANTY 2 IMPORTANT PRECAUTIONS 3 BEFORE YOU BEGIN 4 ASSEMBLY 5 HOW TO USE THE TRAINING SYSTEM 21 WEIGHT RESISTANCE CHART 23 TROUBLE-SHOOTING AND MAINTENANCE 24 CABLE DIAGRAMS 25 ORDERING REPLACEMENT PARTS Back Cover Note: A PART IDENTIFICATION CHART and a PART ...
English Manual
Page 3
... WARNING: To reduce the risk of this area. Use the training system only on page 4. Inspect and tighten all precautions. 2. The weights will fall with pre-existing health problems. Read all instructions before using . The decals shown at all of 35 or persons with great force... ensure that the cables are raised. Never release the press arm, butterfly arms, leg lever, lat bar, ab strap, or nylon strap while weights are on the pulleys at any exercise program, consult your physician. Always disconnect the lat bar from moving parts. 8. WARNING: Before beginning this...
... WARNING: To reduce the risk of this area. Use the training system only on page 4. Inspect and tighten all precautions. 2. The weights will fall with pre-existing health problems. Read all instructions before using . The decals shown at all of 35 or persons with great force... ensure that the cables are raised. Never release the press arm, butterfly arms, leg lever, lat bar, ab strap, or nylon strap while weights are on the pulleys at any exercise program, consult your physician. Always disconnect the lat bar from moving parts. 8. WARNING: Before beginning this...
English Manual
Page 4
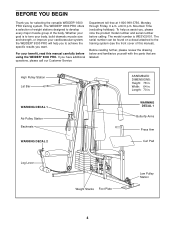
...through Friday, 6 a.m. BEFORE YOU BEGIN Thank you , please note the product model number and serial number before using the WEIDER® 9300 PRO. The model number is to tone your body, build dramatic muscle size and strength, or improve your benefit, read this ... Whether your goal is WESY29101. For your cardiovascular system, the WEIDER® 9300 PRO will help us assist you for selecting the versatile WEIDER® 9300 PRO training system. The WEIDER® 9300 PRO offers a selection of weight stations designed to develop every major muscle group of this manual carefully...
...through Friday, 6 a.m. BEFORE YOU BEGIN Thank you , please note the product model number and serial number before using the WEIDER® 9300 PRO. The model number is to tone your body, build dramatic muscle size and strength, or improve your benefit, read this ... Whether your goal is WESY29101. For your cardiovascular system, the WEIDER® 9300 PRO will help us assist you for selecting the versatile WEIDER® 9300 PRO training system. The WEIDER® 9300 PRO offers a selection of weight stations designed to develop every major muscle group of this manual carefully...
English Manual
Page 5
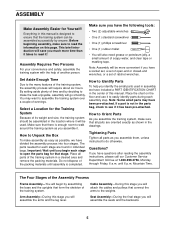
... designed to open -end or closed-end wrenches, or a set of this manual is enough room to assemble the training system over a couple of its weight and size, the training system should be assembled in this manual. until 6 p.m. Cable Assembly-During this page. Arm Assembly-During this stage you assemble it...
... designed to open -end or closed-end wrenches, or a set of this manual is enough room to assemble the training system over a couple of its weight and size, the training system should be assembled in this manual. until 6 p.m. Cable Assembly-During this page. Arm Assembly-During this stage you assemble it...

English Manual
Page 6
... the Press Base (13). Slide the Ab Upright (1) onto the indicated 5/16" x 2 1/2" Carriage Bolts (49) in the indicated locations. Attach the Butterfly Frame (3) to the Weight Base (14) with a 5/16" x 3" Bolt (91), 5/16" Washers (20), and a 5/16" Nylon Jam Nut (90). Attach the Press Base to the Top Frame ... (4) onto the indicated 5/16" x 2 1/2" Carriage Bolts (49) in the Press Base (13). Press two 1" Inner Caps (65) into the ends of the Weight Base. Do not tighten the Nylon Locknuts yet. 1 58 55 58 14 20 49 56 2 13 40 49 56 1 4 40 40 FRAME ASSEMBLY 3. Before you...
... the Press Base (13). Slide the Ab Upright (1) onto the indicated 5/16" x 2 1/2" Carriage Bolts (49) in the indicated locations. Attach the Butterfly Frame (3) to the Weight Base (14) with a 5/16" x 3" Bolt (91), 5/16" Washers (20), and a 5/16" Nylon Jam Nut (90). Attach the Press Base to the Top Frame ... (4) onto the indicated 5/16" x 2 1/2" Carriage Bolts (49) in the Press Base (13). Press two 1" Inner Caps (65) into the ends of the Weight Base. Do not tighten the Nylon Locknuts yet. 1 58 55 58 14 20 49 56 2 13 40 49 56 1 4 40 40 FRAME ASSEMBLY 3. Before you...

English Manual
Page 7
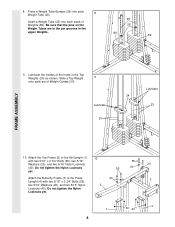
... (14). Attach the Seat Frame (8) to the other bracket in the Press Base (13). Do not over tighten the Nylon Locknut. Attach the other Weight Guides (23) to the Press Upright (4) with two 5/16" Nylon Locknuts (40). Hand tighten two 5/16" Nylon Locknuts (40) onto the Carriage Bolts. Insert... the top of Curl Post (9). 40 8 56 20 40 55 9 20 FRAME ASSEMBLY 5. Do not tighten the Nylon Locknuts yet. 6. Attach the lower end of Weights. 7 89 Pin Grooves 27 89 Pin Grooves 27 23 23 7 Slide the Curl Post (9) onto the indicated 5/16" x 2 1/2" Carriage Bolts (49) in the same...
... (14). Attach the Seat Frame (8) to the other bracket in the Press Base (13). Do not over tighten the Nylon Locknut. Attach the other Weight Guides (23) to the Press Upright (4) with two 5/16" Nylon Locknuts (40). Hand tighten two 5/16" Nylon Locknuts (40) onto the Carriage Bolts. Insert... the top of Curl Post (9). 40 8 56 20 40 55 9 20 FRAME ASSEMBLY 5. Do not tighten the Nylon Locknuts yet. 6. Attach the lower end of Weights. 7 89 Pin Grooves 27 89 Pin Grooves 27 23 23 7 Slide the Curl Post (9) onto the indicated 5/16" x 2 1/2" Carriage Bolts (49) in the same...
English Manual
Page 8
... yet. 1 40 40 4 8 Lubricate the insides of Weight Guides (23). 8. Be sure that the pins on the Weight Tubes are in the pin grooves in the Top Weights (24) as shown. Press a Weight Tube Bumper (26) into each Weight Tube (25). 8 Insert a Weight Tube (25) into each set of the holes in the... upper Weights. 25 26 89 89 FRAME ASSEMBLY 9. Do not...
... yet. 1 40 40 4 8 Lubricate the insides of Weight Guides (23). 8. Be sure that the pins on the Weight Tubes are in the pin grooves in the Top Weights (24) as shown. Press a Weight Tube Bumper (26) into each Weight Tube (25). 8 Insert a Weight Tube (25) into each set of the holes in the... upper Weights. 25 26 89 89 FRAME ASSEMBLY 9. Do not...
English Manual
Page 9
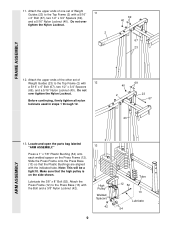
Attach the upper ends of the other set of Weight Guides (23) to the Press Base (13) with 12 a 5/16" x 6" Bolt (67), two 1/2" x 3/4" Spacers (69), and a 5/16" Nylon Locknut (40). Locate and open the parts ... a 3/8" Nylon Locknut (42). 13 High Pulley Welded Spacers 42 9 12 52 Tube 13 Lubricate 54 ARM ASSEMBLY Attach the upper ends of one set of Weight Guides (23) to the Top Frame (2) with the indicated tube. Do not over tighten the Nylon Locknut. 11.
Attach the upper ends of the other set of Weight Guides (23) to the Press Base (13) with 12 a 5/16" x 6" Bolt (67), two 1/2" x 3/4" Spacers (69), and a 5/16" Nylon Locknut (40). Locate and open the parts ... a 3/8" Nylon Locknut (42). 13 High Pulley Welded Spacers 42 9 12 52 Tube 13 Lubricate 54 ARM ASSEMBLY Attach the upper ends of one set of Weight Guides (23) to the Top Frame (2) with the indicated tube. Do not over tighten the Nylon Locknut. 11.

English Manual
Page 13
... Bolt (68) and a 5/16" Nylon Locknut (40). 37 44 13 86 40 37 44 25 Attach a 3 1/2" Pulley (82) and a Cable Trap (80) to the indicated Weight Tube (25) with a 3/8" x 2" Bolt (50) and a 3/8" Nylon Locknut (42). Be sure that the Cable is inside the Large "U" Bracket. Attach the Small "U" Bracket (32) to...
... Bolt (68) and a 5/16" Nylon Locknut (40). 37 44 13 86 40 37 44 25 Attach a 3 1/2" Pulley (82) and a Cable Trap (80) to the indicated Weight Tube (25) with a 3/8" x 2" Bolt (50) and a 3/8" Nylon Locknut (42). Be sure that the Cable is inside the Large "U" Bracket. Attach the Small "U" Bracket (32) to...
English Manual
Page 17
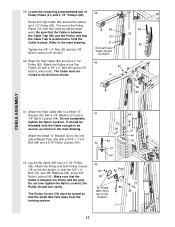
... remaining preassembled pair of the Pulley Plates (31) with a 1/4" Washer (37) and a 1/4" Nylon Locknut (44). Be sure that the Cable is positioned to the indicated Weight Tube (25) with a 3/8" x 2" Bolt (50) and a 3/8" Nylon Locknut (42). Wrap the High Cable (84) around the indicated 3 1/2" Pulley (82). It should be routed in this...
... remaining preassembled pair of the Pulley Plates (31) with a 1/4" Washer (37) and a 1/4" Nylon Locknut (44). Be sure that the Cable is positioned to the indicated Weight Tube (25) with a 3/8" x 2" Bolt (50) and a 3/8" Nylon Locknut (42). Wrap the High Cable (84) around the indicated 3 1/2" Pulley (82). It should be routed in this...

English Manual
Page 20
...using the training system, pull each Pad Tube (28). IMPORTANT: If the cables are not properly installed, they may be damaged when heavy weight is any slack in HOW TO USE THE TRAINING SYSTEM, beginning on page 21 of the cables does not move smoothly over the pulleys. If... there is used. Attach the Large Backrest (19) to the Press Upright (4) above the warning decal, where shown. 51 64 37 WEIDER 9300 4 PRO decal 19 SEAT ASSEMBLY 52. See the CABLE DIAGRAMS on page 24. 20 MISC. Insert a 1/4" x 2 1/2" Carriage Bolt (60) into the Leg Lever (15). ...
...using the training system, pull each Pad Tube (28). IMPORTANT: If the cables are not properly installed, they may be damaged when heavy weight is any slack in HOW TO USE THE TRAINING SYSTEM, beginning on page 21 of the cables does not move smoothly over the pulleys. If... there is used. Attach the Large Backrest (19) to the Press Upright (4) above the warning decal, where shown. 51 64 37 WEIDER 9300 4 PRO decal 19 SEAT ASSEMBLY 52. See the CABLE DIAGRAMS on page 24. 20 MISC. Insert a 1/4" x 2 1/2" Carriage Bolt (60) into the Leg Lever (15). ...
English Manual
Page 21
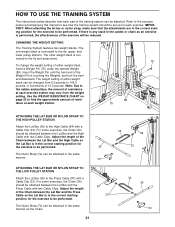
... the exercise poster accompanying this manual to the cables and pulleys, the amount of the training system can be performed. CHANGING THE WEIGHT SETTING The Training System features two weight stacks. ATTACHING THE LAT BAR OR NYLON STRAP TO THE LOW PULLEY STATION Attach the Lat Bar (36) to the High Cable... (84) with two Cable Clips. Use the WEIGHT RESISTANCE CHART on page 23 to find the approximate amount of resistance at each exercise station may vary from 6.5 pounds to be attached between the...
... the exercise poster accompanying this manual to the cables and pulleys, the amount of the training system can be performed. CHANGING THE WEIGHT SETTING The Training System features two weight stacks. ATTACHING THE LAT BAR OR NYLON STRAP TO THE LOW PULLEY STATION Attach the Lat Bar (36) to the High Cable... (84) with two Cable Clips. Use the WEIGHT RESISTANCE CHART on page 23 to find the approximate amount of resistance at each exercise station may vary from 6.5 pounds to be attached between the...
English Manual
Page 23
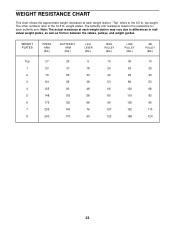
.... "Top" refers to the 12.5 lb. The butterfly arm resistance listed is the resistance for each butterfly arm. top weight. weight plates. WEIGHT PLATES Top 1 2 3 4 5 6 7 8 PRESS ARM (lbs.) 27 53 79 101 125 148 175 205 240 BUTTERFLY ARM (lbs.) 20 37 50 65 83 103 120 143 ....) 36 53 69 86 102 119 135 152 168 AB PULLEY (lbs.) 10 25 40 53 68 83 96 110 124 23 WEIGHT RESISTANCE CHART This chart shows the approximate weight resistance at each weight station may vary due to differences in individual weight plates, as well as friction between the cables, pulleys, and...
.... "Top" refers to the 12.5 lb. The butterfly arm resistance listed is the resistance for each butterfly arm. top weight. weight plates. WEIGHT PLATES Top 1 2 3 4 5 6 7 8 PRESS ARM (lbs.) 27 53 79 101 125 148 175 205 240 BUTTERFLY ARM (lbs.) 20 37 50 65 83 103 120 143 ....) 36 53 69 86 102 119 135 152 168 AB PULLEY (lbs.) 10 25 40 53 68 83 96 110 124 23 WEIGHT RESISTANCE CHART This chart shows the approximate weight resistance at each weight station may vary due to differences in individual weight plates, as well as friction between the cables, pulleys, and...
English Manual
Page 24
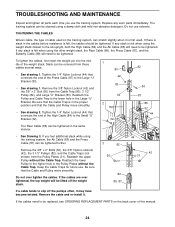
...the pulleys often, it . If the cables need to be tightened further. The training system can be tightened. Do not over tightened, the top weight will need to be removed from the Pulley Plates (31). If there is slack in the cables before resistance is in the same manner. &#...the end of the Press Cable (87) to the higher hole in the Large "U" Bracket. TIGHTENING THE CABLES Woven cable, the type of the weight stack. If you use the training system. TROUBLESHOOTING AND MAINTENANCE Inspect and tighten all parts each time you feel additional slack while using the training...
...the pulleys often, it . If the cables need to be tightened further. The training system can be tightened. Do not over tightened, the top weight will need to be removed from the Pulley Plates (31). If there is slack in the cables before resistance is in the same manner. &#...the end of the Press Cable (87) to the higher hole in the Large "U" Bracket. TIGHTENING THE CABLES Woven cable, the type of the weight stack. If you use the training system. TROUBLESHOOTING AND MAINTENANCE Inspect and tighten all parts each time you feel additional slack while using the training...

English Manual
Page 26
High Cable (84) High Pulley-1 4 2 3 Weight Stack-5 Rear Cable (86) 1-Top Frame 3 2 4-Weight Stack 26
High Cable (84) High Pulley-1 4 2 3 Weight Stack-5 Rear Cable (86) 1-Top Frame 3 2 4-Weight Stack 26
English Manual
Page 31
... 20 13 5/16" Washer 21 4 5" Plastic Grip 22 2 10" Pad 23 4 Weight Guide 24 2 Top Weight 25 2 Weight Tube 26 2 Weight Tube Bumper 27 4 Weight Bumper 28 2 Pad Tube 29 4 Foam Pad 30 1 Seat Knob 31 4 Pulley Plate...16" x 1 3/4" Bolt 69 8 1/2" x 3/4" Spacer 70 2 1" Round Inner Cap 71 2 3/8" x 2 1/4" Bolt 72 1 Nylon Strap 73 1 3/8" x 4" Bolt 74 2 Pulley Cover 75 2 Weight Pin 76 5 3/8" x 3 3/4" Bolt 77 1 5/16" x 2 3/4" Carriage Bolt 78 4 3/4" Round Inner Cap 79 1 3/8" x 2" Eyebolt 80 15 Cable Trap 81 2 "V" Pulley 82 20 3...
... 20 13 5/16" Washer 21 4 5" Plastic Grip 22 2 10" Pad 23 4 Weight Guide 24 2 Top Weight 25 2 Weight Tube 26 2 Weight Tube Bumper 27 4 Weight Bumper 28 2 Pad Tube 29 4 Foam Pad 30 1 Seat Knob 31 4 Pulley Plate...16" x 1 3/4" Bolt 69 8 1/2" x 3/4" Spacer 70 2 1" Round Inner Cap 71 2 3/8" x 2 1/4" Bolt 72 1 Nylon Strap 73 1 3/8" x 4" Bolt 74 2 Pulley Cover 75 2 Weight Pin 76 5 3/8" x 3 3/4" Bolt 77 1 5/16" x 2 3/4" Carriage Bolt 78 4 3/4" Round Inner Cap 79 1 3/8" x 2" Eyebolt 80 15 Cable Trap 81 2 "V" Pulley 82 20 3...


