
English Manual
Page 1
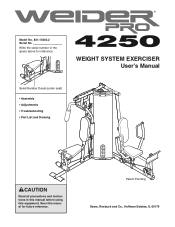
Write the serial number in this manual before using this manual for reference. Save this equipment. WEIGHT SYSTEM EXERCISER User's Manual Serial Number Decal (under seat) • Assembly • Adjustments • Troubleshooting • Part List and Drawing CAUTION Read all precautions and instructions in the space above for future reference. Patent Pending Sears, Roebuck and Co., Hoffman Estates, IL 60179 Model No. 831.15402.2 Serial No.
Write the serial number in this manual before using this manual for reference. Save this equipment. WEIGHT SYSTEM EXERCISER User's Manual Serial Number Decal (under seat) • Assembly • Adjustments • Troubleshooting • Part List and Drawing CAUTION Read all precautions and instructions in the space above for future reference. Patent Pending Sears, Roebuck and Co., Hoffman Estates, IL 60179 Model No. 831.15402.2 Serial No.
English Manual
Page 2
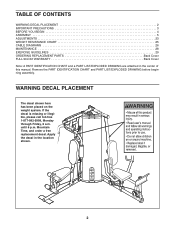
... center of this manual. until 6 p.m. WARNING DECAL PLACEMENT The decal shown here has been placed on the weight system. TABLE OF CONTENTS WARNING DECAL PLACEMENT 2 IMPORTANT PRECAUTIONS 3 BEFORE YOU BEGIN 4 ASSEMBLY 5 ADJUSTMENTS 23 WEIGHT RESISTANCE CHART 25 CABLE DIAGRAMS 26 MAINTENANCE 28 EXERCISE GUIDELINES 29 ORDERING REPLACEMENT PARTS Back Cover FULL 90...
... center of this manual. until 6 p.m. WARNING DECAL PLACEMENT The decal shown here has been placed on the weight system. TABLE OF CONTENTS WARNING DECAL PLACEMENT 2 IMPORTANT PRECAUTIONS 3 BEFORE YOU BEGIN 4 ASSEMBLY 5 ADJUSTMENTS 23 WEIGHT RESISTANCE CHART 25 CABLE DIAGRAMS 26 MAINTENANCE 28 EXERCISE GUIDELINES 29 ORDERING REPLACEMENT PARTS Back Cover FULL 90...
English Manual
Page 3
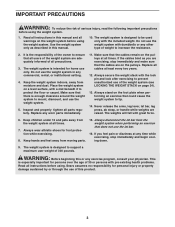
... Always wear athletic shoes for personal injury or property damage sustained by or through the use the weight system in this manual. 10. The weight system is designed to support a maximum user weight of 300 pounds. Sears assumes no responsibility for foot protection while exercising. 8. Make sure that all...be used only with a mat beneath it to protect the floor or carpet. Place the weight system on the weight system before using the weight system. Keep hands and feet away from the weight system at least every two years. 12. This is the responsibility of the owner to...
... Always wear athletic shoes for personal injury or property damage sustained by or through the use the weight system in this manual. 10. The weight system is designed to support a maximum user weight of 300 pounds. Sears assumes no responsibility for foot protection while exercising. 8. Make sure that all...be used only with a mat beneath it to protect the floor or carpet. Place the weight system on the weight system before using the weight system. Keep hands and feet away from the weight system at least every two years. 12. This is the responsibility of the owner to...
English Manual
Page 4
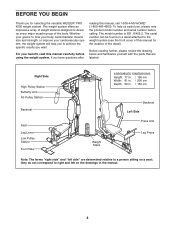
... Thank you for the location of the body. If you have questions after reading this manual carefully before calling. The weight system offers an impressive array of weight stations designed to a person sitting on a seat; To help you want. Whether your benefit, read this manual, ...right side" and "left on a decal attached to achieve the specific results you to the weight system (see the front cover of this manual for selecting the versatile WEIDER® PRO 4250 weight system. Right Side High Pulley Station Butterfly Arm Ab Pulley Station Backrest Seat Leg Lever Low Pulley...
... Thank you for the location of the body. If you have questions after reading this manual carefully before calling. The weight system offers an impressive array of weight stations designed to a person sitting on a seat; To help you want. Whether your benefit, read this manual, ...right side" and "left on a decal attached to achieve the specific results you to the weight system (see the front cover of this manual for selecting the versatile WEIDER® PRO 4250 weight system. Right Side High Pulley Station Butterfly Arm Ab Pulley Station Backrest Seat Leg Lever Low Pulley...
English Manual
Page 5
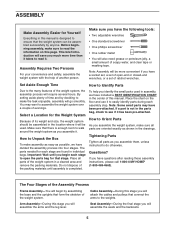
... after reading these assembly instructions, please call 1-800-4-MY-HOME® (1-800-469-4663). Note: Some small parts may want to assemble the weight system over a couple of the packing materials until you begin by anyone. The Four Stages of soapy water, and clear tape or masking tape.... Assembly Requires Two Persons For your convenience and safety, assemble the weight system with the help you identify the small parts used . Note: Assembly will also need grease or petroleum jelly, a small amount of the...
... after reading these assembly instructions, please call 1-800-4-MY-HOME® (1-800-469-4663). Note: Some small parts may want to assemble the weight system over a couple of the packing materials until you begin by anyone. The Four Stages of soapy water, and clear tape or masking tape.... Assembly Requires Two Persons For your convenience and safety, assemble the weight system with the help you identify the small parts used . Note: Assembly will also need grease or petroleum jelly, a small amount of the...
English Manual
Page 8
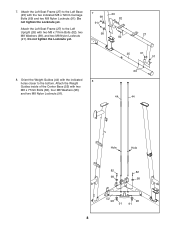
... the two indicated M8 x 72mm Carriage Bolts (69) and two M8 Nylon Locknuts (91). Attach the Left Seat Frame (27) to the bottom. Attach the Weight Guides inside of the Center Base (52) with the indicated 8 holes closer to the Left Base (25) with two M8 x 77mm Bolts (82), two M8... Washers (98), and two M8 Nylon Locknuts 98 82 27 (91). 7. Orient the Weight Guides (44) with two M8 x 77mm Bolts (82), four M8 Washers (98), and two M8 Nylon Locknuts (91). 69 44 44 Hole Hole 82 82...
... the two indicated M8 x 72mm Carriage Bolts (69) and two M8 Nylon Locknuts (91). Attach the Left Seat Frame (27) to the bottom. Attach the Weight Guides inside of the Center Base (52) with the indicated 8 holes closer to the Left Base (25) with two M8 x 77mm Bolts (82), two M8... Washers (98), and two M8 Nylon Locknuts 98 82 27 (91). 7. Orient the Weight Guides (44) with two M8 x 77mm Bolts (82), four M8 Washers (98), and two M8 Nylon Locknuts (91). 69 44 44 Hole Hole 82 82...
English Manual
Page 9
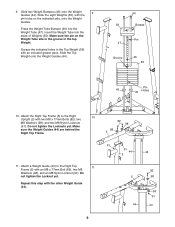
... M8 Washers (98), and two M8 Nylon Locknuts (91). 9. Insert the Weight Tube into the Weight Tube (47). Do not tighten the Locknut yet. Make sure the pin on the indicated side, onto the Weight Guides. Slide the Top Weight onto the Weight Guides (44). 44 56 Grease Pin 47 Groove 46 55 Pin 45... x 77mm Bolt (82), two M8 Washers (98), and an M8 Nylon Locknut (91). Slide the eight Weights (55), with the pin holes on the Weight Tube sits in the groove in the Top Weight (56) with the other Weight Guide (44). 82 5 98 98 91 44 44 9 Grease the indicated holes in the top...
... M8 Washers (98), and two M8 Nylon Locknuts (91). 9. Insert the Weight Tube into the Weight Tube (47). Do not tighten the Locknut yet. Make sure the pin on the indicated side, onto the Weight Guides. Slide the Top Weight onto the Weight Guides (44). 44 56 Grease Pin 47 Groove 46 55 Pin 45... x 77mm Bolt (82), two M8 Washers (98), and an M8 Nylon Locknut (91). Slide the eight Weights (55), with the pin holes on the Weight Tube sits in the groove in the Top Weight (56) with the other Weight Guide (44). 82 5 98 98 91 44 44 9 Grease the indicated holes in the top...
English Manual
Page 16
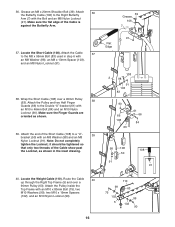
...). 38. Attach the end of the Cable is against the Butterfly Arm. 37. 36. Wrap the Short Cable (108) over a 90mm Pulley (63). Locate the Weight Cable (110). Attach 36 the Butterfly Cable (106) to a "U"- 39 bracket (50) with an M10 x 80mm Bolt (75), two M10 Washers (99), two M10 x 19mm...
...). 38. Attach the end of the Cable is against the Butterfly Arm. 37. 36. Wrap the Short Cable (108) over a 90mm Pulley (63). Locate the Weight Cable (110). Attach 36 the Butterfly Cable (106) to a "U"- 39 bracket (50) with an M10 x 80mm Bolt (75), two M10 Washers (99), two M10 x 19mm...
English Manual
Page 17
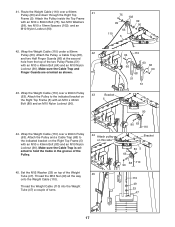
... M10 x 19mm Spacers (102), and an M10 Nylon Locknut (90). 75 99 102 99 90 63 110 5 42. Thread the Weight Cable (110) into the Weight Tube (47) a couple of the Weight 45 Tube (47). 41. Make sure the Cable Trap and Finger Guards are oriented as shown. 43. Make sure the Cable... oriented to the indicated bracket on 43 the Right Top Frame (5) with an M10 x 43mm Bolt (80) and an M10 Nylon Locknut (90). Route the Weight Cable (110) over a 90mm Pulley (63). Wrap the Weight Cable (110) over a 90mm 41 Pulley (63) and down through the Right Top Frame (5). Wrap the...
... M10 x 19mm Spacers (102), and an M10 Nylon Locknut (90). 75 99 102 99 90 63 110 5 42. Thread the Weight Cable (110) into the Weight Tube (47) a couple of the Weight 45 Tube (47). 41. Make sure the Cable Trap and Finger Guards are oriented as shown. 43. Make sure the Cable... oriented to the indicated bracket on 43 the Right Top Frame (5) with an M10 x 43mm Bolt (80) and an M10 Nylon Locknut (90). Route the Weight Cable (110) over a 90mm Pulley (63). Wrap the Weight Cable (110) over a 90mm 41 Pulley (63) and down through the Right Top Frame (5). Wrap the...
English Manual
Page 20
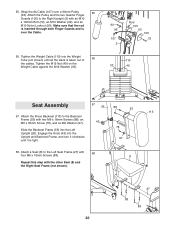
55. Tighten the M12 Nut (49) on the Weight Cable against the M12 Washer (33). 90 99 107 2 Rod 105 63 105 72 110 33 49 ... Screws (88). 8 Repeat this step with the other Seat (8) and the Right Seat Frame (not shown). 27 88 88 20 Tighten the Weight Cable (110) into the Upright and Backrest Frame, and turn it clockwise until all the slack is over a 90mm Pulley 55 (63). Attach...through both Finger Guards and is taken out of 56 the cables. Engage the Knob (43) into the Weight Tube (not shown) until it is tight. 78 97 58. Wrap the Ab Cable (107) over the Cable. 56.
55. Tighten the M12 Nut (49) on the Weight Cable against the M12 Washer (33). 90 99 107 2 Rod 105 63 105 72 110 33 49 ... Screws (88). 8 Repeat this step with the other Seat (8) and the Right Seat Frame (not shown). 27 88 88 20 Tighten the Weight Cable (110) into the Upright and Backrest Frame, and turn it clockwise until all the slack is over a 90mm Pulley 55 (63). Attach...through both Finger Guards and is taken out of 56 the cables. Engage the Knob (43) into the Weight Tube (not shown) until it is tight. 78 97 58. Wrap the Ab Cable (107) over the Cable. 56.
English Manual
Page 22
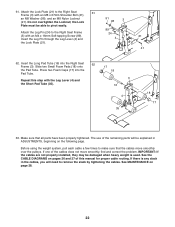
.... If one of this step with an M8 x 67mm Shoulder Bolt (41), an M8 Washer (98), and an M8 Nylon Locknut (91). Before using the weight system, pull each cable a few times to remove the slack by tightening the cables. See the CABLE DIAGRAMS on pages 26 and 27 of the... cables does not move smoothly over the pulleys. the Lock Plate must be damaged when heavy weight is any slack in ADJUSTMENTS, beginning on page 28. 22 Press two Foam Caps (17) into the Right Seat 62 Frame (3). Make sure that the...
.... If one of this step with an M8 x 67mm Shoulder Bolt (41), an M8 Washer (98), and an M8 Nylon Locknut (91). Before using the weight system, pull each cable a few times to remove the slack by tightening the cables. See the CABLE DIAGRAMS on pages 26 and 27 of the... cables does not move smoothly over the pulleys. the Lock Plate must be damaged when heavy weight is any slack in ADJUSTMENTS, beginning on page 28. 22 Press two Foam Caps (17) into the Right Seat 62 Frame (3). Make sure that the...
English Manual
Page 23
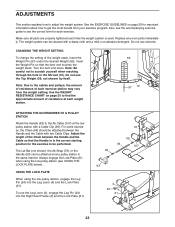
... (24) into the Leg Lever (4) and the Lock Plate (21). CHANGING THE WEIGHT SETTING To change the setting of resistance at each weight station. 55 57 10 ATTACHING THE ACCESSORIES TO A PULLEY STATION Attach the Handle ... When using the low pulley station (see the correct form for each time the weight system is in the same manner. Make sure all parts are properly tightened each exercise. Note: Be... careful not to adjust the weight system. For some exercises, the Chain (94) should be attached at any worn parts immediately....
... (24) into the Leg Lever (4) and the Lock Plate (21). CHANGING THE WEIGHT SETTING To change the setting of resistance at each weight station. 55 57 10 ATTACHING THE ACCESSORIES TO A PULLEY STATION Attach the Handle ... When using the low pulley station (see the correct form for each time the weight system is in the same manner. Make sure all parts are properly tightened each exercise. Note: Be... careful not to adjust the weight system. For some exercises, the Chain (94) should be attached at any worn parts immediately....
English Manual
Page 24
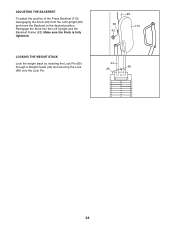
Reengage the Knob into the Left Upright and the Backrest Frame (53). Make sure the Knob is fully tightened. ADJUSTING THE BACKREST To adjust the position of the Press Backrest (113), disengaging the Knob (43) from the Left Upright (26) and move the Backrest to the desired position. LOCKING THE WEIGHT STACK Lock the weight stack by inserting the Lock Pin (65) through a Weight Guide (44) and securing the Lock (48) onto the Lock Pin. 26 53 113 43 44 48 65 24
Reengage the Knob into the Left Upright and the Backrest Frame (53). Make sure the Knob is fully tightened. ADJUSTING THE BACKREST To adjust the position of the Press Backrest (113), disengaging the Knob (43) from the Left Upright (26) and move the Backrest to the desired position. LOCKING THE WEIGHT STACK Lock the weight stack by inserting the Lock Pin (65) through a Weight Guide (44) and securing the Lock (48) onto the Lock Pin. 26 53 113 43 44 48 65 24

English Manual
Page 25
Note: The actual resistance at each exercise station. weight plates. WEIGHT Top 1 2 3 4 5 6 7 8 HIGH PULLEY (lbs.) 10 25 38 54 67 84 97 105 122 BUTTERFLY ARM (lbs.) 16 30 45 51 60 73 88 93 106 ... 146 162 193 223 248 AB STATION (lbs.) 19 27 41 60 73 90 100 114 130 25 The other numbers refer to the 6 lb. Weight resistance shown for the butterfly arm station is for each station may vary due to differences in individual...
Note: The actual resistance at each exercise station. weight plates. WEIGHT Top 1 2 3 4 5 6 7 8 HIGH PULLEY (lbs.) 10 25 38 54 67 84 97 105 122 BUTTERFLY ARM (lbs.) 16 30 45 51 60 73 88 93 106 ... 146 162 193 223 248 AB STATION (lbs.) 19 27 41 60 73 90 100 114 130 25 The other numbers refer to the 6 lb. Weight resistance shown for the butterfly arm station is for each station may vary due to differences in individual...
English Manual
Page 26
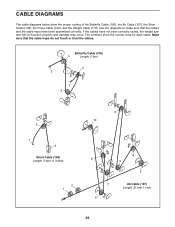
... Butterfly Cable (106), the Ab Cable (107), the Short Cable (108), the Press Cable (109), and the Weight Cable (110). Make sure that the cables and the cable traps have not been correctly routed, the weight system will not function properly and damage may occur. Butterfly Cable (106) 4 Length: 5 feet 2 5 1 3 2 1 3 Short Cable...
... Butterfly Cable (106), the Ab Cable (107), the Short Cable (108), the Press Cable (109), and the Weight Cable (110). Make sure that the cables and the cable traps have not been correctly routed, the weight system will not function properly and damage may occur. Butterfly Cable (106) 4 Length: 5 feet 2 5 1 3 2 1 3 Short Cable...
English Manual
Page 27
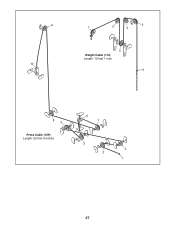
9 10 1 2 4 5 3 Weight Cable (110) Length: 12 feet 1 inch 6 84 Press Cable (109) Length: 22 feet 6 inches 6 7 5 3 2 1 27
9 10 1 2 4 5 3 Weight Cable (110) Length: 12 feet 1 inch 6 84 Press Cable (109) Length: 22 feet 6 inches 6 7 5 3 2 1 27
English Manual
Page 28
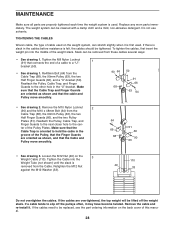
... Cable Trap is used. Reattach the Pulley, Cable Trap, and Finger Guards to the next closer hole to the other hole in the "U"-bracket. The weight system can stretch slightly when it . Do not use solvents. ter of a cable to a "U"- Tighten the Cable into the middle of the... the cables need to be cleaned with a damp cloth and a mild, non-abrasive detergent. MAINTENANCE Make sure all parts are properly tightened each time the weight system is oriented to hold the cable in the groove of the Pulley, that the Finger Guards are oriented as shown and that the cable...
... Cable Trap is used. Reattach the Pulley, Cable Trap, and Finger Guards to the next closer hole to the other hole in the "U"-bracket. The weight system can stretch slightly when it . Do not use solvents. ter of a cable to a "U"- Tighten the Cable into the middle of the... the cables need to be cleaned with a damp cloth and a mild, non-abrasive detergent. MAINTENANCE Make sure all parts are properly tightened each time the weight system is oriented to hold the cable in the groove of the Pulley, that the Finger Guards are oriented as shown and that the cable...
English Manual
Page 29
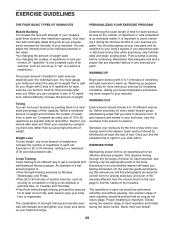
...Rest for three minutes after each workout with 5 to 10 minutes of stretching and light exercise to warm up prepares your body for a maximum of weight. An example of a balanced program is: • Plan strength training workouts on Monday, Wednesday, and Friday. • Plan 20 to 30 ...of 12 repetitions without discomfort. Begin with it during the exertion stage of each exercise depends upon the individual user. Select a moderate amount of weight and increase the number of repetitions in each exercise, and moving through the full range of motion for you , stick with 3 sets of 8...
...Rest for three minutes after each workout with 5 to 10 minutes of stretching and light exercise to warm up prepares your body for a maximum of weight. An example of a balanced program is: • Plan strength training workouts on Monday, Wednesday, and Friday. • Plan 20 to 30 ...of 12 repetitions without discomfort. Begin with it during the exertion stage of each exercise depends upon the individual user. Select a moderate amount of weight and increase the number of repetitions in each exercise, and moving through the full range of motion for you , stick with 3 sets of 8...
English Manual
Page 30
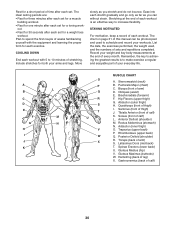
... M N O P Q R S T U V W X MUSCLE CHART A. Plan to spend the first couple of weeks familiarizing yourself with 5 to schedule and record your weight and key body measurements at the end of calf) L. Include stretches for both your everyday life. Abductor (outer thigh) H. Latissimus Dorsi (mid back) T. The ideal... resting periods are: • Rest for three minutes after each set for a weight loss workout. Obliques (waist) E. Quadriceps (front of leg) X. Tibialis Anterior (front of calf) 30 Gluteus Maximus (buttocks) W....
... M N O P Q R S T U V W X MUSCLE CHART A. Plan to spend the first couple of weeks familiarizing yourself with 5 to schedule and record your weight and key body measurements at the end of calf) L. Include stretches for both your everyday life. Abductor (outer thigh) H. Latissimus Dorsi (mid back) T. The ideal... resting periods are: • Rest for three minutes after each set for a weight loss workout. Obliques (waist) E. Quadriceps (front of leg) X. Tibialis Anterior (front of calf) 30 Gluteus Maximus (buttocks) W....
English Manual
Page 31
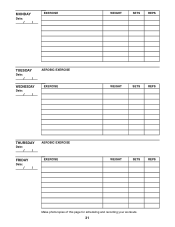
MONDAY Date: // EXERCISE WEIGHT SETS REPS TUESDAY Date: // WEDNESDAY Date: // AEROBIC EXERCISE EXERCISE WEIGHT SETS REPS THURSDAY Date: // FRIDAY Date: // AEROBIC EXERCISE EXERCISE WEIGHT SETS REPS Make photocopies of this page for scheduling and recording your workouts. 31
MONDAY Date: // EXERCISE WEIGHT SETS REPS TUESDAY Date: // WEDNESDAY Date: // AEROBIC EXERCISE EXERCISE WEIGHT SETS REPS THURSDAY Date: // FRIDAY Date: // AEROBIC EXERCISE EXERCISE WEIGHT SETS REPS Make photocopies of this page for scheduling and recording your workouts. 31


