
English Manual
Page 2
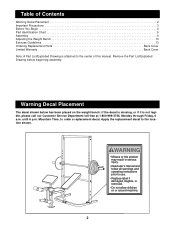
...of Contents Warning Decal Placement 2 Important Precautions 3 Before You Begin 4 Part Identification Chart 5 Assembly 6 Adjusting the Weight Bench 10 Exercise Guidelines 13 Ordering Replacement Parts Back Cover Limited Warranty Back Cover Note: A Part List/Exploded Drawing is not legible, please call our Customer Service Department toll... prior to use. • Replace label if damaged, illegible, or removed. • Do not allow children on the weight bench. Mountain Time, to the location shown. ! Warning Decal Placement The decal shown below has been placed on or around machine...
...of Contents Warning Decal Placement 2 Important Precautions 3 Before You Begin 4 Part Identification Chart 5 Assembly 6 Adjusting the Weight Bench 10 Exercise Guidelines 13 Ordering Replacement Parts Back Cover Limited Warranty Back Cover Note: A Part List/Exploded Drawing is not legible, please call our Customer Service Department toll... prior to use. • Replace label if damaged, illegible, or removed. • Do not allow children on the weight bench. Mountain Time, to the location shown. ! Warning Decal Placement The decal shown below has been placed on or around machine...
English Manual
Page 3
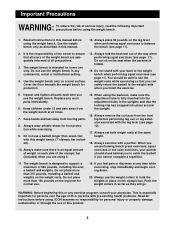
... hands and feet away from the front leg before using. Do not use the weight bench. Always remove the curl post from moving parts. 8. If you cannot complete a repetition. 11. Always set both weight rests at any commercial, rental or institutional setting. 4. WARNING: Before beginning this ...Always fold the backrest out of serious injury, read the following important precautions before using the weight bench. 1. Keep children under 12 and pets away from the weight bench at all parts each side of the olympic bar (included) when you are adequately informed of the owner to...
... hands and feet away from the front leg before using. Do not use the weight bench. Always remove the curl post from moving parts. 8. If you cannot complete a repetition. 11. Always set both weight rests at any commercial, rental or institutional setting. 4. WARNING: Before beginning this ...Always fold the backrest out of serious injury, read the following important precautions before using the weight bench. 1. Keep children under 12 and pets away from the weight bench at all parts each side of the olympic bar (included) when you are adequately informed of the owner to...
English Manual
Page 4
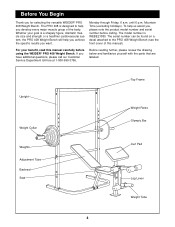
...WEIDER® PRO 408 Weight Bench. Before You Begin Thank you have additional questions, please call our Customer Service Department toll-free at 1-800-999-3756, Before reading further, please review the drawing below and familiarize yourself with the parts that are labeled. The model number is designed to the PRO 408 Weight Bench... size and strength or a healthier cardiovascular system, the PRO 408 Weight Bench will help us assist you, please note the product model number and serial number before using the WEIDER® PRO 408 Weight Bench. The serial number can be found on a decal ...
...WEIDER® PRO 408 Weight Bench. Before You Begin Thank you have additional questions, please call our Customer Service Department toll-free at 1-800-999-3756, Before reading further, please review the drawing below and familiarize yourself with the parts that are labeled. The model number is designed to the PRO 408 Weight Bench... size and strength or a healthier cardiovascular system, the PRO 408 Weight Bench will help us assist you, please note the product model number and serial number before using the WEIDER® PRO 408 Weight Bench. The serial number can be found on a decal ...
English Manual
Page 6
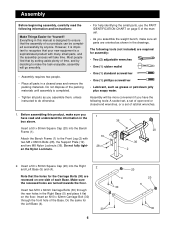
... this product, make sure you assemble the weight bench, make the task enjoyable, assembly will go smoothly. • Assembly requires two people. • Place all parts as shown in the Right Base (5) and place it is completed. • Tighten all parts in this manual is a sophisticated product with...turned towards the floor. Do not fully tighten the Nylon Locknuts. 19 28 20 36 2 2. Attach the Bench Frame (1) to the Front Leg (2) with many small parts, and the assembly process will be completed successfully by deciding to do otherwise. • For help identifying the...
... this product, make sure you assemble the weight bench, make the task enjoyable, assembly will go smoothly. • Assembly requires two people. • Place all parts as shown in the Right Base (5) and place it is completed. • Tighten all parts in this manual is a sophisticated product with...turned towards the floor. Do not fully tighten the Nylon Locknuts. 19 28 20 36 2 2. Attach the Bench Frame (1) to the Front Leg (2) with many small parts, and the assembly process will be completed successfully by deciding to do otherwise. • For help identifying the...
English Manual
Page 9
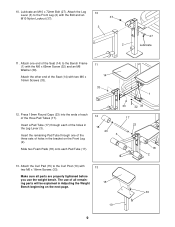
... Screws (33). 11 14 33 1 12. Insert the remaining Pad Tube through each of the holes in Adjusting the Weight 15 Bench beginning on the Front Leg (2). Attach the Leg 10 Lever (3) to the Bench Frame (1) with 13 two M6 x 16mm Screws (33). Press 19mm Round Caps (23) into the ends of each... the Seat (14) with the Bolt and an M10 Nylon Locknut (37). 37 3 2 27 Lubricate 11. Attach the other end of all parts are properly tightened before you use the weight bench. Slide two Foam Pads (18) onto each Pad Tube (17). 12 18 23 33 32 39 17 23 3 18 2 13. Make...
... Screws (33). 11 14 33 1 12. Insert the remaining Pad Tube through each of the holes in Adjusting the Weight 15 Bench beginning on the Front Leg (2). Attach the Leg 10 Lever (3) to the Bench Frame (1) with 13 two M6 x 16mm Screws (33). Press 19mm Round Caps (23) into the ends of each... the Seat (14) with the Bolt and an M10 Nylon Locknut (37). 37 3 2 27 Lubricate 11. Attach the other end of all parts are properly tightened before you use the weight bench. Slide two Foam Pads (18) onto each Pad Tube (17). 12 18 23 33 32 39 17 23 3 18 2 13. Make...
English Manual
Page 10
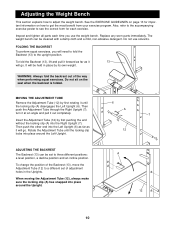
... the Left Upright (6). Inspect and tighten all parts each exercise. To change the position of the Backrest (13), move the Adjustment Tube (12) to a different set to the upright position. It will go . A 12 10 The weight bench can be set of the way when performing squat...positions: a level position, a decline position and an incline position. Then push the other end into the Right Upright (7). Adjusting the Weight Bench This section explains how to see the correct form for important information on the seat when the backrest is folded. See the EXERCISE GUIDELINES...
... the Left Upright (6). Inspect and tighten all parts each exercise. To change the position of the Backrest (13), move the Adjustment Tube (12) to a different set to the upright position. It will go . A 12 10 The weight bench can be set of the way when performing squat...positions: a level position, a decline position and an incline position. Then push the other end into the Right Upright (7). Adjusting the Weight Bench This section explains how to see the correct form for important information on the seat when the backrest is folded. See the EXERCISE GUIDELINES...
English Manual
Page 16
...Health & Fitness, Inc. The warranty extended hereunder is a registered trademark of the product (WEIDER® PRO 408 Weight Bench). 3. ICON HEALTH & FITNESS, INC., 1500 S. 1000 W., LOGAN, UT 84321-9813 WEIDER is in workmanship and material, under this product to be pre-authorized by an ICON authorized ... (WEBE21080). 2. Some states do not allow the exclusion or limitation of incidental or consequential damages. Ordering Replacement Parts To order replacement parts, simply call our Customer Service Department toll-free at one of its authorized service centers with respect to any ...
...Health & Fitness, Inc. The warranty extended hereunder is a registered trademark of the product (WEIDER® PRO 408 Weight Bench). 3. ICON HEALTH & FITNESS, INC., 1500 S. 1000 W., LOGAN, UT 84321-9813 WEIDER is in workmanship and material, under this product to be pre-authorized by an ICON authorized ... (WEBE21080). 2. Some states do not allow the exclusion or limitation of incidental or consequential damages. Ordering Replacement Parts To order replacement parts, simply call our Customer Service Department toll-free at one of its authorized service centers with respect to any ...
English Manual
Page 18
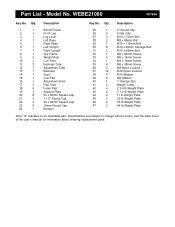
...2 10 1 11 2 12 1 13 1 14 1 15 1 16 1 17 3 18 6 19 1 20 8 21 2 22 4 23 6 24 1 Description Bench Frame Front Leg Leg Lever Left Base Right Base Left Upright Right Upright Top Frame Weight Rest Curl Post Backrest Tube Adjustment Tube Backrest Seat Curl Pad Adjustment Knob Pad Tube Foam Pad Support... No. Specifications are subject to change without notice. WEBE21080 R0798A Key No. See the back cover of the user's manual for information about ordering replacement parts. Qty. 25 1 26 4 27 3 28 2 29 1 30 6 31 2 32 1 33 4 34 1 35 4 36 2 37...
...2 10 1 11 2 12 1 13 1 14 1 15 1 16 1 17 3 18 6 19 1 20 8 21 2 22 4 23 6 24 1 Description Bench Frame Front Leg Leg Lever Left Base Right Base Left Upright Right Upright Top Frame Weight Rest Curl Post Backrest Tube Adjustment Tube Backrest Seat Curl Pad Adjustment Knob Pad Tube Foam Pad Support... No. Specifications are subject to change without notice. WEBE21080 R0798A Key No. See the back cover of the user's manual for information about ordering replacement parts. Qty. 25 1 26 4 27 3 28 2 29 1 30 6 31 2 32 1 33 4 34 1 35 4 36 2 37...


