
Canadian English Manual
Page 1
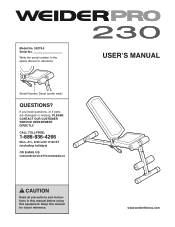
CALL TOLL-FREE: 1-888-936-4266 Mon.-Fri., 8:00 until 17:00 ET (excluding holidays) OR E-MAIL US: [email protected] CAUTION Read all precautions and instructions in the space above for future reference. Write the serial number in this manual before using this manual for reference. If you have questions, or if parts are damaged or missing, PLEASE CONTACT OUR CUSTOMER SERVICE DEPARTMENT DIRECTLY. Model No. 30279.0 Serial No. Serial Number Decal (under seat) QUESTIONS? USERʼS MANUAL www.weiderfitness.com Keep this equipment.
CALL TOLL-FREE: 1-888-936-4266 Mon.-Fri., 8:00 until 17:00 ET (excluding holidays) OR E-MAIL US: [email protected] CAUTION Read all precautions and instructions in the space above for future reference. Write the serial number in this manual before using this manual for reference. If you have questions, or if parts are damaged or missing, PLEASE CONTACT OUR CUSTOMER SERVICE DEPARTMENT DIRECTLY. Model No. 30279.0 Serial No. Serial Number Decal (under seat) QUESTIONS? USERʼS MANUAL www.weiderfitness.com Keep this equipment.

Canadian English Manual
Page 2
Note: The decal(s) may not be shown at actual size. 2 TABLE OF CONTENTS WARNING DECAL PLACEMENT 2 IMPORTANT PRECAUTIONS 3 BEFORE YOU BEGIN 4 PART IDENTIFICATION CHART 5 ASSEMBLY 6 ADJUSTMENT 9 EXERCISE GUIDELINES 9 PART LIST 10 EXPLODED DRAWING 11 ORDERING REPLACEMENT PARTS Back Cover LIMITED WARRANTY Back Cover WARNING DECAL PLACEMENT This drawing shows the location(s) of this manual and request a free replacement decal. Apply the decal in the location shown. If a decal is missing or illegible, see the front cover of the warning decal(s).
Note: The decal(s) may not be shown at actual size. 2 TABLE OF CONTENTS WARNING DECAL PLACEMENT 2 IMPORTANT PRECAUTIONS 3 BEFORE YOU BEGIN 4 PART IDENTIFICATION CHART 5 ASSEMBLY 6 ADJUSTMENT 9 EXERCISE GUIDELINES 9 PART LIST 10 EXPLODED DRAWING 11 ORDERING REPLACEMENT PARTS Back Cover LIMITED WARRANTY Back Cover WARNING DECAL PLACEMENT This drawing shows the location(s) of this manual and request a free replacement decal. Apply the decal in the location shown. If a decal is missing or illegible, see the front cover of the warning decal(s).

Canadian English Manual
Page 3
... age 35 or persons with pre-existing health problems. 2. Read all warnings on the weight bench before using your weight bench. Use the weight bench only as described in this manual and all instructions in this manual. 3. Keep the weight bench indoors, away from moving parts. 9. Keep hands and feet away from moisture and dust. If...
... age 35 or persons with pre-existing health problems. 2. Read all warnings on the weight bench before using your weight bench. Use the weight bench only as described in this manual and all instructions in this manual. 3. Keep the weight bench indoors, away from moving parts. 9. Keep hands and feet away from moisture and dust. If...

Canadian English Manual
Page 4
The PRO 230 weight bench is to achieve the specific results you to tone your body, build dramatic muscle size and strength, or improve your benefit, read this manual carefully before contacting us assist you have questions after reading this manual, please see the front cover of this manual....Bracket Front Leg Foam Pad 4 For your cardiovascular system, the weight bench will help you want. Whether your goal is designed to help us . To help you for selecting the versatile WEIDER® PRO 230 weight bench. BEFORE YOU BEGIN Thank you develop the major muscle groups of ...
The PRO 230 weight bench is to achieve the specific results you to tone your body, build dramatic muscle size and strength, or improve your benefit, read this manual carefully before contacting us assist you have questions after reading this manual, please see the front cover of this manual....Bracket Front Leg Foam Pad 4 For your cardiovascular system, the weight bench will help you want. Whether your goal is designed to help us . To help you for selecting the versatile WEIDER® PRO 230 weight bench. BEFORE YOU BEGIN Thank you develop the major muscle groups of ...
Canadian English Manual
Page 5
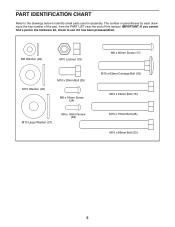
The number in assembly. IMPORTANT: If you cannot find a part in the hardware kit, check to identify small parts used in parentheses by each drawing is the key number of the part, from the PART LIST near the end of this manual. M6 Washer (22) M10 Locknut (19) M10 Washer (20) M10 x 20mm Bolt (25) M6 x 16mm Screw (24) M10 Large Washer (27) M4 x 16mm Screw (28) M6 x 60mm Screw (17) M10 x 63mm Carriage Bolt (18) M10 x 63mm Bolt (16) M10 x 70mm Bolt (26) M10 x 85mm Bolt (23) 5 PART IDENTIFICATION CHART Refer to the drawings below to see if it has been preassembled.
The number in assembly. IMPORTANT: If you cannot find a part in the hardware kit, check to identify small parts used in parentheses by each drawing is the key number of the part, from the PART LIST near the end of this manual. M6 Washer (22) M10 Locknut (19) M10 Washer (20) M10 x 20mm Bolt (25) M6 x 16mm Screw (24) M10 Large Washer (27) M4 x 16mm Screw (28) M6 x 60mm Screw (17) M10 x 63mm Carriage Bolt (18) M10 x 63mm Bolt (16) M10 x 70mm Bolt (26) M10 x 85mm Bolt (23) 5 PART IDENTIFICATION CHART Refer to the drawings below to see if it has been preassembled.

Canadian English Manual
Page 10
... Washer Locking Pin M6 Washer M10 x 85mm Bolt M6 x 16mm Screw M10 x 20mm Bolt M10 x 70mm Bolt M10 Large Washer M4 x 16mm Screw Userʼs Manual Exercise Guide Grease Packet 10 Qty. 1 1 2 1 3 1 4 2 5 1 6 1 7 1 8 1 9 4 10 2 11 4 12 4 13 4 14 1 15 1 16 2 Description Frame Front Leg Rear Leg Stabilizer Backrest Frame Pivot Bracket Backrest...
... Washer Locking Pin M6 Washer M10 x 85mm Bolt M6 x 16mm Screw M10 x 20mm Bolt M10 x 70mm Bolt M10 Large Washer M4 x 16mm Screw Userʼs Manual Exercise Guide Grease Packet 10 Qty. 1 1 2 1 3 1 4 2 5 1 6 1 7 1 8 1 9 4 10 2 11 4 12 4 13 4 14 1 15 1 16 2 Description Frame Front Leg Rear Leg Stabilizer Backrest Frame Pivot Bracket Backrest...

Canadian English Manual
Page 12
... to the original purchaser. ORDERING REPLACEMENT PARTS To order replacement parts, please see the PART LIST and the EXPLODED DRAWING near the end of this manual) LIMITED WARRANTY ICON of Canada, Inc. (ICON) warrants this warranty is limited to repairing or replacing, at ICONʼs option, the product ... when contacting us: • the model number and serial number of the product (see the front cover of this manual) • the name of the product (see the front cover of this manual) • the key number and description of the replacement part(s) (see the front cover of this...
... to the original purchaser. ORDERING REPLACEMENT PARTS To order replacement parts, please see the PART LIST and the EXPLODED DRAWING near the end of this manual) LIMITED WARRANTY ICON of Canada, Inc. (ICON) warrants this warranty is limited to repairing or replacing, at ICONʼs option, the product ... when contacting us: • the model number and serial number of the product (see the front cover of this manual) • the name of the product (see the front cover of this manual) • the key number and description of the replacement part(s) (see the front cover of this...
English Manual
Page 1
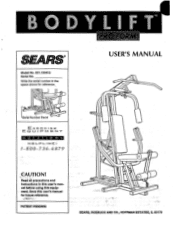
Read all precautions and Instructions in the space above for future reference. Save this user's manual before using thls equipment. Write the serial number in this user's manual for reference. • . )."'" USER'S MANUAL O O SerialNumber Decal E XE R C I S ECZIJI I='MEN -r QUE ST IONS HLI LINEI 1-800-736-6879 CAUTION! PATENT PENDING 0 0 0 0 C 0 SEARS, ROEBUCK AND CO., HOFFMAN ESTATES, IL 60179 LARS® Model No. 831.159412 Serial No.
Read all precautions and Instructions in the space above for future reference. Save this user's manual before using thls equipment. Write the serial number in this user's manual for reference. • . )."'" USER'S MANUAL O O SerialNumber Decal E XE R C I S ECZIJI I='MEN -r QUE ST IONS HLI LINEI 1-800-736-6879 CAUTION! PATENT PENDING 0 0 0 0 C 0 SEARS, ROEBUCK AND CO., HOFFMAN ESTATES, IL 60179 LARS® Model No. 831.159412 Serial No.

English Manual
Page 2
Replace any exercise program, consult your feet under.the fgotrest., WARNING: Before beginning this user's manual and In the accompanying literature before beginning assembly. Always wear athletic shoes for persons over the age of 35 or persons with pre-...the floor beneath the BODYLIFT for personal injury or property damage sustained by only one person at all times. - 5. If you use of this user's manual. TABLE OF CONTENTS IMPORTANT PRECAUTIONS BEFORE YOU BEGIN ASSEMBLY TROUBLE-SHOOTING AND MAINTENANCE USING THE BODYLIFT ORDERING REPLACEMENT PARTS WARRANTY 2 3 4 10 11 Back Cover...
Replace any exercise program, consult your feet under.the fgotrest., WARNING: Before beginning this user's manual and In the accompanying literature before beginning assembly. Always wear athletic shoes for persons over the age of 35 or persons with pre-...the floor beneath the BODYLIFT for personal injury or property damage sustained by only one person at all times. - 5. If you use of this user's manual. TABLE OF CONTENTS IMPORTANT PRECAUTIONS BEFORE YOU BEGIN ASSEMBLY TROUBLE-SHOOTING AND MAINTENANCE USING THE BODYLIFT ORDERING REPLACEMENT PARTS WARRANTY 2 3 4 10 11 Back Cover...

English Manual
Page 3
...be found on a decal attached to develop every major muscle group of the body. Note: The BODYLIFT requires a minimum ceiling height of this user's manual carefully before calling. Central Time (excluding holidays). The compact BODYLIFT features an impressive array of weight stations designed to the BODYLIFT (see the front cover... Service Department toll-free at the drawing below and familiarize yourself with the parts that are labeled. Whether your benefit, read this user's manual). If you for selecting the PROFORM• BODYLIFT Body Weight Resistance System. Length: 51 in .
...be found on a decal attached to develop every major muscle group of the body. Note: The BODYLIFT requires a minimum ceiling height of this user's manual carefully before calling. Central Time (excluding holidays). The compact BODYLIFT features an impressive array of weight stations designed to the BODYLIFT (see the front cover... Service Department toll-free at the drawing below and familiarize yourself with the parts that are labeled. Whether your benefit, read this user's manual). If you for selecting the PROFORM• BODYLIFT Body Weight Resistance System. Length: 51 in .

English Manual
Page 4
...: The 1 BODYLIFT requires a minimum ceiling height of ratchet wrenches. 1. ASSEMBLY Before beginning assembly, carefully read the information and instructions at the top of this user's manual. If a part is not found in the parts bag, check to the size of the BODYLIFT, it should be assembled in the location where it...
...: The 1 BODYLIFT requires a minimum ceiling height of ratchet wrenches. 1. ASSEMBLY Before beginning assembly, carefully read the information and instructions at the top of this user's manual. If a part is not found in the parts bag, check to the size of the BODYLIFT, it should be assembled in the location where it...
English Manual
Page 9
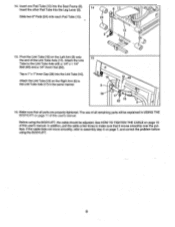
... 5 16. The use of all parts are properly tightened. See HOW TO TIGHTEN THE CABLE on the Left Arm (5) onto the end of this user's manual. If the cable does not move smoothly, refer to the Link Tube Axle with a 1/4" x 1 1/4" Bolt (49) and a 1/4" Acorn Nut (62). Tap a 1" x 1" Inner Cap (36) into...
... 5 16. The use of all parts are properly tightened. See HOW TO TIGHTEN THE CABLE on the Left Arm (5) onto the end of this user's manual. If the cable does not move smoothly, refer to the Link Tube Axle with a 1/4" x 1 1/4" Bolt (49) and a 1/4" Acorn Nut (62). Tap a 1" x 1" Inner Cap (36) into...

English Manual
Page 10
.../2" Pulley (27), and retighten the Adjustment Screw. First, move the selector to hole position "1" (see ORDERING REPLACEMENT PARTS on the back cover of this user's manual. Do not use the BODYLIFT. If there is first used. Ball Adjustment Sleeve 25 0 27 81 10 If a replacement Cable (25) is needed, see HOW...
.../2" Pulley (27), and retighten the Adjustment Screw. First, move the selector to hole position "1" (see ORDERING REPLACEMENT PARTS on the back cover of this user's manual. Do not use the BODYLIFT. If there is first used. Ball Adjustment Sleeve 25 0 27 81 10 If a replacement Cable (25) is needed, see HOW...

English Manual
Page 11
... user to be performed. To change the resistance setting, first pull back the Knob (39) on pages 4 and 5 of the EXERCISE GUIDE accompanying this user's manual for the exercise to provide a wide range of the exercise will be attached between the Lat Bar and the Cable with a Cable Clip (71). USING... the correct starting position for each part of the BODYLIFT can be attached in the same manner. Refer to the EXERCISE GUIDE accompanying this user's manual. 11 25 71 C C 30 86 68 • 25 71 30 86 20, 26 39 19 10 7 5 2 3
... user to be performed. To change the resistance setting, first pull back the Knob (39) on pages 4 and 5 of the EXERCISE GUIDE accompanying this user's manual for the exercise to provide a wide range of the exercise will be attached between the Lat Bar and the Cable with a Cable Clip (71). USING... the correct starting position for each part of the BODYLIFT can be attached in the same manner. Refer to the EXERCISE GUIDE accompanying this user's manual. 11 25 71 C C 30 86 68 • 25 71 30 86 20, 26 39 19 10 7 5 2 3

English Manual
Page 12
...PROFORM® BODYLIFT Body Weight Resistance System). • The PART NUMBER of the part(s) (see the PART LIST/EXPLODED DRAWING accompanying this user's manual). • The DESCRIPTION of charge, repair or replace and install a replacement part for your order will , free of the part(s) (see ...the PART LIST/EXPLODED DRAWING accompanying this user's manual). SERVICE IS AVAILABLE SIMPLY BY CONTACTING YOUR NEAREST SEARS SERVICE CENTER/DEPARTMENT IN THE UNITED STATES. Your BODYLIFT has added value when you ...
...PROFORM® BODYLIFT Body Weight Resistance System). • The PART NUMBER of the part(s) (see the PART LIST/EXPLODED DRAWING accompanying this user's manual). • The DESCRIPTION of charge, repair or replace and install a replacement part for your order will , free of the part(s) (see ...the PART LIST/EXPLODED DRAWING accompanying this user's manual). SERVICE IS AVAILABLE SIMPLY BY CONTACTING YOUR NEAREST SEARS SERVICE CENTER/DEPARTMENT IN THE UNITED STATES. Your BODYLIFT has added value when you ...
English Manual
Page 13
REMOVE THIS PART LIST/EXPLODED DRAWING FROM THE MANUAL!
REMOVE THIS PART LIST/EXPLODED DRAWING FROM THE MANUAL!

English Manual
Page 16
See the back cover of the USER'S MANUAL for information about ordering replacement parts. Description Key Part No. Qty. No. Specifications are subject to change without notice. PART LIST Model No. 831.159412 ... 019173 2 Small Bumper 92 122804 2 1/2" x 5/8" Spacer 93 120792 2 5/8" x 5/8" Spacer 94' 123320 2 Pivot Plate 95 121177 1 3/4" Spacer 96 121174 1 Spring 97 121175 1 Knob Pin # 123329 1 User's Manual # 123763 1 Exercise Guide Note: "r indicates a non-illustrated part. R0195B Printed in USA O1995 Sears, Roebuck and Co.
See the back cover of the USER'S MANUAL for information about ordering replacement parts. Description Key Part No. Qty. No. Specifications are subject to change without notice. PART LIST Model No. 831.159412 ... 019173 2 Small Bumper 92 122804 2 1/2" x 5/8" Spacer 93 120792 2 5/8" x 5/8" Spacer 94' 123320 2 Pivot Plate 95 121177 1 3/4" Spacer 96 121174 1 Spring 97 121175 1 Knob Pin # 123329 1 User's Manual # 123763 1 Exercise Guide Note: "r indicates a non-illustrated part. R0195B Printed in USA O1995 Sears, Roebuck and Co.


