

Canadian English Manual
Page 1
If you have questions, or if parts are damaged or missing, PLEASE CONTACT OUR CUSTOMER SERVICE DEPARTMENT DIRECTLY. Model No. 30279.0 Serial No. Write the serial number in this manual before using this manual for reference. CALL TOLL-FREE: 1-888-936-4266 Mon.-Fri., 8:00 until 17:00 ET (excluding holidays) OR E-MAIL US: [email protected] CAUTION Read all precautions and instructions in the space above for future reference. USERʼS MANUAL www.weiderfitness.com Serial Number Decal (under seat) QUESTIONS? Keep this equipment.
If you have questions, or if parts are damaged or missing, PLEASE CONTACT OUR CUSTOMER SERVICE DEPARTMENT DIRECTLY. Model No. 30279.0 Serial No. Write the serial number in this manual before using this manual for reference. CALL TOLL-FREE: 1-888-936-4266 Mon.-Fri., 8:00 until 17:00 ET (excluding holidays) OR E-MAIL US: [email protected] CAUTION Read all precautions and instructions in the space above for future reference. USERʼS MANUAL www.weiderfitness.com Serial Number Decal (under seat) QUESTIONS? Keep this equipment.

Canadian English Manual
Page 2
Note: The decal(s) may not be shown at actual size. 2 If a decal is missing or illegible, see the front cover of the warning decal(s). Apply the decal in the location shown. TABLE OF CONTENTS WARNING DECAL PLACEMENT 2 IMPORTANT PRECAUTIONS 3 BEFORE YOU BEGIN 4 PART IDENTIFICATION CHART 5 ASSEMBLY 6 ADJUSTMENT 9 EXERCISE GUIDELINES 9 PART LIST 10 EXPLODED DRAWING 11 ORDERING REPLACEMENT PARTS Back Cover LIMITED WARRANTY Back Cover WARNING DECAL PLACEMENT This drawing shows the location(s) of this manual and request a free replacement decal.
Note: The decal(s) may not be shown at actual size. 2 If a decal is missing or illegible, see the front cover of the warning decal(s). Apply the decal in the location shown. TABLE OF CONTENTS WARNING DECAL PLACEMENT 2 IMPORTANT PRECAUTIONS 3 BEFORE YOU BEGIN 4 PART IDENTIFICATION CHART 5 ASSEMBLY 6 ADJUSTMENT 9 EXERCISE GUIDELINES 9 PART LIST 10 EXPLODED DRAWING 11 ORDERING REPLACEMENT PARTS Back Cover LIMITED WARRANTY Back Cover WARNING DECAL PLACEMENT This drawing shows the location(s) of this manual and request a free replacement decal.

Canadian English Manual
Page 3
... lbs. (186 kg) including a maximum user weight of all warnings on the weight bench before using the weight bench. Before beginning any worn parts immediately. 3 Keep the weight bench indoors, away from moving parts. 9. Always wear athletic shoes for home use the weight bench in this product. 1. Inspect and properly tighten all times. 8. Use the weight...
... lbs. (186 kg) including a maximum user weight of all warnings on the weight bench before using the weight bench. Before beginning any worn parts immediately. 3 Keep the weight bench indoors, away from moving parts. 9. Always wear athletic shoes for home use the weight bench in this product. 1. Inspect and properly tighten all times. 8. Use the weight...

Canadian English Manual
Page 4
...1 ft. 6 in. (46 cm) Depth: 3 ft. 4 in. (102 cm) Backrest Seat Locking Pin Pivot Bracket Front Leg Foam Pad 4 The PRO 230 weight bench is to tone your body, build dramatic muscle size and strength, or improve your benefit, read this manual carefully before contacting us assist you develop... using the weight bench. Before reading further, please look at the drawing below and familiarize yourself with the parts that are shown on the front cover of the upper body. BEFORE YOU BEGIN Thank you for selecting the versatile WEIDER® PRO 230 weight bench. The model number...
...1 ft. 6 in. (46 cm) Depth: 3 ft. 4 in. (102 cm) Backrest Seat Locking Pin Pivot Bracket Front Leg Foam Pad 4 The PRO 230 weight bench is to tone your body, build dramatic muscle size and strength, or improve your benefit, read this manual carefully before contacting us assist you develop... using the weight bench. Before reading further, please look at the drawing below and familiarize yourself with the parts that are shown on the front cover of the upper body. BEFORE YOU BEGIN Thank you for selecting the versatile WEIDER® PRO 230 weight bench. The model number...
Canadian English Manual
Page 5
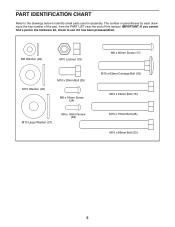
The number in the hardware kit, check to identify small parts used in assembly. M6 Washer (22) M10 Locknut (19) M10 Washer (20) M10 x 20mm Bolt (25) M6 x 16mm Screw (24) M10 Large Washer (27) M4 x 16mm Screw (28) M6 x 60mm Screw (17) M10 x 63mm Carriage Bolt (18) M10 x 63mm Bolt (16) M10 x 70mm Bolt (26) M10 x 85mm Bolt (23) 5 IMPORTANT: If you cannot find a part in parentheses by each drawing is the key number of the part, from the PART LIST near the end of this manual. PART IDENTIFICATION CHART Refer to the drawings below to see if it has been preassembled.
The number in the hardware kit, check to identify small parts used in assembly. M6 Washer (22) M10 Locknut (19) M10 Washer (20) M10 x 20mm Bolt (25) M6 x 16mm Screw (24) M10 Large Washer (27) M4 x 16mm Screw (28) M6 x 60mm Screw (17) M10 x 63mm Carriage Bolt (18) M10 x 63mm Bolt (16) M10 x 70mm Bolt (26) M10 x 85mm Bolt (23) 5 IMPORTANT: If you cannot find a part in parentheses by each drawing is the key number of the part, from the PART LIST near the end of this manual. PART IDENTIFICATION CHART Refer to the drawings below to see if it has been preassembled.

Canadian English Manual
Page 6
...the Locknuts yet. 2 1 19 27 16 27 2 6 Locate the Stabilizer (4) that there is completed. • For help identifying small parts, use the PART IDENTIFICATION CHART on page 5. • The following information and instructions: • Assembly requires two persons. • Because of its weight and ...size, the weight bench should be assembled in the location where it . • Place all parts in a cleared area and remove the packing materials. Attach the Stabilizer (4) to the Frame (1) with two...
...the Locknuts yet. 2 1 19 27 16 27 2 6 Locate the Stabilizer (4) that there is completed. • For help identifying small parts, use the PART IDENTIFICATION CHART on page 5. • The following information and instructions: • Assembly requires two persons. • Because of its weight and ...size, the weight bench should be assembled in the location where it . • Place all parts in a cleared area and remove the packing materials. Attach the Stabilizer (4) to the Frame (1) with two...
Canadian English Manual
Page 8
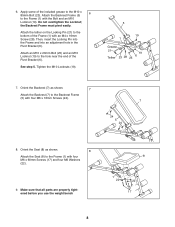
.... 7 Attach the Backrest (7) to the bottom of the Frame (1) with the Bolt and an M10 Locknut (19). Make sure that all parts are properly tightened before you use the weight bench 8 1 22 22 17 8 Attach the tether on the Locking Pin (21) to the Backrest Frame (5) with four M6 x 60mm Screws (17...
.... 7 Attach the Backrest (7) to the bottom of the Frame (1) with the Bolt and an M10 Locknut (19). Make sure that all parts are properly tightened before you use the weight bench 8 1 22 22 17 8 Attach the tether on the Locking Pin (21) to the Backrest Frame (5) with four M6 x 60mm Screws (17...

Canadian English Manual
Page 10
... 1 * - * - * - Select exercises for each repetition and inhale during the exertion stage of each exercise and move only the appropriate parts of each workout. To give balance and variety to your weight and key body measurements once a month. Stretching increases the flexibility of your muscles... range of motion for every major muscle group, emphasizing areas that you want to 10 minutes of your breath. The exertion stage of the body. PART LIST-Model No. 30279.0 R0809A Key No. Qty. 1 1 2 1 3 1 4 2 5 1 6 1 7 1 8 1 9 4 10 2 11 4 12 4 13 4 14 1 15 ...
... 1 * - * - * - Select exercises for each repetition and inhale during the exertion stage of each exercise and move only the appropriate parts of each workout. To give balance and variety to your weight and key body measurements once a month. Stretching increases the flexibility of your muscles... range of motion for every major muscle group, emphasizing areas that you want to 10 minutes of your breath. The exertion stage of the body. PART LIST-Model No. 30279.0 R0809A Key No. Qty. 1 1 2 1 3 1 4 2 5 1 6 1 7 1 8 1 9 4 10 2 11 4 12 4 13 4 14 1 15 ...

Canadian English Manual
Page 12
... provinces do not allow the exclusion or limitation of incidental or consequential damages. ICON of removal or installation; ORDERING REPLACEMENT PARTS To order replacement parts, please see the PART LIST and the EXPLODED DRAWING near the end of this manual) LIMITED WARRANTY ICON of Canada, Inc. (ICON) warrants... this manual. damages with the use or performance of the product; Parts and labor are limited in their scope and duration to the terms set forth above is limited to repairing or replacing, at ICONʼ...
... provinces do not allow the exclusion or limitation of incidental or consequential damages. ICON of removal or installation; ORDERING REPLACEMENT PARTS To order replacement parts, please see the PART LIST and the EXPLODED DRAWING near the end of this manual) LIMITED WARRANTY ICON of Canada, Inc. (ICON) warrants... this manual. damages with the use or performance of the product; Parts and labor are limited in their scope and duration to the terms set forth above is limited to repairing or replacing, at ICONʼ...

English Manual
Page 2
...center of serious Injury, read the following important precautions before using the BODYLIFT. 1. Read all times. Remove the lat bar from moving parts. 7. Inspect and tighten all times. - 5. SEARS assumes no responsibility for protection. 3. Use the BODYLIFT only on the pulleys at any worn ...or frayed parts immediately. 4. Replace any time while exercising, stop immediately and make sure that the cable remains on a level surface. Make sure that ...
...center of serious Injury, read the following important precautions before using the BODYLIFT. 1. Read all times. Remove the lat bar from moving parts. 7. Inspect and tighten all times. - 5. SEARS assumes no responsibility for protection. 3. Use the BODYLIFT only on the pulleys at any worn ...or frayed parts immediately. 4. Replace any time while exercising, stop immediately and make sure that the cable remains on a level surface. Make sure that ...

English Manual
Page 3
...). BEFORE YOU BEGIN Thank you have additional questions, please call our Customer Service Department toll-free at the drawing below and familiarize yourself with the parts that are labeled. The model number is a shapely figure, dramatic muscle size and strength, or a healthier cardiovascular system, the BODYLIFT will help us assist you...
...). BEFORE YOU BEGIN Thank you have additional questions, please call our Customer Service Department toll-free at the drawing below and familiarize yourself with the parts that are labeled. The model number is a shapely figure, dramatic muscle size and strength, or a healthier cardiovascular system, the BODYLIFT will help us assist you...

English Manual
Page 4
...These Carriage Bolts First 41 -.! 70 70 4 Before you begin . • For help identifying the small parts used . • Place all parts of this page. Make sure that all parts as you have been preattached for shipping purposes. Tighten a 3/8" Nylon Jam Nut (41) onto each assembly step... Rear Upright (2) onto the four 3/8" x 2 1/2" Carriage Bolts (70) in a cleared area and remove the packing materials; Note: Some small parts may have the following information and instructions: • Assembly requires two people. • Due to see if it will be more convenient if you ...
...These Carriage Bolts First 41 -.! 70 70 4 Before you begin . • For help identifying the small parts used . • Place all parts of this page. Make sure that all parts as you have been preattached for shipping purposes. Tighten a 3/8" Nylon Jam Nut (41) onto each assembly step... Rear Upright (2) onto the four 3/8" x 2 1/2" Carriage Bolts (70) in a cleared area and remove the packing materials; Note: Some small parts may have the following information and instructions: • Assembly requires two people. • Due to see if it will be more convenient if you ...
English Manual
Page 9
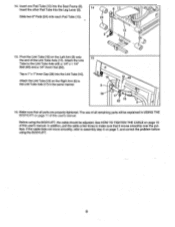
... 6 36 7 62 16 5 16. In addition, pull the cable a few times to make sure that all remaining parts will be adjusted. Make sure that it moves smoothly over the pulleys. The use of all parts are properly tightened. Pivot the Link Tube (16) on page 10 of the Link Tube Axle (17...
... 6 36 7 62 16 5 16. In addition, pull the cable a few times to make sure that all remaining parts will be adjusted. Make sure that it moves smoothly over the pulleys. The use of all parts are properly tightened. Pivot the Link Tube (16) on page 10 of the Link Tube Axle (17...

English Manual
Page 10
..., loosen the Adjustment Screw (81) near the lower end of this user's manual. Ball Adjustment Sleeve 25 0 27 81 10 Replace any worn parts immediately. If there is first used. The BODYLIFT can stretch slightly when it is slack in the Cable, slide the adjustment sleeve and the ball... against the indicated 31/2" Pulley (27), and retighten the Adjustment Screw. First, move the selector to hole position "1" (see ORDERING REPLACEMENT PARTS on page 11). Do not use the BODYLIFT. If a replacement Cable (25) is no slack in the Cable (25), the Cable should be cleaned...
..., loosen the Adjustment Screw (81) near the lower end of this user's manual. Ball Adjustment Sleeve 25 0 27 81 10 Replace any worn parts immediately. If there is first used. The BODYLIFT can stretch slightly when it is slack in the Cable, slide the adjustment sleeve and the ball... against the indicated 31/2" Pulley (27), and retighten the Adjustment Screw. First, move the selector to hole position "1" (see ORDERING REPLACEMENT PARTS on page 11). Do not use the BODYLIFT. If a replacement Cable (25) is no slack in the Cable (25), the Cable should be cleaned...

English Manual
Page 11
... its own weight and the weight of the holes in the cable or chain as an exercise is in the correct starting position for each part of the ten holes in the same manner. The Nylon Strap (68) can be attached in the Selector Plate (19), and release the Knob. To...
... its own weight and the weight of the holes in the cable or chain as an exercise is in the correct starting position for each part of the ten holes in the same manner. The Nylon Strap (68) can be attached in the Selector Plate (19), and release the Knob. To...

English Manual
Page 12
...SEARS SERVICE CENTER/DEPARTMENT IN THE UNITED STATES. Central Time (excluding holidays). Your BODYLIFT has added value when you need repair service or parts, call toll free: 1-800-736-6879, Monday through SEARS, ROEBUCK AND CO. This warranty does not apply when the BODYLIFT is... have other rights whichvary from the date of charge, repair or replace and install a replacement part for commercial or rental purposes. All parts listed herein can be transmitted to a SEARS PARTS DISTRIBUTION CENTER for your order will , free of purchase, when proper assembly and maintenance procedures...
...SEARS SERVICE CENTER/DEPARTMENT IN THE UNITED STATES. Central Time (excluding holidays). Your BODYLIFT has added value when you need repair service or parts, call toll free: 1-800-736-6879, Monday through SEARS, ROEBUCK AND CO. This warranty does not apply when the BODYLIFT is... have other rights whichvary from the date of charge, repair or replace and install a replacement part for commercial or rental purposes. All parts listed herein can be transmitted to a SEARS PARTS DISTRIBUTION CENTER for your order will , free of purchase, when proper assembly and maintenance procedures...
English Manual
Page 13
REMOVE THIS PART LIST/EXPLODED DRAWING FROM THE MANUAL!
REMOVE THIS PART LIST/EXPLODED DRAWING FROM THE MANUAL!

English Manual
Page 14
...assembled for assembly. The number in parenthesis below each part refers to the key number of the part. The second number refers to the quantity needed for shipping purposes; if you identify the small parts used in assembly. PART IDENTIFICATION CHART Model No. 831.159412 This chart is... provided to help you cannot find a part in the parts bag, check the frame to see if it has been pre-assembled. 0 cr- ...
...assembled for assembly. The number in parenthesis below each part refers to the key number of the part. The second number refers to the quantity needed for shipping purposes; if you identify the small parts used in assembly. PART IDENTIFICATION CHART Model No. 831.159412 This chart is... provided to help you cannot find a part in the parts bag, check the frame to see if it has been pre-assembled. 0 cr- ...

English Manual
Page 16
... 2 5/8" x 5/8" Spacer 94' 123320 2 Pivot Plate 95 121177 1 3/4" Spacer 96 121174 1 Spring 97 121175 1 Knob Pin # 123329 1 User's Manual # 123763 1 Exercise Guide Note: "r indicates a non-illustrated part. Specifications are subject to change without notice. Description Key Part No. No. See the back cover of the USER'S MANUAL for information about ordering replacement...
... 2 5/8" x 5/8" Spacer 94' 123320 2 Pivot Plate 95 121177 1 3/4" Spacer 96 121174 1 Spring 97 121175 1 Knob Pin # 123329 1 User's Manual # 123763 1 Exercise Guide Note: "r indicates a non-illustrated part. Specifications are subject to change without notice. Description Key Part No. No. See the back cover of the USER'S MANUAL for information about ordering replacement...


