
English Manual
Page 1
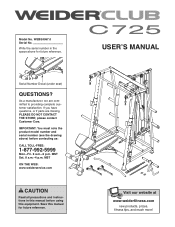
... THE WEB: www.weiderservice.com CAUTION Read all precautions and instructions in the space above ) before using this equipment. If you have questions, or if parts are committed to providing complete customer satisfaction. Visit our website at www.proform.com new products, prizes, fitness tips, and much more ! Model No.
... THE WEB: www.weiderservice.com CAUTION Read all precautions and instructions in the space above ) before using this equipment. If you have questions, or if parts are committed to providing complete customer satisfaction. Visit our website at www.proform.com new products, prizes, fitness tips, and much more ! Model No.
English Manual
Page 2
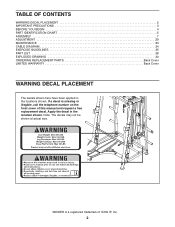
...WARNING DECAL PLACEMENT 2 IMPORTANT PRECAUTIONS 3 BEFORE YOU BEGIN 4 PART IDENTIFICATION CHART 5 ASSEMBLY 7 ADJUSTMENT 29 MAINTENANCE 33 CABLE DIAGRAM 34 EXERCISE GUIDELINES 35 PART LIST 38 EXPLODED DRAWING 40 ORDERING REPLACEMENT PARTS Back Cover LIMITED WARRANTY Back Cover WARNING DECAL PLACEMENT The decals ...shown here have been applied in the location shown. Apply the decal in the locations shown. WEIDER is missing or...
...WARNING DECAL PLACEMENT 2 IMPORTANT PRECAUTIONS 3 BEFORE YOU BEGIN 4 PART IDENTIFICATION CHART 5 ASSEMBLY 7 ADJUSTMENT 29 MAINTENANCE 33 CABLE DIAGRAM 34 EXERCISE GUIDELINES 35 PART LIST 38 EXPLODED DRAWING 40 ORDERING REPLACEMENT PARTS Back Cover LIMITED WARRANTY Back Cover WARNING DECAL PLACEMENT The decals ...shown here have been applied in the location shown. Apply the decal in the locations shown. WEIDER is missing or...
English Manual
Page 3
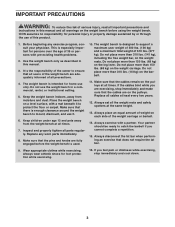
...or property damage sustained by or through the use the weight bench in a commercial, rental, or institutional setting. 5. Inspect and properly tighten all parts regularly. Do not place more than 310 lbs. (141 kg), including the free weight bar, on the weight carriage. Do not place more ...the weight bench is especially important for persons over the age of 35 or persons with pre-existing health problems. 2. Before beginning any worn parts immediately. 8. The weight bench is enough clearance around the weight bench to catch the barbell if you feel pain or dizziness while exercising,...
...or property damage sustained by or through the use the weight bench in a commercial, rental, or institutional setting. 5. Inspect and properly tighten all parts regularly. Do not place more than 310 lbs. (141 kg), including the free weight bar, on the weight carriage. Do not place more ...the weight bench is especially important for persons over the age of 35 or persons with pre-existing health problems. 2. Before beginning any worn parts immediately. 8. The weight bench is enough clearance around the weight bench to catch the barbell if you feel pain or dizziness while exercising,...
English Manual
Page 4
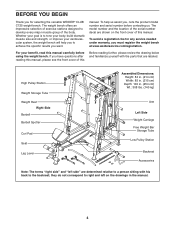
... below and familiarize yourself with his back to the backrest; To avoid a registration fee for selecting the versatile WEIDER® CLUB C725 weight bench. manual. For your goal is to a person sitting with the parts that are determined relative to tone your body, build dramatic muscle size and strength, or improve your cardiovascular...
... below and familiarize yourself with his back to the backrest; To avoid a registration fee for selecting the versatile WEIDER® CLUB C725 weight bench. manual. For your goal is to a person sitting with the parts that are determined relative to tone your body, build dramatic muscle size and strength, or improve your cardiovascular...
English Manual
Page 5
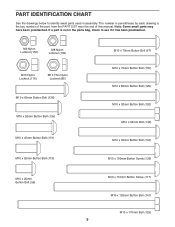
... See the drawings below to see if it has been preattached. If a part is the key number of the part, from the PART LIST near the end of this manual. M6 Nylon Locknut (150) M8 Nylon Locknut (139) M10 Nylon Locknut (116) M10 Thin Nylon Locknut (86) M10 x ...) M10 x 110mm Button Screw (117) M10 x 125mm Button Bolt (141) M10 x 170mm Bolt (123) 5 The number in parentheses by each drawing is not in the parts bag, check to identify small parts used in assembly. Note: Some small...
... See the drawings below to see if it has been preattached. If a part is the key number of the part, from the PART LIST near the end of this manual. M6 Nylon Locknut (150) M8 Nylon Locknut (139) M10 Nylon Locknut (116) M10 Thin Nylon Locknut (86) M10 x ...) M10 x 110mm Button Screw (117) M10 x 125mm Button Bolt (141) M10 x 170mm Bolt (123) 5 The number in parentheses by each drawing is not in the parts bag, check to identify small parts used in assembly. Note: Some small...
English Manual
Page 7
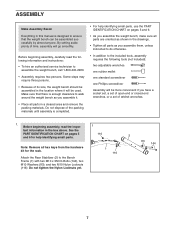
...you assemble it will be assembled in the drawings. • Tighten all parts as you assemble the weight bench, make sure all parts are oriented as shown in the location where it . • Place all parts in the box above. Do not dispose of ratchet wrenches. 1. See ... ASSEMBLY Make Assembly Easier Everything in this manual is completed. • For help identifying small parts. 2 83 144 Note: Remove all hex keys from the hardware kit for help identifying small parts, use the PART IDENTIFICATION CHART on pages 5 116 and 6 for the rack. 1 116 Attach the Rear ...
...you assemble it will be assembled in the drawings. • Tighten all parts as you assemble the weight bench, make sure all parts are oriented as shown in the location where it . • Place all parts in the box above. Do not dispose of ratchet wrenches. 1. See ... ASSEMBLY Make Assembly Easier Everything in this manual is completed. • For help identifying small parts. 2 83 144 Note: Remove all hex keys from the hardware kit for help identifying small parts, use the PART IDENTIFICATION CHART on pages 5 116 and 6 for the rack. 1 116 Attach the Rear ...
English Manual
Page 28
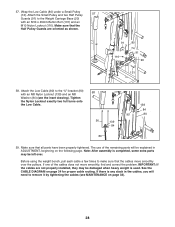
... the following page. Make sure that the Half Pulley Guards are not properly installed, they may be damaged when heavy weight is completed, some extra parts may be left over the pulleys. Attach the Low Cable (80) to remove it by tightening the cables (see the inset drawing). Note: After ... that the cables move smoothly, find and correct the problem. The use of the cables does not move smoothly over . If one of the remaining parts will need to the "U"-bracket (90) 58 with an M10 x 45mm Button Bolt (131) and an M10 Nylon Locknut (116). Before using the weight ...
... the following page. Make sure that the Half Pulley Guards are not properly installed, they may be damaged when heavy weight is completed, some extra parts may be left over the pulleys. Attach the Low Cable (80) to remove it by tightening the cables (see the inset drawing). Note: After ... that the cables move smoothly, find and correct the problem. The use of the cables does not move smoothly over . If one of the remaining parts will need to the "U"-bracket (90) 58 with an M10 x 45mm Button Bolt (131) and an M10 Nylon Locknut (116). Before using the weight ...
English Manual
Page 33
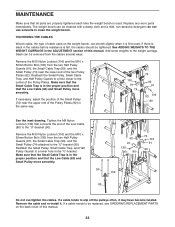
...), and the Small Pulley (74) near the upper end of the Pulley Plates (92) in the ADJUSTMENT section of the Pulley Plates. Replace any worn parts immediately. Reattach the Small Pulley, Small Cable Trap, and Half Pulley Guards to a hole closer to be cleaned with a damp cloth and a mild, non-abrasive... Cable Trap is first used . Make sure that the Small Cable Trap is used . The weight bench can be tightened. MAINTENANCE Make sure that all parts are properly tightened each time the weight bench is in the proper position and that the Low Cable (80) and Small Pulley move smoothly.
...), and the Small Pulley (74) near the upper end of the Pulley Plates (92) in the ADJUSTMENT section of the Pulley Plates. Replace any worn parts immediately. Reattach the Small Pulley, Small Cable Trap, and Half Pulley Guards to a hole closer to be cleaned with a damp cloth and a mild, non-abrasive... Cable Trap is first used . Make sure that the Small Cable Trap is used . The weight bench can be tightened. MAINTENANCE Make sure that all parts are properly tightened each time the weight bench is in the proper position and that the Low Cable (80) and Small Pulley move smoothly.
English Manual
Page 35
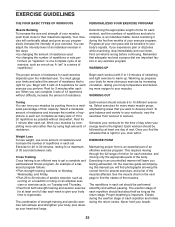
... requires moving through the full range of motion for each set . The exertion stage of each exercise, and moving only the appropriate parts of the body. Exhale during the exertion stage of each set . Never hold your own pace and be performed smoothly and without ... The combination of strength training and aerobic exercise will continually adapt and grow as the return stage. formed. (A "repetition" is an essential part of an effective exercise program. Begin each set " is a series of repetitions.) Determining the appropriate length of rest. WORKING OUT Toning You...
... requires moving through the full range of motion for each set . The exertion stage of each exercise, and moving only the appropriate parts of the body. Exhale during the exertion stage of each set . Never hold your own pace and be performed smoothly and without ... The combination of strength training and aerobic exercise will continually adapt and grow as the return stage. formed. (A "repetition" is an essential part of an effective exercise program. Begin each set " is a series of repetitions.) Determining the appropriate length of rest. WORKING OUT Toning You...

English Manual
Page 36
... as far as you stretch and do not bounce. Obliques (waist) E. Stretching at the end of each workout is to make exercise a regular and enjoyable part of your weight and key body measurements at the end of every month. Triceps (back of thigh) I J K L M N O P Q R S T U V W X MUSCLE CHART A. Hip Flexors (upper thigh) G. The repetitions...
... as far as you stretch and do not bounce. Obliques (waist) E. Stretching at the end of each workout is to make exercise a regular and enjoyable part of your weight and key body measurements at the end of every month. Triceps (back of thigh) I J K L M N O P Q R S T U V W X MUSCLE CHART A. Hip Flexors (upper thigh) G. The repetitions...
English Manual
Page 38
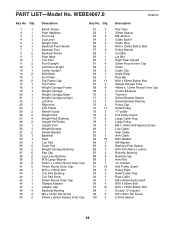
PART LIST-Model No. WEBE4067.0 Key No. Qty. 1 1 2 1 3 1 4 1 5 1 6 1 7 1 8 2 9 1 10 1 11 2 12 1 13 1 14 2 15 1 16 2 17 1 18 1 19 1 20 1 21 1 22 1 23 1 24 1 25 2 26 2 27 4 ...
PART LIST-Model No. WEBE4067.0 Key No. Qty. 1 1 2 1 3 1 4 1 5 1 6 1 7 1 8 2 9 1 10 1 11 2 12 1 13 1 14 2 15 1 16 2 17 1 18 1 19 1 20 1 21 1 22 1 23 1 24 1 25 2 26 2 27 4 ...
English Manual
Page 39
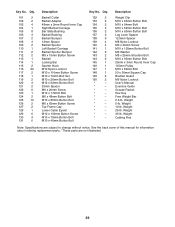
... Screw M10 x 75mm Button Bolt M10 x 45mm Button Bolt Key No. Weight 5-lb. See the back cover of this manual for information about ordering replacement parts. *These parts are subject to change without notice. Qty. 132 2 133 2 134 2 135 3 136 2 137 2 138 9 139 4 140 4 141 1 142 6 143 2 144 2 145 1 146 1 147 1 148...
... Screw M10 x 75mm Button Bolt M10 x 45mm Button Bolt Key No. Weight 5-lb. See the back cover of this manual for information about ordering replacement parts. *These parts are subject to change without notice. Qty. 132 2 133 2 134 2 135 3 136 2 137 2 138 9 139 4 140 4 141 1 142 6 143 2 144 2 145 1 146 1 147 1 148...
English Manual
Page 44
...above limitation may not apply to you . You may not apply to you . ICON HEALTH & FITNESS, INC., 1500 S. 1000 W., LOGAN, UT 84321-9813 Part No. 258689 R0907A Printed in -home service, the customer will be free from state to state. All repairs for a period of ninety (90) days from...date of purchase. To help us assist you specific legal rights. For in China © 2007 ICON IP, Inc. ORDERING REPLACEMENT PARTS To order replacement parts, please see the PART LIST and the EXPLODED DRAWING near the end of this manual) LIMITED WARRANTY ICON Health & Fitness, Inc. (ICON) warrants this ...
...above limitation may not apply to you . You may not apply to you . ICON HEALTH & FITNESS, INC., 1500 S. 1000 W., LOGAN, UT 84321-9813 Part No. 258689 R0907A Printed in -home service, the customer will be free from state to state. All repairs for a period of ninety (90) days from...date of purchase. To help us assist you specific legal rights. For in China © 2007 ICON IP, Inc. ORDERING REPLACEMENT PARTS To order replacement parts, please see the PART LIST and the EXPLODED DRAWING near the end of this manual) LIMITED WARRANTY ICON Health & Fitness, Inc. (ICON) warrants this ...


