
English Manual
Page 1
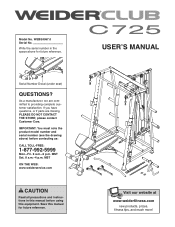
... www.nordictrack.com new products, prizes, fitness tips, and much more ! Model No. MST ON THE WEB: www.weiderservice.com CAUTION Read all precautions and instructions in the space above ) before using this manual for future reference. Visit our website at www.proform.com new products, prizes, fitness tips, and much more ! Serial Number Decal (under seat) QUESTIONS? WEBE4067.0 Serial No.
... www.nordictrack.com new products, prizes, fitness tips, and much more ! Model No. MST ON THE WEB: www.weiderservice.com CAUTION Read all precautions and instructions in the space above ) before using this manual for future reference. Visit our website at www.proform.com new products, prizes, fitness tips, and much more ! Serial Number Decal (under seat) QUESTIONS? WEBE4067.0 Serial No.
English Manual
Page 2
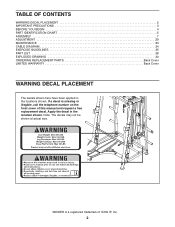
... this manual and request a free replacement decal. WEIDER is missing or illegible, call the telephone number on the front cover of ICON IP, Inc. 2 Note: The decals may not be shown at actual size. TABLE OF CONTENTS WARNING DECAL PLACEMENT 2 IMPORTANT PRECAUTIONS 3 BEFORE YOU BEGIN 4 PART IDENTIFICATION CHART 5 ASSEMBLY 7 ADJUSTMENT 29 MAINTENANCE 33 CABLE DIAGRAM 34 EXERCISE GUIDELINES 35 PART LIST 38 EXPLODED DRAWING 40 ORDERING REPLACEMENT PARTS Back Cover LIMITED WARRANTY Back Cover...
... this manual and request a free replacement decal. WEIDER is missing or illegible, call the telephone number on the front cover of ICON IP, Inc. 2 Note: The decals may not be shown at actual size. TABLE OF CONTENTS WARNING DECAL PLACEMENT 2 IMPORTANT PRECAUTIONS 3 BEFORE YOU BEGIN 4 PART IDENTIFICATION CHART 5 ASSEMBLY 7 ADJUSTMENT 29 MAINTENANCE 33 CABLE DIAGRAM 34 EXERCISE GUIDELINES 35 PART LIST 38 EXPLODED DRAWING 40 ORDERING REPLACEMENT PARTS Back Cover LIMITED WARRANTY Back Cover...
English Manual
Page 3
... ensure that the pins and knobs are on the pulleys. Inspect and properly tighten all cables at the same height. 13. Wear appropriate clothes while exercising. Use the weight bench only as described in a commercial, rental, or institutional setting. 5. Do not use it to support a maximum user weight of 300 lbs. (136 kg) and a maximum total weight of all warnings on the leg lever. Make sure...
... ensure that the pins and knobs are on the pulleys. Inspect and properly tighten all cables at the same height. 13. Wear appropriate clothes while exercising. Use the weight bench only as described in a commercial, rental, or institutional setting. 5. Do not use it to support a maximum user weight of 300 lbs. (136 kg) and a maximum total weight of all warnings on the leg lever. Make sure...
English Manual
Page 4
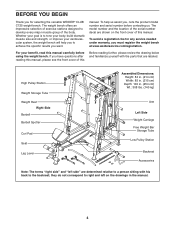
... model number and serial number before using the weight bench. Whether your goal is to the backrest; For your cardiovascular system, the weight bench will help us . manual. High Pulley Station Weight Storage Tube Weight Rest Right Side Barbell Barbell Spotter Curl Pad Seat Leg Lever Assembled Dimensions: Height: 84 in. (214 cm) Width: 85 in. (215 cm) Depth: 100 in the manual. 4 The weight bench offers an impressive selection of exercise...
... model number and serial number before using the weight bench. Whether your goal is to the backrest; For your cardiovascular system, the weight bench will help us . manual. High Pulley Station Weight Storage Tube Weight Rest Right Side Barbell Barbell Spotter Curl Pad Seat Leg Lever Assembled Dimensions: Height: 84 in. (214 cm) Width: 85 in. (215 cm) Depth: 100 in the manual. 4 The weight bench offers an impressive selection of exercise...
English Manual
Page 5
... Button Bolt (56) M10 x 110mm Button Screw (117) M10 x 125mm Button Bolt (141) M10 x 170mm Bolt (123) 5 If a part is the key number of the part, from the PART LIST near the end of this manual. PART IDENTIFICATION CHART See the drawings below to see if it has been preattached. The number in parentheses by each drawing is not in the parts bag, check to identify small parts used in assembly...
... Button Bolt (56) M10 x 110mm Button Screw (117) M10 x 125mm Button Bolt (141) M10 x 170mm Bolt (123) 5 If a part is the key number of the part, from the PART LIST near the end of this manual. PART IDENTIFICATION CHART See the drawings below to see if it has been preattached. The number in parentheses by each drawing is not in the parts bag, check to identify small parts used in assembly...
English Manual
Page 7
... a set of time, assembly will go smoothly. Do not tighten the Nylon Locknuts yet. 7 Do not dispose of its size, the weight bench should be assembled in the location where it . • Place all parts in a cleared area and remove the packing materials. Before beginning assembly, carefully read the impor- 1 tant information in the box above. ASSEMBLY Make Assembly Easier Everything in this manual is...
... a set of time, assembly will go smoothly. Do not tighten the Nylon Locknuts yet. 7 Do not dispose of its size, the weight bench should be assembled in the location where it . • Place all parts in a cleared area and remove the packing materials. Before beginning assembly, carefully read the impor- 1 tant information in the box above. ASSEMBLY Make Assembly Easier Everything in this manual is...
English Manual
Page 9
... both sides of an M10 x 70mm Bolt 7 Set (118). Grease 118 4 118 3 9 Do not overtighten the Nylon Locknut; Tighten the M10 Nylon Locknut 116 (116) and the four M6 x 40mm Screws (140). Then, slide the Olympic Adapter (46) onto the Weight Tube. Attach the Weight Tube (5) to the Bench Frame (1) with an M8 x 10mm Set Screw (49). 4 139 49 46 5 84 45...
... both sides of an M10 x 70mm Bolt 7 Set (118). Grease 118 4 118 3 9 Do not overtighten the Nylon Locknut; Tighten the M10 Nylon Locknut 116 (116) and the four M6 x 40mm Screws (140). Then, slide the Olympic Adapter (46) onto the Weight Tube. Attach the Weight Tube (5) to the Bench Frame (1) with an M8 x 10mm Set Screw (49). 4 139 49 46 5 84 45...
English Manual
Page 20
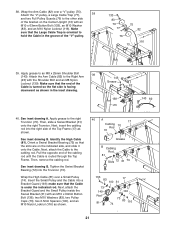
...91 131 Attach the Small Pulley and two Half Pulley 37 Guards (91) to iden- 35 tify the cables as you assemble them. 35. Make sure that the Half Pulley Guards are wider than the other pulleys. See the CABLE DIAGRAM on the Center Upright (13) with an M10 x 63mm Button Bolt (133),...Shoulder Bolt and an M8 Nylon Locknut (139). Wrap the Arm Cable (82) 36 over a "V"-pulley. Make sure that the end of the "V"-pulley. Wrap the Arm Cable (82) under a Small Pulley (74). Identify the two "V"-pulleys (75), which are oriented as shown in the groove of the Cable is turned so ...
...91 131 Attach the Small Pulley and two Half Pulley 37 Guards (91) to iden- 35 tify the cables as you assemble them. 35. Make sure that the Half Pulley Guards are wider than the other pulleys. See the CABLE DIAGRAM on the Center Upright (13) with an M10 x 63mm Button Bolt (133),...Shoulder Bolt and an M8 Nylon Locknut (139). Wrap the Arm Cable (82) 36 over a "V"-pulley. Make sure that the end of the "V"-pulley. Wrap the Arm Cable (82) under a Small Pulley (74). Identify the two "V"-pulleys (75), which are oriented as shown in the groove of the Cable is turned so ...
English Manual
Page 21
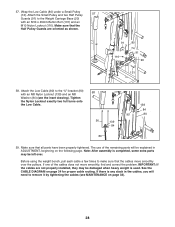
...) as shown. Wrap the Arm Cable (82) over a Small Pulley (74). Attach the Arm Cable (82) to hold the Cable in the inset drawing. 143 Grease 82 139 143 82 23 40. Make sure that the Cable is facing downward as shown. 40 A 17 Cabling 70 Rod 31 Grease B Cabling Rod 81 Slots 72 31 ... the groove of the Cable is turned so the flat side is under the indicated rod. Identify the High Cable (81). Tighten the Swivel Bracket Bearing (72) into the Trunnion (70). Make sure that the slots are on the Center Upright (13) with an M10 x 63mm Button Bolt (133), an M10 ...
...) as shown. Wrap the Arm Cable (82) over a Small Pulley (74). Attach the Arm Cable (82) to hold the Cable in the inset drawing. 143 Grease 82 139 143 82 23 40. Make sure that the Cable is facing downward as shown. 40 A 17 Cabling 70 Rod 31 Grease B Cabling Rod 81 Slots 72 31 ... the groove of the Cable is turned so the flat side is under the indicated rod. Identify the High Cable (81). Tighten the Swivel Bracket Bearing (72) into the Trunnion (70). Make sure that the slots are on the Center Upright (13) with an M10 x 63mm Button Bolt (133), an M10 ...
English Manual
Page 28
... cables move smoothly, find and correct the problem. See the CABLE DIAGRAM on the following page. Before using the weight bench, pull each cable a few times to remove it by tightening the cables (see the inset drawing). Make sure that the Half Pulley Guards are not properly installed, they may be damaged when heavy weight is any slack in the cables, you will be explained in ADJUSTMENT...
... cables move smoothly, find and correct the problem. See the CABLE DIAGRAM on the following page. Before using the weight bench, pull each cable a few times to remove it by tightening the cables (see the inset drawing). Make sure that the Half Pulley Guards are not properly installed, they may be damaged when heavy weight is any slack in the cables, you will be explained in ADJUSTMENT...
English Manual
Page 29
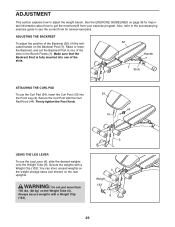
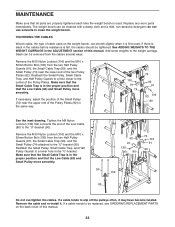
... kg) on the rear uprights. Always secure weights with the Curl Pad Knob (44). Secure the weights with a Weight Clip (132). ADJUSTMENT This section explains how to get the most benefit from your exercise program. You can store unused weights on the weight storage tubes (not shown) on the Weight Tube (5). Firmly tighten the Post Knob. 34 44 10 USING THE LEG LEVER To use the Curl Pad...
... kg) on the rear uprights. Always secure weights with the Curl Pad Knob (44). Secure the weights with a Weight Clip (132). ADJUSTMENT This section explains how to get the most benefit from your exercise program. You can store unused weights on the weight storage tubes (not shown) on the Weight Tube (5). Firmly tighten the Post Knob. 34 44 10 USING THE LEG LEVER To use the Curl Pad...
English Manual
Page 30
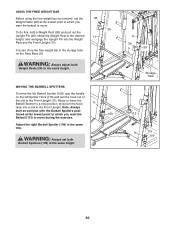
...move . 26 To do this, hold a Weight Rest (26) and pull out the Upright Pin (28). Raise or lower the Barbell Spotter to the desired 11 height, and reengage the Upright Pin into a slot in the Front Upright. Adjust the right Barbell Spotter (109) in the Front Upright (11). WARNING: Always adjust...height. WARNING: Always set the 28 Weight Rests (26) at the same height. 115 109 11 26 9 28 Storage Tube 113 11 115 109 30 USING THE FREE WEIGHT BAR Before using the free weight bar (not shown), set both Weight Rests (26) to move during the exercise. tioned at the ...
...move . 26 To do this, hold a Weight Rest (26) and pull out the Upright Pin (28). Raise or lower the Barbell Spotter to the desired 11 height, and reengage the Upright Pin into a slot in the Front Upright. Adjust the right Barbell Spotter (109) in the Front Upright (11). WARNING: Always adjust...height. WARNING: Always set the 28 Weight Rests (26) at the same height. 115 109 11 26 9 28 Storage Tube 113 11 115 109 30 USING THE FREE WEIGHT BAR Before using the free weight bar (not shown), set both Weight Rests (26) to move during the exercise. tioned at the ...
English Manual
Page 32
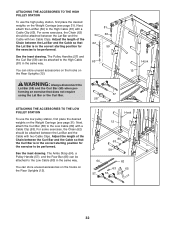
... be attached between the Lat Bar and the 63 Cable with two Cable Clips. Adjust the length of the Chain between the Curl Bar and the Cable so that does not require using the Lat Bar or the Curl Bar. 57 58 ATTACHING THE ACCESSORIES TO THE LOW PULLEY STATION To use the high pulley station, first place the desired weights on the Rear Uprights (12). The Ankle Strap (64), a Pulley...
... be attached between the Lat Bar and the 63 Cable with two Cable Clips. Adjust the length of the Chain between the Curl Bar and the Cable so that does not require using the Lat Bar or the Curl Bar. 57 58 ATTACHING THE ACCESSORIES TO THE LOW PULLEY STATION To use the high pulley station, first place the desired weights on the Rear Uprights (12). The Ankle Strap (64), a Pulley...
English Manual
Page 33
... ORDERING REPLACEMENT PARTS on the weight bench, can be removed from the cables several ways: Remove the M10 Nylon Locknut (116) and the M10 x 52mm Button Bolt (135) from the two Half Pulley Guards (91), the Small Cable Trap (93), and the Small Pulley (74) attached to a lower hole in the proper position and that connects the end of the two Pulley Plates (92). If necessary, adjust...
... ORDERING REPLACEMENT PARTS on the weight bench, can be removed from the cables several ways: Remove the M10 Nylon Locknut (116) and the M10 x 52mm Button Bolt (135) from the two Half Pulley Guards (91), the Small Cable Trap (93), and the Small Pulley (74) attached to a lower hole in the proper position and that connects the end of the two Pulley Plates (92). If necessary, adjust...
English Manual
Page 34
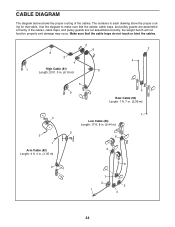
CABLE DIAGRAM The diagram below shows the proper routing of the cables. If the cables, cable traps, and pulley guards are assembled correctly. The numbers in . (5.44 m) 2 6 3 8 7 2 1 5 4 34 Use the diagram to make sure that cable. Make sure that the cable traps do not touch or bind the cables. 2 3 4 6 7 1 High Cable (81) 8 Length: 20 ft. 3 in. (6.19 m) 2 4 5 9 3 Rear Cable (94) Length: 7 ft. 7 in. (2.36 m) 4 5 1 Arm Cable (82) Length: 4 ft. 4 in. (1.35...
CABLE DIAGRAM The diagram below shows the proper routing of the cables. If the cables, cable traps, and pulley guards are assembled correctly. The numbers in . (5.44 m) 2 6 3 8 7 2 1 5 4 34 Use the diagram to make sure that cable. Make sure that the cable traps do not touch or bind the cables. 2 3 4 6 7 1 High Cable (81) 8 Length: 20 ft. 3 in. (6.19 m) 2 4 5 9 3 Rear Cable (94) Length: 7 ft. 7 in. (2.36 m) 4 5 1 Arm Cable (82) Length: 4 ft. 4 in. (1.35...
English Manual
Page 35
... set . Weight Loss To lose weight, use a low amount of resistance and increase the number of the body. This requires moving only the appropriate parts of repetitions in two ways: • by changing the amount of resistance used • by using high amounts of 12 repetitions without pausing. Each workout should last about half as long as running on a treadmill or riding on an elliptical exerciser or exercise...
... set . Weight Loss To lose weight, use a low amount of resistance and increase the number of the body. This requires moving only the appropriate parts of repetitions in two ways: • by changing the amount of resistance used • by using high amounts of 12 repetitions without pausing. Each workout should last about half as long as running on a treadmill or riding on an elliptical exerciser or exercise...

English Manual
Page 36
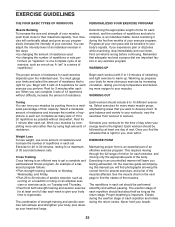
.... Pectoralis Major (chest) C. Anterior Deltoid (shoulder) M. Adductor (inner thigh) O. Posterior Deltoid (shoulder) R. Gluteus Medius (hip) V. List the date, the exercises performed, the resistance used, and the numbers of arm) S. Obliques (waist) E. Abductor (outer thigh) H. Triceps (back of sets and repetitions completed. Gluteus Maximus (buttocks) W. Exhale during the exertion stage of each workout is important. Never hold your arms and legs. out...
.... Pectoralis Major (chest) C. Anterior Deltoid (shoulder) M. Adductor (inner thigh) O. Posterior Deltoid (shoulder) R. Gluteus Medius (hip) V. List the date, the exercises performed, the resistance used, and the numbers of arm) S. Obliques (waist) E. Abductor (outer thigh) H. Triceps (back of sets and repetitions completed. Gluteus Maximus (buttocks) W. Exhale during the exertion stage of each workout is important. Never hold your arms and legs. out...
English Manual
Page 38
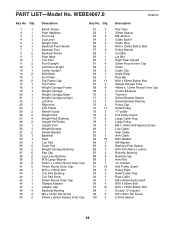
... Spacer M8 Jamnut Cable Eyelet Cable Stop M10 x 20mm Button Bolt Pulley Handle Curl Bar Lat Bar Right Rear Upright 25mm Round Inner Cap Chain Cable Clip Ankle Strap Row Bar M10 x 65mm Button Bolt Weight Storage Tube 48mm x 1.5mm Round Inner Cap Center Backrest Trunnion Swivel Bracket Spacer Swivel Bracket Bearing Pulley Cap Small Pulley "V"-pulley Full Pulley Guard Large Cable Trap Large Pulley M4 x 10mm Self-tapping Screw Low Cable High Cable Arm Cable M10 Washer M8...
... Spacer M8 Jamnut Cable Eyelet Cable Stop M10 x 20mm Button Bolt Pulley Handle Curl Bar Lat Bar Right Rear Upright 25mm Round Inner Cap Chain Cable Clip Ankle Strap Row Bar M10 x 65mm Button Bolt Weight Storage Tube 48mm x 1.5mm Round Inner Cap Center Backrest Trunnion Swivel Bracket Spacer Swivel Bracket Bearing Pulley Cap Small Pulley "V"-pulley Full Pulley Guard Large Cable Trap Large Pulley M4 x 10mm Self-tapping Screw Low Cable High Cable Arm Cable M10 Washer M8...
English Manual
Page 39
... Button Bolt M10 x 94mm Bolt M10 x 52mm Button Bolt M10 x 60mm Button Bolt Leg Lever Spacer 12.5mm Spacer M8 Nylon Locknut M6 x 40mm Screw M10 x 125mm Button Bolt M6 Washer M8 x 25mm Shoulder Bolt M10 x 95mm Button Bolt 25mm x 3mm Round Inner Cap 115mm Pulley M10 x 80mm Bolt 50 x 50mm Square Cap Bracket Guard M6 Nylon Locknut User's Manual Exercise Guide Grease Packet Hex Key Free Weight Bar 2.5-lb. Weight 5-lb. Weight 45-lb. Weight Cabling Rod Note: Specifications...
... Button Bolt M10 x 94mm Bolt M10 x 52mm Button Bolt M10 x 60mm Button Bolt Leg Lever Spacer 12.5mm Spacer M8 Nylon Locknut M6 x 40mm Screw M10 x 125mm Button Bolt M6 Washer M8 x 25mm Shoulder Bolt M10 x 95mm Button Bolt 25mm x 3mm Round Inner Cap 115mm Pulley M10 x 80mm Bolt 50 x 50mm Square Cap Bracket Guard M6 Nylon Locknut User's Manual Exercise Guide Grease Packet Hex Key Free Weight Bar 2.5-lb. Weight 5-lb. Weight 45-lb. Weight Cabling Rod Note: Specifications...
English Manual
Page 44
..., the above is limited to replacing or repairing, at ICON's option, the product through one of its scope and duration to the terms set forth above limitation may not apply to you . products used as store display models. ICON HEALTH & FITNESS, INC., 1500 S. 1000 W., LOGAN, UT 84321-9813 Part No. 258689 R0907A Printed in China © 2007 ICON IP, Inc. For in-home service, the customer...
..., the above is limited to replacing or repairing, at ICON's option, the product through one of its scope and duration to the terms set forth above limitation may not apply to you . products used as store display models. ICON HEALTH & FITNESS, INC., 1500 S. 1000 W., LOGAN, UT 84321-9813 Part No. 258689 R0907A Printed in China © 2007 ICON IP, Inc. For in-home service, the customer...


