
User Manual
Page 2
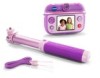
Kidizoom® Selfie Cam even includes fun fantasy photo and video effects! your child can even use included apps like Make Up Studio to beautify their creations to take great selfies anytime! With the included micro USB cable, your child can take great photos, selfies, videos, play games and more! That's not all; Beautify it contains important information. • The battery in this product must not...
Kidizoom® Selfie Cam even includes fun fantasy photo and video effects! your child can even use included apps like Make Up Studio to beautify their creations to take great selfies anytime! With the included micro USB cable, your child can take great photos, selfies, videos, play games and more! That's not all; Beautify it contains important information. • The battery in this product must not...
User Manual
Page 3
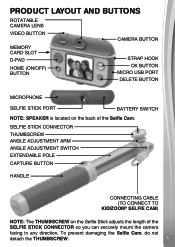
... OK Button Micro USB port Delete Button Microphone SELFIE STICK PORT BATTERY Switch NOTE: SPEAKER is located on the Selfie Stick adjusts the length of the Selfie Cam. SELFIE STICK CONNECTOR Thumbscrew Angle Adjustment Arm ANGLE ADJUSTMENT SWITCH Extendable Pole Capture Button Handle Connecting Cable (To connect to Kidizoom® Selfie Cam) NOTE: The THUMBSCREW on the back of the SELFIE STICK CONNECTOR so you can securely mount the camera facing in any direction. To...
... OK Button Micro USB port Delete Button Microphone SELFIE STICK PORT BATTERY Switch NOTE: SPEAKER is located on the Selfie Stick adjusts the length of the Selfie Cam. SELFIE STICK CONNECTOR Thumbscrew Angle Adjustment Arm ANGLE ADJUSTMENT SWITCH Extendable Pole Capture Button Handle Connecting Cable (To connect to Kidizoom® Selfie Cam) NOTE: The THUMBSCREW on the back of the SELFIE STICK CONNECTOR so you can securely mount the camera facing in any direction. To...

User Manual
Page 4
... battery will function and the battery can also be charged. NOTE: You may need a small tool (such as a paperclip) to move the switch to the ON or OFF position. where you can take photos when in Camera Mode and to start and stop recording videos in daily use for an extended period of time. While the Selfie Cam is ON, press this button to delete...
... battery will function and the battery can also be charged. NOTE: You may need a small tool (such as a paperclip) to move the switch to the ON or OFF position. where you can take photos when in Camera Mode and to start and stop recording videos in daily use for an extended period of time. While the Selfie Cam is ON, press this button to delete...

User Manual
Page 5
... included) with program data, actual memory available for connection to start and stop recording videos in Video Mode. Video effects are approximations. File Format Photos: Standard Baseline JPEG Video: AVI (Motion JPEG) Connectivity Micro USB 2.0 cable (included) for user storage will be less). The actual length and capacity of the Selfie Cam to connect to 32GB is connected to the Selfie Stick, press this resolution) 320 X 240 (default...
... included) with program data, actual memory available for connection to start and stop recording videos in Video Mode. Video effects are approximations. File Format Photos: Standard Baseline JPEG Video: AVI (Motion JPEG) Connectivity Micro USB 2.0 cable (included) for user storage will be less). The actual length and capacity of the Selfie Cam to connect to 32GB is connected to the Selfie Stick, press this resolution) 320 X 240 (default...

User Manual
Page 7
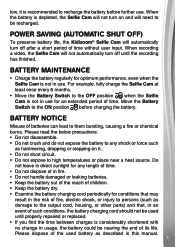
... operation required. Connect the Selfie Cam to your computer. NOTE: It will then automatically turn off. If your computer. Some activities will be more frequent usage will be displayed in the right top corner of the screen. Only move the switch to the OFF position when the Selfie Cam is not necessary to move the Battery Switch to charge the battery. • Make sure...
... operation required. Connect the Selfie Cam to your computer. NOTE: It will then automatically turn off. If your computer. Some activities will be more frequent usage will be displayed in the right top corner of the screen. Only move the switch to the OFF position when the Selfie Cam is not necessary to move the Battery Switch to charge the battery. • Make sure...
User Manual
Page 8
... use . When recording a video, the Selfie Cam will automatically turn off until properly repaired or replaced. • If you find the time between charges is considerably shortened with no change in this manual. 8 Move the Battery Switch to them bursting, causing a fire or chemical burns. Please dispose of time without user input. Power Saving (Automatic Shut Off) To preserve battery life, the Kidizoom® Selfie Cam will not automatically turn...
... use . When recording a video, the Selfie Cam will automatically turn off until properly repaired or replaced. • If you find the time between charges is considerably shortened with no change in this manual. 8 Move the Battery Switch to them bursting, causing a fire or chemical burns. Please dispose of time without user input. Power Saving (Automatic Shut Off) To preserve battery life, the Kidizoom® Selfie Cam will not automatically turn...
User Manual
Page 9
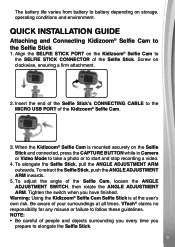
... the switch when you prepare to the MICRO USB PORT of the Kidizoom® Selfie Cam. 3. When the Kidizoom® Selfie Cam is at all times. To elongate the Selfie Stick, pull the ANGLE ADJUSTMENT ARM outwards. Warning: Using the Kidizoom® Selfie Cam Selfie Stick is mounted securely on the Selfie Stick and connected, press the CAPTURE BUTTON while in Camera or Video Mode to take a photo or to start and stop recording a video. 4. Be...
... the switch when you prepare to the MICRO USB PORT of the Kidizoom® Selfie Cam. 3. When the Kidizoom® Selfie Cam is at all times. To elongate the Selfie Stick, pull the ANGLE ADJUSTMENT ARM outwards. Warning: Using the Kidizoom® Selfie Cam Selfie Stick is mounted securely on the Selfie Stick and connected, press the CAPTURE BUTTON while in Camera or Video Mode to take a photo or to start and stop recording a video. 4. Be...

User Manual
Page 11
... logo are trademarks of the Selfie Cam. • Pull up the rubber cover. • Insert your memory card before using it will automatically be seen until the memory card has been removed. Memory Card Installation Kidizoom® Selfie Cam supports the below memory cards for all important data from the slot, push the card once and it . NOTE: If a memory card is turned OFF. • Locate the MEMORY...
... logo are trademarks of the Selfie Cam. • Pull up the rubber cover. • Insert your memory card before using it will automatically be seen until the memory card has been removed. Memory Card Installation Kidizoom® Selfie Cam supports the below memory cards for all important data from the slot, push the card once and it . NOTE: If a memory card is turned OFF. • Locate the MEMORY...
User Manual
Page 12
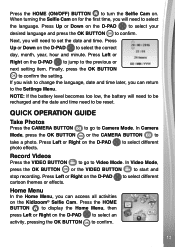
... day, month, year, hour and minute. Quick Operation Guide Take Photos Press the CAMERA BUTTON to go to start and stop recording. Press the HOME (ON/OFF) BUTTON to Camera Mode. Press Up or Down on . Finally, press the OK BUTTON to confirm. In Camera Mode, press the OK BUTTON or the CAMERA BUTTON to the previous or next setting item. When turning the Selfie Cam on the D-PAD to jump...
... day, month, year, hour and minute. Quick Operation Guide Take Photos Press the CAMERA BUTTON to go to start and stop recording. Press the HOME (ON/OFF) BUTTON to Camera Mode. Press Up or Down on . Finally, press the OK BUTTON to confirm. In Camera Mode, press the OK BUTTON or the CAMERA BUTTON to the previous or next setting item. When turning the Selfie Cam on the D-PAD to jump...

User Manual
Page 13
...: • You will see a removable drive called VTech 1937 on the computer. Connect to a Computer for 2 seconds. To turn off after a short period of the micro USB cable into a USB port on your computer, 13 Once connected, you can connect Kidizoom® Selfie Cam to a PC or Mac computer using the included micro USB cable. Please follow the instructions on the D-PAD to view the next or...
...: • You will see a removable drive called VTech 1937 on the computer. Connect to a Computer for 2 seconds. To turn off after a short period of the micro USB cable into a USB port on your computer, 13 Once connected, you can connect Kidizoom® Selfie Cam to a PC or Mac computer using the included micro USB cable. Please follow the instructions on the D-PAD to view the next or...

User Manual
Page 15
...PAD to the Settings section in this manual for the best results. If your friends in each of the frames. Macintosh Hardware Requirements: Macintosh Computer with an Intel® processor Memory: 512 MB RAM 300 MB Hard disk space USB Port required Macintosh Software Requirements: Mac OS X version... the DELETE BUTTON. in the United States and other countries. Please ensure that light conditions are detected. NOTE: The Self-Timer can be changed in Settings, please refer to select a style, then take photos of you and your Selfie Cam does not detect a face, it will then activate a...
...PAD to the Settings section in this manual for the best results. If your friends in each of the frames. Macintosh Hardware Requirements: Macintosh Computer with an Intel® processor Memory: 512 MB RAM 300 MB Hard disk space USB Port required Macintosh Software Requirements: Mac OS X version... the DELETE BUTTON. in the United States and other countries. Please ensure that light conditions are detected. NOTE: The Self-Timer can be changed in Settings, please refer to select a style, then take photos of you and your Selfie Cam does not detect a face, it will then activate a...

User Manual
Page 17
...add and press the OK BUTTON to take a photo. Press Left or Right on the D-PAD to select a previously taken photo and press the OK BUTTON to the Advanced Settings of the outline. To begin . NOTE: To change to confirm. Use the D-PAD to select an option ...Make Up Studio In the Make Up Studio, there are in Camera Mode or downloaded from a computer cannot be displayed on the screen. NOTE: The Make Up Studio activities only support photos which are taken within the remainder of a specific effect, press Up on the D-PAD when the effect is selected. A face outline will be used...
...add and press the OK BUTTON to take a photo. Press Left or Right on the D-PAD to select a previously taken photo and press the OK BUTTON to the Advanced Settings of the outline. To begin . NOTE: To change to confirm. Use the D-PAD to select an option ...Make Up Studio In the Make Up Studio, there are in Camera Mode or downloaded from a computer cannot be displayed on the screen. NOTE: The Make Up Studio activities only support photos which are taken within the remainder of a specific effect, press Up on the D-PAD when the effect is selected. A face outline will be used...

User Manual
Page 19
... right eye shadow. Use the D-PAD to select an option and press the OK BUTTON to take a photo. 2. NOTE: To change the shape of the effect. 19 Use the D-PAD to move the position of a specific effect, press Up on the D-PAD to select a previously taken photo and then press the OK BUTTON to the Advanced Settings of the effect...
... right eye shadow. Use the D-PAD to select an option and press the OK BUTTON to take a photo. 2. NOTE: To change the shape of the effect. 19 Use the D-PAD to move the position of a specific effect, press Up on the D-PAD to select a previously taken photo and then press the OK BUTTON to the Advanced Settings of the effect...
User Manual
Page 21
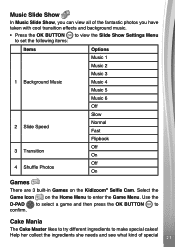
... the Home Menu to enter the Game Menu. Use the D-PAD to select a game and then press the OK BUTTON to make special cakes! Cake Mania The Cake Master likes to try different ingredients to confirm. Select the Game Icon on the Kidizoom® Selfie Cam. Help her collect the ingredients she needs and see what kind of the fantastic photos you can...
... the Home Menu to enter the Game Menu. Use the D-PAD to select a game and then press the OK BUTTON to make special cakes! Cake Mania The Cake Master likes to try different ingredients to confirm. Select the Game Icon on the Kidizoom® Selfie Cam. Help her collect the ingredients she needs and see what kind of the fantastic photos you can...

User Manual
Page 23
... some flickering 23 In Settings, use the D-PAD to make a selection and press the OK BUTTON to select when using a memory card. • Only the 320 X 240 and 160 X 120 video resolutions support video cartoon themes and effects. Self-Timer : To turn OFF automatically every time the Selfie Cam is better, but the video size will take up all of the Selfie Cam. When the Self-Timer...
... some flickering 23 In Settings, use the D-PAD to make a selection and press the OK BUTTON to select when using a memory card. • Only the 320 X 240 and 160 X 120 video resolutions support video cartoon themes and effects. Self-Timer : To turn OFF automatically every time the Selfie Cam is better, but the video size will take up all of the Selfie Cam. When the Self-Timer...
User Manual
Page 24
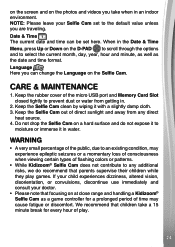
...Language Here you take a 15 minute break for a prolonged period of time may experience epileptic seizures or a momentary loss of consciousness when viewing certain types of flashing colors or patterns. • While Kidizoom® Selfie Cam does not contribute to any direct heat source. 4. Keep the Selfie Cam out of play games. Do not drop the Selfie Cam... of the micro USB port and Memory Card Slot closed tightly to an existing condition, may cause fatigue or discomfort. Date & Time The current date and time can change the Language on the Selfie Cam. NOTE: Please leave...
...Language Here you take a 15 minute break for a prolonged period of time may experience epileptic seizures or a momentary loss of consciousness when viewing certain types of flashing colors or patterns. • While Kidizoom® Selfie Cam does not contribute to any direct heat source. 4. Keep the Selfie Cam out of play games. Do not drop the Selfie Cam... of the micro USB port and Memory Card Slot closed tightly to an existing condition, may cause fatigue or discomfort. Date & Time The current date and time can change the Language on the Selfie Cam. NOTE: Please leave...
User Manual
Page 25
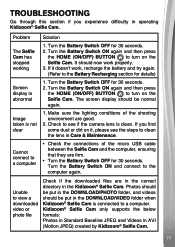
... Videos in operating Kidizoom® Selfie Cam. Turn the Battery Switch OFF for 30 seconds. 2. The screen display should be put in the DOWNLOAD/PHOTO folder, and videos should now work , recharge the battery and try again. (Refer to view a downloaded video or photo file Check if the downloaded files are good. 2. Problem The Selfie Cam has stopped working Screen display is abnormal Image taken is not clear Cannot connect to see the steps...
... Videos in operating Kidizoom® Selfie Cam. Turn the Battery Switch OFF for 30 seconds. 2. The screen display should be put in the DOWNLOAD/PHOTO folder, and videos should now work , recharge the battery and try again. (Refer to view a downloaded video or photo file Check if the downloaded files are good. 2. Problem The Selfie Cam has stopped working Screen display is abnormal Image taken is not clear Cannot connect to see the steps...
User Manual
Page 26
... a driver comes standard on the lighting environment. Question 2: What is looking for further assistance. Answer: Please make sure the Battery Switch is ON and the battery is no separate driver needed for a driver. or 1-877-352-8697 in the U.S. Answer: There is charged. 26 It uses a standard USB mass storage device driver. Question 3: Why won't my Kidizoom® Selfie Cam turn ON? A support representative will not work with any problems...
... a driver comes standard on the lighting environment. Question 2: What is looking for further assistance. Answer: Please make sure the Battery Switch is ON and the battery is no separate driver needed for a driver. or 1-877-352-8697 in the U.S. Answer: There is charged. 26 It uses a standard USB mass storage device driver. Question 3: Why won't my Kidizoom® Selfie Cam turn ON? A support representative will not work with any problems...

User Manual
Page 27
... the videos on a enlarged screen will soften the edges in a blurred picture. The video quality of Kidizoom® Selfie Cam to my computer. Question 8: I followed the instructions (connecting the micro USB cable to improve the picture quality? This too can do at any way to allow for a longer exposure time. Is there anything I need to do to the Selfie Cam and computer) and the new drive appears...
... the videos on a enlarged screen will soften the edges in a blurred picture. The video quality of Kidizoom® Selfie Cam to my computer. Question 8: I followed the instructions (connecting the micro USB cable to improve the picture quality? This too can do at any way to allow for a longer exposure time. Is there anything I need to do to the Selfie Cam and computer) and the new drive appears...
User Manual
Page 28
... is accompanied by moving the JPEG image files into the folder DOWNLOAD/PHOTO. connected the micro USB cable to provide reasonable protection against harmful interference in a residential installation. VTech® Electronics North America, L.L.C. A service representative will be viewed on Kidizoom® Selfie Cam, you can open the drive, look under the Customer Support link with the limits for you to know that you...
... is accompanied by moving the JPEG image files into the folder DOWNLOAD/PHOTO. connected the micro USB cable to provide reasonable protection against harmful interference in a residential installation. VTech® Electronics North America, L.L.C. A service representative will be viewed on Kidizoom® Selfie Cam, you can open the drive, look under the Customer Support link with the limits for you to know that you...

