
M470VSE User Manual
Page 1
USER GUIDE MOMDODEELLSS // E3D320VX // ME3D44270V0XVSE // ME3D54750V0XVSE M650VSE INSTALLING YOUR new TV CONTROLS & CONNECTIONS CONNECTING YOUR DEVICES USING THE ON-SCREEN MENU USING THE USB MEDIA PLAYER USING VIZIO INTERNET APPS TROUBLESHOOTING & SUPPORT Help, SPECs, warranty & LEGAL
USER GUIDE MOMDODEELLSS // E3D320VX // ME3D44270V0XVSE // ME3D54750V0XVSE M650VSE INSTALLING YOUR new TV CONTROLS & CONNECTIONS CONNECTING YOUR DEVICES USING THE ON-SCREEN MENU USING THE USB MEDIA PLAYER USING VIZIO INTERNET APPS TROUBLESHOOTING & SUPPORT Help, SPECs, warranty & LEGAL
M470VSE User Manual
Page 6
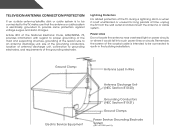
... Discharge Unit (NEC Section 810-20) Grounding Conductors (NEC Section 810-21) Ground Clamps Power Service Grounding Electrode System (NEC ART 250, part H) Remember, the screen of time, unplug the TV from the wall outlet and disconnect the antenna or cable system. Article 810 of the National Electrical Code, ANSI/NFPSA...
... Discharge Unit (NEC Section 810-20) Grounding Conductors (NEC Section 810-21) Ground Clamps Power Service Grounding Electrode System (NEC ART 250, part H) Remember, the screen of time, unplug the TV from the wall outlet and disconnect the antenna or cable system. Article 810 of the National Electrical Code, ANSI/NFPSA...
M470VSE User Manual
Page 7
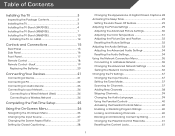
... Connecting to a Wireless Network 24 Completing the First-Time Setup 25 Using the On-Screen Menu 26 Navigating the On-Screen Menu 26 Changing the Input Source 27 Changing the Screen Aspect Ratio 27 Setting Up Closed Captioning 28 Changing the Appearance of Contents Installing the TV... 3 Inspecting the Package Contents 3 Installing the TV 3 Installing the TV Stand (M470VSE 4 Installing the TV Stand (M550VSE 7 Installing the...
... Connecting to a Wireless Network 24 Completing the First-Time Setup 25 Using the On-Screen Menu 26 Navigating the On-Screen Menu 26 Changing the Input Source 27 Changing the Screen Aspect Ratio 27 Setting Up Closed Captioning 28 Changing the Appearance of Contents Installing the TV... 3 Inspecting the Package Contents 3 Installing the TV 3 Installing the TV Stand (M470VSE 4 Installing the TV Stand (M550VSE 7 Installing the...
M470VSE User Manual
Page 8
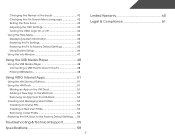
Changing the Names of the Inputs 42 Changing the On-Screen Menu Language 42 Setting the Time Zone 43 Adjusting the CEC Settings 43 Turning the VIZIO Logo On or Off 44 Using the Help Menu 44 Displaying System Information 45 Resetting the TV Settings 45 Restoring the TV to Factory Default... Using the USB Media Player 48 Using the USB Media Player 48 Connecting a USB Thumb Drive to the TV 48 Playing USB Media 48 Using VIZIO Internet Apps 51 Using the VIA Shortcut Buttons 51 Using the VIA Dock 51 Moving an App on the VIA Dock 51 Adding a New App...
Changing the Names of the Inputs 42 Changing the On-Screen Menu Language 42 Setting the Time Zone 43 Adjusting the CEC Settings 43 Turning the VIZIO Logo On or Off 44 Using the Help Menu 44 Displaying System Information 45 Resetting the TV Settings 45 Restoring the TV to Factory Default... Using the USB Media Player 48 Using the USB Media Player 48 Connecting a USB Thumb Drive to the TV 48 Playing USB Media 48 Using VIZIO Internet Apps 51 Using the VIA Shortcut Buttons 51 Using the VIA Dock 51 Moving an App on the VIA Dock 51 Adding a New App...
M470VSE User Manual
Page 11
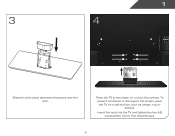
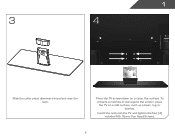
Insert the neck into place over the neck. 1 3 4 Slide the collar piece downward into the TV and tighten the four (4) included M4 14mm Pan HeaTdhisSPcrordeucwt Ssol.d Separately 5 Place the TV screen-down on a soft surface, such as carpet, rug, or blanket. To prevent scratches or damage to the screen, place the TV on a clean, flat surface.
Insert the neck into place over the neck. 1 3 4 Slide the collar piece downward into the TV and tighten the four (4) included M4 14mm Pan HeaTdhisSPcrordeucwt Ssol.d Separately 5 Place the TV screen-down on a soft surface, such as carpet, rug, or blanket. To prevent scratches or damage to the screen, place the TV on a clean, flat surface.
M470VSE User Manual
Page 14
To prevent scratches or damage to the screen, place the TV on a clean, flat surface. Insert the neck into place over the neck. Place the TV screen-down on a soft surface, such as carpet, rug, or blanket. 1 3 4 Slide the collar piece downward into the TV and tighten the four (4) included M5 16mm Pan HeaTdhisSPcrordeucwt Ssol.d Separately 8
To prevent scratches or damage to the screen, place the TV on a clean, flat surface. Insert the neck into place over the neck. Place the TV screen-down on a soft surface, such as carpet, rug, or blanket. 1 3 4 Slide the collar piece downward into the TV and tighten the four (4) included M5 16mm Pan HeaTdhisSPcrordeucwt Ssol.d Separately 8
M470VSE User Manual
Page 18
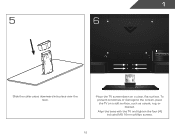
Place the TV screen-down on a soft surface, such as carpet, rug, or blanket. Align the base with the TV and tighten the four (4) included M5 16mm phillips screws. 12 1 5 6 Slide the collar piece downward into place over the neck. To prevent scratches or damage to the screen, place the TV on a clean, flat surface.
Place the TV screen-down on a soft surface, such as carpet, rug, or blanket. Align the base with the TV and tighten the four (4) included M5 16mm phillips screws. 12 1 5 6 Slide the collar piece downward into place over the neck. To prevent scratches or damage to the screen, place the TV on a clean, flat surface.
M470VSE User Manual
Page 22
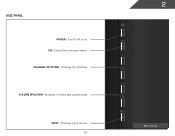
Increase or decrease volume level. Open the on . VIA - CHANNEL UP/DOWN - Change input source. 16 2 VIA CH+ CHVOL+ VOLINPUT Side Panel INPUT - Turn TV off or on -screen menu. Change the channel. Side Panel POWER - VOLUME UP/DOWN -
Increase or decrease volume level. Open the on . VIA - CHANNEL UP/DOWN - Change input source. 16 2 VIA CH+ CHVOL+ VOLINPUT Side Panel INPUT - Turn TV off or on -screen menu. Change the channel. Side Panel POWER - VOLUME UP/DOWN -

M470VSE User Manual
Page 24
...-channel. (For example, 18-4 or 18-5.) Remote Control 18 App launcher Quickly launch the pictured app. Menu Display the on -screen menu. V Button Open the VIA dock. Exit Close the on -screen menu. Wide Switch the display mode. Power Turn TV on or off or on. Dash Use with number pad to.... A/V Controls Control USB media player. Number Pad Manually enter a channel. Info Display the info window. Arrow Navigate the on -screen menu. Channel Up/Down Change the channel. Volume Up/Down Increase or decrease loudness of the audio. Guide Display the info window. Ok Select the ...
...-channel. (For example, 18-4 or 18-5.) Remote Control 18 App launcher Quickly launch the pictured app. Menu Display the on -screen menu. V Button Open the VIA dock. Exit Close the on -screen menu. Wide Switch the display mode. Power Turn TV on or off or on. Dash Use with number pad to.... A/V Controls Control USB media player. Number Pad Manually enter a channel. Info Display the info window. Arrow Navigate the on -screen menu. Channel Up/Down Change the channel. Volume Up/Down Increase or decrease loudness of the audio. Guide Display the info window. Ok Select the ...
M470VSE User Manual
Page 25
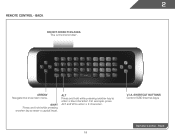
SHIFT Press and hold while pressing another key to enter a # character. Shortcut buttons Control VIZIO Internet Apps Remote Control - 2 Remote Control - BacK do not cover this area This is the transmitter. For example, press ALT and W to enter a capital letter. ARROW Navigate the on-screen menu. V.I.A. Back 19 Alt Press and hold while pressing another key to enter a blue character.
SHIFT Press and hold while pressing another key to enter a # character. Shortcut buttons Control VIZIO Internet Apps Remote Control - 2 Remote Control - BacK do not cover this area This is the transmitter. For example, press ALT and W to enter a capital letter. ARROW Navigate the on-screen menu. V.I.A. Back 19 Alt Press and hold while pressing another key to enter a blue character.
M470VSE User Manual
Page 31
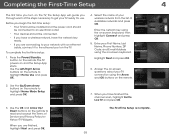
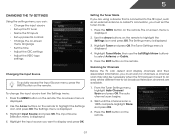
...steps necessary to your TV connection using the on and the Setup App starts. The First-Time Setup is complete. 25 The TV powers on -screen keyboard. Use the OK and Arrow Up/ Down buttons on the remote. 2. Highlight Next and press OK. 6. When you through each of ...available networks and press OK. To complete the first-time setup: 1. Answer the on-screen questions about your network with an ethernet cable, connect it to the ethernet port on the remote to Live TV and press OK. 3. Before you...
...steps necessary to your TV connection using the on and the Setup App starts. The First-Time Setup is complete. 25 The TV powers on -screen keyboard. Use the OK and Arrow Up/ Down buttons on the remote. 2. Highlight Next and press OK. 6. When you through each of ...available networks and press OK. To complete the first-time setup: 1. Answer the on-screen questions about your network with an ethernet cable, connect it to the ethernet port on the remote to Live TV and press OK. 3. Before you...
M470VSE User Manual
Page 32
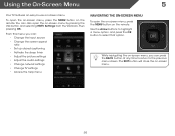
...you can press the BACK button at any time to return to select that option. You can : • Change the input source • Change the screen aspect ratio • Set up closed captioning • Activate the sleep timer • Adjust the picture settings • Adjust the audio settings • ...Change network settings • Change TV settings • Access the help menu Navigating the On-Screen Menu To open the on-screen menu, press the MENU button on the remote. Use the Arrow buttons to highlight a menu option, and press the OK button to...
...you can press the BACK button at any time to return to select that option. You can : • Change the input source • Change the screen aspect ratio • Set up closed captioning • Activate the sleep timer • Adjust the picture settings • Adjust the audio settings • ...Change network settings • Change TV settings • Access the help menu Navigating the On-Screen Menu To open the on-screen menu, press the MENU button on the remote. Use the Arrow buttons to highlight a menu option, and press the OK button to...

M470VSE User Manual
Page 33
.... This option is only available when the TV is displayed. 4. If you wish to highlight the Settings icon and press OK. To change the screen aspect ratio: 1. If you must first change the input source in five different modes: Wide, Zoom, Normal, Panoramic, and Stretch. Use the ...Up/Down Arrow buttons on the remote to highlight your desired screen mode and press OK: • Normal preserves the content's original aspect ratio. The Input Source Selection menu is displaying a 720p/1080i/1080p source....
.... This option is only available when the TV is displayed. 4. If you wish to highlight the Settings icon and press OK. To change the screen aspect ratio: 1. If you must first change the input source in five different modes: Wide, Zoom, Normal, Panoramic, and Stretch. Use the ...Up/Down Arrow buttons on the remote to highlight your desired screen mode and press OK: • Normal preserves the content's original aspect ratio. The Input Source Selection menu is displaying a 720p/1080i/1080p source....
M470VSE User Manual
Page 34
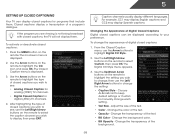
... Up Closed Captioning Your TV can be displayed according to display, then press EXIT. The Digital CC Style menu appears. 3. Press the MENU button on -screen menu is displayed. 2. After highlighting the type of digital closed captions you are viewing is displayed. 3. To change the setting: • Caption Style - Closed captions...
... Up Closed Captioning Your TV can be displayed according to display, then press EXIT. The Digital CC Style menu appears. 3. Press the MENU button on -screen menu is displayed. 2. After highlighting the type of digital closed captions you are viewing is displayed. 3. To change the setting: • Caption Style - Closed captions...
M470VSE User Manual
Page 35
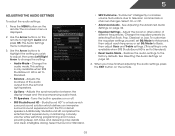
... TV to values that will turn the TV off after which you are satisfied with the appearance of time. Use the Arrow buttons on the screen. From the Sleep Timer menu, use the sleep timer: 1. This is the recommended setting. • Movie mode sets the picture settings to values ...perfect for watching a movie in the most cases. Change the edge type. 4. Press the MENU button on -screen menu is displayed. 2. The Timer menu is displayed. 3. Use the Up/Down Arrow buttons on the remote. Highlight Off or 10 min and press OK...
... TV to values that will turn the TV off after which you are satisfied with the appearance of time. Use the Arrow buttons on the screen. From the Sleep Timer menu, use the sleep timer: 1. This is the recommended setting. • Movie mode sets the picture settings to values ...perfect for watching a movie in the most cases. Change the edge type. 4. Press the MENU button on -screen menu is displayed. 2. The Timer menu is displayed. 3. Use the Up/Down Arrow buttons on the remote. Highlight Off or 10 min and press OK...
M470VSE User Manual
Page 39
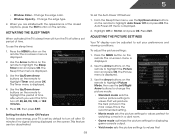
.... • Lip Sync - 5 Adjusting the Audio Settings To adjust the audio settings: 1. Press the MENU button on or off. • SRS StudioSound HD - The on-screen menu is displayed. 3. Adjusts the loudness of different frequencies. Turns the built-in speakers on the remote.
.... • Lip Sync - 5 Adjusting the Audio Settings To adjust the audio settings: 1. Press the MENU button on or off. • SRS StudioSound HD - The on-screen menu is displayed. 3. Adjusts the loudness of different frequencies. Turns the built-in speakers on the remote.
M470VSE User Manual
Page 40
The Advanced Audio menu is displayed. 3. Press the MENU button on -screen menu is displayed. 2. The on the remote. Use the Arrow buttons to the factory defaults?" 4. When you have finished adjusting the advanced audio settings, press ...
The Advanced Audio menu is displayed. 3. Press the MENU button on -screen menu is displayed. 2. The on the remote. Use the Arrow buttons to the factory defaults?" 4. When you have finished adjusting the advanced audio settings, press ...

M470VSE User Manual
Page 41
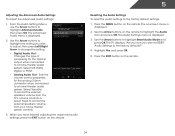
...this is the network's SSID) and press OK. 5. Highlight Show keyboard and press OK to open the on -screen keyboard. 5. Highlight Show keyboard and press OK to open the on -screen keyboard. 4. Connecting to a Wireless Network To connect to a wireless network whose network name (SSID) is being ... the name of available wireless networks, is internet-ready, featuring both an ethernet port and built-in high-speed wireless-N. Using the on -screen keyboard, enter your network's password, then highlight Connect and press OK. 6. If you will not see your network's name (SSID), then...
...this is the network's SSID) and press OK. 5. Highlight Show keyboard and press OK to open the on -screen keyboard. 5. Highlight Show keyboard and press OK to open the on -screen keyboard. 4. Connecting to a Wireless Network To connect to a wireless network whose network name (SSID) is being ... the name of available wireless networks, is internet-ready, featuring both an ethernet port and built-in high-speed wireless-N. Using the on -screen keyboard, enter your network's password, then highlight Connect and press OK. 6. If you will not see your network's name (SSID), then...

M470VSE User Manual
Page 42
.... • Subnet Mask - The IP Setting menu is displayed. 2. The subnet mask. • Default Gateway - Your network's default gateway address. • Pref. The Test Connection screen displays the connection method, network name, signal strength, and download speed of the other settings. • IP Address - The IP address assigned to change advanced...
.... • Subnet Mask - The IP Setting menu is displayed. 2. The subnet mask. • Default Gateway - Your network's default gateway address. • Pref. The Test Connection screen displays the connection method, network name, signal strength, and download speed of the other settings. • IP Address - The IP address assigned to change advanced...
M470VSE User Manual
Page 43
...are using a device that is displayed. 4. The Settings menu is 100% complete. Press the EXIT button on the remote. Use the Arrow buttons on -screen menu is displayed. 4. Highlight the input source you must set the tuner mode. 1. Use the Arrow buttons on the remote. The auto channel scan ... TV tuner • Name the TV inputs • Set up parental controls • Change the on-screen menu language • Set the time • Adjust the CEC settings • Adjust the VIZIO logo settings Changing the Input Source To quickly access the Input Source menu, press the INPUT button on...
...are using a device that is displayed. 4. The Settings menu is 100% complete. Press the EXIT button on the remote. Use the Arrow buttons on -screen menu is displayed. 4. Highlight the input source you must set the tuner mode. 1. Use the Arrow buttons on the remote. The auto channel scan ... TV tuner • Name the TV inputs • Set up parental controls • Change the on-screen menu language • Set the time • Adjust the CEC settings • Adjust the VIZIO logo settings Changing the Input Source To quickly access the Input Source menu, press the INPUT button on...


