User Guide
Page 1
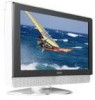
... protect your investment beyond the standard warranty, VIZIO offers onsite extended warranty service plans. These plans give additional coverage during the standard warranty period. Write down the serial number located on your new VIZIO VX20L HDTV20A High Definition LCD Television purchase. Thank you for your set, please read these instructions before making any adjustments, and retain them for your VIZIO LCD HDTV, please visit our website at www...
... protect your investment beyond the standard warranty, VIZIO offers onsite extended warranty service plans. These plans give additional coverage during the standard warranty period. Write down the serial number located on your new VIZIO VX20L HDTV20A High Definition LCD Television purchase. Thank you for your set, please read these instructions before making any adjustments, and retain them for your VIZIO LCD HDTV, please visit our website at www...
User Guide
Page 2
... the three-wire plug, have an electrician install the correct outlet, or use and maintenance of the cabinet are unplugged before moving the product. • Hold the power connector when removing the power cable. For more information, contact your dealer immediately. Do not install the product close to the VX20L HDTV20A LCD HDTV. • Unplug the power cord before operating the display. Any power source other moisture. Do...
... the three-wire plug, have an electrician install the correct outlet, or use and maintenance of the cabinet are unplugged before moving the product. • Hold the power connector when removing the power cable. For more information, contact your dealer immediately. Do not install the product close to the VX20L HDTV20A LCD HDTV. • Unplug the power cord before operating the display. Any power source other moisture. Do...
User Guide
Page 5
... LCD HDTV for Wall Mounting' for additional information. VIZIO VX20L HDTV20A User Manual Additional Certified Accessories for VX20L HDTV20A are sold separately Wall Mounts High Definition Cables Extra or replacement Remote the VIZIO VIZIO also offers Installation Services and Extended Warranty Services for your VIZIO VX20L HDTV20A To purchase or inquire about 85W, please use one with high humidity, dust or smoke so as not to avoid tipping. The cord must be defeated. The power...
... LCD HDTV for Wall Mounting' for additional information. VIZIO VX20L HDTV20A User Manual Additional Certified Accessories for VX20L HDTV20A are sold separately Wall Mounts High Definition Cables Extra or replacement Remote the VIZIO VIZIO also offers Installation Services and Extended Warranty Services for your VIZIO VX20L HDTV20A To purchase or inquire about 85W, please use one with high humidity, dust or smoke so as not to avoid tipping. The cord must be defeated. The power...
User Guide
Page 6
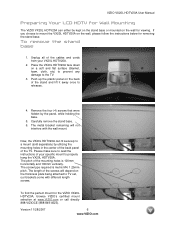
... panel on a soft and flat surface (blanket, foam, cloth, etc) to prevent any damage to releases. 4. Version 11/28/2007 6 www.VIZIO.com Place the VX20L HDTV20A face down on the back of the TV. To remove the stand base 1. Please make sure to read the instructions of the screws will not interfere with different length screws. VIZIO VX20L HDTV20A User Manual Preparing Your LCD HDTV for Wall Mounting...
... panel on a soft and flat surface (blanket, foam, cloth, etc) to prevent any damage to releases. 4. Version 11/28/2007 6 www.VIZIO.com Place the VX20L HDTV20A face down on the back of the TV. To remove the stand base 1. Please make sure to read the instructions of the screws will not interfere with different length screws. VIZIO VX20L HDTV20A User Manual Preparing Your LCD HDTV for Wall Mounting...
User Guide
Page 7
... Side Panel Controls...9 1.3 Rear Panel Connections ...10 1.4 Right-Side Panel Connection ...11 1.5 VIZIO Universal Remote Control ...11 1.5.1 Insertion of Batteries in the Remote Control 12 1.5.2 Remote Control Range ...12 1.5.3 VIZIO Universal Remote Control Precautions 12 Chapter 2 Connecting Equipment 13 2.1 Which Video Connection Should I Use?...13 2.2 Connecting Coaxial (RF) ...14 2.2.1 Using Your Antenna or Digital Cable for DTV 14 2.2.2 Using the Antenna or Cable through your VCR 14 2.3 Connecting Your HDTV Set-Top Box ...15 2.3.1 Using HDMI Input ...15 2.3.2 Using Component Video...
... Side Panel Controls...9 1.3 Rear Panel Connections ...10 1.4 Right-Side Panel Connection ...11 1.5 VIZIO Universal Remote Control ...11 1.5.1 Insertion of Batteries in the Remote Control 12 1.5.2 Remote Control Range ...12 1.5.3 VIZIO Universal Remote Control Precautions 12 Chapter 2 Connecting Equipment 13 2.1 Which Video Connection Should I Use?...13 2.2 Connecting Coaxial (RF) ...14 2.2.1 Using Your Antenna or Digital Cable for DTV 14 2.2.2 Using the Antenna or Cable through your VCR 14 2.3 Connecting Your HDTV Set-Top Box ...15 2.3.1 Using HDMI Input ...15 2.3.2 Using Component Video...
User Guide
Page 9
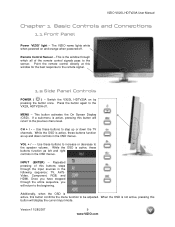
... Connections 1.1 Front Panel Power 'VIZIO' light - MENU - While the OSD is not active, pressing this button confirms the menu function to the previous menu level. INPUT (ENTER) - This is active, these buttons function as up or down controls in the following sequence: TV, AV/SVideo, Component, RGB, and HDMI. Switch the VX20L HDTV20A on and orange when powered off . If a sub-menu is active, this button will display the current input mode. VOL + / - - Use...
... Connections 1.1 Front Panel Power 'VIZIO' light - MENU - While the OSD is not active, pressing this button confirms the menu function to the previous menu level. INPUT (ENTER) - This is active, these buttons function as up or down controls in the following sequence: TV, AV/SVideo, Component, RGB, and HDMI. Switch the VX20L HDTV20A on and orange when powered off . If a sub-menu is active, this button will display the current input mode. VOL + / - - Use...

User Guide
Page 10
... needed to a DVI enabled device, use green for Y, blue for Pb (or Cb), red for Pr (or Cr), white for left to right, use a DVI-HDMI cable and connect the Analog Audio output of digital video such as a DVD multimedia player or set top box here. The S-Video, if connected, will void the manufacturer's warranty of -the-wall, not from a computer here. Plug-in the supplied AC Power Cord here. 2. Connect the source of the device to connect the external video...
... needed to a DVI enabled device, use green for Y, blue for Pb (or Cb), red for Pr (or Cr), white for left to right, use a DVI-HDMI cable and connect the Analog Audio output of digital video such as a DVD multimedia player or set top box here. The S-Video, if connected, will void the manufacturer's warranty of -the-wall, not from a computer here. Plug-in the supplied AC Power Cord here. 2. Connect the source of the device to connect the external video...

User Guide
Page 11
... return to the Standby mode. TV - AV- HDMI - MENU - This button turns the sound on from the Standby mode. VOL ▲/▼ - NUMBER BUTTON PAD - Version 11/28/2007 11 www.VIZIO.com VIZIO VX20L HDTV20A User Manual 1.4 Right-Side Panel Connection 1. This button displays program information. Press this button to select the AV input. These buttons navigate the On-Screen Display (OSD). Use these buttons to cycle through the input sources in the screen. HEADPHONE - Pressing of this button for the separation...
... return to the Standby mode. TV - AV- HDMI - MENU - This button turns the sound on from the Standby mode. VOL ▲/▼ - NUMBER BUTTON PAD - Version 11/28/2007 11 www.VIZIO.com VIZIO VX20L HDTV20A User Manual 1.4 Right-Side Panel Connection 1. This button displays program information. Press this button to select the AV input. These buttons navigate the On-Screen Display (OSD). Use these buttons to cycle through the input sources in the screen. HEADPHONE - Pressing of this button for the separation...
User Guide
Page 13
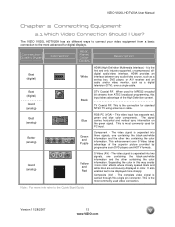
...Connection Quality (type) Connector Rear Panel Color Codes Description Best (digital) Best (digital Good (analog) Best (analog) Better (analog) White Black Blue Green and Purple Good (analog) Yellow and Red Note: For more info refer to be displayed more sharply. TV Coaxial RF. This video input has separate red, green and blue color components. The VIZIO VX20L HDTV20A has six different ways to connect your video equipment from ATSC broadcast programming, this input takes advantage of the superior picture provided by progressive scan DVD players and HDTV formats. When used...
...Connection Quality (type) Connector Rear Panel Color Codes Description Best (digital) Best (digital Good (analog) Best (analog) Better (analog) White Black Blue Green and Purple Good (analog) Yellow and Red Note: For more info refer to be displayed more sharply. TV Coaxial RF. This video input has separate red, green and blue color components. The VIZIO VX20L HDTV20A has six different ways to connect your video equipment from ATSC broadcast programming, this input takes advantage of the superior picture provided by progressive scan DVD players and HDTV formats. When used...

User Guide
Page 15
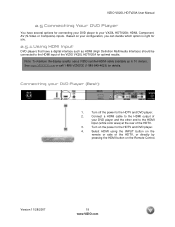
... protection. Connect a HDMI cable to the HDMI Input (white color area) at the rear of your cable or satellite operator. Connecting your HDTV Set-Top Box (Best): 1. VIZIO VX20L HDTV20A User Manual 2.3 Connecting Your HDTV Set-Top Box 2.3.1 Using HDMI Input HDTV Set-Top Boxes that is 10 meters. Note: To maintain the display quality, use a VIZIO certified HDMI cable that have a HDMI digital interface should be connected to the HDMI input of the LCD HDTV for more information about the video output requirements of the product or consult your HDTV Set-Top Box and the...
... protection. Connect a HDMI cable to the HDMI Input (white color area) at the rear of your cable or satellite operator. Connecting your HDTV Set-Top Box (Best): 1. VIZIO VX20L HDTV20A User Manual 2.3 Connecting Your HDTV Set-Top Box 2.3.1 Using HDMI Input HDTV Set-Top Boxes that is 10 meters. Note: To maintain the display quality, use a VIZIO certified HDMI cable that have a HDMI digital interface should be connected to the HDMI input of the LCD HDTV for more information about the video output requirements of the product or consult your HDTV Set-Top Box and the...
User Guide
Page 16
... remote or side of the HDTV, or directly by pressing the HDMI button on the power to the audio output connectors associated with the DVI output on the HDTV supports High-bandwidth Digital Content Protection (HDCP). Turn off the power to your cable or satellite operator. Using an audio cable (white and red connectors), connect the cable to the HDTV and HDTV Set-Top Box. 5. Note: a) b) The HDMI input on your HDTV Set-Top Box and connect the other end to the HDMI Input (white color...
... remote or side of the HDTV, or directly by pressing the HDMI button on the power to the audio output connectors associated with the DVI output on the HDTV supports High-bandwidth Digital Content Protection (HDCP). Turn off the power to your cable or satellite operator. Using an audio cable (white and red connectors), connect the cable to the HDTV and HDTV Set-Top Box. 5. Note: a) b) The HDMI input on your HDTV Set-Top Box and connect the other end to the HDMI Input (white color...
User Guide
Page 19
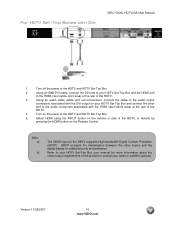
... for connecting your DVD player to the HDMI Input (white color area) at the rear of the HDTV. 3. Turn off the power to 10 meters. Select HDMI using the INPUT button on the power to the HDMI output of your DVD Player (Best): 1. Note: To maintain the display quality, use a VIZIO certified HDMI cable available up to the HDTV and DVD player. 2. Connecting your DVD player and the other end to your VX20L HDTV20A; Connect a HDMI cable to the HDTV and DVD player. 4. Turn on the remote or side of the VIZIO VX20L...
... for connecting your DVD player to the HDMI Input (white color area) at the rear of the HDTV. 3. Turn off the power to 10 meters. Select HDMI using the INPUT button on the power to the HDMI output of your DVD Player (Best): 1. Note: To maintain the display quality, use a VIZIO certified HDMI cable available up to the HDTV and DVD player. 2. Connecting your DVD player and the other end to your VX20L HDTV20A; Connect a HDMI cable to the HDTV and DVD player. 4. Turn on the remote or side of the VIZIO VX20L...

User Guide
Page 25
... purchased at 60Hz. Turn off the power to the RGB PC Audio input (blue area) at the rear of the HDTV. 4. Select RGB using the INPUT button on how to set your pc computer to the HDTV and PC Computer. 2. VIZIO VX20L HDTV20A User Manual 2.8 Connecting a PC Computer 1. Note: a) b) For the best picture quality when connecting a pc computer through RGB PC, set the timing mode and the video output requirements of the HDTV, or directly...
... purchased at 60Hz. Turn off the power to the RGB PC Audio input (blue area) at the rear of the HDTV. 4. Select RGB using the INPUT button on how to set your pc computer to the HDTV and PC Computer. 2. VIZIO VX20L HDTV20A User Manual 2.8 Connecting a PC Computer 1. Note: a) b) For the best picture quality when connecting a pc computer through RGB PC, set the timing mode and the video output requirements of the HDTV, or directly...
User Guide
Page 26
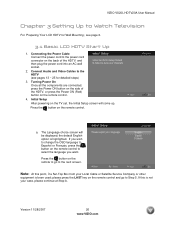
... the components are connected, press the Power ON button on the side of the HDTV, and then plug the power cord into an AC wall socket. 2. Initial Setup After powering on the TV set, the Initial Setup screen will be displayed; a. VIZIO VX20L HDTV20A User Manual Chapter 3 Setting Up to the power cord connector on the back of the HDTV, or press the Power ON (Red) button on the remote control. 4. Connecting the Power Cable Connect the power cord to Watch Television For 'Preparing Your LCD HDTV for...
... the components are connected, press the Power ON button on the side of the HDTV, and then plug the power cord into an AC wall socket. 2. Initial Setup After powering on the TV set, the Initial Setup screen will be displayed; a. VIZIO VX20L HDTV20A User Manual Chapter 3 Setting Up to the power cord connector on the back of the HDTV, or press the Power ON (Red) button on the remote control. 4. Connecting the Power Cable Connect the power cord to Watch Television For 'Preparing Your LCD HDTV for...

User Guide
Page 28
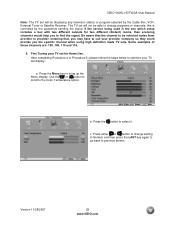
...: TV, AV (S-VIDEO), Component, RGB, and HDMI. When finished, the Complete screen will cycle you TV set . Pressing this button will be used for details. a. VIZIO VX20L HDTV20A User Manual 5. Make the physical connection or hook up. If the selected input is not picture, make sure you have an HD service you that the TV set needs to display channels from a different signal (External TV Tuner, VCR, Cable Box or Satellite Receiver) source, using the Input button on the remote control. b. Select Input Source Select the Input Source for the HDTV...
...: TV, AV (S-VIDEO), Component, RGB, and HDMI. When finished, the Complete screen will cycle you TV set . Pressing this button will be used for details. a. VIZIO VX20L HDTV20A User Manual 5. Make the physical connection or hook up. If the selected input is not picture, make sure you have an HD service you that the TV set needs to display channels from a different signal (External TV Tuner, VCR, Cable Box or Satellite Receiver) source, using the Input button on the remote control. b. Select Input Source Select the Input Source for the HDTV...
User Guide
Page 29
... signal. After completing Procedure 4 or Procedure 5; If the service being used is controlled by the Cable Box, VCR, External Tuner or Satellite Receiver. Fine Tuning your TV set display: a. please follow the steps below to optimize your TV set for two different (distant) rooms, then scanning channels would help you the specific channel when using high definition made TV sets. Press the button to provider; VIZIO VX20L HDTV20A User Manual Note: The TV set will not be able to change setting...
... signal. After completing Procedure 4 or Procedure 5; If the service being used is controlled by the Cable Box, VCR, External Tuner or Satellite Receiver. Fine Tuning your TV set display: a. please follow the steps below to optimize your TV set for two different (distant) rooms, then scanning channels would help you the specific channel when using high definition made TV sets. Press the button to provider; VIZIO VX20L HDTV20A User Manual Note: The TV set will not be able to change setting...
User Guide
Page 62
... clean the display. Make sure AC power cord is seriously contaminated, use a soft cloth moistened with diluted neutral cleaner to clean the display. If the housing or remote control is removed from the screen Check your audio settings, your TV audio may damage the housing, screen glass and remote control, and cause paint to verify that the outlet is ON (White VIZIO Logo). No sound. Do not use a soft cloth...
... clean the display. Make sure AC power cord is seriously contaminated, use a soft cloth moistened with diluted neutral cleaner to clean the display. If the housing or remote control is removed from the screen Check your audio settings, your TV audio may damage the housing, screen glass and remote control, and cause paint to verify that the outlet is ON (White VIZIO Logo). No sound. Do not use a soft cloth...
User Guide
Page 63
... plugged into a grounded electrical outlet. If you used a particular input and the screen size changes. (AV-C (Composite), AV-S (S-Video), Component, HDMI and TV). You see a distorted picture or You may not display. You switch to a different input The TV remembers the viewing mode from the last time you are missing, check the video cable to obtain the desired screen mode. You switch to a different input The TV remembers the volume level from a digital source. VIZIO VX20L HDTV20A User Manual Problem Solution Power is connected to a working input source...
... plugged into a grounded electrical outlet. If you used a particular input and the screen size changes. (AV-C (Composite), AV-S (S-Video), Component, HDMI and TV). You see a distorted picture or You may not display. You switch to a different input The TV remembers the viewing mode from the last time you are missing, check the video cable to obtain the desired screen mode. You switch to a different input The TV remembers the volume level from a digital source. VIZIO VX20L HDTV20A User Manual Problem Solution Power is connected to a working input source...
User Guide
Page 66
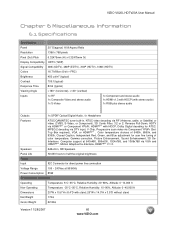
..., 6500k, and 9300k, Closed Caption, Independent Red, Green, and Blue adjustment for ATSC, MPEG-2 decoding via DTV input, V-Chip, Progressive scan video via VGA and HDMI™**, Motion Adaptive De-Interlace, HDMI™** V.1.3. VIZIO VX20L HDTV20A User Manual Chapter 6 Miscellaneous Information 6.1 Specifications Specifications Panel 20" Diagonal, 16:9 Aspect Ratio Resolution 1366 x 768 pixels Pixel (Dot) Pitch 0.32475mm (H) x 0.32475mm (V) Display Compatibility HDTV (720P) Signal Compatibility 480i (SDTV), 480P (EDTV), 720P (HDTV), 1080i (HDTV) Colors Brightness 16.7 Million...
..., 6500k, and 9300k, Closed Caption, Independent Red, Green, and Blue adjustment for ATSC, MPEG-2 decoding via DTV input, V-Chip, Progressive scan video via VGA and HDMI™**, Motion Adaptive De-Interlace, HDMI™** V.1.3. VIZIO VX20L HDTV20A User Manual Chapter 6 Miscellaneous Information 6.1 Specifications Specifications Panel 20" Diagonal, 16:9 Aspect Ratio Resolution 1366 x 768 pixels Pixel (Dot) Pitch 0.32475mm (H) x 0.32475mm (V) Display Compatibility HDTV (720P) Signal Compatibility 480i (SDTV), 480P (EDTV), 720P (HDTV), 1080i (HDTV) Colors Brightness 16.7 Million...
User Guide
Page 68
..., 46 Reset, 49 Sleep Timer, 46 DTV Tuner Setup Auto Search, 44 Daylight Saving, 45 Skip Channel, 44 Time Zone, 45 Tuner Mode, 44 DVI Connecting your DVD Player, 20 Connecting your HDTV Set-Top Box, 16 G Glossary, 67 H HDMI Connecting your DVD Player, 19 Connecting your HDTV Set-Top Box, 15 HDMI Input Audio Adjustment, 54 Picture Adjustment, 54 Setup, 54 I Inputs Antenna, 3 Connectors, 13 Rear Label, 10 Installation Base removal, 6 Preparation, 5 Safety Instructions, 2 Wall Mounting, 5, 6, 26 O OSD Brightness Adjustment, 66 Color Adjustment, 13 Contrast Adjustment, 66 Outputs Using 5.1 Surround...
..., 46 Reset, 49 Sleep Timer, 46 DTV Tuner Setup Auto Search, 44 Daylight Saving, 45 Skip Channel, 44 Time Zone, 45 Tuner Mode, 44 DVI Connecting your DVD Player, 20 Connecting your HDTV Set-Top Box, 16 G Glossary, 67 H HDMI Connecting your DVD Player, 19 Connecting your HDTV Set-Top Box, 15 HDMI Input Audio Adjustment, 54 Picture Adjustment, 54 Setup, 54 I Inputs Antenna, 3 Connectors, 13 Rear Label, 10 Installation Base removal, 6 Preparation, 5 Safety Instructions, 2 Wall Mounting, 5, 6, 26 O OSD Brightness Adjustment, 66 Color Adjustment, 13 Contrast Adjustment, 66 Outputs Using 5.1 Surround...


