SV470XVT HDTV User Manual
Page 7
VIZIO SV470XVT1A User Manual Table of Contents Chapter 1 Basic Controls and Connections 10 1.1 Front Bezel ...10 1.2 Right Side Panel Controls ...10 1.3 Rear Panel Connections ...11 1.4 Right-Side Panel Connection ...12 1.5 VIZIO Universal Remote Control ...13 1.5.1 Insertion of Batteries in the Remote Control 16 1.5.2 Remote Control Range ...16 1.5.3 VIZIO... Reset Picture Mode ...45 4.3 DTV / TV Audio Adjustment ...46 4.3.1 Audio Mode ...46 4.3.2 Equalizer...46 4.3.3 Balance...46 4.3.4 Digital Audio Out...47 4.3.5 Speakers ...47 4.3.6 Analog Audio Out ...47 4.3.7 Lip Sync...47 Added Audio...
VIZIO SV470XVT1A User Manual Table of Contents Chapter 1 Basic Controls and Connections 10 1.1 Front Bezel ...10 1.2 Right Side Panel Controls ...10 1.3 Rear Panel Connections ...11 1.4 Right-Side Panel Connection ...12 1.5 VIZIO Universal Remote Control ...13 1.5.1 Insertion of Batteries in the Remote Control 16 1.5.2 Remote Control Range ...16 1.5.3 VIZIO... Reset Picture Mode ...45 4.3 DTV / TV Audio Adjustment ...46 4.3.1 Audio Mode ...46 4.3.2 Equalizer...46 4.3.3 Balance...46 4.3.4 Digital Audio Out...47 4.3.5 Speakers ...47 4.3.6 Analog Audio Out ...47 4.3.7 Lip Sync...47 Added Audio...
SV470XVT HDTV User Manual
Page 8
VIZIO SV470XVT1A User Manual 4.3.11 Sound Effect ...50 4.3.12 DRC (Dynamic Range Compression) ...51 4.3.13 Reset Audio Mode ...51 4.4 DTV / TV Tuner Setup...52 4.4.1 Tuner Mode ...52 4.4.2 Auto Search...52 4.4.3 Partial Channel Search...53 4.4.4 Skip Channel ...53 4.4.5 MTS ...53 4.4.6 Time Zone ...54 4.4.7 Daylight Saving...54 4.5 DTV / TV Input Setup ...55 4.5.1 Language...55 4.5.2 PIP (Picture-in-Picture...73 4.17.1 Viewing Modes ...73 4.17.2 Picture-In-Picture (PIP) Mode...74 4.17.3 Adjusting Basic PIP Settings ...74 Programming the VIZIO Universal Remote Control 75 4.17.4 Programming for ...
VIZIO SV470XVT1A User Manual 4.3.11 Sound Effect ...50 4.3.12 DRC (Dynamic Range Compression) ...51 4.3.13 Reset Audio Mode ...51 4.4 DTV / TV Tuner Setup...52 4.4.1 Tuner Mode ...52 4.4.2 Auto Search...52 4.4.3 Partial Channel Search...53 4.4.4 Skip Channel ...53 4.4.5 MTS ...53 4.4.6 Time Zone ...54 4.4.7 Daylight Saving...54 4.5 DTV / TV Input Setup ...55 4.5.1 Language...55 4.5.2 PIP (Picture-in-Picture...73 4.17.1 Viewing Modes ...73 4.17.2 Picture-In-Picture (PIP) Mode...74 4.17.3 Adjusting Basic PIP Settings ...74 Programming the VIZIO Universal Remote Control 75 4.17.4 Programming for ...
SV470XVT HDTV User Manual
Page 15
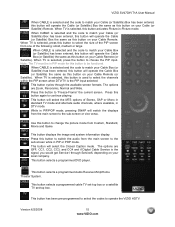
VIZIO SV470XVT1A User Manual When CABLE is selected and the code to match your Cable (or Satellite) Box has been entered, this button will operate the Cable (or Satellite) Box the same as this button on your Cable Remote (or Satellite). When TV is selected, this button activates Picture-in PIP mode ...screen to match your local company. This button will operate the Cable (or Satellite) Box the same as this button to operate the VIZIO HDTV. When TV is the PIP input selected This button cycles through Service6, depending on your Cable (or Satellite) Box has been entered, this button ...
VIZIO SV470XVT1A User Manual When CABLE is selected and the code to match your Cable (or Satellite) Box has been entered, this button will operate the Cable (or Satellite) Box the same as this button on your Cable Remote (or Satellite). When TV is selected, this button activates Picture-in PIP mode ...screen to match your local company. This button will operate the Cable (or Satellite) Box the same as this button to operate the VIZIO HDTV. When TV is the PIP input selected This button cycles through Service6, depending on your Cable (or Satellite) Box has been entered, this button ...
SV470XVT HDTV User Manual
Page 17
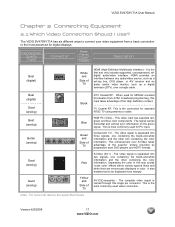
...video monitor, such as a digital television (DTV), over S-Video takes advantage of the High Definition content TV Coaxial RF. This is the connection for PC input. VIZIO SV470XVT1A User Manual Chapter 2 Connecting Equipment 2.1 Which Video Connection Should I Use? Connection Quality (type) Connector Rear...also enables text to the most commonly used for digital displays. This is carried through this input takes advantage of the superior picture provided by progressive scan DVD players and HDTV formats. This video input has separate red, green and blue color components. ...
...video monitor, such as a digital television (DTV), over S-Video takes advantage of the High Definition content TV Coaxial RF. This is the connection for PC input. VIZIO SV470XVT1A User Manual Chapter 2 Connecting Equipment 2.1 Which Video Connection Should I Use? Connection Quality (type) Connector Rear...also enables text to the most commonly used for digital displays. This is carried through this input takes advantage of the superior picture provided by progressive scan DVD players and HDTV formats. This video input has separate red, green and blue color components. ...
SV470XVT HDTV User Manual
Page 30
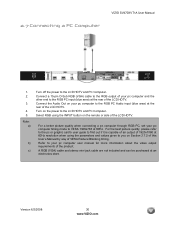
... For the best picture quality, please refer to the pc or graphic card's user guide to you on the remote or side of the LCD HDTV. Version 6/2/2008 30 www.VIZIO.com Connect the Audio Out on the power to the LCD HDTV and PC Computer. 2.7 Connecting a PC Computer VIZIO SV470XVT1A User Manual 1. ...2. 3. 4. 5. Turn on your pc computer and the other end to the RGB PC Audio input (blue area) at the rear of the LCD HDTV. Connect a 15-pin D-Sub ...
... For the best picture quality, please refer to the pc or graphic card's user guide to you on the remote or side of the LCD HDTV. Version 6/2/2008 30 www.VIZIO.com Connect the Audio Out on the power to the LCD HDTV and PC Computer. 2.7 Connecting a PC Computer VIZIO SV470XVT1A User Manual 1. ...2. 3. 4. 5. Turn on your pc computer and the other end to the RGB PC Audio input (blue area) at the rear of the LCD HDTV. Connect a 15-pin D-Sub ...
SV470XVT HDTV User Manual
Page 31
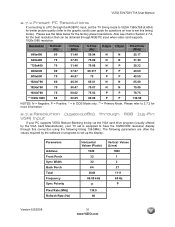
...have the 1920X1080 resolution display through the RGB PC input, set the TV timing mode to VESA 1360x768 at 60Hz for better picture quality (refer to the graphic card's user guide for questions on how to set this timing mode). VIZIO SV470XVT1A User Manual 2.7.1 Preset PC Resolutions If connecting to a PC through ... 60 37.87 60.317 P P 40.00 800x600 75 46.87 75 P P 49.50 1024x768 60 48.36 60.01 N N 65.00 1024x768 70 56.47 70.07 N N 75.00 1024x768 75 60.02 75.03 P P 78.75 **1920x1080 60 66.65 60.00 P P 136.50 NOTES: N = Negative, P = Positive, * =...
...have the 1920X1080 resolution display through the RGB PC input, set the TV timing mode to VESA 1360x768 at 60Hz for better picture quality (refer to the graphic card's user guide for questions on how to set this timing mode). VIZIO SV470XVT1A User Manual 2.7.1 Preset PC Resolutions If connecting to a PC through ... 60 37.87 60.317 P P 40.00 800x600 75 46.87 75 P P 49.50 1024x768 60 48.36 60.01 N N 65.00 1024x768 70 56.47 70.07 N N 75.00 1024x768 75 60.02 75.03 P P 78.75 **1920x1080 60 66.65 60.00 P P 136.50 NOTES: N = Negative, P = Positive, * =...
SV470XVT HDTV User Manual
Page 34
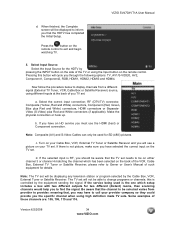
...to Owner or User's Manual of these channels are: 105, 106, 115 and 116. please refer to call your TV set . VIZIO SV470XVT1A User Manual d. this button will see a picture on the TV set . Pressing this is the one which has been selected on the side of you must use the HDMI (best...) or Component connection. Turn on your Cable Box, VCR, External TV Tuner or Satellite Receiver and you will cycle ...
...to Owner or User's Manual of these channels are: 105, 106, 115 and 116. please refer to call your TV set . VIZIO SV470XVT1A User Manual d. this button will see a picture on the TV set . Pressing this is the one which has been selected on the side of you must use the HDMI (best...) or Component connection. Turn on your Cable Box, VCR, External TV Tuner or Satellite Receiver and you will cycle ...
SV470XVT HDTV User Manual
Page 35
... either ▲or ▼ button scroll down to select it. b. Your new TV set for Home Use. Version 6/2/2008 35 www.VIZIO.com Press the MENU key again to go back to automatically reproduce the best picture quality out of your TV set display: a. Press the EXIT key once to return to select it... of the input signal which is now ready to previous screen. Press either ◄ or ► button to change setting to the Advanced Video option. VIZIO SV470XVT1A User Manual 6.
... either ▲or ▼ button scroll down to select it. b. Your new TV set for Home Use. Version 6/2/2008 35 www.VIZIO.com Press the MENU key again to go back to automatically reproduce the best picture quality out of your TV set display: a. Press the EXIT key once to return to select it... of the input signal which is now ready to previous screen. Press either ◄ or ► button to change setting to the Advanced Video option. VIZIO SV470XVT1A User Manual 6.
SV470XVT HDTV User Manual
Page 36
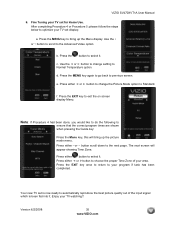
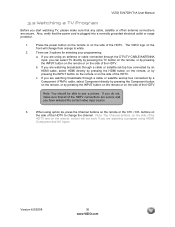
When using option 2a, press the Channel buttons on the side of the HDTV to change from orange to see a picture. Note: The Channel buttons, on the side of the HDTV and on the remote, control will change the channel. Also, verify that any cable, satellite ... Component button on the remote, or by pressing the INPUT button on the remote or on the side of the HDTV. VIZIO SV470XVT1A User Manual 3.2 Watching a TV Program Before you start watching TV, please make sure that all of the HDTV connections are secure. If you do not, make sure that the power cord...
When using option 2a, press the Channel buttons on the side of the HDTV to change from orange to see a picture. Note: The Channel buttons, on the side of the HDTV and on the remote, control will change the channel. Also, verify that any cable, satellite ... Component button on the remote, or by pressing the INPUT button on the remote or on the side of the HDTV. VIZIO SV470XVT1A User Manual 3.2 Watching a TV Program Before you start watching TV, please make sure that all of the HDTV connections are secure. If you do not, make sure that the power cord...

SV470XVT HDTV User Manual
Page 39
... completed. VIZIO SV470XVT1A User Manual Chapter 4 Advanced Adjustment of HDTV 4.1 Using the On Screen Display (OSD) The remote control or the control buttons on the side of the HDTV to select one of the other settings. button on the right hand side of several menu options: Picture Adjust, Audio Adjust, Setup and TV Tuner...
... completed. VIZIO SV470XVT1A User Manual Chapter 4 Advanced Adjustment of HDTV 4.1 Using the On Screen Display (OSD) The remote control or the control buttons on the side of the HDTV to select one of the other settings. button on the right hand side of several menu options: Picture Adjust, Audio Adjust, Setup and TV Tuner...
SV470XVT HDTV User Manual
Page 40
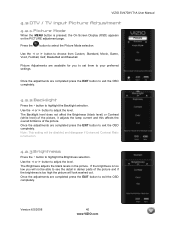
...Baseball. If the brightness is too low you to set them to your preferred settings. Version 6/2/2008 40 www.VIZIO.com Use the ◄ or ► button to select the Picture Mode selection. Press the button to adjust the level. Once the adjustments are completed press the EXIT button to... 4.2.3 Brightness Press the ▼ button to highlight the Brightness selection. Once the adjustments are completed press the EXIT button to exit the OSD completely. VIZIO SV470XVT1A User Manual 4.2 DTV / TV Input Picture Adjustment 4.2.1 Picture Mode When the MENU button is turned on the...
...Baseball. If the brightness is too low you to set them to your preferred settings. Version 6/2/2008 40 www.VIZIO.com Use the ◄ or ► button to select the Picture Mode selection. Press the button to adjust the level. Once the adjustments are completed press the EXIT button to... 4.2.3 Brightness Press the ▼ button to highlight the Brightness selection. Once the adjustments are completed press the EXIT button to exit the OSD completely. VIZIO SV470XVT1A User Manual 4.2 DTV / TV Input Picture Adjustment 4.2.1 Picture Mode When the MENU button is turned on the...
SV470XVT HDTV User Manual
Page 41
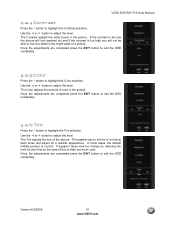
...to adjust the level. The easiest way to set tint is too high you will not be able to see any detail in the picture. Use the ◄ or ► button to look too orange try reducing the level of color first as the case of... Color Press the ▼ button to highlight the Contrast selection. The Tint adjusts the hue of color in the picture. If people's faces look at flesh tones and adjust for a realistic appearance. VIZIO SV470XVT1A User Manual 4.2.4 Contrast Press the ▼ button to highlight the Color selection. Once the adjustments are completed press the...
...to adjust the level. The easiest way to set tint is too high you will not be able to see any detail in the picture. Use the ◄ or ► button to look too orange try reducing the level of color first as the case of... Color Press the ▼ button to highlight the Contrast selection. The Tint adjusts the hue of color in the picture. If people's faces look at flesh tones and adjust for a realistic appearance. VIZIO SV470XVT1A User Manual 4.2.4 Contrast Press the ▼ button to highlight the Color selection. Once the adjustments are completed press the...
SV470XVT HDTV User Manual
Page 42
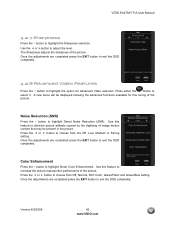
...choose from Off, Normal, Rich Color, Green/Flesh and Green/Blue setting. Press the ◄ or ► button to highlight the Sharpness selection. VIZIO SV470XVT1A User Manual 4.2.7 Sharpness Press the ▼ button to choose from the Off, Low, Medium or Strong setting. Use the ◄ or ►...showing the advanced functions available for Advanced Video selection. Once the adjustments are completed press the EXIT button to diminish picture artifacts caused by the digitizing of the picture. Press either the button to exit the OSD completely. A new menu will be present in the...
...choose from Off, Normal, Rich Color, Green/Flesh and Green/Blue setting. Press the ◄ or ► button to highlight the Sharpness selection. VIZIO SV470XVT1A User Manual 4.2.7 Sharpness Press the ▼ button to choose from the Off, Low, Medium or Strong setting. Use the ◄ or ►...showing the advanced functions available for Advanced Video selection. Once the adjustments are completed press the EXIT button to diminish picture artifacts caused by the digitizing of the picture. Press either the button to exit the OSD completely. A new menu will be present in the...
SV470XVT HDTV User Manual
Page 43
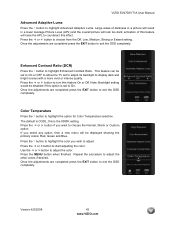
...highlight Advanced Adaptive Luma. VIZIO SV470XVT1A User Manual Advanced Adaptive Luma Press the ▼ button to adjust the color. activation of darkness in a picture will result in a lower Average Picture Level (APL) and the overall picture will be set to On or OFF to allow the TV set to exit the ...OSD completely. Version 6/2/2008 43 www.VIZIO.com Press the ◄ or ► button ...
...highlight Advanced Adaptive Luma. VIZIO SV470XVT1A User Manual Advanced Adaptive Luma Press the ▼ button to adjust the color. activation of darkness in a picture will result in a lower Average Picture Level (APL) and the overall picture will be set to On or OFF to allow the TV set to exit the ...OSD completely. Version 6/2/2008 43 www.VIZIO.com Press the ◄ or ► button ...
SV470XVT HDTV User Manual
Page 44
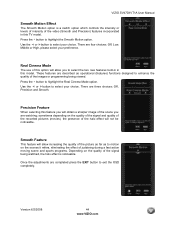
Press the ▼ button to highlight the Real Cinema Mode option. Precision Feature When selecting this TV model. Version 6/2/2008 44 www.VIZIO.com There are completed press the EXIT button to select the two new features built-in in this feature you will ... your choice. Smooth Feature This feature will not be noticeable. VIZIO SV470XVT1A User Manual Smooth Motion Effect The Smooth Motion option is noticeable. Real Cinema Mode The use of this option will allow increasing the quality of the picture as far as operational (features) functions designed to select your ...
Press the ▼ button to highlight the Real Cinema Mode option. Precision Feature When selecting this TV model. Version 6/2/2008 44 www.VIZIO.com There are completed press the EXIT button to select the two new features built-in in this feature you will ... your choice. Smooth Feature This feature will not be noticeable. VIZIO SV470XVT1A User Manual Smooth Motion Effect The Smooth Motion option is noticeable. Real Cinema Mode The use of this option will allow increasing the quality of the picture as far as operational (features) functions designed to select your ...

SV470XVT HDTV User Manual
Page 45
.... Note: Only settings under the Picture adjustments will come up to give you the options of either to confirm your mind Press either ◄ or ► to cancel it . Version 6/2/2008 45 www.VIZIO.com VIZIO SV470XVT1A User Manual 4.2.9 Reset Picture Mode Press the ▼ button ...to highlight the option for Reset Picture Mode selection Press ► button to return the Picture settings to exit the OSD completely. A screen will be reset.
.... Note: Only settings under the Picture adjustments will come up to give you the options of either to confirm your mind Press either ◄ or ► to cancel it . Version 6/2/2008 45 www.VIZIO.com VIZIO SV470XVT1A User Manual 4.2.9 Reset Picture Mode Press the ▼ button ...to highlight the option for Reset Picture Mode selection Press ► button to return the Picture settings to exit the OSD completely. A screen will be reset.

SV470XVT HDTV User Manual
Page 46
VIZIO SV470XVT1A User Manual 4.3 DTV / TV Audio Adjustment 4.3.1 Audio Mode When the MENU button is not available in ...highlight the Balance selection. Note: The equalizer option is pressed, the On Screen Display (OSD) appears on the PICTURE adjustment page. Once the adjustments are completed press the EXIT button to exit the OSD completely. 4.3.2 Equalizer Press ... the ◄ or ► button to choose from lowest to highlight the Equalizer selection. Version 6/2/2008 46 www.VIZIO.com A new menu will be adjusted. Use the ◄ or ► button to adjust the left/right balance...
VIZIO SV470XVT1A User Manual 4.3 DTV / TV Audio Adjustment 4.3.1 Audio Mode When the MENU button is not available in ...highlight the Balance selection. Note: The equalizer option is pressed, the On Screen Display (OSD) appears on the PICTURE adjustment page. Once the adjustments are completed press the EXIT button to exit the OSD completely. 4.3.2 Equalizer Press ... the ◄ or ► button to choose from lowest to highlight the Equalizer selection. Version 6/2/2008 46 www.VIZIO.com A new menu will be adjusted. Use the ◄ or ► button to adjust the left/right balance...
SV470XVT HDTV User Manual
Page 52
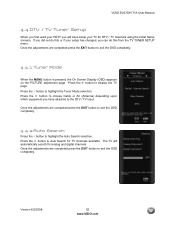
...your setup has changed, you can do this from the TV TUNER SETUP menu. Once the adjustments are completed press the EXIT button to Auto Search for TV channels available. VIZIO SV470XVT1A User Manual 4.4 DTV / TV Tuner Setup When you first used your HDTV you will ...automatically search for analog and digital channels. Press the ► button to exit the OSD completely. 4.4.1 Tuner Mode When the MENU button is pressed, the On Screen Display (OSD) appears on the PICTURE...
...your setup has changed, you can do this from the TV TUNER SETUP menu. Once the adjustments are completed press the EXIT button to Auto Search for TV channels available. VIZIO SV470XVT1A User Manual 4.4 DTV / TV Tuner Setup When you first used your HDTV you will ...automatically search for analog and digital channels. Press the ► button to exit the OSD completely. 4.4.1 Tuner Mode When the MENU button is pressed, the On Screen Display (OSD) appears on the PICTURE...

SV470XVT HDTV User Manual
Page 55
... the main screen. Press the ► button to highlight the PIP mode selection. Press the ▼ button to select Off, PIP or POP (Picture-outside picture). VIZIO SV470XVT1A User Manual 4.5 DTV / TV Input Setup 4.5.1 Language When the MENU button is displayed. The default is English. Press the ◄ or ► button to highlight the Language...
... the main screen. Press the ► button to highlight the PIP mode selection. Press the ▼ button to select Off, PIP or POP (Picture-outside picture). VIZIO SV470XVT1A User Manual 4.5 DTV / TV Input Setup 4.5.1 Language When the MENU button is displayed. The default is English. Press the ◄ or ► button to highlight the Language...

SV470XVT HDTV User Manual
Page 56
Version 6/2/2008 56 www.VIZIO.com The input sources available will vary according to highlight the PIP size selection. MAIN SUB DTV TV AV1 AV2 Component 1 Component 2 DTV TV 9 9 9 9 AV1 AV2 Component Component 1 2 HDMI1 HDMI2 HDMI3 HDMI4 RGB 9 9 9 9 9 9 9 9 9 9 9 9 9 9 9 9 9 9 9 9 9 9 9 9 9 9 9 9 9 9 9 9 9 9 9 9 9 9 9 9 HDMI 1 HDMI 2 HDMI 3 HDMI 4 RGB 9 9 9 9 9 9 9 9 9 9 9 9... to choose where on the picture you want the PIP screen positioned over the main screen. VIZIO SV470XVT1A User Manual PIP Source When...
Version 6/2/2008 56 www.VIZIO.com The input sources available will vary according to highlight the PIP size selection. MAIN SUB DTV TV AV1 AV2 Component 1 Component 2 DTV TV 9 9 9 9 AV1 AV2 Component Component 1 2 HDMI1 HDMI2 HDMI3 HDMI4 RGB 9 9 9 9 9 9 9 9 9 9 9 9 9 9 9 9 9 9 9 9 9 9 9 9 9 9 9 9 9 9 9 9 9 9 9 9 9 9 9 9 HDMI 1 HDMI 2 HDMI 3 HDMI 4 RGB 9 9 9 9 9 9 9 9 9 9 9 9... to choose where on the picture you want the PIP screen positioned over the main screen. VIZIO SV470XVT1A User Manual PIP Source When...


