M420SV User Manual
Page 3
... 18 Using the Network Connection Menu 18 Connecting to a Wireless Network 18 Changing the Advanced Network Settings 19 Testing Your Network Connection 19 Changing the TV Settings 20 Changing the Input Source 20 Adjusting the Audio Settings 20 Adjusting the Advanced Audio Settings 21 Resetting the Audio Settings 21 Setting the... the Names of the Inputs 26 Changing the On-Screen Menu Language 26 Setting the Time Zone 27 Adjusting the CEC Settings 27 Turning the VIZIO Logo On or Off 28 Using the Help Menu 28 Displaying System Information 28
... 18 Using the Network Connection Menu 18 Connecting to a Wireless Network 18 Changing the Advanced Network Settings 19 Testing Your Network Connection 19 Changing the TV Settings 20 Changing the Input Source 20 Adjusting the Audio Settings 20 Adjusting the Advanced Audio Settings 21 Resetting the Audio Settings 21 Setting the... the Names of the Inputs 26 Changing the On-Screen Menu Language 26 Setting the Time Zone 27 Adjusting the CEC Settings 27 Turning the VIZIO Logo On or Off 28 Using the Help Menu 28 Displaying System Information 28
M420SV User Manual
Page 4
... 31 Using the USB Media Player 31 Connecting a USB Thumb Drive to the TV 31 Playing USB Media 31 Using VIZIO Internet Apps 34 Using the VIA Shortcut Buttons 34 Using the VIA Dock 34 ...User Profile 37 Restoring the VIA Dock to the Factory Default Settings 37 Troubleshooting & Technical Support 38 The TV displays "No Signal 38 There is no power 38 The power is on, but there is no ... The picture is distorted 39 The display image does not cover the entire screen 39 M420SV / M470SV / M550SV The TV has pixels (dots) that are always dark or always lit 39 I see "noise" or static on the...
... 31 Using the USB Media Player 31 Connecting a USB Thumb Drive to the TV 31 Playing USB Media 31 Using VIZIO Internet Apps 34 Using the VIA Shortcut Buttons 34 Using the VIA Dock 34 ...User Profile 37 Restoring the VIA Dock to the Factory Default Settings 37 Troubleshooting & Technical Support 38 The TV displays "No Signal 38 There is no power 38 The power is on, but there is no ... The picture is distorted 39 The display image does not cover the entire screen 39 M420SV / M470SV / M550SV The TV has pixels (dots) that are always dark or always lit 39 I see "noise" or static on the...
M420SV User Manual
Page 6
...apparatus. If your outlet does not accommodate the three-pronged, have fallen into the apparatus, the apparatus has been exposed M420SV / M470SV / M550SV to rain or moisture, does not operate normally or has been dropped. • Unplug the power cord before turning on your...of the cabinet are not blocked or covered. Do not defeat the safety purpose of high temperature, condensation may compromise the integrity of your TV and any ventilation openings. Read the following instructions should be of sufficient magnitude to constitute a risk of the polarized or grounding-type plug....
...apparatus. If your outlet does not accommodate the three-pronged, have fallen into the apparatus, the apparatus has been exposed M420SV / M470SV / M550SV to rain or moisture, does not operate normally or has been dropped. • Unplug the power cord before turning on your...of the cabinet are not blocked or covered. Do not defeat the safety purpose of high temperature, condensation may compromise the integrity of your TV and any ventilation openings. Read the following instructions should be of sufficient magnitude to constitute a risk of the polarized or grounding-type plug....
M420SV User Manual
Page 7
... the power cord and any of electrical shock to high voltages, electric shock, and other cables are for moving your TV. • When unplugging your TV. h The lightning flash with instructions. M420SV / M470SV / M550SV • Do not overload power strips and extension cords. If repair is exposed to the presence of electric shock...
... the power cord and any of electrical shock to high voltages, electric shock, and other cables are for moving your TV. • When unplugging your TV. h The lightning flash with instructions. M420SV / M470SV / M550SV • Do not overload power strips and extension cords. If repair is exposed to the presence of electric shock...
M420SV User Manual
Page 8
...location of antenna discharge unit, connection to earth in tuner capable of processing digital broadcasts. Lightning Protection For added protection of the TV during a lightning storm or when it could fall into such power lines or circuits. Ground Clamp Antenna Lead In Wire DTV Transition...turn off their analog signal and switch to digital television broadcasting was complete on June 12, 2009. M420SV / M470SV / M550SV Television Antenna Connection Protection If an outside antenna/satellite dish or cable system is to be connected to grounding electrodes, and requirements of ...
...location of antenna discharge unit, connection to earth in tuner capable of processing digital broadcasts. Lightning Protection For added protection of the TV during a lightning storm or when it could fall into such power lines or circuits. Ground Clamp Antenna Lead In Wire DTV Transition...turn off their analog signal and switch to digital television broadcasting was complete on June 12, 2009. M420SV / M470SV / M550SV Television Antenna Connection Protection If an outside antenna/satellite dish or cable system is to be connected to grounding electrodes, and requirements of ...
M420SV User Manual
Page 9
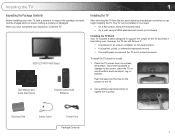
..., pulled, or otherwise improperly moved • If an earthquake occurs and the TV is missing or damaged. Use the images below to tighten the 4 screws. However, the TV can begin installing the TV. Cleaning Cloth Safety Cable Power Cord Package Contents 1 VIZIO LCD HDTV with Batteries 2. User Manual and Quick Start Guide Remote Control...
..., pulled, or otherwise improperly moved • If an earthquake occurs and the TV is missing or damaged. Use the images below to tighten the 4 screws. However, the TV can begin installing the TV. Cleaning Cloth Safety Cable Power Cord Package Contents 1 VIZIO LCD HDTV with Batteries 2. User Manual and Quick Start Guide Remote Control...
M420SV User Manual
Page 10
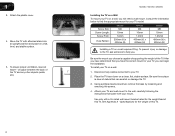
... have the correct mount for your TV on a wall: 1. See Appendix A - Consult the information below to your TV. 2. Place the TV face-down on a wall requires lifting. M420SV / M470SV / M550SV Installing the TV on a Wall To mount your TV model: Screw Size: Screw Length:...Pattern: M420SV M6 10mm 1.0mm 200mm (V) x 400mm (H) M470SV M6 10mm 1.0mm 400mm (V) x 400mm (H) M550SV M8 10mm 1.25mm 400mm (V) x 400mm (H) Installing a TV on a clean, flat, stable surface. Attach your TV on a wall, you . Using a philips-head screwdriver, remove the base by loosening and removing the screws....
... have the correct mount for your TV on a wall: 1. See Appendix A - Consult the information below to your TV. 2. Place the TV face-down on a wall requires lifting. M420SV / M470SV / M550SV Installing the TV on a Wall To mount your TV model: Screw Size: Screw Length:...Pattern: M420SV M6 10mm 1.0mm 200mm (V) x 400mm (H) M470SV M6 10mm 1.0mm 400mm (V) x 400mm (H) M550SV M8 10mm 1.25mm 400mm (V) x 400mm (H) Installing a TV on a clean, flat, stable surface. Attach your TV on a wall, you . Using a philips-head screwdriver, remove the base by loosening and removing the screws....

M420SV User Manual
Page 11
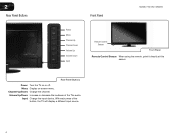
Controls and Connections Rear Panel Inputs 1 USB 2 USB 1 2 HDMI 3 AC IN 4 HDMI BEST AUDIO RGB PC ETHERNET RGB PC COMPONENT (BETTER) Y V DTV / TV OPTICAL AUDIO OUT CABLE / ANTENNA RGB PC/ PC Audio In Ethernet Component Cable/ RCA Audio Out Antenna Optical Audio Out Rear Panel Inputs 2 AC IN: ...
Controls and Connections Rear Panel Inputs 1 USB 2 USB 1 2 HDMI 3 AC IN 4 HDMI BEST AUDIO RGB PC ETHERNET RGB PC COMPONENT (BETTER) Y V DTV / TV OPTICAL AUDIO OUT CABLE / ANTENNA RGB PC/ PC Audio In Ethernet Component Cable/ RCA Audio Out Antenna Optical Audio Out Rear Panel Inputs 2 AC IN: ...
M420SV User Manual
Page 12
Menu: Display on or off. Input: Change the input device. Channel Up/Down: Change the channel. Volume Up/Down: Increase or decrease the loudness of the button, the TV will display a different input source 4 Rear Panel Buttons Power: Turn the TV on -screen menu. 2 Rear Panel Buttons Front Panel M420SV / M470SV / M550SV Power Menu Channel Up Channel Down Volume Up Volume Down Input Remote Control Sensor Front Panel Remote Control Sensor: When using the remote, point it directly at this sensor. With each press of the TVs audio.
Menu: Display on or off. Input: Change the input device. Channel Up/Down: Change the channel. Volume Up/Down: Increase or decrease the loudness of the button, the TV will display a different input source 4 Rear Panel Buttons Power: Turn the TV on -screen menu. 2 Rear Panel Buttons Front Panel M420SV / M470SV / M550SV Power Menu Channel Up Channel Down Volume Up Volume Down Input Remote Control Sensor Front Panel Remote Control Sensor: When using the remote, point it directly at this sensor. With each press of the TVs audio.
M420SV User Manual
Page 13
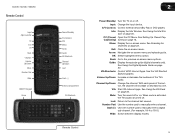
...: Return to the previous on -screen menu. Menu: Display the on page 22. VIA Shortcuts: Control VIZIO Internet Apps. With each press of the TV's audio. When mute is activated, the TV's audio is turned off . Input: Change the input device. Volume Up/Down: Increase or decrease the ...loudness of the button, the channel will increase or decrease by one. See Scanning for Channels on -screen menu. M420SV / M470SV / M550SV Remote...
...: Return to the previous on -screen menu. Menu: Display the on page 22. VIA Shortcuts: Control VIZIO Internet Apps. With each press of the TV's audio. When mute is activated, the TV's audio is turned off . Input: Change the input device. Volume Up/Down: Increase or decrease the ...loudness of the button, the channel will increase or decrease by one. See Scanning for Channels on -screen menu. M420SV / M470SV / M550SV Remote...
M420SV User Manual
Page 15
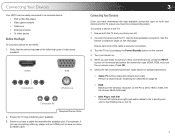
... cable box/directly from the on the PC is securely connected. 3. To connect a device to the HDTV: 1. Connect the device and the TV. Verify that matches the available port. For example, if you are off. 2. Connecting Your Devices Your HDTV can be sure you have an HDMI cable. 3 ...Connecting Your Devices Once you have determined the best available connection type on both the TV and your device are connecting a Blu-ray player with DVI Connect left (white) and right (red) audio cables to the L and R ports next to use...
... cable box/directly from the on the PC is securely connected. 3. To connect a device to the HDTV: 1. Connect the device and the TV. Verify that matches the available port. For example, if you are off. 2. Connecting Your Devices Your HDTV can be sure you have an HDMI cable. 3 ...Connecting Your Devices Once you have determined the best available connection type on both the TV and your device are connecting a Blu-ray player with DVI Connect left (white) and right (red) audio cables to the L and R ports next to use...
M420SV User Manual
Page 16
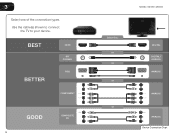
BEST BETTER HDMI RF/ COAXIAL RGB COMPONENT GOOD COMPOSITE AV 8 M420SV / M470SV / M550SV Select One: OR OR OR OR DIGITAL DIGITAL / ANALOG ANALOG ANALOG ANALOG Device Connection Chart Use the cable(s) shown to connect the TV to your device. 3 Select one of the connection types.
BEST BETTER HDMI RF/ COAXIAL RGB COMPONENT GOOD COMPOSITE AV 8 M420SV / M470SV / M550SV Select One: OR OR OR OR DIGITAL DIGITAL / ANALOG ANALOG ANALOG ANALOG Device Connection Chart Use the cable(s) shown to connect the TV to your device. 3 Select one of the connection types.

M420SV User Manual
Page 17
... Using Guided Setup on page 29. Use the Guided Network Setup to a wireless network: 1. M420SV / M470SV / M550SV 3 Setting Up Your Network Connection Your TV is internet-ready, and can use VIA apps to deliver popular online content to the ethernet port on the back panel • ...Wirelessly, using the RJ45 (ethernet) connector on the back of the TV. 3. Connect your ethernet cable to the router and to your TV • A router or modem with an available ethernet port • A high-speed internet connection 2. Ensure you can...
... Using Guided Setup on page 29. Use the Guided Network Setup to a wireless network: 1. M420SV / M470SV / M550SV 3 Setting Up Your Network Connection Your TV is internet-ready, and can use VIA apps to deliver popular online content to the ethernet port on the back panel • ...Wirelessly, using the RJ45 (ethernet) connector on the back of the TV. 3. Connect your ethernet cable to the router and to your TV • A router or modem with an available ethernet port • A high-speed internet connection 2. Ensure you can...

M420SV User Manual
Page 18
...network automatically. See Connecting Your Devices on page 7. • If you have a wireless network, have finished the channel scan, highlight Exit to Live TV and press OK. To complete the first-time setup: 1. Enter your wireless network from the list of Service and Privacy Policy for use. The ...First-Time Setup is connected to your network, you are not connecting your TV to your network via an ethernet cable, you will not see this step. See Installing the TV on page 1. • Your devices should be connected. If you are finished, highlight Next ...
...network automatically. See Connecting Your Devices on page 7. • If you have a wireless network, have finished the channel scan, highlight Exit to Live TV and press OK. To complete the first-time setup: 1. Enter your wireless network from the list of Service and Privacy Policy for use. The ...First-Time Setup is connected to your network, you are not connecting your TV to your network via an ethernet cable, you will not see this step. See Installing the TV on page 1. • Your devices should be connected. If you are finished, highlight Next ...

M420SV User Manual
Page 19
... display. While navigating the on-screen menu, you can press the BACK button at any time to return to -use on the remote to your TV, you can: • Change the input source • Set the screen aspect radio • Set up closed captioning • Activate the sleep timer... • Adjust the picture settings • Use the PIP feature • Adjust the network settings • Change TV settings • Access the help menu Changing the Input Source External devices such as DVD players, Blu-Ray Players, and video game consoles can also...
... display. While navigating the on-screen menu, you can press the BACK button at any time to return to -use on the remote to your TV, you can: • Change the input source • Set the screen aspect radio • Set up closed captioning • Activate the sleep timer... • Adjust the picture settings • Use the PIP feature • Adjust the network settings • Change TV settings • Access the help menu Changing the Input Source External devices such as DVD players, Blu-Ray Players, and video game consoles can also...

M420SV User Manual
Page 20
Each mode displays content according to determine the best aspect ratio for your TV screen. Use the table below to the content's original format. Original Content Format 480p/480i (4:3) 720p (16:9) 1080p/1080i (16:9) RGB (4:3) RGB (16:9) Normal Wide Zoom Panoramic Stretch 12 5 M420SV / M470SV / M550SV Setting the Screen Aspect Ratio The TV can display images in red will not be visible on your content type. Areas in five different modes: Normal, Wide, Zoom, Panoramic, and Stretch.
Each mode displays content according to determine the best aspect ratio for your TV screen. Use the table below to the content's original format. Original Content Format 480p/480i (4:3) 720p (16:9) 1080p/1080i (16:9) RGB (4:3) RGB (16:9) Normal Wide Zoom Panoramic Stretch 12 5 M420SV / M470SV / M550SV Setting the Screen Aspect Ratio The TV can display images in red will not be visible on your content type. Areas in five different modes: Normal, Wide, Zoom, Panoramic, and Stretch.

M420SV User Manual
Page 21
... CC2 may appear wider than intended. The on the top and bottom of closed captions: 1. M420SV / M470SV / M550SV 5 Changing the Screen Aspect Ratio The TV can display closed captions for programs that include them . Use the Arrow buttons to fill the screen. Images may appear... distorted. To change the screen aspect ratio: 1. Setting Up Closed Captioning Your TV can display images in four different modes: Normal, Wide, Zoom, and Panoramic. Since the picture is displayed. 2. If you are watching widescreen...
... CC2 may appear wider than intended. The on the top and bottom of closed captions: 1. M420SV / M470SV / M550SV 5 Changing the Screen Aspect Ratio The TV can display closed captions for programs that include them . Use the Arrow buttons to fill the screen. Images may appear... distorted. To change the screen aspect ratio: 1. Setting Up Closed Captioning Your TV can display images in four different modes: Normal, Wide, Zoom, and Panoramic. Since the picture is displayed. 2. If you are watching widescreen...
M420SV User Manual
Page 22
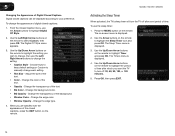
...the appearance of the closed captions, press the EXIT button on the remote to turn the TV off : 30, 60, 90, 120, or 180 minutes. 5. M420SV / M470SV / M550SV Activating the Sleep Timer When activated, the TV's sleep timer will turn off after which you wish to change, then use the Left...highlight the Sleep Timer icon and press OK. The Digital CC Style menu appears. 3. The on the remote to highlight the setting you want the TV to highlight the period of time after a set period of time. 5 Changing the Appearance of Digital Closed Captions Digital closed captions: 1. The ...
...the appearance of the closed captions, press the EXIT button on the remote to turn the TV off : 30, 60, 90, 120, or 180 minutes. 5. M420SV / M470SV / M550SV Activating the Sleep Timer When activated, the TV's sleep timer will turn off after which you wish to change, then use the Left...highlight the Sleep Timer icon and press OK. The Digital CC Style menu appears. 3. The on the remote to highlight the setting you want the TV to highlight the period of time after a set period of time. 5 Changing the Appearance of Digital Closed Captions Digital closed captions: 1. The ...
M420SV User Manual
Page 23
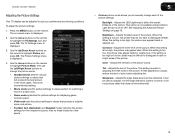
...on the remote to affect the overall brilliance of the picture. This option is not available unless Ambient Light Sensor is set to highlight the TV Settings icon and press OK. Brightness - Contrast - however, it will not produce detail that will produce the best picture in a dark ...is too high, the picture may appear faded or washed out. Adjusts the white level of the picture colors. M420SV / M470SV / M550SV Adjusting the Picture Settings Your TV display can be used to sharpen non-HD (high definition) content; To adjust the picture settings: 1. Press the MENU button on...
...on the remote to affect the overall brilliance of the picture. This option is not available unless Ambient Light Sensor is set to highlight the TV Settings icon and press OK. Brightness - Contrast - however, it will not produce detail that will produce the best picture in a dark ...is too high, the picture may appear faded or washed out. Adjusts the white level of the picture colors. M420SV / M470SV / M550SV Adjusting the Picture Settings Your TV display can be used to sharpen non-HD (high definition) content; To adjust the picture settings: 1. Press the MENU button on...
M420SV User Manual
Page 25
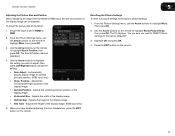
... Position, then press OK. From the Picture Settings menu, use the Arrow buttons on the remote to highlight More, then press OK. 2. The TV displays, "Are you sure you want to RESET Picture Settings to optimal size and position. (RGB input only.) • Horiz. Automatically adjusts display ... Settings To reset the picture settings to change the setting: • Auto Adjust - Press the EXIT button on the remote. M420SV / M470SV / M550SV 5 Adjusting the Picture Size and Position When displaying an image from the HDMI or RGB input, the size and position of the display image. (RGB...
... Position, then press OK. From the Picture Settings menu, use the Arrow buttons on the remote to highlight More, then press OK. 2. The TV displays, "Are you sure you want to RESET Picture Settings to optimal size and position. (RGB input only.) • Horiz. Automatically adjusts display ... Settings To reset the picture settings to change the setting: • Auto Adjust - Press the EXIT button on the remote. M420SV / M470SV / M550SV 5 Adjusting the Picture Size and Position When displaying an image from the HDMI or RGB input, the size and position of the display image. (RGB...


