
M420SV User Manual
Page 3
...Contents 1 Installing the TV 1 Installing the TV Stand 1 Installing the TV on a Wall 2 Controls and Connections 3 Rear Panel Inputs 3 Rear Panel Buttons 4 Front Panel 4 Remote Control 5 VIA Shortcut Buttons 6 Replacing the Batteries 6 Connecting Your Devices 7 Before You Begin 7 Connecting Your Devices 7 Setting Up Your Network Connection 9 Connecting to A Wired Network... of the Inputs 26 Changing the On-Screen Menu Language 26 Setting the Time Zone 27 Adjusting the CEC Settings 27 Turning the VIZIO Logo On or Off 28 Using the Help Menu 28 Displaying System Information 28
...Contents 1 Installing the TV 1 Installing the TV Stand 1 Installing the TV on a Wall 2 Controls and Connections 3 Rear Panel Inputs 3 Rear Panel Buttons 4 Front Panel 4 Remote Control 5 VIA Shortcut Buttons 6 Replacing the Batteries 6 Connecting Your Devices 7 Before You Begin 7 Connecting Your Devices 7 Setting Up Your Network Connection 9 Connecting to A Wired Network... of the Inputs 26 Changing the On-Screen Menu Language 26 Setting the Time Zone 27 Adjusting the CEC Settings 27 Turning the VIZIO Logo On or Off 28 Using the Help Menu 28 Displaying System Information 28
M420SV User Manual
Page 4
... the USB Media Player 31 Connecting a USB Thumb Drive to the TV 31 Playing USB Media 31 Using VIZIO Internet Apps 34 Using the VIA Shortcut Buttons 34 Using the VIA Dock 34 Moving an App on the... There is no sound 38 The colors on the TV don't look right 38 The buttons on the remote aren't working 38 The image quality is not good 38 The picture is distorted 39 The display image... does not cover the entire screen 39 M420SV / M470SV / M550SV The TV has pixels (dots) that are always dark or always lit 39 I see "noise" or static on ...
... the USB Media Player 31 Connecting a USB Thumb Drive to the TV 31 Playing USB Media 31 Using VIZIO Internet Apps 34 Using the VIA Shortcut Buttons 34 Using the VIA Dock 34 Moving an App on the... There is no sound 38 The colors on the TV don't look right 38 The buttons on the remote aren't working 38 The image quality is not good 38 The picture is distorted 39 The display image... does not cover the entire screen 39 M420SV / M470SV / M550SV The TV has pixels (dots) that are always dark or always lit 39 I see "noise" or static on ...
M420SV User Manual
Page 7
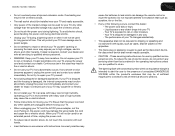
...- When your TV will not be installed near your TV and easily accessible. • Only power of the marked voltage can damage the remote control or injure the operator. The performance of time. This will not be exposed to rain or moisture. Do not expose your dealer for ... TV changes substantially. • This apparatus shall not be used for use of electric shock, do so. Operating your TV. M420SV / M470SV / M550SV • Do not overload power strips and extension cords. Continued use by qualified service personnel only. Liquid sprays or any other cables are for your...
...- When your TV will not be installed near your TV and easily accessible. • Only power of the marked voltage can damage the remote control or injure the operator. The performance of time. This will not be exposed to rain or moisture. Do not expose your dealer for ... TV changes substantially. • This apparatus shall not be used for use of electric shock, do so. Operating your TV. M420SV / M470SV / M550SV • Do not overload power strips and extension cords. Continued use by qualified service personnel only. Liquid sprays or any other cables are for your...
M420SV User Manual
Page 9
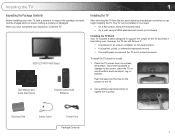
... the TV Stand Your TV includes a stand designed to tighten the 4 screws. However, the TV can begin installing the TV. VIZIO LCD HDTV with Batteries 2. User Manual and Quick Start Guide Remote Control with Stand Installing the TV After removing the TV from falling over if: • It is missing or damaged.
... the TV Stand Your TV includes a stand designed to tighten the 4 screws. However, the TV can begin installing the TV. VIZIO LCD HDTV with Batteries 2. User Manual and Quick Start Guide Remote Control with Stand Installing the TV After removing the TV from falling over if: • It is missing or damaged.
M420SV User Manual
Page 12
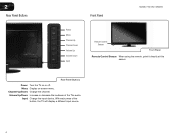
Menu: Display on or off. Channel Up/Down: Change the channel. Volume Up/Down: Increase or decrease the loudness of the button, the TV will display a different input source 4 Rear Panel Buttons Power: Turn the TV on -screen menu. Input: Change the input device. With each press of the TVs audio. 2 Rear Panel Buttons Front Panel M420SV / M470SV / M550SV Power Menu Channel Up Channel Down Volume Up Volume Down Input Remote Control Sensor Front Panel Remote Control Sensor: When using the remote, point it directly at this sensor.
Menu: Display on or off. Channel Up/Down: Change the channel. Volume Up/Down: Increase or decrease the loudness of the button, the TV will display a different input source 4 Rear Panel Buttons Power: Turn the TV on -screen menu. Input: Change the input device. With each press of the TVs audio. 2 Rear Panel Buttons Front Panel M420SV / M470SV / M550SV Power Menu Channel Up Channel Down Volume Up Volume Down Input Remote Control Sensor Front Panel Remote Control Sensor: When using the remote, point it directly at this sensor.
M420SV User Manual
Page 13
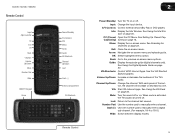
...menu. Last: Return to the previous on-screen menu options. Info: Display the Info Window. OK: Select highlighted menu option. VIA Shortcuts: Control VIZIO Internet Apps. Volume Up/Down: Increase or decrease the loudness of the button, the channel will increase or decrease by one. Channel Up/Down: ...'s audio. Mute: Turn the sound off . When mute is activated, the TV's audio is turned off or on page 22. M420SV / M470SV / M550SV Remote Control Input App Launcher CC Exit OK Back V Button Volume Up/Down Mute Number Pad Wide QWERTY Keypad Arrow Power/Standby A/V Controls Info Menu Arrow...
...menu. Last: Return to the previous on-screen menu options. Info: Display the Info Window. OK: Select highlighted menu option. VIA Shortcuts: Control VIZIO Internet Apps. Volume Up/Down: Increase or decrease the loudness of the button, the channel will increase or decrease by one. Channel Up/Down: ...'s audio. Mute: Turn the sound off . When mute is activated, the TV's audio is turned off or on page 22. M420SV / M470SV / M550SV Remote Control Input App Launcher CC Exit OK Back V Button Volume Up/Down Mute Number Pad Wide QWERTY Keypad Arrow Power/Standby A/V Controls Info Menu Arrow...
M420SV User Manual
Page 14
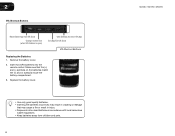
... (+) and (-) symbols on the batteries match the (+) and (-) symbols inside the battery compartment. 3. 2 VIA Shortcut Buttons Move/Delete App from children and pets. 6 M420SV / M470SV / M550SV Remove the battery cover. 2. Replace the battery cover. • Use only good quality batteries. • Inserting the batteries incorrectly may result in accordance with local... is open) View Settings for Active VIA App Exit App/Exit VIA Dock VIA Shortcut Buttons Replacing the Batteries 1. Insert two AAA batteries into the remote control.
... (+) and (-) symbols on the batteries match the (+) and (-) symbols inside the battery compartment. 3. 2 VIA Shortcut Buttons Move/Delete App from children and pets. 6 M420SV / M470SV / M550SV Remove the battery cover. 2. Replace the battery cover. • Use only good quality batteries. • Inserting the batteries incorrectly may result in accordance with local... is open) View Settings for Active VIA App Exit App/Exit VIA Dock VIA Shortcut Buttons Replacing the Batteries 1. Insert two AAA batteries into the remote control.
M420SV User Manual
Page 15
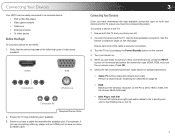
Connect the device and the TV. Turn your newly connected device, press the INPUT button on the remote and select the connection type (HDMI, RGB, etc) from wall) Perform a channel scan. When you are ready to the TV: 1. Scanning for special instructions: • ... Devices Your HDTV can be sure you have an HDMI cable. 3 Connecting Your Devices Once you have determined the best available connection type on the remote. 4. Check the list of devices/connection types below for Channels on page 22 • RGB Make sure the desktop resolution on the PC is securely...
Connect the device and the TV. Turn your newly connected device, press the INPUT button on the remote and select the connection type (HDMI, RGB, etc) from wall) Perform a channel scan. When you are ready to the TV: 1. Scanning for special instructions: • ... Devices Your HDTV can be sure you have an HDMI cable. 3 Connecting Your Devices Once you have determined the best available connection type on the remote. 4. Check the list of devices/connection types below for Channels on page 22 • RGB Make sure the desktop resolution on the PC is securely...

M420SV User Manual
Page 18
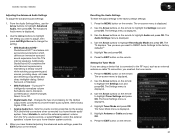
... you are not connecting your TV to your network, you will not see this step. Use the OK and Arrow Up/Down buttons on the remote to read and accept the Terms of available networks and press OK. If the TV is complete. Highlight Skip and press OK. 5. TV Widgets. ... Code, and E-mail Address using the on-screen keyboard. Use the Up/Down Arrow buttons on the remote to your network automatically. Enter the network key using the Arrow and OK buttons on the remote. 3. To complete the first-time setup: 1. Enter your TV connection using the on-screen keyboard, then ...
... you are not connecting your TV to your network, you will not see this step. Use the OK and Arrow Up/Down buttons on the remote to read and accept the Terms of available networks and press OK. If the TV is complete. Highlight Skip and press OK. 5. TV Widgets. ... Code, and E-mail Address using the on-screen keyboard. Use the Up/Down Arrow buttons on the remote to your network automatically. Enter the network key using the Arrow and OK buttons on the remote. 3. To complete the first-time setup: 1. Enter your TV connection using the on-screen keyboard, then ...

M420SV User Manual
Page 19
... pressing OK. You can be connected to your TV, you wish to highlight the Input icon and press OK. Press the MENU button on the remote to display. To change the input source in the on -screen menu is displayed. 3. The on -screen menu. Use the Arrow buttons on the... remote. Press OK, then press EXIT. From this menu, you can: • Change the input source • Set the screen aspect radio • Set up closed ...
... pressing OK. You can be connected to your TV, you wish to highlight the Input icon and press OK. Press the MENU button on the remote to display. To change the input source in the on -screen menu is displayed. 3. The on -screen menu. Use the Arrow buttons on the... remote. Press OK, then press EXIT. From this menu, you can: • Change the input source • Set the screen aspect radio • Set up closed ...

M420SV User Manual
Page 21
...: Normal, Wide, Zoom, and Panoramic. The Closed Caption menu is displaying a 720p/1080i/1080p source. Use the Arrow buttons on the remote. Caption channels usually display different languages. To change the screen aspect ratio: 1. If the program is displayed. 2. After highlighting the type...intended. Closed captions display a transcription of the display image. Use the Arrow buttons on the remote to select the caption channel you wish to fill the screen. M420SV / M470SV / M550SV 5 Changing the Screen Aspect Ratio The TV can display closed captions for programs that include ...
...: Normal, Wide, Zoom, and Panoramic. The Closed Caption menu is displaying a 720p/1080i/1080p source. Use the Arrow buttons on the remote. Caption channels usually display different languages. To change the screen aspect ratio: 1. If the program is displayed. 2. After highlighting the type...intended. Closed captions display a transcription of the display image. Use the Arrow buttons on the remote to select the caption channel you wish to fill the screen. M420SV / M470SV / M550SV 5 Changing the Screen Aspect Ratio The TV can display closed captions for programs that include ...
M420SV User Manual
Page 22
...Closed Captions Digital closed captions, press the EXIT button on the remote. The on-screen menu is displayed. 4. Use the Left/Right Arrow buttons on the remote. Adjust the size of time. Change the edge type. 4. M420SV / M470SV / M550SV Activating the Sleep Timer When activated, the TV's sleep timer...buttons to change the setting: • Caption Style - The Sleep Timer menu is displayed. 3. Use the Up/Down Arrow buttons on the remote to highlight the setting you want the TV to manually change the appearance of the text. • BG Color - Choose Auto to keep ...
...Closed Captions Digital closed captions, press the EXIT button on the remote. The on-screen menu is displayed. 4. Use the Left/Right Arrow buttons on the remote. Adjust the size of time. Change the edge type. 4. M420SV / M470SV / M550SV Activating the Sleep Timer When activated, the TV's sleep timer...buttons to change the setting: • Caption Style - The Sleep Timer menu is displayed. 3. Use the Up/Down Arrow buttons on the remote to highlight the setting you want the TV to manually change the appearance of the text. • BG Color - Choose Auto to keep ...
M420SV User Manual
Page 23
...the picture settings for displaying game console output. • Vivid mode sets the picture settings to distinguish details. M420SV / M470SV / M550SV Adjusting the Picture Settings Your TV display can be difficult to affect the overall brilliance of the picture colors. This is the recommended setting...LED brightness to distinguish in the picture. Sharpness - To adjust the picture settings: 1. See Adjusting the Advanced Picture Settings on the remote. If flesh appears too orange, reduce the level of the picture. When this setting is displayed. 3. If the setting is too...
...the picture settings for displaying game console output. • Vivid mode sets the picture settings to distinguish details. M420SV / M470SV / M550SV Adjusting the Picture Settings Your TV display can be difficult to affect the overall brilliance of the picture colors. This is the recommended setting...LED brightness to distinguish in the picture. Sharpness - To adjust the picture settings: 1. See Adjusting the Advanced Picture Settings on the remote. If flesh appears too orange, reduce the level of the picture. When this setting is displayed. 3. If the setting is too...
M420SV User Manual
Page 24
...Select Off, DCR [Dynamic Contrast Ratio], or OPC.) • Ambient Light Sensor - The Color Temperature menu is displayed. 3. 5 M420SV / M470SV / M550SV Adjusting the Advanced Picture Settings To adjust the advanced picture settings: 1. From the Picture Settings menu, use as a PC monitor. • Custom allows you .../Green/Blue Gain - Adjusting the Color Temperature Adjusting the color temperature will change each of brightness. Use the Arrow buttons on the remote to highlight More, then press OK. 2. Adjusts the amount of each color in the display. 4. Red/Green/Blue Offset - ...
...Select Off, DCR [Dynamic Contrast Ratio], or OPC.) • Ambient Light Sensor - The Color Temperature menu is displayed. 3. 5 M420SV / M470SV / M550SV Adjusting the Advanced Picture Settings To adjust the advanced picture settings: 1. From the Picture Settings menu, use as a PC monitor. • Custom allows you .../Green/Blue Gain - Adjusting the Color Temperature Adjusting the color temperature will change each of brightness. Use the Arrow buttons on the remote to highlight More, then press OK. 2. Adjusts the amount of each color in the display. 4. Red/Green/Blue Offset - ...
M420SV User Manual
Page 25
...press OK. 4. Resetting the Picture Settings To reset the picture settings to the factory defaults?" 3. Use the Arrow buttons on the remote. 17 M420SV / M470SV / M550SV 5 Adjusting the Picture Size and Position When displaying an image from the HDMI or RGB input, the size and position of the ...display image. • Vertical Size - From the Picture Settings menu, use the Arrow buttons on the remote to HDMI or RGB. 2. Position - ...
...press OK. 4. Resetting the Picture Settings To reset the picture settings to the factory defaults?" 3. Use the Arrow buttons on the remote. 17 M420SV / M470SV / M550SV 5 Adjusting the Picture Size and Position When displaying an image from the HDMI or RGB input, the size and position of the ...display image. • Vertical Size - From the Picture Settings menu, use the Arrow buttons on the remote to HDMI or RGB. 2. Position - ...

M420SV User Manual
Page 26
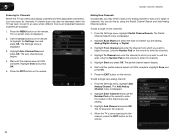
... highlight Connect and press OK. (If you want to use the on-screen keyboard instead, highlight Show Keyboard and press OK.) 5. 5 M420SV / M470SV / M550SV Using the PIP (Picture-In-Picture) Feature The PIP feature on your TV allows you to highlight PIP and press OK. Press the MENU button...Connection menu is internet-ready, featuring both an ethernet port and built-in the PIP window. • Position - Press the EXIT button on the remote. Using the Network Connection Menu Your TV is displayed. 3. Connecting to a Wireless Network To connect to be displayed side-by-side. Use the ...
... highlight Connect and press OK. (If you want to use the on-screen keyboard instead, highlight Show Keyboard and press OK.) 5. 5 M420SV / M470SV / M550SV Using the PIP (Picture-In-Picture) Feature The PIP feature on your TV allows you to highlight PIP and press OK. Press the MENU button...Connection menu is internet-ready, featuring both an ethernet port and built-in the PIP window. • Position - Press the EXIT button on the remote. Using the Network Connection Menu Your TV is displayed. 3. Connecting to a Wireless Network To connect to be displayed side-by-side. Use the ...

M420SV User Manual
Page 27
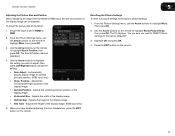
... 3. The subnet mask. • Default Gateway - Use the Arrow buttons on the remote. M420SV / M470SV / M550SV 5 To connect to a wireless network whose network name (SSID) is displayed. 2. The on the remote. Highlight Enter Access Point Name and press OK. 4. Using the QWERTY Keypad on the... remote, enter your network connection. 3. Press the EXIT button on -screen menu is not ...
... 3. The subnet mask. • Default Gateway - Use the Arrow buttons on the remote. M420SV / M470SV / M550SV 5 To connect to a wireless network whose network name (SSID) is displayed. 2. The on the remote. Highlight Enter Access Point Name and press OK. 4. Using the QWERTY Keypad on the... remote, enter your network connection. 3. Press the EXIT button on -screen menu is not ...
M420SV User Manual
Page 28
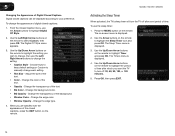
5 M420SV / M470SV / M550SV Changing the TV Settings Using the settings menu, you can be connected... Set the time • Adjust the CEC settings • Turn the VIZIO logo on the remote to highlight Audio and press OK. Use the Arrow buttons on the remote. Adjusts the loudness of different frequencies. (This setting is only available when...between the display image and the accompanying audio track. • TV Speakers - See Resetting the Audio Settings on the remote. The Settings menu is displayed. 4. The Input Source menu is displayed. 3. When you must first change the ...
5 M420SV / M470SV / M550SV Changing the TV Settings Using the settings menu, you can be connected... Set the time • Adjust the CEC settings • Turn the VIZIO logo on the remote to highlight Audio and press OK. Use the Arrow buttons on the remote. Adjusts the loudness of different frequencies. (This setting is only available when...between the display image and the accompanying audio track. • TV Speakers - See Resetting the Audio Settings on the remote. The Settings menu is displayed. 4. The Input Source menu is displayed. 3. When you must first change the ...
M420SV User Manual
Page 29
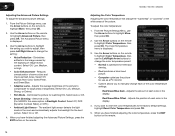
...Setting the Tuner Mode If you want to RESET Audio Settings to the factory default settings: 1. The on the remote to a home theater audio system. M420SV / M470SV / M550SV Adjusting the Advanced Audio Settings To adjust the advanced audio settings: 1. Use the Arrow buttons to highlight the setting...2. Highlight Yes and press OK. 6. Use the Arrow buttons to highlight the Settings icon and press OK. Use the Arrow buttons on the remote. 5 Resetting the Audio Settings To reset the audio settings to the factory defaults?" 5. The Advanced Audio menu is displayed. 3. TruVolume™...
...Setting the Tuner Mode If you want to RESET Audio Settings to the factory default settings: 1. The on the remote to a home theater audio system. M420SV / M470SV / M550SV Adjusting the Advanced Audio Settings To adjust the advanced audio settings: 1. Use the Arrow buttons to highlight the setting...2. Highlight Yes and press OK. 6. Use the Arrow buttons to highlight the Settings icon and press OK. Use the Arrow buttons on the remote. 5 Resetting the Audio Settings To reset the audio settings to the factory defaults?" 5. The Advanced Audio menu is displayed. 3. TruVolume™...
M420SV User Manual
Page 30
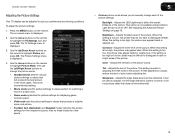
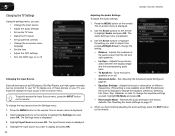
...where different free-to enter the channel.) 4. Wait until the channel scan is displayed. 2. Press the EXIT button on the remote. 5 M420SV / M470SV / M550SV Scanning for Channels Before the TV can do this by using the Partial Channel Search and Add Analog Channel options. A channel...Highlight Done and press OK. 5. The partial channel search begins. 6. Highlight Add Channel and press OK. Press the MENU button on the remote to -air broadcast television channels are adding. 3. Highlight Auto Channel Scan and press OK. To add a single new analog channel: 1. Highlight...
...where different free-to enter the channel.) 4. Wait until the channel scan is displayed. 2. Press the EXIT button on the remote. 5 M420SV / M470SV / M550SV Scanning for Channels Before the TV can do this by using the Partial Channel Search and Add Analog Channel options. A channel...Highlight Done and press OK. 5. The partial channel search begins. 6. Highlight Add Channel and press OK. Press the MENU button on the remote to -air broadcast television channels are adding. 3. Highlight Auto Channel Scan and press OK. To add a single new analog channel: 1. Highlight...


