
M320SL User Manua
Page 18
... Display the on . Dash Use with number pad to the previous on or off or on -screen menu. 2 Remote Control (Models M320SL, M370SL) Input Change the currently-displayed input. Mute Turn the audio off . Arrow Navigate the ... Close the on -screen menu. Back Go to manually enter a digital sub-channel. (For example, 18-4 or 18-5.) Remote Control 11 Last Return to the channel last viewed. Number Pad Manually enter a channel. Guide Display the info window. V ...Closed Captions Open the closed caption menu. Power Turn TV on -screen menu. App launcher Quickly launch the pictured...
... Display the on . Dash Use with number pad to the previous on or off or on -screen menu. 2 Remote Control (Models M320SL, M370SL) Input Change the currently-displayed input. Mute Turn the audio off . Arrow Navigate the ... Close the on -screen menu. Back Go to manually enter a digital sub-channel. (For example, 18-4 or 18-5.) Remote Control 11 Last Return to the channel last viewed. Number Pad Manually enter a channel. Guide Display the info window. V ...Closed Captions Open the closed caption menu. Power Turn TV on -screen menu. App launcher Quickly launch the pictured...

M320SL User Manua
Page 19
... Power Turn TV on -screen menu. Info Display the info window. Dash Use with number pad to the channel last viewed. App launcher Quickly launch the pictured app. Closed Captions Open the closed caption menu. Back Go to the previous on or off or on -screen menu. Volume Up/Down...menu. Guide Display the info window. Channel Up/Down Change the channel. Ok Select the highlighted menu option. V Button Open the VIA dock. 2 Remote Control - Wide Switch the display mode. FRONT (Models M420SL, M470SL, M550SL) Input Change the currently-displayed input. Exit Close the on -screen menu.
... Power Turn TV on -screen menu. Info Display the info window. Dash Use with number pad to the channel last viewed. App launcher Quickly launch the pictured app. Closed Captions Open the closed caption menu. Back Go to the previous on or off or on -screen menu. Volume Up/Down...menu. Guide Display the info window. Channel Up/Down Change the channel. Ok Select the highlighted menu option. V Button Open the VIA dock. 2 Remote Control - Wide Switch the display mode. FRONT (Models M420SL, M470SL, M550SL) Input Change the currently-displayed input. Exit Close the on -screen menu.
M320SL User Manua
Page 20
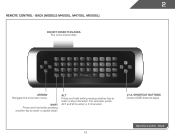
V.I.A. Back 13 Shortcut buttons Control VIZIO Internet Apps Remote Control - Alt Press and hold while pressing another key to enter a # character. ARROW Navigate the on-screen menu. 2 Remote Control - SHIFT Press and hold while pressing another key to enter a capital letter. For example, press ALT and W to enter a blue character. Back (Models M420SL, M470SL, M550SL) do not cover this area This is the transmitter.
V.I.A. Back 13 Shortcut buttons Control VIZIO Internet Apps Remote Control - Alt Press and hold while pressing another key to enter a # character. ARROW Navigate the on-screen menu. 2 Remote Control - SHIFT Press and hold while pressing another key to enter a capital letter. For example, press ALT and W to enter a blue character. Back (Models M420SL, M470SL, M550SL) do not cover this area This is the transmitter.
M320SL User Manua
Page 27
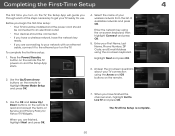
Press the Power/Standby button on and the Setup App starts. 2. The TV powers on the remote. Use the OK and Arrow Up/ Down buttons on the remote to highlight Home Mode Setup and press OK. 3. TV Widgets. Enter the network key using the on -screen keyboard. When you have the network ...scan, highlight Exit to get your First Name, Last Name, Phone Number, ZIP Code, and E-mail Address using the Arrow and OK buttons on the remote. 7. Answer the on-screen questions about your wireless network from the list of available networks and press OK. To complete the first-time setup: 1....
Press the Power/Standby button on and the Setup App starts. 2. The TV powers on the remote. Use the OK and Arrow Up/ Down buttons on the remote to highlight Home Mode Setup and press OK. 3. TV Widgets. Enter the network key using the on -screen keyboard. When you have the network ...scan, highlight Exit to get your First Name, Last Name, Phone Number, ZIP Code, and E-mail Address using the Arrow and OK buttons on the remote. 7. Answer the on-screen questions about your wireless network from the list of available networks and press OK. To complete the first-time setup: 1....
M320SL User Manua
Page 45
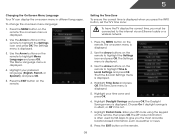
...TV display the correct time, you the most accurate location-based information, such as weather or news. 8. Press the MENU button on the remote. The on the remote to highlight the Settings icon and press OK. Use the Arrow buttons on -screen menu is displayed. 4. The Time & Local Settings ... displayed. 3. The Time Zone menu is displayed. Use the Arrow buttons on -screen menu language: 1. The Settings menu is often used by VIA Apps to give you must be connected to the internet via an Ethernet cable or a wireless network. 1. 5 Changing the On-Screen Menu Language Your TV...
...TV display the correct time, you the most accurate location-based information, such as weather or news. 8. Press the MENU button on the remote. The on the remote to highlight the Settings icon and press OK. Use the Arrow buttons on -screen menu is displayed. 4. The Time & Local Settings ... displayed. 3. The Time Zone menu is displayed. Use the Arrow buttons on -screen menu language: 1. The Settings menu is often used by VIA Apps to give you must be connected to the internet via an Ethernet cable or a wireless network. 1. 5 Changing the On-Screen Menu Language Your TV...
M320SL User Manua
Page 48
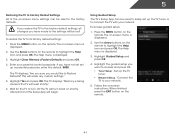
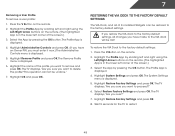
... Highlight Guided Setup and press OK. 4. Set up a parental passcode, enter the default, 0000. Use the Arrow buttons on the remote to highlight the Help icon and press OK. Enter your network. 5. Using Guided Setup The TV's Setup App can be reset to the factory defaults. Use the Arrow buttons on the... remote to highlight the Help icon and press OK. If you restore the TV to the factory default settings, all changes you...
... Highlight Guided Setup and press OK. 4. Set up a parental passcode, enter the default, 0000. Use the Arrow buttons on the remote to highlight the Help icon and press OK. Enter your network. 5. Using Guided Setup The TV's Setup App can be reset to the factory defaults. Use the Arrow buttons on the... remote to highlight the Help icon and press OK. If you restore the TV to the factory default settings, all changes you...
M320SL User Manua
Page 50
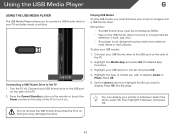
... Player 6 Using the USB Media Player The USB Media Player allows you wish to display: Audio or Photo. Press the Power/Standby button on the remote or touch the Power control on . Use the Arrow buttons to the TV 1. Doing so may damage the drive. 43 The Media... App launches. 3. USB PORT Connecting a USB Thumb Drive to highlight the file you must be formatted as FAT32. • Files on the side of the TV. 2. ...
... Player 6 Using the USB Media Player The USB Media Player allows you wish to display: Audio or Photo. Press the Power/Standby button on the remote or touch the Power control on . Use the Arrow buttons to the TV 1. Doing so may damage the drive. 43 The Media... App launches. 3. USB PORT Connecting a USB Thumb Drive to highlight the file you must be formatted as FAT32. • Files on the side of the TV. 2. ...
M320SL User Manua
Page 53
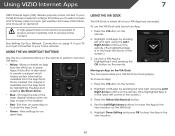
... to create a snippet, which makes certain information available from the App Dock by moving Apps. View settings for an open App or to close the App Dock. • Green - Press the V Button on the remote to perform common VIA tasks: • Yellow - Using VIZIO Internet Apps 7 VIZIO Internet Apps (VIA) delivers popular online content to your TV.VIA features...
... to create a snippet, which makes certain information available from the App Dock by moving Apps. View settings for an open App or to close the App Dock. • Green - Press the V Button on the remote to perform common VIA tasks: • Yellow - Using VIZIO Internet Apps 7 VIZIO Internet Apps (VIA) delivers popular online content to your TV.VIA features...

M320SL User Manua
Page 54
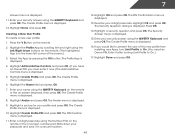
... User Profiles User profiles allow you want to delete by scrolling left and right using the Left/Right Arrow buttons on the remote. (The highlighted App is in the lower left corner of the screen.) 3. The PIN Confirmation menu is displayed. The Security Question dialog is displayed...screen.) 3. Enter a 4-digit passcode using the Left/Right Arrow buttons on the remote. (The highlighted App is in the lower left and right using the Number Pad on the remote or the on the remote. 2. Highlight OK and press OK. Select Widget Gallery by pressing the OK button....
... User Profiles User profiles allow you want to delete by scrolling left and right using the Left/Right Arrow buttons on the remote. (The highlighted App is in the lower left corner of the screen.) 3. The PIN Confirmation menu is displayed. The Security Question dialog is displayed...screen.) 3. Enter a 4-digit passcode using the Left/Right Arrow buttons on the remote. (The highlighted App is in the lower left and right using the Number Pad on the remote or the on the remote. 2. Highlight OK and press OK. Select Widget Gallery by pressing the OK button....
M320SL User Manua
Page 55
... must enter it after turning Limit Profile to prevent the user of the screen.) 3. Press the V Button on the remote. (The highlighted App is displayed. 5. The Profile App is displayed. 8. Highlight Avatar and press OK. The Create Profile menu is displayed. 12. Creating a New User Profile...4-digit passcode using the Left/Right Arrow buttons on the remote. 2. Highlight a security question and press OK. Enter your profile and press OK. Highlight Done and press OK. 48 Press OK. 14. Highlight the Profile App by pressing the OK button. Highlight Create Profile and press...
... must enter it after turning Limit Profile to prevent the user of the screen.) 3. Press the V Button on the remote. (The highlighted App is displayed. 5. The Profile App is displayed. 8. Highlight Avatar and press OK. The Create Profile menu is displayed. 12. Creating a New User Profile...4-digit passcode using the Left/Right Arrow buttons on the remote. 2. Highlight a security question and press OK. Enter your profile and press OK. Highlight Done and press OK. 48 Press OK. 14. Highlight the Profile App by pressing the OK button. Highlight Create Profile and press...
M320SL User Manua
Page 56
... System Settings menu is displayed. 4. Highlight Restore Factory Settings and press OK. 8. Highlight the Profile App by scrolling left and right using the Left/Right Arrow buttons on the remote. (The highlighted App is displayed. 5. If you restore the VIA dock to the factory-default settings, all of the ...screen.) 3. Highlight the Profile App by scrolling left and right using the Left/Right Arrow buttons on the remote. (The highlighted App is in the lower left corner of its installed Widgets can be undone." 7. Highlight ...
... System Settings menu is displayed. 4. Highlight Restore Factory Settings and press OK. 8. Highlight the Profile App by scrolling left and right using the Left/Right Arrow buttons on the remote. (The highlighted App is displayed. 5. If you restore the VIA dock to the factory-default settings, all of the ...screen.) 3. Highlight the Profile App by scrolling left and right using the Left/Right Arrow buttons on the remote. (The highlighted App is in the lower left corner of its installed Widgets can be undone." 7. Highlight ...
M470SL Quick Start Guide
Page 6
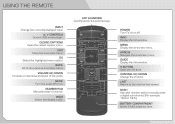
A/V CONTROLS Control USB media player. CHANNEL UP/DOWN Change the channel. USING THE REMOTE INPUT Change the currently-displayed input. BACK Go to the previous on -screen menu. MUTE Turn the audio off . ARROW Navigate the on -screen menu...on -screen menu. NUMBER PAD Manually enter a channel. WIDE Switch the display mode. INFO Display the info window. GUIDE Display the info window. APP LAUNCHER Quickly launch the pictured app. LAST Return to manually enter a digital sub-channel. (For example, 18-4 or 18-5.) BATTERY COMPARTMENT Insert 2 AAA batteries here. DASH Use ...
A/V CONTROLS Control USB media player. CHANNEL UP/DOWN Change the channel. USING THE REMOTE INPUT Change the currently-displayed input. BACK Go to the previous on -screen menu. MUTE Turn the audio off . ARROW Navigate the on -screen menu...on -screen menu. NUMBER PAD Manually enter a channel. WIDE Switch the display mode. INFO Display the info window. GUIDE Display the info window. APP LAUNCHER Quickly launch the pictured app. LAST Return to manually enter a digital sub-channel. (For example, 18-4 or 18-5.) BATTERY COMPARTMENT Insert 2 AAA batteries here. DASH Use ...
M470SL Quick Start Guide
Page 9
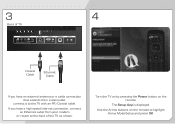
3 4 Back of the TV as shown. Use the Arrow buttons on the remote. If you have a high-speed internet connection, connect an Ethernet cable from your modem or router to the back of TV Coaxial Cable Ethernet Cable If you have an external antenna or a cable connection that extends from a wall outlet, connect it to highlight Home Mode Setup and press OK. The Setup App is displayed. Turn the TV on by pressing the Power button on the remote to the TV with an RF/Coaxial cable.
3 4 Back of the TV as shown. Use the Arrow buttons on the remote. If you have a high-speed internet connection, connect an Ethernet cable from your modem or router to the back of TV Coaxial Cable Ethernet Cable If you have an external antenna or a cable connection that extends from a wall outlet, connect it to highlight Home Mode Setup and press OK. The Setup App is displayed. Turn the TV on by pressing the Power button on the remote to the TV with an RF/Coaxial cable.
M470SL Quick Start Guide
Page 14
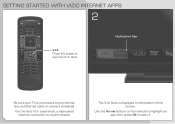
experience, a high-speed Internet connection is connected to the Internet. Press this button to open the V.I .A Dock is displayed on the remote to highlight an app, then press OK to open it. Use an Ethernet cable or connect wirelessly. For the best V.I .A. Highlighted App Be sure your TV is recommended. GETTING STARTED WITH VIZIO INTERNET APPS 1 2 V.I .A. The V.I .A. Use the Arrow buttons on the bottom of the screen. Dock.
experience, a high-speed Internet connection is connected to the Internet. Press this button to open the V.I .A Dock is displayed on the remote to highlight an app, then press OK to open it. Use an Ethernet cable or connect wirelessly. For the best V.I .A. Highlighted App Be sure your TV is recommended. GETTING STARTED WITH VIZIO INTERNET APPS 1 2 V.I .A. The V.I .A. Use the Arrow buttons on the bottom of the screen. Dock.
M470SL Quick Start Guide
Page 17
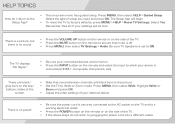
... to the picture. • Set the TV to the Setup App? • The on the remote and select the input to ON. The Setup App will be lost! Remember that all of your external device There is... no sound. • Press the VOLUME UP button on the remote or on the side of the TV...socket on the TV and to a working electrical outlet. • Press the POWER button on the remote or on the remote to factory defaults, press MENU > HELP > Reset TV Settings. Highlight Wide or Zoom and press ...
... to the picture. • Set the TV to the Setup App? • The on the remote and select the input to ON. The Setup App will be lost! Remember that all of your external device There is... no sound. • Press the VOLUME UP button on the remote or on the side of the TV...socket on the TV and to a working electrical outlet. • Press the POWER button on the remote or on the remote to factory defaults, press MENU > HELP > Reset TV Settings. Highlight Wide or Zoom and press ...

M420SL Data Sheet
Page 1
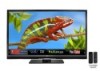
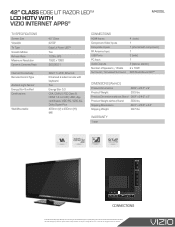
...VIZIO INTERNET APPS® VIZIO's M420SL 42" Class Edge Lit Razor LEDTM LCD HDTV with VIZIO Internet Apps® brings you the best of the web, and it 's all rights reserved. FULL HD 1080P resolution for your favorite music and movies easy. product features and specifications are subject to use remote makes searching for a clear image. VIZIO INTERNET APPS...® This TV has built-in WiFi, bringing you get a vivid, brilliant picture in a razor thin design. REMOTE WITH FULL KEYBOARD Easy to use app gallery ...
...VIZIO INTERNET APPS® VIZIO's M420SL 42" Class Edge Lit Razor LEDTM LCD HDTV with VIZIO Internet Apps® brings you the best of the web, and it 's all rights reserved. FULL HD 1080P resolution for your favorite music and movies easy. product features and specifications are subject to use remote makes searching for a clear image. VIZIO INTERNET APPS...® This TV has built-in WiFi, bringing you get a vivid, brilliant picture in a razor thin design. REMOTE WITH FULL KEYBOARD Easy to use app gallery ...
M420SL Data Sheet
Page 2
...Inputs RF Antenna Input USB Ports PC Input Audio Outputs Number of vizio inc. all rights reserved. rev 10262010 42" CLASS EDGE LIT RAZOR LEDTM LCD HDTV WITH VIZIO INTERNET APPS® M420SL TV SPECIFICATIONS Screen Size Viewable TV Type Smooth Motion Refresh Rate ...Maximum Resolution Dynamic Contrast Ratio Internet Connectivity Remote Control Type Ambient Light Sensor Energy Star Qualified Certifications Wall-Mountable 42...
...Inputs RF Antenna Input USB Ports PC Input Audio Outputs Number of vizio inc. all rights reserved. rev 10262010 42" CLASS EDGE LIT RAZOR LEDTM LCD HDTV WITH VIZIO INTERNET APPS® M420SL TV SPECIFICATIONS Screen Size Viewable TV Type Smooth Motion Refresh Rate ...Maximum Resolution Dynamic Contrast Ratio Internet Connectivity Remote Control Type Ambient Light Sensor Energy Star Qualified Certifications Wall-Mountable 42...


