
M320SL User Manua
Page 1
USER GUIDE MOMDODEELLSS // E3D320VX // E3MD4230V2X0SL // E3MD4730V7X0SL M420SL M470SL M550SL INSTALLING YOUR new TV CONTROLS & CONNECTIONS CONNECTING YOUR DEVICES USING THE ON-SCREEN MENU USING THE USB MEDIA PLAYER USING VIZIO INTERNET APPS TROUBLESHOOTING & SUPPORT Help, SPECs, warranty & LEGAL
USER GUIDE MOMDODEELLSS // E3D320VX // E3MD4230V2X0SL // E3MD4730V7X0SL M420SL M470SL M550SL INSTALLING YOUR new TV CONTROLS & CONNECTIONS CONNECTING YOUR DEVICES USING THE ON-SCREEN MENU USING THE USB MEDIA PLAYER USING VIZIO INTERNET APPS TROUBLESHOOTING & SUPPORT Help, SPECs, warranty & LEGAL
M320SL User Manua
Page 7
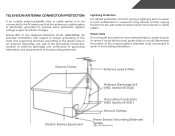
Remember, the screen of the coaxial cable is intended to be connected to the TV, make sure that the antenna or cable system is electrically grounded to provide ...
Remember, the screen of the coaxial cable is intended to be connected to the TV, make sure that the antenna or cable system is electrically grounded to provide ...
M320SL User Manua
Page 8
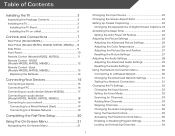
...Screen Aspect Ratio 22 Setting Up Closed Captioning 23 Changing the Appearance of Contents Installing the TV 3 Inspecting the Package Contents 3 Installing the TV 3 Installing the TV Stand 3 Installing the TV on a Wall 5 Controls and Connections 7 Rear Panel (Model M320SL 7 Rear Panel (Models M370SL, M420SL,... 15 Connecting A Device 15 Connecting A PC 16 Connecting an audio device (Model M320SL 17 Connecting an audio device (Model M370SL, M420SL, M470SL, M550SL 18 Connecting to your network 19 Connecting to a Wired Network (Best 19 Connecting to a Wireless Network 30 Changing...
...Screen Aspect Ratio 22 Setting Up Closed Captioning 23 Changing the Appearance of Contents Installing the TV 3 Inspecting the Package Contents 3 Installing the TV 3 Installing the TV Stand 3 Installing the TV on a Wall 5 Controls and Connections 7 Rear Panel (Model M320SL 7 Rear Panel (Models M370SL, M420SL,... 15 Connecting A Device 15 Connecting A PC 16 Connecting an audio device (Model M320SL 17 Connecting an audio device (Model M370SL, M420SL, M470SL, M550SL 18 Connecting to your network 19 Connecting to a Wired Network (Best 19 Connecting to a Wireless Network 30 Changing...
M320SL User Manua
Page 9
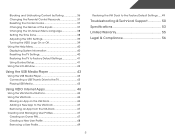
... Control Passcode 37 Resetting the Content Locks 37 Changing the Names of the Inputs 37 Changing the On-Screen Menu Language 38 Setting the Time Zone 38 Adjusting the CEC Settings 39 Turning the VIZIO Logo On or Off 39 Using the Help Menu 40 Displaying System Information 40 Resetting the TV... Using the USB Media Player 43 Using the USB Media Player 43 Connecting a USB Thumb Drive to the TV 43 Playing USB Media 43 Using VIZIO Internet Apps 46 Using the VIA Shortcut Buttons 46 Using the VIA Dock 46 Moving an App on the VIA Dock 46 Adding a New App...
... Control Passcode 37 Resetting the Content Locks 37 Changing the Names of the Inputs 37 Changing the On-Screen Menu Language 38 Setting the Time Zone 38 Adjusting the CEC Settings 39 Turning the VIZIO Logo On or Off 39 Using the Help Menu 40 Displaying System Information 40 Resetting the TV... Using the USB Media Player 43 Using the USB Media Player 43 Connecting a USB Thumb Drive to the TV 43 Playing USB Media 43 Using VIZIO Internet Apps 46 Using the VIA Shortcut Buttons 46 Using the VIA Dock 46 Moving an App on the VIA Dock 46 Adding a New App...
M320SL User Manua
Page 11
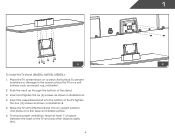
... illustration B. 5. To ensure proper ventilation, leave at least 1" of space between the back of the stand. 3. To prevent scratches or damage to the screen, place the TV on a clean, flat surface. Tighten the four (4) screws as carpet, rug, or blanket. 2. Move the TV with attached stand...stand into an upright position and place on a flat, level, and stable surface. 6. Place the TV screen-down on a soft surface, such as shown in illustration A. 4. 1 A B To install the TV stand (M420SL, M470SL, M550SL): 1. Push the neck up through the bottom of the TV and any other objects (...
... illustration B. 5. To ensure proper ventilation, leave at least 1" of space between the back of the stand. 3. To prevent scratches or damage to the screen, place the TV on a clean, flat surface. Tighten the four (4) screws as carpet, rug, or blanket. 2. Move the TV with attached stand...stand into an upright position and place on a flat, level, and stable surface. 6. Place the TV screen-down on a soft surface, such as shown in illustration A. 4. 1 A B To install the TV stand (M420SL, M470SL, M550SL): 1. Push the neck up through the bottom of the TV and any other objects (...
M320SL User Manua
Page 12
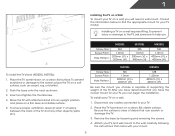
... and place on a wall: 1. M320SL Screw Size: Screw Pitch: Hole Pattern: M6 1.0mm 200mm (V) x 200mm (H) M370SL M6 1.0mm 200mm (V) x 400mm (H) M420SL M6 1.0mm 400mm (V) x 400mm (H) To install the TV stand (M320SL, M370SL): 1. Insert and tighten the thumbscrew. 4. Push the base onto the neck as carpet...TV on a Wall To mount your TV on a wall requires lifting. Disconnect any other objects (walls, etc). Consult the information below to the screen, place the TV on a soft surface, such as shown. 3. To prevent scratches or damage to find the appropriate mount for your mount. 5 ...
... and place on a wall: 1. M320SL Screw Size: Screw Pitch: Hole Pattern: M6 1.0mm 200mm (V) x 200mm (H) M370SL M6 1.0mm 200mm (V) x 400mm (H) M420SL M6 1.0mm 400mm (V) x 400mm (H) To install the TV stand (M320SL, M370SL): 1. Insert and tighten the thumbscrew. 4. Push the base onto the neck as carpet...TV on a Wall To mount your TV on a wall requires lifting. Disconnect any other objects (walls, etc). Consult the information below to the screen, place the TV on a soft surface, such as shown. 3. To prevent scratches or damage to find the appropriate mount for your mount. 5 ...
M320SL User Manua
Page 16
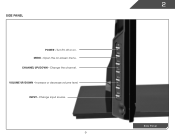
Side Panel POWER - CHANNEL UP/DOWN - INPUT - VOLUME UP/DOWN - Increase or decrease volume level. Open the on . Change the channel. MENU - Turn TV off or on -screen menu. Change input source. 9 2 Side Panel
Side Panel POWER - CHANNEL UP/DOWN - INPUT - VOLUME UP/DOWN - Increase or decrease volume level. Open the on . Change the channel. MENU - Turn TV off or on -screen menu. Change input source. 9 2 Side Panel

M320SL User Manua
Page 18
... the channel last viewed. Ok Select the highlighted menu option. Back Go to the previous on or off or on -screen menu. Power Turn TV on -screen menu. Menu Display the on -screen menu. Last Return to manually enter a digital sub-channel. (For example, 18-4 or 18-5.) Remote Control 11 Volume Up/Down... (Models M320SL, M370SL) Input Change the currently-displayed input. App launcher Quickly launch the pictured app. Info Display the info window. Arrow Navigate the on -screen menu.
... the channel last viewed. Ok Select the highlighted menu option. Back Go to the previous on or off or on -screen menu. Power Turn TV on -screen menu. Menu Display the on -screen menu. Last Return to manually enter a digital sub-channel. (For example, 18-4 or 18-5.) Remote Control 11 Volume Up/Down... (Models M320SL, M370SL) Input Change the currently-displayed input. App launcher Quickly launch the pictured app. Info Display the info window. Arrow Navigate the on -screen menu.

M320SL User Manua
Page 19
... last viewed. Mute Turn the audio off . App launcher Quickly launch the pictured app. Arrow Navigate the on -screen menu. Last Return to the previous on-screen menu. Closed Captions Open the closed caption menu. Info Display the info window. A/V Controls Control USB media player....example, 18-4 or 18-5.) battery compartment Insert 2 AAA batteries here. FRONT (Models M420SL, M470SL, M550SL) Input Change the currently-displayed input. Wide Switch the display mode. Menu Display the on -screen menu. Remote Control 12 Channel Up/Down Change the channel. Power Turn TV on or...
... last viewed. Mute Turn the audio off . App launcher Quickly launch the pictured app. Arrow Navigate the on -screen menu. Last Return to the previous on-screen menu. Closed Captions Open the closed caption menu. Info Display the info window. A/V Controls Control USB media player....example, 18-4 or 18-5.) battery compartment Insert 2 AAA batteries here. FRONT (Models M420SL, M470SL, M550SL) Input Change the currently-displayed input. Wide Switch the display mode. Menu Display the on -screen menu. Remote Control 12 Channel Up/Down Change the channel. Power Turn TV on or...
M320SL User Manua
Page 20
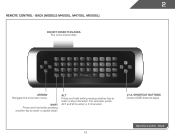
For example, press ALT and W to enter a capital letter. Back (Models M420SL, M470SL, M550SL) do not cover this area This is the transmitter. Alt Press and hold while pressing another key to enter a blue character. Shortcut buttons Control VIZIO Internet Apps Remote Control - V.I.A. SHIFT Press and hold while pressing another key to enter a # character. ARROW Navigate the on-screen menu. Back 13 2 Remote Control -
For example, press ALT and W to enter a capital letter. Back (Models M420SL, M470SL, M550SL) do not cover this area This is the transmitter. Alt Press and hold while pressing another key to enter a blue character. Shortcut buttons Control VIZIO Internet Apps Remote Control - V.I.A. SHIFT Press and hold while pressing another key to enter a # character. ARROW Navigate the on-screen menu. Back 13 2 Remote Control -
M320SL User Manua
Page 27
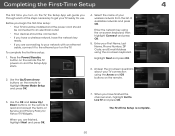
...finished the channel scan, highlight Exit to Live TV and press OK. To complete the first-time setup: 1. Press the Power/Standby button on -screen keyboard, then highlight Connect and press OK. 5. Highlight Next and press OK. 6. Enter your TV connection using the Arrow and OK buttons on ...the remote. 7. Enter the network key using the on-screen keyboard. When you are finished, highlight Next and press OK. 4. The First-Time Setup is complete. 20 When you through each of the steps necessary...
...finished the channel scan, highlight Exit to Live TV and press OK. To complete the first-time setup: 1. Press the Power/Standby button on -screen keyboard, then highlight Connect and press OK. 5. Highlight Next and press OK. 6. Enter your TV connection using the Arrow and OK buttons on ...the remote. 7. Enter the network key using the on-screen keyboard. When you are finished, highlight Next and press OK. 4. The First-Time Setup is complete. 20 When you through each of the steps necessary...

M320SL User Manua
Page 28
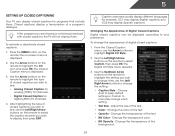
From this menu, you can press the BACK button at any time to return to the previous menu screen. You can : • Change the input source • Change the screen aspect ratio • Set up closed captioning • Activate the sleep timer • Adjust the picture settings • Adjust the ...audio settings • Change network settings • Change TV settings • Access the help menu Navigating the On-Screen Menu To open the on the remote. Use the Arrow buttons to highlight a menu option, and press the MENU/OK button to select that option...
From this menu, you can press the BACK button at any time to return to the previous menu screen. You can : • Change the input source • Change the screen aspect ratio • Set up closed captioning • Activate the sleep timer • Adjust the picture settings • Adjust the ...audio settings • Change network settings • Change TV settings • Access the help menu Navigating the On-Screen Menu To open the on the remote. Use the Arrow buttons to highlight a menu option, and press the MENU/OK button to select that option...
M320SL User Manua
Page 29
...the picture differently. Press the MENU button on the remote to the edges of the display image. • Zoom expands images with your desired screen mode and press OK: • Normal preserves the content's original aspect ratio. Images may appear wider than intended. The Input Source Selection ...menu is not large enough to fill the TV's screen, black bars are added to the left and right of the display image. Since the 4:3 aspect ratio is displayed. 4. If you are ...
...the picture differently. Press the MENU button on the remote to the edges of the display image. • Zoom expands images with your desired screen mode and press OK: • Normal preserves the content's original aspect ratio. Images may appear wider than intended. The Input Source Selection ...menu is not large enough to fill the TV's screen, black bars are added to the left and right of the display image. Since the 4:3 aspect ratio is displayed. 4. If you are ...
M320SL User Manua
Page 30
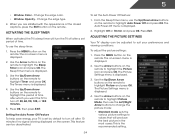
... manually change the appearance of the text. • Color - Adjust the size of digital closed captions: 1. Change the background color. • BG Opacity - The on-screen menu is displayed. 2.
... manually change the appearance of the text. • Color - Adjust the size of digital closed captions: 1. Change the background color. • BG Opacity - The on-screen menu is displayed. 2.
M320SL User Manua
Page 31
... your preferences and viewing conditions. This feature can be deactivated. From the Sleep Timer menu, use the Up/Down Arrow buttons on the screen. The Picture Settings menu is being displayed on the remote to highlight Timer and press OK. Activating the Sleep Timer When activated, the TV... on the remote to highlight the period of time after a set the Auto Power Off feature: 1. Use the Up/Down Arrow buttons on -screen menu is displayed. 4. Adjusting the Picture Settings Your TV display can be adjusted to highlight Picture and press OK. This is the recommended setting....
... your preferences and viewing conditions. This feature can be deactivated. From the Sleep Timer menu, use the Up/Down Arrow buttons on the screen. The Picture Settings menu is being displayed on the remote to highlight Timer and press OK. Activating the Sleep Timer When activated, the TV... on the remote to highlight the period of time after a set the Auto Power Off feature: 1. Use the Up/Down Arrow buttons on -screen menu is displayed. 4. Adjusting the Picture Settings Your TV display can be adjusted to highlight Picture and press OK. This is the recommended setting....
M320SL User Manua
Page 35
... between the display image and the accompanying audio track. • TV Speakers - The on or off. • Advanced Audio - Turns the built-in speakers on -screen menu is displayed. 3. See Resetting the Audio Settings on page 29. • Equalizer Settings - See Adjusting the Advanced Audio Settings on page 30. 4. Use the...
... between the display image and the accompanying audio track. • TV Speakers - The on or off. • Advanced Audio - Turns the built-in speakers on -screen menu is displayed. 3. See Resetting the Audio Settings on page 29. • Equalizer Settings - See Adjusting the Advanced Audio Settings on page 30. 4. Use the...
M320SL User Manua
Page 37
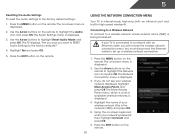
...The More Access Points menu, which is a list of your network's password, then highlight Connect and press OK. 6. Use the Arrow buttons on -screen menu is connected to a network with an Ethernet cable, you want to RESET Audio Settings to highlight the Network icon and press OK. Use the...an ethernet port and built-in high-speed wireless-N. If you do not see the wireless network connection menu. Use the Arrow buttons on -screen keyboard, enter your wireless network (this is displayed. 3. You must disconnect the Ethernet cable to highlight Reset Audio Mode and press OK. ...
...The More Access Points menu, which is a list of your network's password, then highlight Connect and press OK. 6. Use the Arrow buttons on -screen menu is connected to a network with an Ethernet cable, you want to RESET Audio Settings to highlight the Network icon and press OK. Use the...an ethernet port and built-in high-speed wireless-N. If you do not see the wireless network connection menu. Use the Arrow buttons on -screen keyboard, enter your wireless network (this is displayed. 3. You must disconnect the Ethernet cable to highlight Reset Audio Mode and press OK. ...
M320SL User Manua
Page 38
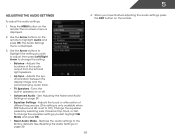
... Arrow buttons on the remote to change advanced network settings: 1. Highlight Enter Access Point Name and press OK. 4. Using the on -screen menu is not being broadcast: 1. Changing the Advanced Network Settings Advanced users can fine-tune the network settings using the Manual Setup feature....This setting must be turned Off to highlight the Network icon and press OK. The on -screen keyboard, enter your network's name (SSID), then highlight Connect and press OK. 5. Press the EXIT button on -screen keyboard, enter your network, these are displayed at the bottom of the other settings. &#...
... Arrow buttons on the remote to change advanced network settings: 1. Highlight Enter Access Point Name and press OK. 4. Using the on -screen menu is not being broadcast: 1. Changing the Advanced Network Settings Advanced users can fine-tune the network settings using the Manual Setup feature....This setting must be turned Off to highlight the Network icon and press OK. The on -screen keyboard, enter your network's name (SSID), then highlight Connect and press OK. 5. Press the EXIT button on -screen keyboard, enter your network, these are displayed at the bottom of the other settings. &#...
M320SL User Manua
Page 39
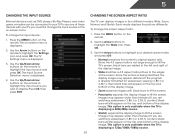
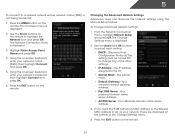
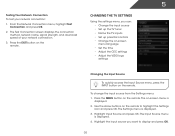
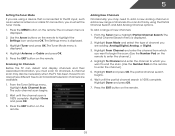
... OK. 2. Press the EXIT button on the remote. Press the MENU button on the remote. The Input Source menu is displayed. 3. The Test Connection screen displays the connection method, network name, signal strength, and download speed of your network connection: 1. Use the Arrow buttons on...up the TV tuner • Name the TV inputs • Set up parental controls • Change the on-screen menu language • Set the time • Adjust the CEC settings • Adjust the VIZIO logo settings Changing the Input Source To quickly access the Input Source menu, press the INPUT button on...
... OK. 2. Press the EXIT button on the remote. Press the MENU button on the remote. The Input Source menu is displayed. 3. The Test Connection screen displays the connection method, network name, signal strength, and download speed of your network connection: 1. Use the Arrow buttons on...up the TV tuner • Name the TV inputs • Set up parental controls • Change the on-screen menu language • Set the time • Adjust the CEC settings • Adjust the VIZIO logo settings Changing the Input Source To quickly access the Input Source menu, press the INPUT button on...
M320SL User Manua
Page 40
... free-to enter the channel.) 5. Highlight To Channel and enter the channel to which you want to end the scan. (Use the Number Pad on -screen menu is 100% complete. Highlight Start and press OK. 5 Setting the Tuner Mode If you are using the Partial Channel Search and Add Analog Channel...
... free-to enter the channel.) 5. Highlight To Channel and enter the channel to which you want to end the scan. (Use the Number Pad on -screen menu is 100% complete. Highlight Start and press OK. 5 Setting the Tuner Mode If you are using the Partial Channel Search and Add Analog Channel...

