M320SL User Manua
Page 4
... be used , use an adapter to ground your TV close to smoke. Do not install your TV safely. To ensure reliable operation of the grounded plug. • When connected to a power outlet, power is always flowing into the apparatus, the apparatus has been exposed to rain or moisture, does not operate normally or has been dropped. • Unplug the power cord before turning on...
... be used , use an adapter to ground your TV close to smoke. Do not install your TV safely. To ensure reliable operation of the grounded plug. • When connected to a power outlet, power is always flowing into the apparatus, the apparatus has been exposed to rain or moisture, does not operate normally or has been dropped. • Unplug the power cord before turning on...
M320SL User Manua
Page 5
... damage the remote control or injure the operator. If your TV is dropped and the housing is dropped or damaged in the operating instructions unless you to high voltages, electric shock, and other cables are unplugged before moving your TV. Unplug the power cord immediately and..., hold the AC/DC power adapter, not the cord. The power cord fails or frays. - The performance of electric shock, do not perform any way. - These servicing instructions are for an extended period of time, unplug the power cord. • To reduce risk of your TV changes substantially. • This apparatus...
... damage the remote control or injure the operator. If your TV is dropped and the housing is dropped or damaged in the operating instructions unless you to high voltages, electric shock, and other cables are unplugged before moving your TV. Unplug the power cord immediately and..., hold the AC/DC power adapter, not the cord. The power cord fails or frays. - The performance of electric shock, do not perform any way. - These servicing instructions are for an extended period of time, unplug the power cord. • To reduce risk of your TV changes substantially. • This apparatus...
M320SL User Manua
Page 7
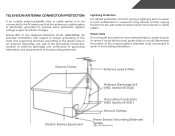
... supporting structure, grounding of the lead-in the building installation. Television Antenna Connection Protection If an outside antenna/satellite dish or cable system is to be connected to earth in wire to an antenna discharge unit, size of the grounding conductors, location of antenna discharge unit, connection to grounding electrodes, and requirements of the grounding electrode. Ground Clamp Antenna Lead In Wire Electric Service...
... supporting structure, grounding of the lead-in the building installation. Television Antenna Connection Protection If an outside antenna/satellite dish or cable system is to be connected to earth in wire to an antenna discharge unit, size of the grounding conductors, location of antenna discharge unit, connection to grounding electrodes, and requirements of the grounding electrode. Ground Clamp Antenna Lead In Wire Electric Service...
M320SL User Manua
Page 8
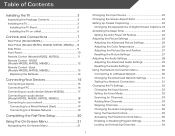
...the On-Screen Menu 21 1 Changing the Input Source 22 Changing the Screen Aspect Ratio 22 Setting Up Closed Captioning 23 Changing the Appearance of Contents Installing the TV 3 Inspecting the Package Contents 3 Installing the TV 3 Installing the TV Stand 3 Installing the TV on a Wall 5 Controls and Connections 7 Rear Panel (Model M320SL 7 Rear Panel (Models M370SL, M420SL, M470SL, M550SL)..... 8 Side Panel 9 Front Panel 10 Remote Control (Models M320SL, M370SL 11 Remote Control - Table of Digital Closed Captions.. 23 Activating the Sleep Timer 24 Setting the Auto Power Off...
...the On-Screen Menu 21 1 Changing the Input Source 22 Changing the Screen Aspect Ratio 22 Setting Up Closed Captioning 23 Changing the Appearance of Contents Installing the TV 3 Inspecting the Package Contents 3 Installing the TV 3 Installing the TV Stand 3 Installing the TV on a Wall 5 Controls and Connections 7 Rear Panel (Model M320SL 7 Rear Panel (Models M370SL, M420SL, M470SL, M550SL)..... 8 Side Panel 9 Front Panel 10 Remote Control (Models M320SL, M370SL 11 Remote Control - Table of Digital Closed Captions.. 23 Activating the Sleep Timer 24 Setting the Auto Power Off...
M320SL User Manua
Page 9
... 36 Changing the Parental Control Passcode 37 Resetting the Content Locks 37 Changing the Names of the Inputs 37 Changing the On-Screen Menu Language 38 Setting the Time Zone 38 Adjusting the CEC Settings 39 Turning the VIZIO Logo On or Off 39 Using the Help Menu 40 Displaying System Information 40 Resetting the TV Settings 40 Restoring the TV to Factory Default Settings 41 Using Guided Setup 41 Using the Info Window 42 Using the USB Media Player 43 Using the USB Media Player 43 Connecting a USB...
... 36 Changing the Parental Control Passcode 37 Resetting the Content Locks 37 Changing the Names of the Inputs 37 Changing the On-Screen Menu Language 38 Setting the Time Zone 38 Adjusting the CEC Settings 39 Turning the VIZIO Logo On or Off 39 Using the Help Menu 40 Displaying System Information 40 Resetting the TV Settings 40 Restoring the TV to Factory Default Settings 41 Using Guided Setup 41 Using the Info Window 42 Using the USB Media Player 43 Using the USB Media Player 43 Connecting a USB...
M320SL User Manua
Page 12
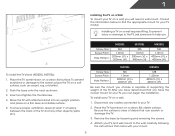
... removing the screws. 4. Attach your TV and wall mount to the wall, carefully following the instructions that you have determined that came with attached stand into an upright position and place on a clean, flat, stable surface. Move the TV with your TV. 2. After you choose is clear of the TV and any cables connected to help you will need a wall mount. Place the TV screen...
... removing the screws. 4. Attach your TV and wall mount to the wall, carefully following the instructions that you have determined that came with attached stand into an upright position and place on a clean, flat, stable surface. Move the TV with your TV. 2. After you choose is clear of the TV and any cables connected to help you will need a wall mount. Place the TV screen...

M320SL User Manua
Page 18
... closed caption menu. App launcher Quickly launch the pictured app. V Button Open the VIA dock. Channel Up/Down Change the channel. Ok Select the highlighted menu option. Volume Up/Down Increase or decrease loudness of the audio. Menu Display the on -screen menu. Dash Use with number pad to the channel last viewed. 2 Remote Control (Models M320SL, M370SL) Input Change the currently-displayed input. Arrow Navigate the on -screen menu. A/V Controls Control USB media player. Wide Switch the display mode. Back Go to the previous on -screen menu. Number Pad Manually...
... closed caption menu. App launcher Quickly launch the pictured app. V Button Open the VIA dock. Channel Up/Down Change the channel. Ok Select the highlighted menu option. Volume Up/Down Increase or decrease loudness of the audio. Menu Display the on -screen menu. Dash Use with number pad to the channel last viewed. 2 Remote Control (Models M320SL, M370SL) Input Change the currently-displayed input. Arrow Navigate the on -screen menu. A/V Controls Control USB media player. Wide Switch the display mode. Back Go to the previous on -screen menu. Number Pad Manually...

M320SL User Manua
Page 19
...Volume Up/Down Increase or decrease loudness of the audio. Guide Display the info window. Dash Use with number pad to the channel last viewed. A/V Controls Control USB media player. Closed Captions Open the closed caption menu. Mute Turn the audio off or on or off. Channel Up/Down Change the channel. Arrow Navigate the on -screen menu. Ok Select the highlighted menu option. Remote Control 12 Number Pad Manually enter a channel. 2 Remote Control - Menu Display the on -screen menu. FRONT (Models M420SL, M470SL, M550SL) Input Change the currently-displayed input...
...Volume Up/Down Increase or decrease loudness of the audio. Guide Display the info window. Dash Use with number pad to the channel last viewed. A/V Controls Control USB media player. Closed Captions Open the closed caption menu. Mute Turn the audio off or on or off. Channel Up/Down Change the channel. Arrow Navigate the on -screen menu. Ok Select the highlighted menu option. Remote Control 12 Number Pad Manually enter a channel. 2 Remote Control - Menu Display the on -screen menu. FRONT (Models M420SL, M470SL, M550SL) Input Change the currently-displayed input...
M320SL User Manua
Page 22
.... 3. Connecting Your Devices Connecting A Device Your TV can be used (HDMI-1, HDM1-2, etc). 3 Cable/Satellite Box DVD/Blu-ray Player Game Console HDMI CABLE BEST • DIGITAL • HD VIDEO (1080p)* • HD AUDIO COMPONENT CABLE • ANALOG BETTER • HD VIDEO (1080i)* • STEREO AUDIO AV CABLE GOOD • ANALOG • VIDEO (480i)* • STEREO AUDIO * Maximum Resolution 15 CONNECTING A DEVICE Connect the appropriate cable (not included) to display output from most devices. 1. Turn the TV and your device has a video port...
.... 3. Connecting Your Devices Connecting A Device Your TV can be used (HDMI-1, HDM1-2, etc). 3 Cable/Satellite Box DVD/Blu-ray Player Game Console HDMI CABLE BEST • DIGITAL • HD VIDEO (1080p)* • HD AUDIO COMPONENT CABLE • ANALOG BETTER • HD VIDEO (1080i)* • STEREO AUDIO AV CABLE GOOD • ANALOG • VIDEO (480i)* • STEREO AUDIO * Maximum Resolution 15 CONNECTING A DEVICE Connect the appropriate cable (not included) to display output from most devices. 1. Turn the TV and your device has a video port...
M320SL User Manua
Page 32
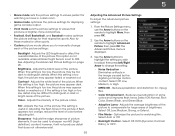
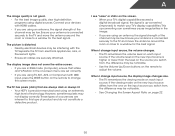
... the picture settings for displaying game console output. • Vivid mode sets the picture settings to manually change the setting: • Noise Reduction Diminishes artifacts in the picture. This option is not available unless Ambient Light Sensor is too low, the picture may be too dark to OFF. When this setting is useful in adjusting the flesh tones in the image caused by the digitizing of brightness. Sharpness - Use the Arrow buttons...
... the picture settings for displaying game console output. • Vivid mode sets the picture settings to manually change the setting: • Noise Reduction Diminishes artifacts in the picture. This option is not available unless Ambient Light Sensor is too low, the picture may be too dark to OFF. When this setting is useful in adjusting the flesh tones in the image caused by the digitizing of brightness. Sharpness - Use the Arrow buttons...
M320SL User Manua
Page 36
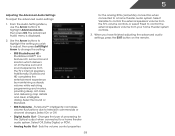
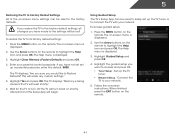
... Off. • Digital Audio Out - Sets the volume control properties for the Optical output when connected to television commercials or channel changes. From the Audio Settings Menu, use the Arrow buttons to a home theater audio system. TruVolume™ intelligently normalizes volume fluctuations due to a home theater audio system. Changes the type of processing for the analog RCA (red/white) connectors when connected to highlight Advanced Audio, then press OK. 5 Adjusting the Advanced Audio Settings To adjust the advanced audio settings: 1. Select Surround...
... Off. • Digital Audio Out - Sets the volume control properties for the Optical output when connected to television commercials or channel changes. From the Audio Settings Menu, use the Arrow buttons to a home theater audio system. TruVolume™ intelligently normalizes volume fluctuations due to a home theater audio system. Changes the type of processing for the analog RCA (red/white) connectors when connected to highlight Advanced Audio, then press OK. 5 Adjusting the Advanced Audio Settings To adjust the advanced audio settings: 1. Select Surround...
M320SL User Manua
Page 40
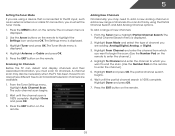
... you are adding: Analog/Digital, Analog, or Digital. 3. Wait until the channel scan is 100% complete. Press the EXIT button on the remote to which you must set the tuner mode. 1. Use the Arrow buttons on the remote. 33 Press the EXIT button on the remote. From the Tuner Settings menu, highlight Auto Channel Scan. Wait until the partial channel search is connected to the RF input, such as an external antenna or cable TV connection, you may also...
... you are adding: Analog/Digital, Analog, or Digital. 3. Wait until the channel scan is 100% complete. Press the EXIT button on the remote to which you must set the tuner mode. 1. Use the Arrow buttons on the remote. 33 Press the EXIT button on the remote. From the Tuner Settings menu, highlight Auto Channel Scan. Wait until the partial channel search is connected to the RF input, such as an external antenna or cable TV connection, you may also...
M320SL User Manua
Page 46
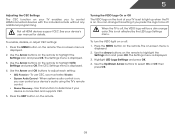
... color. Not all HDMI devices support CEC. See your device's audio using the TV's remote control. • Device Discovery - Press the MENU button on the remote. The on-screen menu is displayed. 4. The CEC Settings menu is displayed. 2. To use CEC, you must select Enable. • System Audio Control - Press the EXIT button on or off . You can control your device's user manual for details. To turn the VIZIO light on the remote. Use the Up/Down Arrow buttons...
... color. Not all HDMI devices support CEC. See your device's audio using the TV's remote control. • Device Discovery - Press the MENU button on the remote. The on-screen menu is displayed. 4. The CEC Settings menu is displayed. 2. To use CEC, you must select Enable. • System Audio Control - Press the EXIT button on or off . You can control your device's user manual for details. To turn the VIZIO light on the remote. Use the Up/Down Arrow buttons...
M320SL User Manua
Page 48
... Help menu is displayed. 2. The on the remote. The TV will begin. To access guided setup: 1. When finished, press the EXIT button on shortly afterward and the Setup App will turn off. To restore the TV to access and press OK: • Tuner Setup - Using Guided Setup The TV's Setup App can be reset to the factory default settings, all changes you would like to your parental control passcode. If you want to its factory default settings...
... Help menu is displayed. 2. The on the remote. The TV will begin. To access guided setup: 1. When finished, press the EXIT button on shortly afterward and the Setup App will turn off. To restore the TV to access and press OK: • Tuner Setup - Using Guided Setup The TV's Setup App can be reset to the factory default settings, all changes you would like to your parental control passcode. If you want to its factory default settings...

M320SL User Manua
Page 58
...; Check the audio connections of external devices (Blu-ray player, game console, cable/satellite box) that are connected to the TV. • If you are using cable TV, satellite, or antenna connected directly to the TV. • Press the Power/Standby button on the remote or on the remote aren't working. • Ensure you are connected correctly. The colors on page 24 • Reset the picture settings. Devices differ; See Resetting the Picture Settings on page...
...; Check the audio connections of external devices (Blu-ray player, game console, cable/satellite box) that are connected to the TV. • If you are using cable TV, satellite, or antenna connected directly to the TV. • Press the Power/Standby button on the remote or on the remote aren't working. • Ensure you are connected correctly. The colors on page 24 • Reset the picture settings. Devices differ; See Resetting the Picture Settings on page...
M320SL User Manua
Page 59
... on-screen menu are using an antenna, the signal strength of the channel may be noticable. • Use the Volume Up/Down buttons on page 22. 52 Connect your antenna is connected securely to the TV and move the antenna around the room or close to a window for the best signal. If the viewing mode on the new input source differs from electrical appliances, cars, or flourescent lights. • Ensure all cables...
... on-screen menu are using an antenna, the signal strength of the channel may be noticable. • Use the Volume Up/Down buttons on page 22. 52 Connect your antenna is connected securely to the TV and move the antenna around the room or close to a window for the best signal. If the viewing mode on the new input source differs from electrical appliances, cars, or flourescent lights. • Ensure all cables...
M320SL User Manua
Page 62
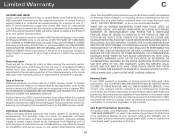
... damage, normal wear and tear, improper operation, improper voltage supply or power surges, signal issues, damages from shipping, acts of the limited "ONE YEAR WARRANTY" on the box. 55 Replacement parts and Products are not covered. To obtain warranty service, contact VIZIO Technical Support via e-mail: TechSupport@VIZIO.com or via phone at VIZIO's option and sole discretion. Parts and Labor There will either the original...
... damage, normal wear and tear, improper operation, improper voltage supply or power surges, signal issues, damages from shipping, acts of the limited "ONE YEAR WARRANTY" on the box. 55 Replacement parts and Products are not covered. To obtain warranty service, contact VIZIO Technical Support via e-mail: TechSupport@VIZIO.com or via phone at VIZIO's option and sole discretion. Parts and Labor There will either the original...
M470SL Quick Start Guide
Page 2
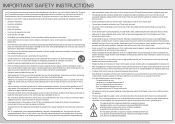
..., does not operate normally or has been dropped. • Unplug the power cord before turning on your TV and any heat source, such as when the power-supply cord or plug is required, contact your dealer and refer all servicing to the presence of the obsolete outlet. • Protect the power cord from being damaged, the following instructions should be installed near any way...
..., does not operate normally or has been dropped. • Unplug the power cord before turning on your TV and any heat source, such as when the power-supply cord or plug is required, contact your dealer and refer all servicing to the presence of the obsolete outlet. • Protect the power cord from being damaged, the following instructions should be installed near any way...
M470SL Quick Start Guide
Page 19
....VIZIO.com. Replacement parts and Products may be sent to a VIZIO service center to the "DETAILS" tab of the model's product information page (www.VIZIO. Type of user data is not responsible for transportation costs to the service center, but VIZIO will provide instructions for packing and shipping the covered Product to the customer. VIZIO Technical Support will cover return shipping to the VIZIO service center. VIZIO...
....VIZIO.com. Replacement parts and Products may be sent to a VIZIO service center to the "DETAILS" tab of the model's product information page (www.VIZIO. Type of user data is not responsible for transportation costs to the service center, but VIZIO will provide instructions for packing and shipping the covered Product to the customer. VIZIO Technical Support will cover return shipping to the VIZIO service center. VIZIO...
M420SL Data Sheet
Page 2
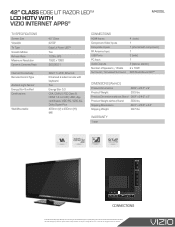
...sided remote with component) 1 2 (side) 1 2 (optical, stereo) 2 x 10W SRS StudioSound HD™ DIMENSIONS (WxHxD) Product Dimensions 38.9" x 26.7" x 9" Product Weight 33.5 lbs Product Dimensions without Stand 38.9" x 24.6" x 2" Product Weight without notice. © 2012 vizio inc. CEC/ARC, App certificates, VIZIO PQ, VIZIO AQ, Dolby Digital Plus 400mm (V) x 400mm (H), M6 CONNECTIONS HDMI Inputs Component Video Inputs Composite Inputs RF Antenna Input USB Ports PC Input Audio Outputs Number of vizio inc. product features and specifications are subject to change without Stand 30...
...sided remote with component) 1 2 (side) 1 2 (optical, stereo) 2 x 10W SRS StudioSound HD™ DIMENSIONS (WxHxD) Product Dimensions 38.9" x 26.7" x 9" Product Weight 33.5 lbs Product Dimensions without Stand 38.9" x 24.6" x 2" Product Weight without notice. © 2012 vizio inc. CEC/ARC, App certificates, VIZIO PQ, VIZIO AQ, Dolby Digital Plus 400mm (V) x 400mm (H), M6 CONNECTIONS HDMI Inputs Component Video Inputs Composite Inputs RF Antenna Input USB Ports PC Input Audio Outputs Number of vizio inc. product features and specifications are subject to change without Stand 30...


