M3D550KD User Manual
Page 5
...; Do not install your TV in any of electric shock, do not perform any abnormality occurs. Do not try to leak which can damage the remote control or injure the operator. The performance of electric shock, do not touch the connector with wet hands. • Insert batteries in environments with instructions...
...; Do not install your TV in any of electric shock, do not perform any abnormality occurs. Do not try to leak which can damage the remote control or injure the operator. The performance of electric shock, do not touch the connector with wet hands. • Insert batteries in environments with instructions...

M3D550KD User Manual
Page 8
Back (Model M3D470KD 11 Remote Control - Back (Model M3D550KD 13 Replacing the Batteries 14 Connecting Your Devices 15 Connecting A Device 15 Connecting A PC 16 Connecting an Audio Device 17 Connecting to Your Network 18 ... the TV 3 Installing the TV Stand 3 Installing the TV on a Wall 6 Controls and Connections 7 Rear Panel 7 Side Panel 8 Front Panel 9 Remote Control - FRONT (Model M3D550KD 12 Remote Control - FRONT (Model M3D470KD 10 Remote Control - Table of Digital Closed Captions.. 23 Activating the Sleep Timer 23 Setting the Auto Power Off Feature 23 Adjusting the...
Back (Model M3D470KD 11 Remote Control - Back (Model M3D550KD 13 Replacing the Batteries 14 Connecting Your Devices 15 Connecting A Device 15 Connecting A PC 16 Connecting an Audio Device 17 Connecting to Your Network 18 ... the TV 3 Installing the TV Stand 3 Installing the TV on a Wall 6 Controls and Connections 7 Rear Panel 7 Side Panel 8 Front Panel 9 Remote Control - FRONT (Model M3D550KD 12 Remote Control - FRONT (Model M3D470KD 10 Remote Control - Table of Digital Closed Captions.. 23 Activating the Sleep Timer 23 Setting the Auto Power Off Feature 23 Adjusting the...
M3D550KD User Manual
Page 10
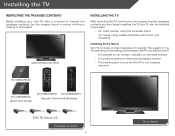
Installing the TV Inspecting the Package Contents Before installing your new TV, take a moment to ensure nothing is not properly secured (For M3D550KD) Quick Start Guide (For M3D470KD) (For M3D550KD) Remote Control with Batteries VIZIO 3D Glasses (4) Package Contents 3 TV on an uneven, unstable, or non-level surface • It is pushed, pulled, or otherwise...
Installing the TV Inspecting the Package Contents Before installing your new TV, take a moment to ensure nothing is not properly secured (For M3D550KD) Quick Start Guide (For M3D470KD) (For M3D550KD) Remote Control with Batteries VIZIO 3D Glasses (4) Package Contents 3 TV on an uneven, unstable, or non-level surface • It is pushed, pulled, or otherwise...

M3D550KD User Manual
Page 16
2 Front Panel REMOTE SENSOR When using the remote, aim it directly at this sensor. Front Panel 9
2 Front Panel REMOTE SENSOR When using the remote, aim it directly at this sensor. Front Panel 9
M3D550KD User Manual
Page 17
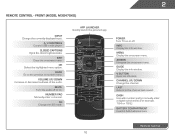
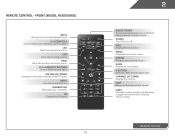
... pictured app. 3D Power Turn TV on or off or on. Guide Display the info window. 2 Remote Control - Exit Close the on -screen menu. Info Display the info window. V Button Open the VIA dock. Remote Control 10 Menu Display the on -screen menu. Channel Up/Down Change the channel. Dash Use with...
... pictured app. 3D Power Turn TV on or off or on. Guide Display the info window. 2 Remote Control - Exit Close the on -screen menu. Info Display the info window. V Button Open the VIA dock. Remote Control 10 Menu Display the on -screen menu. Channel Up/Down Change the channel. Dash Use with...
M3D550KD User Manual
Page 18
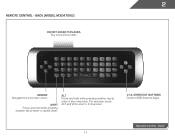
Alt Press and hold while pressing another key to enter a blue character. SHIFT Press and hold while pressing another key to enter a # character. For example, press ALT and W to enter a capital letter. ARROW Navigate the on-screen menu. V.I.A. Back 11 Shortcut buttons Control VIZIO Internet Apps Remote Control - Back (Model M3D470KD) do not cover this area This is the transmitter. 2 Remote Control -
Alt Press and hold while pressing another key to enter a blue character. SHIFT Press and hold while pressing another key to enter a # character. For example, press ALT and W to enter a capital letter. ARROW Navigate the on-screen menu. V.I.A. Back 11 Shortcut buttons Control VIZIO Internet Apps Remote Control - Back (Model M3D470KD) do not cover this area This is the transmitter. 2 Remote Control -
M3D550KD User Manual
Page 19
... Control USB photo slideshow and V.I .A. Exit Close the on -screen menu. Info Display the info window. Menu Display the on -screen menu. V Button Open the VIZIO Internet Apps dock. apps. Mute Turn the sound off . Channel Up/Down Change the channel. FRONT (Model M3D550KD) Input Change the currently-displayed input. Remote Control -
... Control USB photo slideshow and V.I .A. Exit Close the on -screen menu. Info Display the info window. Menu Display the on -screen menu. V Button Open the VIZIO Internet Apps dock. apps. Mute Turn the sound off . Channel Up/Down Change the channel. FRONT (Model M3D550KD) Input Change the currently-displayed input. Remote Control -
M3D550KD User Manual
Page 20
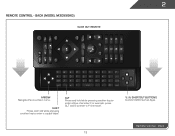
Back (Model M3D550KD) Slide out remote ARROW Navigate the on-screen menu. For example, press ALT and S to enter a capital letter. SHIFT Press and hold while pressing another key to enter a # character. 13 V.I.A. 2 Remote Control - Alt Press and hold while pressing another key to enter a blue character. Shortcut buttons Control VIZIO Internet Apps Remote Control - Back
Back (Model M3D550KD) Slide out remote ARROW Navigate the on-screen menu. For example, press ALT and S to enter a capital letter. SHIFT Press and hold while pressing another key to enter a # character. 13 V.I.A. 2 Remote Control - Alt Press and hold while pressing another key to enter a blue character. Shortcut buttons Control VIZIO Internet Apps Remote Control - Back

M3D550KD User Manual
Page 21
... that may result in accordance with local hazardous waste regulations. • Keep batteries away from children and pets. 14 Insert two batteries into the remote control. AAA BATTERY M3D550KD • Use only good quality batteries. • Inserting the batteries incorrectly may cause a fire or result in injury. • Dispose of old or...
... that may result in accordance with local hazardous waste regulations. • Keep batteries away from children and pets. 14 Insert two batteries into the remote control. AAA BATTERY M3D550KD • Use only good quality batteries. • Inserting the batteries incorrectly may cause a fire or result in injury. • Dispose of old or...
M3D550KD User Manual
Page 26
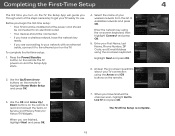
... through each of Service and Privacy Policy for use. Press the Power/Standby button on and the Setup App starts. 2. The TV powers on the remote. Use the Up/Down Arrow buttons on -screen keyboard, then highlight Connect and press OK. 5. Use the OK and Arrow Up/ Down buttons on -screen... you begin the first-time setup: • Your TV should be installed and the power cord should be connected to the ethernet port on the remote. 7. The First-Time Setup is complete. 19 TV Widgets. Enter your wireless network from the list of available networks and press OK. Answer the on...
... through each of Service and Privacy Policy for use. Press the Power/Standby button on and the Setup App starts. 2. The TV powers on the remote. Use the Up/Down Arrow buttons on -screen keyboard, then highlight Connect and press OK. 5. Use the OK and Arrow Up/ Down buttons on -screen... you begin the first-time setup: • Your TV should be installed and the power cord should be connected to the ethernet port on the remote. 7. The First-Time Setup is complete. 19 TV Widgets. Enter your wireless network from the list of available networks and press OK. Answer the on...
M3D550KD User Manual
Page 27
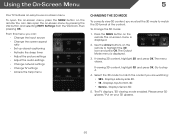
.... Select the 3D mode to match the content you must set the 3D mode to match the 3D format of the content. Put on the remote. Press the MENU button on your 3D glasses. 20 If viewing 3D content, highlight 3D and press OK. Displays top/bottom 3D. • Sensio - From.... • TB - The on-screen menu is displayed. 3. Go to step 4. 4. Using the On-Screen Menu 5 Your TV features an easy-to-use on the remote to highlight the 3D icon and press OK. Displays Sensio 3D. 5. Please wear 3D glasses." You can : • Change the input source • Change the...
.... Select the 3D mode to match the content you must set the 3D mode to match the 3D format of the content. Put on the remote. Press the MENU button on your 3D glasses. 20 If viewing 3D content, highlight 3D and press OK. Displays top/bottom 3D. • Sensio - From.... • TB - The on-screen menu is displayed. 3. Go to step 4. 4. Using the On-Screen Menu 5 Your TV features an easy-to-use on the remote to highlight the 3D icon and press OK. Displays Sensio 3D. 5. Please wear 3D glasses." You can : • Change the input source • Change the...
M3D550KD User Manual
Page 28
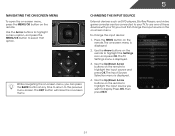
...1 2 3 Selection menu is displa1yed. 4. Press OK7, then press EXIT. 8 6 9 3D 0 3D 0 21 Use the Up/Down Arrow VOL CH buttons on the remote t4o highlight the input source you must first change the input device: OK 1. buttons on the remoVteOL to highlight the Settings icon and press OK.... To change the input source in the on the remote to CH highlight the input source and press OK. Use the Arrow buttons on -screen menu. Use the Up/Down Arrow 2 3 While...
...1 2 3 Selection menu is displa1yed. 4. Press OK7, then press EXIT. 8 6 9 3D 0 3D 0 21 Use the Up/Down Arrow VOL CH buttons on the remote t4o highlight the input source you must first change the input device: OK 1. buttons on the remoVteOL to highlight the Settings icon and press OK.... To change the input source in the on the remote to CH highlight the input source and press OK. Use the Arrow buttons on -screen menu. Use the Up/Down Arrow 2 3 While...
M3D550KD User Manual
Page 29
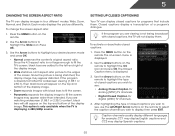
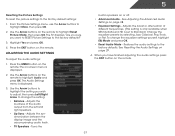
... viewing is not large enough to highlight the CC icon and press OK. Closed captions display a transcription of closed captions: 1. The on the remote. If the program is displayed. 2. This option is only available when the TV is displaying a 480i/480p source. Caption channels usually display different...Wide, Zoom, Normal, and Stretch. Each mode displays the picture differently. To change the screen aspect ratio: 1. Press the MENU button on the remote to fill the TV's screen, black bars are watching widescreen (1.85:1 or 2.35:1) content, black bars will appear on the top and bottom...
... viewing is not large enough to highlight the CC icon and press OK. Closed captions display a transcription of closed captions: 1. The on the remote. If the program is displayed. 2. This option is only available when the TV is displaying a 480i/480p source. Caption channels usually display different...Wide, Zoom, Normal, and Stretch. Each mode displays the picture differently. To change the screen aspect ratio: 1. Press the MENU button on the remote to fill the TV's screen, black bars are watching widescreen (1.85:1 or 2.35:1) content, black bars will appear on the top and bottom...
M3D550KD User Manual
Page 30
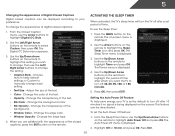
... the TV off after 10 minutes if no signal is displayed. 2. Press the MENU button on -screen menu is being displayed on the remote to highlight Timer and press OK. Setting the Auto Power Off Feature To help save energy, your preference. Press Exit. 23 To change ... then use the sleep timer: 1. The Timers menu is displayed. 2. From the Closed Caption menu, use the Up/Down Arrow buttons on the remote to highlight the setting you are satisfied with the appearance of the closed captions: 1. 5 Changing the Appearance of Digital Closed Captions Digital closed captions ...
... the TV off after 10 minutes if no signal is displayed. 2. Press the MENU button on -screen menu is being displayed on the remote to highlight Timer and press OK. Setting the Auto Power Off Feature To help save energy, your preference. Press Exit. 23 To change ... then use the sleep timer: 1. The Timers menu is displayed. 2. From the Closed Caption menu, use the Up/Down Arrow buttons on the remote to highlight the setting you are satisfied with the appearance of the closed captions: 1. 5 Changing the Appearance of Digital Closed Captions Digital closed captions ...
M3D550KD User Manual
Page 31
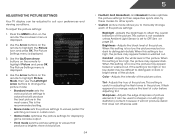
... Vivid mode sets the picture settings to values that does not otherwise exist. Brightness - Tint - Sharpness - Use the Arrow buttons on the remote. See on the remote to highlight Picture and press OK. Use the Up/Down Arrow buttons on page 24. Use the Arrow buttons on -screen menu is too... picture. When this setting is displayed. 2. Adjusts the hue of the picture. It can be too dark to distinguish details. The on the remote to highlight Picture Mode, then use the Left/Right Arrow buttons to change each of the picture colors. Contrast - If the setting is too...
... Vivid mode sets the picture settings to values that does not otherwise exist. Brightness - Tint - Sharpness - Use the Arrow buttons on the remote. See on the remote to highlight Picture and press OK. Use the Up/Down Arrow buttons on page 24. Use the Arrow buttons on -screen menu is too... picture. When this setting is displayed. 2. Adjusts the hue of the picture. It can be too dark to distinguish details. The on the remote to highlight Picture Mode, then use the Left/Right Arrow buttons to change each of the picture colors. Contrast - If the setting is too...
M3D550KD User Manual
Page 32
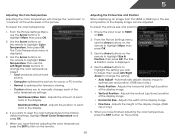
...The ambient light sensor detects the light levels in the image caused by the digitizing of image motion content. Use the Arrow buttons on the remote to highlight More, then press OK. 2. Select Off, Low, Middle, or High. • Real Cinema Mode - Optimizes the picture ...• Adaptive Luma - Select Auto or Off. • Backlight Control - From the Picture Settings menu, use the Arrow buttons on the remote to change the setting: • Smooth Motion Effect Activates Smooth Motion™ motion estimation/motion compensation, which suppresses motion judder, or "stuttering" ...
...The ambient light sensor detects the light levels in the image caused by the digitizing of image motion content. Use the Arrow buttons on the remote to highlight More, then press OK. 2. Select Off, Low, Middle, or High. • Real Cinema Mode - Optimizes the picture ...• Adaptive Luma - Select Auto or Off. • Backlight Control - From the Picture Settings menu, use the Arrow buttons on the remote to change the setting: • Smooth Motion Effect Activates Smooth Motion™ motion estimation/motion compensation, which suppresses motion judder, or "stuttering" ...
M3D550KD User Manual
Page 33
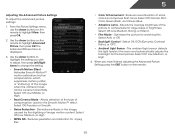
... you want to reset the color temperatures to optimal size and position. (RGB input only.) • Horiz. Use the Arrow buttons on the remote to manually change each color in the display. 4. Adjusts the horizontal (left/right) position of the display image. • Fine Tune - ...Adjusts the width of the display image. • Vertical Position - Use the Arrow buttons on the remote to highlight Color Temperature, then use the Left/Right Arrow buttons to change the color temperature preset: • Cool produces a blue-hued picture. ...
... you want to reset the color temperatures to optimal size and position. (RGB input only.) • Horiz. Use the Arrow buttons on the remote to manually change each color in the display. 4. Adjusts the horizontal (left/right) position of the display image. • Fine Tune - ...Adjusts the width of the display image. • Vertical Position - Use the Arrow buttons on the remote to highlight Color Temperature, then use the Left/Right Arrow buttons to change the color temperature preset: • Cool produces a blue-hued picture. ...
M3D550KD User Manual
Page 34
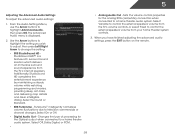
... OK. Press the EXIT button on page 29. 4. The Audio Settings menu is displayed. 2. See Adjusting the Advanced Audio Settings on the remote. Adjusting the Audio Settings To adjust the audio settings: 1. Use the Arrow buttons to highlight the setting you wish to adjust, then press Left... - Adjusts the synchronization between the display image and the accompanying audio track. • TV Speakers - Turns the built-in speakers on the remote. 27 Adjusts the loudness of different frequencies. (This setting is only available when SRS StudioSound HD is set to the factory defaults.
... OK. Press the EXIT button on page 29. 4. The Audio Settings menu is displayed. 2. See Adjusting the Advanced Audio Settings on the remote. Adjusting the Audio Settings To adjust the audio settings: 1. Use the Arrow buttons to highlight the setting you wish to adjust, then press Left... - Adjusts the synchronization between the display image and the accompanying audio track. • TV Speakers - Turns the built-in speakers on the remote. 27 Adjusts the loudness of different frequencies. (This setting is only available when SRS StudioSound HD is set to the factory defaults.
M3D550KD User Manual
Page 35
... properties for the Optical output when connected to highlight the setting you have finished adjusting the advanced audio settings, press the EXIT button on the remote. 28 When you wish to adjust, then press Left/Right Arrow to a home theater audio system. Additionally, StudioSound HD completes the entertainment experience by maintaining...
... properties for the Optical output when connected to highlight the setting you have finished adjusting the advanced audio settings, press the EXIT button on the remote. 28 When you wish to adjust, then press Left/Right Arrow to a home theater audio system. Additionally, StudioSound HD completes the entertainment experience by maintaining...
M3D550KD User Manual
Page 36
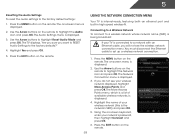
Use the Arrow buttons on the remote to a network with an Ethernet cable, you will not see your TV is the network's SSID) and press OK. ... -screen menu is displayed. 2. Press the EXIT button on the remote. The on -screen menu is displayed. 2. Press the EXIT button on the remote. Press the MENU button on the remote. Using the on the remote to highlight the Network icon and press OK. You must disconnect the... network (this is connected to highlight the Audio icon and press OK. Press the MENU button on the remote. 29 Using the Network Connection Menu Your TV is displayed. 3.
Use the Arrow buttons on the remote to a network with an Ethernet cable, you will not see your TV is the network's SSID) and press OK. ... -screen menu is displayed. 2. Press the EXIT button on the remote. The on -screen menu is displayed. 2. Press the EXIT button on the remote. Press the MENU button on the remote. Using the on the remote to highlight the Network icon and press OK. You must disconnect the... network (this is connected to highlight the Audio icon and press OK. Press the MENU button on the remote. 29 Using the Network Connection Menu Your TV is displayed. 3.


