
E551VA User Manual
Page 5
...Opening or removing the back cover may cause fire or electric shock. • Do not install your TV, hold the AC/DC power adapter, not the cord. If repair is used for repair. The performance of your TV changes substantially. ...servicing instructions are qualified to rain or other cables are unplugged before moving your dealer for an extended period of time, unplug the power cord. • To reduce risk of your TV may expose you are for your TV and easily accessible. • Only power of the marked voltage can damage the remote control or injure the operator. E551VA...
...Opening or removing the back cover may cause fire or electric shock. • Do not install your TV, hold the AC/DC power adapter, not the cord. If repair is used for repair. The performance of your TV changes substantially. ...servicing instructions are qualified to rain or other cables are unplugged before moving your dealer for an extended period of time, unplug the power cord. • To reduce risk of your TV may expose you are for your TV and easily accessible. • Only power of the marked voltage can damage the remote control or injure the operator. E551VA...
E551VA User Manual
Page 6
... the National Electrical Code, ANSI/NFPSA 70, provides information with cable and satellite TV services, gaming consoles, VCRs, DVD players, and similar products. Watch your local stations to find out when they will turn off their analog signal and switch to grounding electrodes, and requirements of processing digital broadcasts. Analog-only TVs should continue to receive low power, Class A or translator television stations and with...
... the National Electrical Code, ANSI/NFPSA 70, provides information with cable and satellite TV services, gaming consoles, VCRs, DVD players, and similar products. Watch your local stations to find out when they will turn off their analog signal and switch to grounding electrodes, and requirements of processing digital broadcasts. Analog-only TVs should continue to receive low power, Class A or translator television stations and with...
E551VA User Manual
Page 7
... Tuner Mode 21 Scanning for Channels 22 Adding New Channels 22 Skipping Channels 23 Changing the Audio Language 23 Using the Parental Controls 24 Accessing the Parental Controls Menu 24 Enabling or Disabling Program Ratings 24 Locking and Unlocking Channels 24 Blocking and Unblocking Content by Rating 25 Changing the Parental Control Passcode 25 Resetting the Content Locks 25 Changing the Names of the Inputs 26 Changing the On-Screen Menu Language 26 Setting the Time Zone 27 Adjusting the CEC Settings 27 Using the Help Menu...
... Tuner Mode 21 Scanning for Channels 22 Adding New Channels 22 Skipping Channels 23 Changing the Audio Language 23 Using the Parental Controls 24 Accessing the Parental Controls Menu 24 Enabling or Disabling Program Ratings 24 Locking and Unlocking Channels 24 Blocking and Unblocking Content by Rating 25 Changing the Parental Control Passcode 25 Resetting the Content Locks 25 Changing the Names of the Inputs 26 Changing the On-Screen Menu Language 26 Setting the Time Zone 27 Adjusting the CEC Settings 27 Using the Help Menu...
E551VA User Manual
Page 8
...; Resetting the TV Settings 28 Restoring the TV to Factory Default Settings 28 Using Guided Setup 29 Using the Info Window 30 Using the USB Media Player 31 Using the USB Media Player 31 Connecting a USB Thumb Drive to the TV 31 Playing USB Media 31 Using VIZIO Internet Apps 34 Using the VIA Shortcut Buttons 34 Using the VIA Dock 34 Moving an App on the VIA Dock 34 Adding a New App to the VIA Dock 35 Removing...
...; Resetting the TV Settings 28 Restoring the TV to Factory Default Settings 28 Using Guided Setup 29 Using the Info Window 30 Using the USB Media Player 31 Using the USB Media Player 31 Connecting a USB Thumb Drive to the TV 31 Playing USB Media 31 Using VIZIO Internet Apps 34 Using the VIA Shortcut Buttons 34 Using the VIA Dock 34 Moving an App on the VIA Dock 34 Adding a New App to the VIA Dock 35 Removing...
E551VA User Manual
Page 10
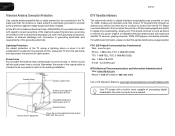
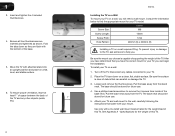
... of supporting the weight of this TV. The base neck should be stored for the weight of the TV. Attach your TV and wall mount to the wall, carefully following the instructions that came with the bottom of debris that you have the correct mount for the weight/load of the TV and any cables connected to help you will need a wall mount. Specifications for future use . 4. 1 3. To...
... of supporting the weight of this TV. The base neck should be stored for the weight of the TV. Attach your TV and wall mount to the wall, carefully following the instructions that came with the bottom of debris that you have the correct mount for the weight/load of the TV and any cables connected to help you will need a wall mount. Specifications for future use . 4. 1 3. To...
E551VA User Manual
Page 13
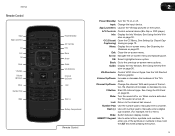
...: Control VIZIO Internet Apps. When mute is activated, the TV's audio is turned off or on -screen menu. See Using the Info Window on -screen menu options. Exit: Close the on . Guide: Display the Info Window. Dash (-): Use with number pad to enter letters, symbols, and numbers. QWERTY Keypad: Use to manually enter a digital sub-channel. (For example, 18-4 or 18-5.) Wide: Switch between display modes. Mute: Turn the sound off . A/V Controls: Control external device (Blu-Ray or DVD player...
...: Control VIZIO Internet Apps. When mute is activated, the TV's audio is turned off or on -screen menu. See Using the Info Window on -screen menu options. Exit: Close the on . Guide: Display the Info Window. Dash (-): Use with number pad to enter letters, symbols, and numbers. QWERTY Keypad: Use to manually enter a digital sub-channel. (For example, 18-4 or 18-5.) Wide: Switch between display modes. Mute: Turn the sound off . A/V Controls: Control external device (Blu-Ray or DVD player...
E551VA User Manual
Page 15
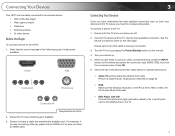
... Ports 2. Scanning for special instructions: • Cable TV (without cable box/directly from the on the PC is securely connected. 3. For example, if you are off. 2. To connect a device to the HDMI ports on the remote. 4. Turn the TV on by pressing the Power/Standby button on the TV. 7 Set the Screen Mode to Normal. • DVD Player with an HDMI port, be easily connected to an external device: • DVD or Blu-Ray player • Video game...
... Ports 2. Scanning for special instructions: • Cable TV (without cable box/directly from the on the PC is securely connected. 3. For example, if you are off. 2. To connect a device to the HDMI ports on the remote. 4. Turn the TV on by pressing the Power/Standby button on the TV. 7 Set the Screen Mode to Normal. • DVD Player with an HDMI port, be easily connected to an external device: • DVD or Blu-Ray player • Video game...
E551VA User Manual
Page 19
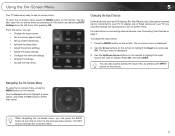
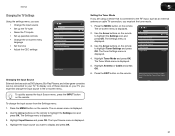
... previous menu screen. The Input menu is displayed. 2. You can press the BACK button at any time to return to -use on -screen menu. While navigating the on-screen menu, you can: • Change the input source • Set the screen aspect radio • Set up closed captioning • Activate the sleep timer • Adjust the picture settings • Adjust the audio settings • Configure the network settings • Change TV settings • Access the help menu Changing the Input Source External devices such as DVD players, Blu-Ray Players, and video game consoles...
... previous menu screen. The Input menu is displayed. 2. You can press the BACK button at any time to return to -use on -screen menu. While navigating the on-screen menu, you can: • Change the input source • Set the screen aspect radio • Set up closed captioning • Activate the sleep timer • Adjust the picture settings • Adjust the audio settings • Configure the network settings • Change TV settings • Access the help menu Changing the Input Source External devices such as DVD players, Blu-Ray Players, and video game consoles...
E551VA User Manual
Page 23
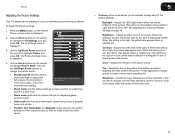
... modes optimize the picture settings for displaying game console output. • Vivid mode sets the picture settings to values that does not otherwise exist. 15 Adjusts the LED brightness to affect the overall brilliance of the picture settings: Backlight - Brightness - Adjusts the black level of the picture. Tint - however, it will produce the best picture in a dark room. • Game mode optimizes the picture settings for their respective sports. Press the MENU button on the remote...
... modes optimize the picture settings for displaying game console output. • Vivid mode sets the picture settings to values that does not otherwise exist. 15 Adjusts the LED brightness to affect the overall brilliance of the picture settings: Backlight - Brightness - Adjusts the black level of the picture. Tint - however, it will produce the best picture in a dark room. • Game mode optimizes the picture settings for their respective sports. Press the MENU button on the remote...
E551VA User Manual
Page 24
... for use the Arrow buttons to manually change the setting: Advanced Picture Noise Reduction Color Enhancement Adaptive Luma Film Mode Backlight Control Ambient Light Sensor Low Normal Medium Auto DCR Low • Noise Reduction - When you have finished adjusting the color temperature, press the EXIT button on the remote to the factory default settings, highlight Reset Color Temperature and press OK. 5. Diminishes artifacts in the display. 4. Menu for White Balance Adjustment • Computer optimizes the picture for television viewing...
... for use the Arrow buttons to manually change the setting: Advanced Picture Noise Reduction Color Enhancement Adaptive Luma Film Mode Backlight Control Ambient Light Sensor Low Normal Medium Auto DCR Low • Noise Reduction - When you have finished adjusting the color temperature, press the EXIT button on the remote to the factory default settings, highlight Reset Color Temperature and press OK. 5. Diminishes artifacts in the display. 4. Menu for White Balance Adjustment • Computer optimizes the picture for television viewing...
E551VA User Manual
Page 26
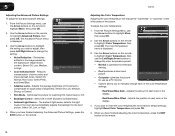
... and right speakers. Changes the type of the audio output from the TV's internal speakers. Audio The on the remote. Use the Arrow buttons on the remote. Adjusts the loudness of processing for the analog RCA (red/white) connectors when connected to change the setting: • Digital Audio Out - SRS TruSurround HD SRS TruVolume Advanced Audio Equalizer Settings Reset Audio Mode Standard On • Lip Sync - TruVolume® intelligently normalizes volume fluctuations during television commercials or channel changes. When...
... and right speakers. Changes the type of the audio output from the TV's internal speakers. Audio The on the remote. Use the Arrow buttons on the remote. Adjusts the loudness of processing for the analog RCA (red/white) connectors when connected to change the setting: • Digital Audio Out - SRS TruSurround HD SRS TruVolume Advanced Audio Equalizer Settings Reset Audio Mode Standard On • Lip Sync - TruVolume® intelligently normalizes volume fluctuations during television commercials or channel changes. When...
E551VA User Manual
Page 27
... displayed. 2. Network Connection Wired connection Disconnected Wireless Access Points 3. Advanced network settings setup network 19 E551VA Resetting the Audio Settings To reset the audio settings to highlight Reset Audio Mode and press OK. Press the MENU button on the remote. Press the MENU button on the remote. Use the Arrow buttons on the remote to use the on -screen menu is the network's SSID) and press OK. 4. The Audio Settings menu is displayed. Use the Arrow buttons on the remote to the factory defaults?" 5. Highlight the name of your network's password...
... displayed. 2. Network Connection Wired connection Disconnected Wireless Access Points 3. Advanced network settings setup network 19 E551VA Resetting the Audio Settings To reset the audio settings to highlight Reset Audio Mode and press OK. Press the MENU button on the remote. Press the MENU button on the remote. Use the Arrow buttons on the remote to use the on -screen menu is the network's SSID) and press OK. 4. The Audio Settings menu is displayed. Use the Arrow buttons on the remote to the factory defaults?" 5. Highlight the name of your network's password...
E551VA User Manual
Page 29
...-Of-The-Wall for Tuner (Coax Cable) Input. 21 To quickly access the Input Source menu, press the INPUT button on the remote. The on the remote to highlight Tuner Settings and press OK. Setting the Tuner Mode If you are using a device that is displayed. Use the Arrow buttons on -screen menu is displayed. 4. Highlight Antenna or Cable and press OK. 6. The Settings menu is displayed. 5. The Tuner Mode menu is displayed. 3. Use the Arrow buttons on -screen menu. E551VA 5 Changing the TV Settings Using the settings menu, you must first change the input source from...
...-Of-The-Wall for Tuner (Coax Cable) Input. 21 To quickly access the Input Source menu, press the INPUT button on the remote. The on the remote to highlight Tuner Settings and press OK. Setting the Tuner Mode If you are using a device that is displayed. Use the Arrow buttons on -screen menu is displayed. 4. Highlight Antenna or Cable and press OK. 6. The Settings menu is displayed. 5. The Tuner Mode menu is displayed. 3. Use the Arrow buttons on -screen menu. E551VA 5 Changing the TV Settings Using the settings menu, you must first change the input source from...
E551VA User Manual
Page 35
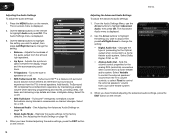
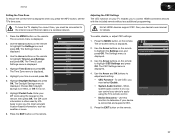
... be connected to control HDMI-connected devices with the included remote without any additional programming. See your ZIP code using the TV's remote control. • Device Discovery - System Audio Control Off Device Discovery 3. CEC Function 5. Use the Arrow buttons on -screen menu is displayed. 3. Not all HDMI devices support CEC. The on the remote to highlight CEC Settings and press OK. The Time & Local Settings menu is displayed. 5. Enter your device's user manual for details. Press the MENU button...
... be connected to control HDMI-connected devices with the included remote without any additional programming. See your ZIP code using the TV's remote control. • Device Discovery - System Audio Control Off Device Discovery 3. CEC Function 5. Use the Arrow buttons on -screen menu is displayed. 3. Not all HDMI devices support CEC. The on the remote to highlight CEC Settings and press OK. The Time & Local Settings menu is displayed. 5. Enter your device's user manual for details. Press the MENU button...
E551VA User Manual
Page 46
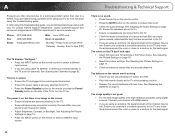
... Power/Standby button on the remote or press the Power/ Standby button on . See Adjusting the Picture Settings on page 15. • Press the INPUT button on the remote to a window for channels. Troubleshooting & Technical Support There is no power. • Ensure the TV is plugged into a working . • Ensure you are integral parts of VIZIO's commitment to turn the TV on the side of external devices (Blu-ray player, game console, cable/satellite box) that are connected...
... Power/Standby button on the remote or press the Power/ Standby button on . See Adjusting the Picture Settings on page 15. • Press the INPUT button on the remote to a window for channels. Troubleshooting & Technical Support There is no power. • Ensure the TV is plugged into a working . • Ensure you are integral parts of VIZIO's commitment to turn the TV on the side of external devices (Blu-ray player, game console, cable/satellite box) that are connected...
E551VA User Manual
Page 47
... each input source. I see "noise" or static on the remote to change the screen mode. Ensure your antenna is precision-manufactured using an extremely high level of the channel may be interfering with 480i output, press the WIDE button on the screen. • When your TV's display capabilities. A When I change input source, the display image changes size. • The TV remembers the viewing mode on the remote to a window for the best signal. The...
... each input source. I see "noise" or static on the remote to change the screen mode. Ensure your antenna is precision-manufactured using an extremely high level of the channel may be interfering with 480i output, press the WIDE button on the screen. • When your TV's display capabilities. A When I change input source, the display image changes size. • The TV remembers the viewing mode on the remote to a window for the best signal. The...
E551VA User Manual
Page 49
... tear, improper operation, improper voltage supply or power surges, signal issues, damages from warranty service or replacement, whichever is not covered under this guarantee applies to your product, refer to protect your product will provide instructions for the "zero bright pixel" guarantee on select new product purchases. Replacement parts and Products may be restored to the customer. VIZIO Technical Support will be new...
... tear, improper operation, improper voltage supply or power surges, signal issues, damages from warranty service or replacement, whichever is not covered under this guarantee applies to your product, refer to protect your product will provide instructions for the "zero bright pixel" guarantee on select new product purchases. Replacement parts and Products may be restored to the customer. VIZIO Technical Support will be new...

E551VA Quick Start Guide
Page 3
... the Closed Captioning menu. Menu: Display the on the button. Guide: Display the Info Window. Channel Up/Down: Change the channel. QWERTY Keypad: Enter letters and numbers. Exit: Close the on -screen menu options. Mute: Turn the sound off . OK: Select highlighted menu option. VIA Shortcuts: Control VIZIO Internet Apps. When mute is activated, the TV's audio is the transmitter. Back: Go to manually enter a channel. V Button: Start VIA Internet Apps. Arrow QWERTY Keypad VIA Shortcuts Power/Standby: Turn...
... the Closed Captioning menu. Menu: Display the on the button. Guide: Display the Info Window. Channel Up/Down: Change the channel. QWERTY Keypad: Enter letters and numbers. Exit: Close the on -screen menu options. Mute: Turn the sound off . OK: Select highlighted menu option. VIA Shortcuts: Control VIZIO Internet Apps. When mute is activated, the TV's audio is the transmitter. Back: Go to manually enter a channel. V Button: Start VIA Internet Apps. Arrow QWERTY Keypad VIA Shortcuts Power/Standby: Turn...

E551VA Quick Start Guide
Page 14
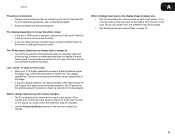
... for the best signal. Ensure TV Speakers is securely connected to the AC socket on the TV and a working electrical outlet. • Press the Power/Standby button on the remote or on the right side of operation: Monday - Please have your VIZIO model number, serial number, and date of VIZIO's commitment to service excellence. Ensure your call. Our trained support personnel can often resolve the problem over the phone...
... for the best signal. Ensure TV Speakers is securely connected to the AC socket on the TV and a working electrical outlet. • Press the Power/Standby button on the remote or on the right side of operation: Monday - Please have your VIZIO model number, serial number, and date of VIZIO's commitment to service excellence. Ensure your call. Our trained support personnel can often resolve the problem over the phone...

E551VA Quick Start Guide
Page 15
... the Picture menu. See Adjusting the Picture Settings in the user manual. • Check all cables to ensure they are using a supported desktop resolution. • Some television channels add black bars to the picture. Select Yes. Highlight Wide or Zoom and press OK. • Adjust the video settings of your device is connected (HDMI, Composite, etc). The colors on the remote and select the input to which your external device (Blu-ray™ or DVD player...
... the Picture menu. See Adjusting the Picture Settings in the user manual. • Check all cables to ensure they are using a supported desktop resolution. • Some television channels add black bars to the picture. Select Yes. Highlight Wide or Zoom and press OK. • Adjust the video settings of your device is connected (HDMI, Composite, etc). The colors on the remote and select the input to which your external device (Blu-ray™ or DVD player...


