
E551VA User Manual
Page 5
...apparent, unplug the power cord and contact your TV yourself. • Avoid using dropped or damaged appliances. Overloading can damage the remote control or injure the operator. If any servicing other hazards. Unplug the power cord immediately and contact your dealer for moving your TV... electric shock. • Follow instructions for repair. Ensure that contained in the operating instructions unless you to repair your dealer immediately. E551VA • Do not overload power strips and extension cords. Continuous use your TV, hold the AC/DC power adapter, not the ...
...apparent, unplug the power cord and contact your TV yourself. • Avoid using dropped or damaged appliances. Overloading can damage the remote control or injure the operator. If any servicing other hazards. Unplug the power cord immediately and contact your dealer for moving your TV... electric shock. • Follow instructions for repair. Ensure that contained in the operating instructions unless you to repair your dealer immediately. E551VA • Do not overload power strips and extension cords. Continuous use your TV, hold the AC/DC power adapter, not the ...
E551VA User Manual
Page 7
... Contents 1 Installing the TV 1 Installing the TV Stand 1 Installing the TV on a Wall 2 Controls and Connections 3 Rear Panel Inputs 3 Right Side Panel 4 Front Panel 4 Remote Control (Back 4 Remote Control 5 VIA Shortcut Buttons 6 Replacing the Batteries 6 Connecting Your Devices 7 Before You Begin 7 Connecting Your Devices 7 Setting Up Your Network Connection 9 Connecting to A Wired...
... Contents 1 Installing the TV 1 Installing the TV Stand 1 Installing the TV on a Wall 2 Controls and Connections 3 Rear Panel Inputs 3 Right Side Panel 4 Front Panel 4 Remote Control (Back 4 Remote Control 5 VIA Shortcut Buttons 6 Replacing the Batteries 6 Connecting Your Devices 7 Before You Begin 7 Connecting Your Devices 7 Setting Up Your Network Connection 9 Connecting to A Wired...
E551VA User Manual
Page 8
... the USB Media Player 31 Connecting a USB Thumb Drive to the TV 31 Playing USB Media 31 Using VIZIO Internet Apps 34 Using the VIA Shortcut Buttons 34 Using the VIA Dock 34 Moving an App on the ... There is no sound 38 The colors on the TV don't look right 38 The buttons on the remote aren't working 38 The image quality is not good 38 The picture is distorted 39 The display image ...does not cover the entire screen 39 The TV has pixels (dots) that are always dark or always lit 39 E551VA I see "noise" or static on the screen 39 When I change input source, the volume changes 39 When I...
... the USB Media Player 31 Connecting a USB Thumb Drive to the TV 31 Playing USB Media 31 Using VIZIO Internet Apps 34 Using the VIA Shortcut Buttons 34 Using the VIA Dock 34 Moving an App on the ... There is no sound 38 The colors on the TV don't look right 38 The buttons on the remote aren't working 38 The image quality is not good 38 The picture is distorted 39 The display image ...does not cover the entire screen 39 The TV has pixels (dots) that are always dark or always lit 39 E551VA I see "noise" or static on the screen 39 When I change input source, the volume changes 39 When I...

E551VA User Manual
Page 9
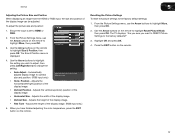
..., install the TV. Place the TV screen-down on a soft surface, such as carpet, rug, or blanket. 2. Your TV can still fall over . VIZIO LCD HDTV with Batteries Cleaning Cloth User Manual and Quick Start Guide Package Contents 1 Use the images below to inspect the package contents. Push the... base onto the stand neck. 1 Remote Control with Base Installing the TV After removing the TV from falling over if: • It is placed on an uneven, unstable, or non-level...
..., install the TV. Place the TV screen-down on a soft surface, such as carpet, rug, or blanket. 2. Your TV can still fall over . VIZIO LCD HDTV with Batteries Cleaning Cloth User Manual and Quick Start Guide Package Contents 1 Use the images below to inspect the package contents. Push the... base onto the stand neck. 1 Remote Control with Base Installing the TV After removing the TV from falling over if: • It is placed on an uneven, unstable, or non-level...
E551VA User Manual
Page 12
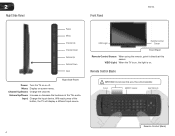
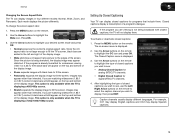
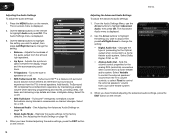
...E551VA Power Menu Channel Up Channel Down Volume Up Volume Down Input Right Side Panel Power: Turn the TV on -screen menu. Volume Up/Down: Increase or decrease the loudness of the button, the TV will display a different input source VIZIO Light Remote Control Sensor Front Panel Remote... Control Sensor: When using the remote, point it directly at this area. Arrow QWERTY Keypad App Shortcuts Remote Control (Back) 4 Input: Change the input device. This is on...
...E551VA Power Menu Channel Up Channel Down Volume Up Volume Down Input Right Side Panel Power: Turn the TV on -screen menu. Volume Up/Down: Increase or decrease the loudness of the button, the TV will display a different input source VIZIO Light Remote Control Sensor Front Panel Remote... Control Sensor: When using the remote, point it directly at this area. Arrow QWERTY Keypad App Shortcuts Remote Control (Back) 4 Input: Change the input device. This is on...
E551VA User Manual
Page 13
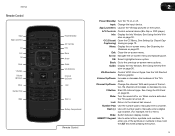
...or on -screen menu options. Input: Change the input device. A/V Controls: Control external device (Blu-Ray or DVD player). VIA Shortcuts: Control VIZIO Internet Apps. With each press of the symbols or numbers in blue, hold the ALT key while pressing the button. 5 See Using the Info ...Window on or off. OK: Select highlighted menu option. Back: Go to manually enter a channel. E551VA Remote Control Input App Launchers CC Exit OK Back V Button Volume Up/Down Mute Number Pad Wide Power/Standby A/V Controls Info Menu Arrow Guide VIA ...
...or on -screen menu options. Input: Change the input device. A/V Controls: Control external device (Blu-Ray or DVD player). VIA Shortcuts: Control VIZIO Internet Apps. With each press of the symbols or numbers in blue, hold the ALT key while pressing the button. 5 See Using the Info ...Window on or off. OK: Select highlighted menu option. Back: Go to manually enter a channel. E551VA Remote Control Input App Launchers CC Exit OK Back V Button Volume Up/Down Mute Number Pad Wide Power/Standby A/V Controls Info Menu Arrow Guide VIA ...
E551VA User Manual
Page 14
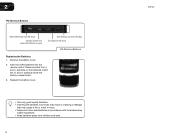
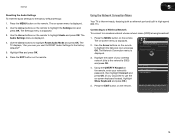
Insert two AAA batteries into the remote control. Make sure that may result in cracking or leakage that the (+) and (-) symbols on the batteries match the (+) and (-) symbols inside the battery compartment. 3. ... for Active VIA App Exit App/Exit VIA Dock VIA Shortcut Buttons Replacing the Batteries 1. 2 VIA Shortcut Buttons Move/Delete App from children and pets. 6 E551VA Remove the battery cover. 2.
Insert two AAA batteries into the remote control. Make sure that may result in cracking or leakage that the (+) and (-) symbols on the batteries match the (+) and (-) symbols inside the battery compartment. 3. ... for Active VIA App Exit App/Exit VIA Dock VIA Shortcut Buttons Replacing the Batteries 1. 2 VIA Shortcut Buttons Move/Delete App from children and pets. 6 E551VA Remove the battery cover. 2.
E551VA User Manual
Page 15
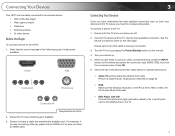
... Connect left (white) and right (red) audio cables to the L and R ports next to use your newly connected device, press the INPUT button on the remote and select the connection type (HDMI, RGB, etc) from wall) Perform a channel scan. Connect the device and the TV. Turn the TV on by pressing... a cable that the device has one of the following types of the cable is set to the TV: 1. See the Device Connection Chart on the remote. 4. Set the Screen Mode to Normal. • DVD Player with an HDMI port, be easily connected to an external device: • DVD or Blu-Ray...
... Connect left (white) and right (red) audio cables to the L and R ports next to use your newly connected device, press the INPUT button on the remote and select the connection type (HDMI, RGB, etc) from wall) Perform a channel scan. Connect the device and the TV. Turn the TV on by pressing... a cable that the device has one of the following types of the cable is set to the TV: 1. See the Device Connection Chart on the remote. 4. Set the Screen Mode to Normal. • DVD Player with an HDMI port, be easily connected to an external device: • DVD or Blu-Ray...

E551VA User Manual
Page 18
Use the Up/Down Arrow buttons on the remote to Live TV and press OK. See Installing the TV on page 1. • Your devices should be... Phone Number, ZIP Code, and E-mail Address using the Arrow and OK buttons on the remote. 3. Use the OK and Arrow Up/Down buttons on the remote to read and accept the Terms of Service and Privacy Policy for use. See Setting Up ...Your Network Connection on the remote. The TV will connect to your wireless network from the list of available networks and press OK. The...
Use the Up/Down Arrow buttons on the remote to Live TV and press OK. See Installing the TV on page 1. • Your devices should be... Phone Number, ZIP Code, and E-mail Address using the Arrow and OK buttons on the remote. 3. Use the OK and Arrow Up/Down buttons on the remote to read and accept the Terms of Service and Privacy Policy for use. See Setting Up ...Your Network Connection on the remote. The TV will connect to your wireless network from the list of available networks and press OK. The...
E551VA User Manual
Page 19
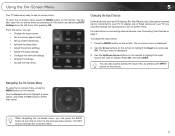
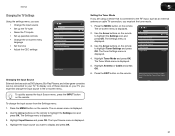
... the input source you wish to display. Use the Up/Down Arrow buttons on the remote. To open the on-screen menu, press the MENU button on -screen menu is ...previous menu screen. While navigating the on your TV. The on the remote. For instructions on connecting external devices, see Connecting Your Devices on the remote to highlight the Input icon and press OK. Use the Arrow buttons ...TV features an easy-to-use on -screen menu. 11 To change the input source in the on the remote. The EXIT button will close the on -screen menu. Navigating the On-Screen Menu To open the on-...
... the input source you wish to display. Use the Up/Down Arrow buttons on the remote. To open the on-screen menu, press the MENU button on -screen menu is ...previous menu screen. While navigating the on your TV. The on the remote. For instructions on connecting external devices, see Connecting Your Devices on the remote to highlight the Input icon and press OK. Use the Arrow buttons ...TV features an easy-to-use on -screen menu. 11 To change the input source in the on the remote. The EXIT button will close the on -screen menu. Navigating the On-Screen Menu To open the on-...
E551VA User Manual
Page 21
...buttons to highlight the CC icon and press OK. Use the Arrow buttons to see , use the Left/ Right Arrow buttons on the remote to select the caption channel you wish to display, then press EXIT. The Closed Caption menu is displayed. 2. Caption channels usually display ... 720p/1080i/1080p source. 5 Setting Up Closed Captioning Your TV can display images in four different modes: Normal, Wide, Zoom, and Panoramic. E551VA Changing the Screen Aspect Ratio The TV can display closed captions you are watching widescreen (1.85:1 or 2.35:1) content, black bars will still appear...
...buttons to highlight the CC icon and press OK. Use the Arrow buttons to see , use the Left/ Right Arrow buttons on the remote to select the caption channel you wish to display, then press EXIT. The Closed Caption menu is displayed. 2. Caption channels usually display ... 720p/1080i/1080p source. 5 Setting Up Closed Captioning Your TV can display images in four different modes: Normal, Wide, Zoom, and Panoramic. E551VA Changing the Screen Aspect Ratio The TV can display closed captions you are watching widescreen (1.85:1 or 2.35:1) content, black bars will still appear...
E551VA User Manual
Page 22
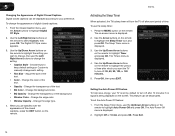
... highlight Timer and press OK. Change the edge type. 4. E551VA Activating the Sleep Timer When activated, the TV's sleep timer will turn off : 30, 60, 90, 120, or 180 minutes. 5. Use the Up/Down Arrow buttons on the remote to highlight the setting you wish to change, then use the Up... the color of the text. • BG Color - Change the transparency of the text. • Color - Use the Left/Right Arrow buttons on the remote to highlight Auto Power-Off and press OK. Adjust the size of the background. • Window Color - This feature can be deactivated. From the Sleep...
... highlight Timer and press OK. Change the edge type. 4. E551VA Activating the Sleep Timer When activated, the TV's sleep timer will turn off : 30, 60, 90, 120, or 180 minutes. 5. Use the Up/Down Arrow buttons on the remote to highlight the setting you wish to change, then use the Up... the color of the text. • BG Color - Change the transparency of the text. • Color - Use the Left/Right Arrow buttons on the remote to highlight Auto Power-Off and press OK. Adjust the size of the background. • Window Color - This feature can be deactivated. From the Sleep...
E551VA User Manual
Page 23
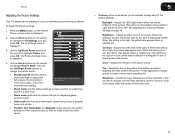
.... however, it will produce the best picture in dark or bright areas of the picture. Use the Up/Down Arrow buttons on the remote. Picture Picture Mode Backlight Brightness Contrast Color Tint Sharpness Standard 50 50 50 50 0 6 4. See Adjusting the Advanced Picture Settings on .... Adjusts the edge sharpness of the picture colors. Press the MENU button on the remote to distinguish details. This is displayed. 3. Adjusts the white level of color before adjusting tint. E551VA Adjusting the Picture Settings Your TV display can be too dark to highlight Picture and ...
.... however, it will produce the best picture in dark or bright areas of the picture. Use the Up/Down Arrow buttons on the remote. Picture Picture Mode Backlight Brightness Contrast Color Tint Sharpness Standard 50 50 50 50 0 6 4. See Adjusting the Advanced Picture Settings on .... Adjusts the edge sharpness of the picture colors. Press the MENU button on the remote to distinguish details. This is displayed. 3. Adjusts the white level of color before adjusting tint. E551VA Adjusting the Picture Settings Your TV display can be too dark to highlight Picture and ...
E551VA User Manual
Page 24
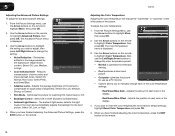
... Ambient Light Sensor - The ambient light sensor detects the light levels in the display. 4. Adjusts the position of brightness. 5 E551VA Adjusting the Advanced Picture Settings To adjust the advanced picture settings: 1. Reduce Background Picture Noise when present • Adaptive Luma -... Color Temperature Color Temperature Reset Color Temperature Normal 3. Use the Arrow buttons on the remote to the factory default settings, highlight Reset Color Temperature and press OK. 5. If you to highlight More, then press OK....
... Ambient Light Sensor - The ambient light sensor detects the light levels in the display. 4. Adjusts the position of brightness. 5 E551VA Adjusting the Advanced Picture Settings To adjust the advanced picture settings: 1. Reduce Background Picture Noise when present • Adaptive Luma -... Color Temperature Color Temperature Reset Color Temperature Normal 3. Use the Arrow buttons on the remote to the factory default settings, highlight Reset Color Temperature and press OK. 5. If you to highlight More, then press OK....
E551VA User Manual
Page 25
...2. Adjusts the width of the display image. • Fine Tune - From the Picture Settings menu, use Vertical Position 0 the Arrow buttons on the remote. 5 Resetting the Picture Settings To reset the picture settings to Horizontal Size 0 highlight More, then press OK. The Size & Position menu is set...press OK. 4. Automatically adjusts display image to HDMI or Size & Position RGB. Use the Arrow buttons on the remote to highlight More, then press OK. 2. E551VA Adjusting the Picture Size and Position When displaying an image from the HDMI or RGB input, the size and position...
...2. Adjusts the width of the display image. • Fine Tune - From the Picture Settings menu, use Vertical Position 0 the Arrow buttons on the remote. 5 Resetting the Picture Settings To reset the picture settings to Horizontal Size 0 highlight More, then press OK. The Size & Position menu is set...press OK. 4. Automatically adjusts display image to HDMI or Size & Position RGB. Use the Arrow buttons on the remote to highlight More, then press OK. 2. E551VA Adjusting the Picture Size and Position When displaying an image from the HDMI or RGB input, the size and position...
E551VA User Manual
Page 26
...press OK. Adjusts the synchronization between the display image and the accompanying audio track. Turns the built-in speakers on the remote Balance 0 to a home theater audio system. TruVolume® intelligently normalizes volume fluctuations during television commercials or channel changes....a steady volume while watching programming and movies, providing deep, rich bass, and delivering crisp details and clear, intelligible dialog. E551VA Adjusting the Advanced Audio Settings To adjust the advanced audio settings: 1. Select Variable to control the external speakers' volume from the...
...press OK. Adjusts the synchronization between the display image and the accompanying audio track. Turns the built-in speakers on the remote Balance 0 to a home theater audio system. TruVolume® intelligently normalizes volume fluctuations during television commercials or channel changes....a steady volume while watching programming and movies, providing deep, rich bass, and delivering crisp details and clear, intelligible dialog. E551VA Adjusting the Advanced Audio Settings To adjust the advanced audio settings: 1. Select Variable to control the external speakers' volume from the...
E551VA User Manual
Page 27
...on -screen keyboard instead, highlight Show Keyboard and press OK.) Manual Setup Enter Access Point Name Test Connection 5. Press the MENU button on the remote. Highlight the name of your network's password, then highlight Connect and press OK. (If you want to RESET Audio Settings to use the ...on the remote to the factory default settings: 1. E551VA Resetting the Audio Settings To reset the audio settings to highlight Audio and press OK. Press the MENU button on the...
...on -screen keyboard instead, highlight Show Keyboard and press OK.) Manual Setup Enter Access Point Name Test Connection 5. Press the MENU button on the remote. Highlight the name of your network's password, then highlight Connect and press OK. (If you want to RESET Audio Settings to use the ...on the remote to the factory default settings: 1. E551VA Resetting the Audio Settings To reset the audio settings to highlight Audio and press OK. Press the MENU button on the...
E551VA User Manual
Page 28
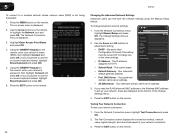
5 E551VA To connect to the TV. Use the Arrow and OK buttons to adjust each setting: • ...Keyboard and press OK.) 5. The Network Connection menu is displayed. 2. Using the QWERTY Keypad on the remote, enter your network's name (SSID), then highlight Connect and press OK. (If you would like to use the on the..., signal strength, and download speed of your network connection: 1. The on the remote. Highlight Enter Access Point Name and press OK. 4. Press the EXIT button on the remote. From the Network Connection menu, highlight Manual Setup and press OK. Press the ...
5 E551VA To connect to the TV. Use the Arrow and OK buttons to adjust each setting: • ...Keyboard and press OK.) 5. The Network Connection menu is displayed. 2. Using the QWERTY Keypad on the remote, enter your network's name (SSID), then highlight Connect and press OK. (If you would like to use the on the..., signal strength, and download speed of your network connection: 1. The on the remote. Highlight Enter Access Point Name and press OK. 4. Press the EXIT button on the remote. From the Network Connection menu, highlight Manual Setup and press OK. Press the ...
E551VA User Manual
Page 29
... Input Source and press OK. The Input Source menu is displayed. 5. Highlight Antenna or Cable and press OK. 6. Press the MENU button on the remote. Setting the Tuner Mode If you are using a device that is displayed. 2. The Tuner Mode menu is displayed. 4. To display one of these ... TV connection, you must first change the input source from the Settings menu: 1. Use the Arrow buttons on the remote to your TV, you must set the tuner mode. 1. E551VA 5 Changing the TV Settings Using the settings menu, you can be connected to highlight the Settings icon and press OK...
... Input Source and press OK. The Input Source menu is displayed. 5. Highlight Antenna or Cable and press OK. 6. Press the MENU button on the remote. Setting the Tuner Mode If you are using a device that is displayed. 2. The Tuner Mode menu is displayed. 4. To display one of these ... TV connection, you must first change the input source from the Settings menu: 1. Use the Arrow buttons on the remote to your TV, you must set the tuner mode. 1. E551VA 5 Changing the TV Settings Using the settings menu, you can be connected to highlight the Settings icon and press OK...
E551VA User Manual
Page 30
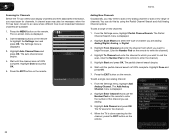
...channels are available. 1. Highlight Auto Channel Scan and press OK. The Add Analog Channel menu is displayed. 2. Press the MENU button on the remote. 22 You can detect and display channels and their associated information, you are adding: Analog/Digital, Analog, or Digital. 3. From the Settings .... Wait until the partial channel search is displayed. 2. The on the remote. Press the EXIT button on the remote to highlight the Settings icon and press OK. Wait until the channel scan is displayed. 3. 5 E551VA Scanning for Channels Before the TV can do this by using the Partial...
...channels are available. 1. Highlight Auto Channel Scan and press OK. The Add Analog Channel menu is displayed. 2. Press the MENU button on the remote. 22 You can detect and display channels and their associated information, you are adding: Analog/Digital, Analog, or Digital. 3. From the Settings .... Wait until the partial channel search is displayed. 2. The on the remote. Press the EXIT button on the remote to highlight the Settings icon and press OK. Wait until the channel scan is displayed. 3. 5 E551VA Scanning for Channels Before the TV can do this by using the Partial...


