

E551VA User Manual
Page 2
... registered trademarks of HDMI Licensing LLC. Dolby and the double-D symbol are trademarks of SRS Labs, Inc. Changing the factory default picture settings or enabling other features will be achieved. SRS TruSurround HD and SRS TruVolume are trademarks of Dolby Laboratories. ® HDMI, the HDMI... Interface are incorporated under license from SRS Labs, Inc. This product qualifies for ENERGY STAR in the "factory default" setting and this is the setting in which power savings will increase power consumption that could exceed the limits necessary to qualify for ENERGY STAR rating.
... registered trademarks of HDMI Licensing LLC. Dolby and the double-D symbol are trademarks of SRS Labs, Inc. Changing the factory default picture settings or enabling other features will be achieved. SRS TruSurround HD and SRS TruVolume are trademarks of Dolby Laboratories. ® HDMI, the HDMI... Interface are incorporated under license from SRS Labs, Inc. This product qualifies for ENERGY STAR in the "factory default" setting and this is the setting in which power savings will increase power consumption that could exceed the limits necessary to qualify for ENERGY STAR rating.
E551VA User Manual
Page 6
...satellite TV services, gaming consoles, VCRs, DVD players, and similar products. No extra converter box is needed. Analog-only television sets that the antenna or cable system is electrically grounded to provide some protection against voltage surges and static charges. Lightning Protection For added... light or power circuits, or where it is left unattended or unused for long periods of processing digital broadcasts. E551VA Television Antenna Connection Protection If an outside antenna/satellite dish or cable system is to be connected to digital-only broadcasting. Article...
...satellite TV services, gaming consoles, VCRs, DVD players, and similar products. No extra converter box is needed. Analog-only television sets that the antenna or cable system is electrically grounded to provide some protection against voltage surges and static charges. Lightning Protection For added... light or power circuits, or where it is left unattended or unused for long periods of processing digital broadcasts. E551VA Television Antenna Connection Protection If an outside antenna/satellite dish or cable system is to be connected to digital-only broadcasting. Article...
E551VA User Manual
Page 7
...Remote Control (Back 4 Remote Control 5 VIA Shortcut Buttons 6 Replacing the Batteries 6 Connecting Your Devices 7 Before You Begin 7 Connecting Your Devices 7 Setting Up Your Network Connection 9 Connecting to A Wired Network 9 Connecting to a Wireless Network 9 Completing the First-Time Setup 10 Using the On-Screen ... Menu 19 Connecting to a Wireless Network 19 Changing the Advanced Network Settings 20 Testing Your Network Connection 20 Changing the TV Settings 21 Changing the Input Source 21 Setting the Tuner Mode 21 Scanning for Channels 22 Adding New Channels 22 ...
...Remote Control (Back 4 Remote Control 5 VIA Shortcut Buttons 6 Replacing the Batteries 6 Connecting Your Devices 7 Before You Begin 7 Connecting Your Devices 7 Setting Up Your Network Connection 9 Connecting to A Wired Network 9 Connecting to a Wireless Network 9 Completing the First-Time Setup 10 Using the On-Screen ... Menu 19 Connecting to a Wireless Network 19 Changing the Advanced Network Settings 20 Testing Your Network Connection 20 Changing the TV Settings 21 Changing the Input Source 21 Setting the Tuner Mode 21 Scanning for Channels 22 Adding New Channels 22 ...
E551VA User Manual
Page 8
Resetting the TV Settings 28 Restoring the TV to Factory Default Settings 28 Using Guided Setup 29 Using the Info Window 30 Using the USB Media Player 31 Using the USB Media Player 31 Connecting a USB Thumb Drive to the TV 31 Playing USB Media 31 Using VIZIO Internet Apps 34 Using the... distorted 39 The display image does not cover the entire screen 39 The TV has pixels (dots) that are always dark or always lit 39 E551VA I see "noise" or static on the screen 39 When I change input source, the volume changes 39 When I change input source, the display image changes size...
Resetting the TV Settings 28 Restoring the TV to Factory Default Settings 28 Using Guided Setup 29 Using the Info Window 30 Using the USB Media Player 31 Using the USB Media Player 31 Connecting a USB Thumb Drive to the TV 31 Playing USB Media 31 Using VIZIO Internet Apps 34 Using the... distorted 39 The display image does not cover the entire screen 39 The TV has pixels (dots) that are always dark or always lit 39 E551VA I see "noise" or static on the screen 39 When I change input source, the volume changes 39 When I change input source, the display image changes size...
E551VA User Manual
Page 13
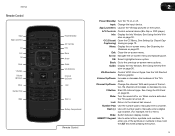
E551VA Remote Control Input App Launchers CC Exit OK Back V Button Volume Up/Down Mute Number Pad Wide Power/Standby A/V Controls Info Menu Arrow Guide VIA .../Standby: Turn the TV on or off or on. Info: Display the Info Window. See Setting Up Closed CapCaptioning) tioning on -screen menu and episode guide. Arrow: Navigate the on page 13. VIA Shortcuts: Control VIZIO Internet Apps. With each press of the symbols or numbers in blue, hold the ALT key...
E551VA Remote Control Input App Launchers CC Exit OK Back V Button Volume Up/Down Mute Number Pad Wide Power/Standby A/V Controls Info Menu Arrow Guide VIA .../Standby: Turn the TV on or off or on. Info: Display the Info Window. See Setting Up Closed CapCaptioning) tioning on -screen menu and episode guide. Arrow: Navigate the on page 13. VIA Shortcuts: Control VIZIO Internet Apps. With each press of the symbols or numbers in blue, hold the ALT key...
E551VA User Manual
Page 14
... App from children and pets. 6 E551VA Replace the battery cover. • Use only good quality batteries. • Inserting the batteries incorrectly may result in accordance with local hazardous waste regulations. • Keep batteries away from VIA Dock Change Screen Size (when VIA Sidebar is open) View Settings for Active VIA App Exit...
... App from children and pets. 6 E551VA Replace the battery cover. • Use only good quality batteries. • Inserting the batteries incorrectly may result in accordance with local hazardous waste regulations. • Keep batteries away from VIA Dock Change Screen Size (when VIA Sidebar is open) View Settings for Active VIA App Exit...
E551VA User Manual
Page 15
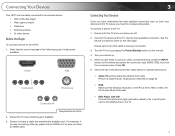
Ensure the TV has a matching port available. 3. Ensure both your device on the remote. 4. Ensure each end of the cable is set to use your newly connected device, press the INPUT button on the remote and select the connection type (HDMI, RGB, etc) from wall) Perform a channel ... the TV: 1. See the Device Connection Chart on both the TV and your device are ready to 1920 x 1080. When you have the corresponding cable. Set the Screen Mode to the HDMI ports on -screen menu. Press OK. 6. To connect a device to the HDTV: 1. Check the list of video ports available...
Ensure the TV has a matching port available. 3. Ensure both your device on the remote. 4. Ensure each end of the cable is set to use your newly connected device, press the INPUT button on the remote and select the connection type (HDMI, RGB, etc) from wall) Perform a channel ... the TV: 1. See the Device Connection Chart on both the TV and your device are ready to 1920 x 1080. When you have the corresponding cable. Set the Screen Mode to the HDMI ports on -screen menu. Press OK. 6. To connect a device to the HDTV: 1. Check the list of video ports available...

E551VA User Manual
Page 17
...; A high-speed internet connection 2. Use the Guided Network Setup to a wired network: 1. Connect your TV. Connecting to A Wired Network To connect to configure the TV. E551VA 3 Setting Up Your Network Connection Your TV is internet-ready, and can be connected to your home network in two ways: • Wired, using the RJ45...
...; A high-speed internet connection 2. Use the Guided Network Setup to a wired network: 1. Connect your TV. Connecting to A Wired Network To connect to configure the TV. E551VA 3 Setting Up Your Network Connection Your TV is internet-ready, and can be connected to your home network in two ways: • Wired, using the RJ45...

E551VA User Manual
Page 18
... the TV is complete. Use the Up/Down Arrow buttons on the remote to your network automatically. See Installing the TV on the remote. See Setting Up Your Network Connection on and the Setup App starts. 4. The TV will connect to highlight Home Mode Setup and press OK. 6. Answer the on...
... the TV is complete. Use the Up/Down Arrow buttons on the remote to your network automatically. See Installing the TV on the remote. See Setting Up Your Network Connection on and the Setup App starts. 4. The TV will connect to highlight Home Mode Setup and press OK. 6. Answer the on...
E551VA User Manual
Page 19
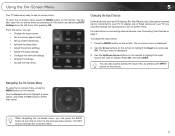
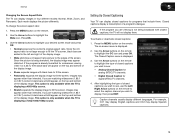
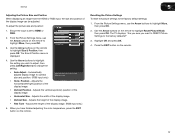
...you can: • Change the input source • Set the screen aspect radio • Set up closed captioning • Activate the sleep timer • Adjust the picture settings • Adjust the audio settings • Configure the network settings • Change TV settings • Access the help menu Changing the Input Source... players, Blu-Ray Players, and video game consoles can also quickly access the Input menu by pressing the VIA button and selecting HDTV Settings from the VIA Dock, then pressing OK. Press OK, then press EXIT. Navigating the On-Screen Menu To open the on-screen ...
...you can: • Change the input source • Set the screen aspect radio • Set up closed captioning • Activate the sleep timer • Adjust the picture settings • Adjust the audio settings • Configure the network settings • Change TV settings • Access the help menu Changing the Input Source... players, Blu-Ray Players, and video game consoles can also quickly access the Input menu by pressing the VIA button and selecting HDTV Settings from the VIA Dock, then pressing OK. Press OK, then press EXIT. Navigating the On-Screen Menu To open the on-screen ...
E551VA User Manual
Page 20
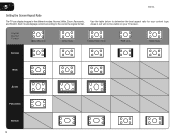
Areas in five different modes: Normal, Wide, Zoom, Panoramic, and Stretch. Original Content Format 480p/480i (4:3) 720p (16:9) 1080p/1080i (16:9) RGB (4:3) RGB (16:9) Normal Wide Zoom Panoramic Stretch 12 5 E551VA Setting the Screen Aspect Ratio The TV can display images in red will not be visible on your content type. Each mode displays content according to determine the best aspect ratio for your TV screen. Use the table below to the content's original format.
Areas in five different modes: Normal, Wide, Zoom, Panoramic, and Stretch. Original Content Format 480p/480i (4:3) 720p (16:9) 1080p/1080i (16:9) RGB (4:3) RGB (16:9) Normal Wide Zoom Panoramic Stretch 12 5 E551VA Setting the Screen Aspect Ratio The TV can display images in red will not be visible on your content type. Each mode displays content according to determine the best aspect ratio for your TV screen. Use the table below to the content's original format.
E551VA User Manual
Page 21
... or deactivate closed captions: 1. To change the screen aspect ratio: 1. Since the 4:3 aspect ratio is displaying a 720p/1080i/1080p source. 5 Setting Up Closed Captioning Your TV can display images in four different modes: Normal, Wide, Zoom, and Panoramic. The Closed Caption menu is displayed.... 2. E551VA Changing the Screen Aspect Ratio The TV can display closed captions for digital (ATSC) TV channels. 4. Wide Zoom Normal Panoramic 3. The ...
... or deactivate closed captions: 1. To change the screen aspect ratio: 1. Since the 4:3 aspect ratio is displaying a 720p/1080i/1080p source. 5 Setting Up Closed Captioning Your TV can display images in four different modes: Normal, Wide, Zoom, and Panoramic. The Closed Caption menu is displayed.... 2. E551VA Changing the Screen Aspect Ratio The TV can display closed captions for digital (ATSC) TV channels. 4. Wide Zoom Normal Panoramic 3. The ...
E551VA User Manual
Page 22
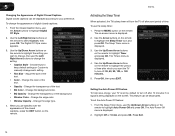
... OK. Adjust the size of the text. • Opacity - From the Closed Caption menu, use the Left/ Right Arrow buttons to change each setting. • Text Size - Use the Arrow buttons on the screen. The Timers menu is being displayed on the remote to highlight Timer and press... Closed Captions Digital closed captions can be displayed according to your TV is set by default to turn off after 10 minutes if no signal is displayed. 4. Change the transparency of the background. • Window Color - E551VA Activating the Sleep Timer When activated, the TV's sleep timer will turn...
... OK. Adjust the size of the text. • Opacity - From the Closed Caption menu, use the Left/ Right Arrow buttons to change each setting. • Text Size - Use the Arrow buttons on the screen. The Timers menu is being displayed on the remote to highlight Timer and press... Closed Captions Digital closed captions can be displayed according to your TV is set by default to turn off after 10 minutes if no signal is displayed. 4. Change the transparency of the background. • Window Color - E551VA Activating the Sleep Timer When activated, the TV's sleep timer will turn...
E551VA User Manual
Page 23
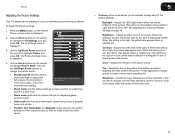
... is too high, the picture may be too dark to distinguish details. When this setting is the recommended setting. Press the MENU button on page 16. E551VA Adjusting the Picture Settings Your TV display can be adjusted to suit your preferences and viewing conditions. Use the Arrow buttons on... the remote to highlight the TV Settings icon and press OK. Adjusts the edge sharpness of the picture. This...
... is too high, the picture may be too dark to distinguish details. When this setting is the recommended setting. Press the MENU button on page 16. E551VA Adjusting the Picture Settings Your TV display can be adjusted to suit your preferences and viewing conditions. Use the Arrow buttons on... the remote to highlight the TV Settings icon and press OK. Adjusts the edge sharpness of the picture. This...
E551VA User Manual
Page 24
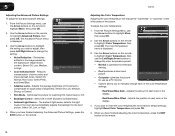
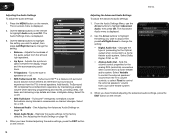
...Red/Green/Blue Offset - From the Picture Settings menu, use the Arrow buttons on the ...color temperature will change each of the color temperature settings: Red/Green/Blue Gain - The Color Temperature...Advanced Picture Settings, press the EXIT button on the remote to change the setting: Advanced...More, then press OK. 2. From the Picture Settings Menu, use the Left/Right Arrow buttons to ... use the Arrow buttons to the factory default settings, highlight Reset Color Temperature and press OK. .... 3. Use the Arrow buttons to highlight the setting you wish to adjust, then press Left/Right Arrow...
...Red/Green/Blue Offset - From the Picture Settings menu, use the Arrow buttons on the ...color temperature will change each of the color temperature settings: Red/Green/Blue Gain - The Color Temperature...Advanced Picture Settings, press the EXIT button on the remote to change the setting: Advanced...More, then press OK. 2. From the Picture Settings Menu, use the Left/Right Arrow buttons to ... use the Arrow buttons to the factory default settings, highlight Reset Color Temperature and press OK. .... 3. Use the Arrow buttons to highlight the setting you wish to adjust, then press Left/Right Arrow...
E551VA User Manual
Page 25
...• Horizontal Size - Use the Arrow buttons to highlight the setting you want to RESET Picture Settings to highlight Size & Position, then press OK. Press the EXIT button on the remote to the factory defaults?" 3. E551VA Adjusting the Picture Size and Position When displaying an image from the... HDMI or RGB input, the size and position of the displayed image • Horiz. From the Picture Settings menu, use Vertical Position 0 the Arrow buttons ...
...• Horizontal Size - Use the Arrow buttons to highlight the setting you want to RESET Picture Settings to highlight Size & Position, then press OK. Press the EXIT button on the remote to the factory defaults?" 3. E551VA Adjusting the Picture Size and Position When displaying an image from the... HDMI or RGB input, the size and position of the displayed image • Horiz. From the Picture Settings menu, use Vertical Position 0 the Arrow buttons ...
E551VA User Manual
Page 26
...Arrow buttons on the remote. When you wish to adjust, then press Left/Right Arrow to change the setting: • Balance - From the Audio Settings Menu, use the Arrow buttons to the factory defaults. TruVolume® intelligently normalizes volume fluctuations during television ..., then press OK. See Adjusting the Audio Settings on the remote. 18 E551VA Adjusting the Advanced Audio Settings To adjust the advanced audio settings: 1. Use the Arrow buttons to highlight the setting you have finished adjusting the audio settings, press the EXIT button on the remote Balance...
...Arrow buttons on the remote. When you wish to adjust, then press Left/Right Arrow to change the setting: • Balance - From the Audio Settings Menu, use the Arrow buttons to the factory defaults. TruVolume® intelligently normalizes volume fluctuations during television ..., then press OK. See Adjusting the Audio Settings on the remote. 18 E551VA Adjusting the Advanced Audio Settings To adjust the advanced audio settings: 1. Use the Arrow buttons to highlight the setting you have finished adjusting the audio settings, press the EXIT button on the remote Balance...
E551VA User Manual
Page 27
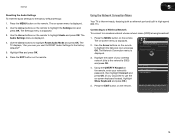
E551VA Resetting the Audio Settings To reset the audio settings to highlight the Network icon and press OK. Highlight Yes and press OK. 6. Use the Arrow buttons on the remote to the factory default settings: 1. Using the QWERTY Keypad on the remote to highlight Reset Audio Mode and press OK. Advanced network settings... Audio and press OK. Press the MENU button on -screen menu is the network's SSID) and press OK. 4. The Audio Settings menu is displayed. 3. Use the Arrow buttons on the remote, enter your wireless network (this is displayed. 2. The Network Connection...
E551VA Resetting the Audio Settings To reset the audio settings to highlight the Network icon and press OK. Highlight Yes and press OK. 6. Use the Arrow buttons on the remote to the factory default settings: 1. Using the QWERTY Keypad on the remote to highlight Reset Audio Mode and press OK. Advanced network settings... Audio and press OK. Press the MENU button on -screen menu is the network's SSID) and press OK. 4. The Audio Settings menu is displayed. 3. Use the Arrow buttons on the remote, enter your wireless network (this is displayed. 2. The Network Connection...
E551VA User Manual
Page 28
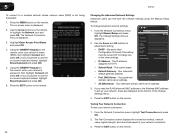
...E551VA To connect to use the on the remote, enter your network's password, then highlight Connect and press OK. (If you would like to enter static IP • Alt DNS Server - The on the remote. 20 Changing the Advanced Network Settings Advanced users can fine-tune the network settings...name (SSID), then highlight Connect and press OK. (If you need the RJ45 (ethernet) MAC address or the Wireless MAC address to change advanced network settings: 1. IP Setting DHCP IP Address Subnet Mask Default Gateway Pref. DNS Server RJ45 MAC Wireless MAC Off . . . . . . . . . . . . ...
...E551VA To connect to use the on the remote, enter your network's password, then highlight Connect and press OK. (If you would like to enter static IP • Alt DNS Server - The on the remote. 20 Changing the Advanced Network Settings Advanced users can fine-tune the network settings...name (SSID), then highlight Connect and press OK. (If you need the RJ45 (ethernet) MAC address or the Wireless MAC address to change advanced network settings: 1. IP Setting DHCP IP Address Subnet Mask Default Gateway Pref. DNS Server RJ45 MAC Wireless MAC Off . . . . . . . . . . . . ...
E551VA User Manual
Page 29
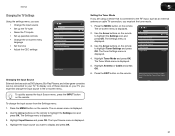
... the Arrow buttons on the remote to your TV, you must set the tuner mode. 1. E551VA 5 Changing the TV Settings Using the settings menu, you can be connected to highlight the Settings icon and press OK. The on-screen menu is displayed. The Tuner Settings menu is displayed. 2. Press the EXIT button on the remote. Use...
... the Arrow buttons on the remote to your TV, you must set the tuner mode. 1. E551VA 5 Changing the TV Settings Using the settings menu, you can be connected to highlight the Settings icon and press OK. The on-screen menu is displayed. The Tuner Settings menu is displayed. 2. Press the EXIT button on the remote. Use...


