E500AR User Manual
Page 4
...power, unplug the power cord. • The lightning flash with the apparatus. This will not be used for ventilation. Do not install your TV. Do not place any object into your TV to rain or moisture. The manufacturer's warranty does not cover user abuse or improper installations. • The power cord must be replaced when using... not operate normally or has been dropped. • Unplug the power cord before turning on your TV away from an area of low temperature to an area of high temperature, condensation may form in the back and bottom of the display. Servicing is ...
...power, unplug the power cord. • The lightning flash with the apparatus. This will not be used for ventilation. Do not install your TV. Do not place any object into your TV to rain or moisture. The manufacturer's warranty does not cover user abuse or improper installations. • The power cord must be replaced when using... not operate normally or has been dropped. • Unplug the power cord before turning on your TV away from an area of low temperature to an area of high temperature, condensation may form in the back and bottom of the display. Servicing is ...
E500AR User Manual
Page 5
...alert the user to do so. Continued use of your TV may cause fire or electric shock. • Do not install your TV. - Ensure that contained in the operating instructions unless you are qualified to the presence of electric shock, do not perform any servicing other than that the power cord and any...shock. • Do not use your TV. Operating your TV in any of your TV, hold the AC/DC power adapter, not the cord. Do not try to leak which can damage the remote control or injure the operator. Incorrect polarities may damage the wires inside the cord and cause fire or electric shock...
...alert the user to do so. Continued use of your TV may cause fire or electric shock. • Do not install your TV. - Ensure that contained in the operating instructions unless you are qualified to the presence of electric shock, do not perform any servicing other than that the power cord and any...shock. • Do not use your TV. Operating your TV in any of your TV, hold the AC/DC power adapter, not the cord. Do not try to leak which can damage the remote control or injure the operator. Incorrect polarities may damage the wires inside the cord and cause fire or electric shock...
E500AR User Manual
Page 6
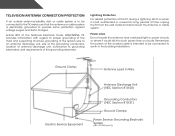
... screen of the coaxial cable is intended to be connected to the TV, make sure that the antenna or cable system is electrically grounded to earth in wire to an antenna discharge unit, size of the grounding conductors, location of antenna discharge unit, connection to grounding electrodes, and requirements of time, unplug the TV from the wall outlet and disconnect the antenna or cable...
... screen of the coaxial cable is intended to be connected to the TV, make sure that the antenna or cable system is electrically grounded to earth in wire to an antenna discharge unit, size of the grounding conductors, location of antenna discharge unit, connection to grounding electrodes, and requirements of time, unplug the TV from the wall outlet and disconnect the antenna or cable...
E500AR User Manual
Page 7
... the Advanced Picture Settings 27 Adjusting the Color Temperature 28 Adjusting the Picture Size and Position 29 Resetting the Picture Settings 29 Adjusting the Audio Settings 29 Adjusting the Advanced Audio Settings 30 Resetting the Audio Settings 31 Changing the TV Settings 32 Changing the Input Source 32 Setting the Tuner Mode 32 Scanning for Channels 32 Adding New Channels 33 Skipping Channels 34 Changing the Audio Language 34 Using the Parental Controls 35 Accessing the Parental Controls Menu 35 Enabling or Disabling Program Ratings 35 Locking and Unlocking Channels 35...
... the Advanced Picture Settings 27 Adjusting the Color Temperature 28 Adjusting the Picture Size and Position 29 Resetting the Picture Settings 29 Adjusting the Audio Settings 29 Adjusting the Advanced Audio Settings 30 Resetting the Audio Settings 31 Changing the TV Settings 32 Changing the Input Source 32 Setting the Tuner Mode 32 Scanning for Channels 32 Adding New Channels 33 Skipping Channels 34 Changing the Audio Language 34 Using the Parental Controls 35 Accessing the Parental Controls Menu 35 Enabling or Disabling Program Ratings 35 Locking and Unlocking Channels 35...
E500AR User Manual
Page 8
Changing the On-Screen Menu Language 37 Setting the Time and Local Settings 38 Adjusting the CEC Settings 38 Using the Help Menu 39 Displaying System Information 39 Resetting the TV Settings 39 Restoring the TV to Factory Default Settings 40 Using Setup Wizard 40 Using the Info Window 41 Using the USB Media Player 42 Using the USB Photo slideshow 42 Connecting a USB Thumb Drive to the TV 42 Playing USB Media 43 Troubleshooting & Technical Support 45 Specifications 48 Limited Warranty 50 Legal & Compliance 51 2
Changing the On-Screen Menu Language 37 Setting the Time and Local Settings 38 Adjusting the CEC Settings 38 Using the Help Menu 39 Displaying System Information 39 Resetting the TV Settings 39 Restoring the TV to Factory Default Settings 40 Using Setup Wizard 40 Using the Info Window 41 Using the USB Media Player 42 Using the USB Photo slideshow 42 Connecting a USB Thumb Drive to the TV 42 Playing USB Media 43 Troubleshooting & Technical Support 45 Specifications 48 Limited Warranty 50 Legal & Compliance 51 2
E500AR User Manual
Page 10
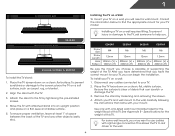
... scratches or damage to use cables with your mount. E240AR E320AR E420AR E500AR Screw Size: Screw Length: Hole Pattern: M4 12mm 100mm (V) x 100mm (H) M6 12mm 200mm (V) x 200mm (H) M6 M6 12mm 12mm 300mm (V) x 300mm (V) x 300mm (H) 300mm (H) Be sure the mount you . To install your TV on a flat, level, and stable surface. 5. Remove the stand by tightening the pre-installed screws. 4. After you will need a wall mount. Specifications for your TV...
... scratches or damage to use cables with your mount. E240AR E320AR E420AR E500AR Screw Size: Screw Length: Hole Pattern: M4 12mm 100mm (V) x 100mm (H) M6 12mm 200mm (V) x 200mm (H) M6 M6 12mm 12mm 300mm (V) x 300mm (V) x 300mm (H) 300mm (H) Be sure the mount you . To install your TV on a flat, level, and stable surface. 5. Remove the stand by tightening the pre-installed screws. 4. After you will need a wall mount. Specifications for your TV...
E500AR User Manual
Page 19
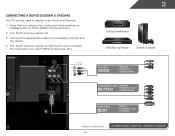
Connect the appropriate cable (not included) to component inputs: Y/V L R 3 Cable/Satellite Box DVD/Blu-ray Player Game Console AV CABLE GOOD • ANALOG • VIDEO (480i)* • STEREO AUDIO COMPONENT CABLE • ANALOG BETTER • HD VIDEO (1080i)* • STEREO AUDIO HDMI CABLE BEST • DIGITAL • HD VIDEO (1080p)* • HD AUDIO * Maximum Resolution 13 CONNECTING A DEVICE - Turn the TV and your device on the TV (HDMI, Component, etc). 2. Set the TV's input to match the connection you used to display output from most devices...
Connect the appropriate cable (not included) to component inputs: Y/V L R 3 Cable/Satellite Box DVD/Blu-ray Player Game Console AV CABLE GOOD • ANALOG • VIDEO (480i)* • STEREO AUDIO COMPONENT CABLE • ANALOG BETTER • HD VIDEO (1080i)* • STEREO AUDIO HDMI CABLE BEST • DIGITAL • HD VIDEO (1080p)* • HD AUDIO * Maximum Resolution 13 CONNECTING A DEVICE - Turn the TV and your device on the TV (HDMI, Component, etc). 2. Set the TV's input to match the connection you used to display output from most devices...
E500AR User Manual
Page 20
... available port on . Turn the TV and your device off. 3. Connect the appropriate cable (not included) to match the connection you used to component inputs: Y/V L R 3 Cable/Satellite Box DVD/Blu-ray Player Game Console AV CABLE GOOD • ANALOG • VIDEO (480i)* • STEREO AUDIO COMPONENT CABLE • ANALOG BETTER • HD VIDEO (1080i)* • STEREO AUDIO HDMI CABLE BEST • DIGITAL • HD VIDEO (1080p)* • HD AUDIO * Maximum Resolution 14 CONNECTING A DEVICE - E320AR & E420AR BACK OF TV Connect to display output...
... available port on . Turn the TV and your device off. 3. Connect the appropriate cable (not included) to match the connection you used to component inputs: Y/V L R 3 Cable/Satellite Box DVD/Blu-ray Player Game Console AV CABLE GOOD • ANALOG • VIDEO (480i)* • STEREO AUDIO COMPONENT CABLE • ANALOG BETTER • HD VIDEO (1080i)* • STEREO AUDIO HDMI CABLE BEST • DIGITAL • HD VIDEO (1080p)* • HD AUDIO * Maximum Resolution 14 CONNECTING A DEVICE - E320AR & E420AR BACK OF TV Connect to display output...

E500AR User Manual
Page 21
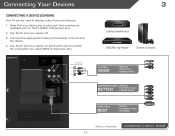
Connecting A Device (E500AR) Your TV can be used (HDMI, Component, etc). Connect the appropriate cable (not included) to display output from most devices. 1. Turn the TV and your device on the TV (HDMI, Component, etc). 2. Set the TV's input to component inputs: Y/V L R AV CABLE GOOD * Maximum Resolution 15 • ANALOG • VIDEO (480i)* • STEREO AUDIO CONNECTING A DEVICE - BACK OF TV 3 Cable/Satellite Box DVD/Blu-ray Player Game Console HDMI CABLE BEST • DIGITAL • HD VIDEO (1080p)* • HD AUDIO COMPONENT CABLE • ANALOG BETTER...
Connecting A Device (E500AR) Your TV can be used (HDMI, Component, etc). Connect the appropriate cable (not included) to display output from most devices. 1. Turn the TV and your device on the TV (HDMI, Component, etc). 2. Set the TV's input to component inputs: Y/V L R AV CABLE GOOD * Maximum Resolution 15 • ANALOG • VIDEO (480i)* • STEREO AUDIO CONNECTING A DEVICE - BACK OF TV 3 Cable/Satellite Box DVD/Blu-ray Player Game Console HDMI CABLE BEST • DIGITAL • HD VIDEO (1080p)* • HD AUDIO COMPONENT CABLE • ANALOG BETTER...

E500AR User Manual
Page 30
... your desired screen mode and press OK: • Normal preserves the content's original aspect ratio. If the program is already formatted for widescreen viewing (1.85:1 or 2.35:1), then black bars will appear on the top and bottom of the display image. Images may appear wider than intended. 5 Changing the Input Source External devices such as DVD players, Blu-Ray Players, and video game consoles can display images...
... your desired screen mode and press OK: • Normal preserves the content's original aspect ratio. If the program is already formatted for widescreen viewing (1.85:1 or 2.35:1), then black bars will appear on the top and bottom of the display image. Images may appear wider than intended. 5 Changing the Input Source External devices such as DVD players, Blu-Ray Players, and video game consoles can display images...

E500AR User Manual
Page 33
.../Blue. • Adaptive Luma - When this setting is displayed. 3. Adjusts the intensity of some colors and improves flesh tones. It can be too dark to Off. Select Off, Low, Medium, Strong, or Extend. • Film Mode - Select Off, DCR (Dynamic Contrast Ratio), or OPC. (Backlight Control setting is only available when both Ambient Light Sensor and Backlight Control are set to distinguish...
.../Blue. • Adaptive Luma - When this setting is displayed. 3. Adjusts the intensity of some colors and improves flesh tones. It can be too dark to Off. Select Off, Low, Medium, Strong, or Extend. • Film Mode - Select Off, DCR (Dynamic Contrast Ratio), or OPC. (Backlight Control setting is only available when both Ambient Light Sensor and Backlight Control are set to distinguish...

E500AR User Manual
Page 36
.... Turns the built-in speakers on the remote. Select On or Off. • Advanced Audio - From the Audio Settings Menu, use the Arrow buttons to a home theater audio system. StudioSound HD™ is a feature-rich surround sound solution which delivers an immersive surround sound experience from your home theater system controls. 30 Select Off, Dolby Digital, or PCM. • Analog Audio Out Sets the volume control properties for the Optical output...
.... Turns the built-in speakers on the remote. Select On or Off. • Advanced Audio - From the Audio Settings Menu, use the Arrow buttons to a home theater audio system. StudioSound HD™ is a feature-rich surround sound solution which delivers an immersive surround sound experience from your home theater system controls. 30 Select Off, Dolby Digital, or PCM. • Analog Audio Out Sets the volume control properties for the Optical output...

E500AR User Manual
Page 38
... displayed. 4. The on-screen menu is displayed. 3. Use the Arrow buttons on the remote. 32 Scanning for Channels Before the TV can : • Change the input source • Set up the TV tuner • Name the TV inputs • Turn Game Mode on or off. (Except TV input) • Set up parental controls • Change the on-screen menu language • Set the time • Adjust the CEC settings Changing the Input Source To quickly access the input source menu, press the INPUT button on -screen menu is displayed. 4. The auto channel scan begins. 2. Highlight Tuner...
... displayed. 4. The on-screen menu is displayed. 3. Use the Arrow buttons on the remote. 32 Scanning for Channels Before the TV can : • Change the input source • Set up the TV tuner • Name the TV inputs • Turn Game Mode on or off. (Except TV input) • Set up parental controls • Change the on-screen menu language • Set the time • Adjust the CEC settings Changing the Input Source To quickly access the input source menu, press the INPUT button on -screen menu is displayed. 4. The auto channel scan begins. 2. Highlight Tuner...

E500AR User Manual
Page 40
... the Tuner Settings menu, highlight Skip Channel and press OK. Changing the Audio Language Some digital free-to-air and cable channels broadcast programs in more than one language.The TV's MTS (Multichannel Television Sound) feature allows you to listen to audio in the language you select. To use the Digital MTS feature: 1. From the Tuner Settings menu, highlight Analog MTS and press OK. Press the EXIT button on the remote to view...
... the Tuner Settings menu, highlight Skip Channel and press OK. Changing the Audio Language Some digital free-to-air and cable channels broadcast programs in more than one language.The TV's MTS (Multichannel Television Sound) feature allows you to listen to audio in the language you select. To use the Digital MTS feature: 1. From the Tuner Settings menu, highlight Analog MTS and press OK. Press the EXIT button on the remote to view...

E500AR User Manual
Page 52
... your device's user manual for the best signal. See Resetting the Picture Settings on page 29. • Check all devices are connected correctly. The buttons on the remote aren't working electrical outlet. • Press the Power/Standby button on the remote or on the side of the TV to turn the TV on. A The TV displays "No Signal." • Press the INPUT button on the remote control to select a different input source. • If...
... your device's user manual for the best signal. See Resetting the Picture Settings on page 29. • Check all devices are connected correctly. The buttons on the remote aren't working electrical outlet. • Press the Power/Standby button on the remote or on the side of the TV to turn the TV on. A The TV displays "No Signal." • Press the INPUT button on the remote control to select a different input source. • If...

E500AR User Manual
Page 53
... antenna is connected securely to the TV and move the antenna around the room or close to change input source, the display image changes size. • The TV remembers the viewing mode on the remote to this type of product and do not constitute a defective product. This up -converted (improved) to a window for the best signal. However, sometimes pixels may be noticable. • Use the Volume Up/Down buttons...
... antenna is connected securely to the TV and move the antenna around the room or close to change input source, the display image changes size. • The TV remembers the viewing mode on the remote to this type of product and do not constitute a defective product. This up -converted (improved) to a window for the best signal. However, sometimes pixels may be noticable. • Use the Volume Up/Down buttons...

E500AR User Manual
Page 56
... operation, improper voltage supply or power surges, signal issues, damages from warranty service or replacement, whichever is greater. Zero Bright Pixel Defect Guarantee This policy covers "zero bright pixel" defects for a period of one (1) year of non-commercial usage and ninety (90) days of commercial use. PRE-AUTHORIZATION MUST BE OBTAINED BEFORE SENDING ANY PRODUCT TO A VIZIO SERVICE CENTER. Type of Service Defective...
... operation, improper voltage supply or power surges, signal issues, damages from warranty service or replacement, whichever is greater. Zero Bright Pixel Defect Guarantee This policy covers "zero bright pixel" defects for a period of one (1) year of non-commercial usage and ninety (90) days of commercial use. PRE-AUTHORIZATION MUST BE OBTAINED BEFORE SENDING ANY PRODUCT TO A VIZIO SERVICE CENTER. Type of Service Defective...
E500AR Quick Start Guide
Page 2
... the cart, stand, tripod, bracket, or table specified by qualified service personnel only. The manufacturer's warranty does not cover user abuse or improper installations. • The power cord must be of sufficient magnitude to constitute a risk of electric shock to persons. • Do not overload power strips and extension cords. To totally disconnect power, unplug the power cord. • The lightning flash with arrowhead symbol...
... the cart, stand, tripod, bracket, or table specified by qualified service personnel only. The manufacturer's warranty does not cover user abuse or improper installations. • The power cord must be of sufficient magnitude to constitute a risk of electric shock to persons. • Do not overload power strips and extension cords. To totally disconnect power, unplug the power cord. • The lightning flash with arrowhead symbol...
E500AR Quick Start Guide
Page 15
... adjustments, as well as installation and set-up issues or any type of the servicer. VIZIO Technical Support will be responsible for restoring all personal information from warranty service or replacement, whichever is capable of commercial use. This warranty does not cover, for packing and shipping the covered Product to the VIZIO service center. This one year limited warranty does not cover Products sold "AS IS", "FACTORY...
... adjustments, as well as installation and set-up issues or any type of the servicer. VIZIO Technical Support will be responsible for restoring all personal information from warranty service or replacement, whichever is capable of commercial use. This warranty does not cover, for packing and shipping the covered Product to the VIZIO service center. This one year limited warranty does not cover Products sold "AS IS", "FACTORY...
E500AR Data Sheet
Page 2
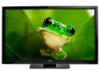
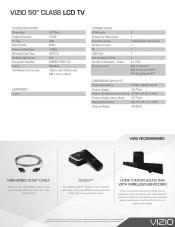
... LED and other VIZIO trademarks are the property of their respective owners. VIZIO 50" CLASS LCD TV TV SPECIFICATIONS Screen Size Diagonal Viewable TV Type Refresh Rate Maximum Resolution Remote Control Type Ambient Light Sensor Energy Star Qualified Power Wall Mount & Screw Size 50" Class 50.00" LCD 60Hz 1080p XRT010 Yes ENERGY STAR® 5.3 89.34W 300mm (V) x 300mm (H), M6 x 1mm x 12mm WARRANTY 1 year CONNECTIONS HDMI Inputs Component Video Inputs Composite Inputs RF Antenna Input PC USB Ports Stereo Audio (3.5mm) Number of Speakers / Watts Premium Audio...
... LED and other VIZIO trademarks are the property of their respective owners. VIZIO 50" CLASS LCD TV TV SPECIFICATIONS Screen Size Diagonal Viewable TV Type Refresh Rate Maximum Resolution Remote Control Type Ambient Light Sensor Energy Star Qualified Power Wall Mount & Screw Size 50" Class 50.00" LCD 60Hz 1080p XRT010 Yes ENERGY STAR® 5.3 89.34W 300mm (V) x 300mm (H), M6 x 1mm x 12mm WARRANTY 1 year CONNECTIONS HDMI Inputs Component Video Inputs Composite Inputs RF Antenna Input PC USB Ports Stereo Audio (3.5mm) Number of Speakers / Watts Premium Audio...


