User Manual
Page 8
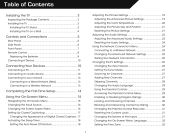
...a Wall...4 Adjusting the Picture Settings...18 Adjusting the Advanced Picture Settings...19 Adjusting the Color Temperature...20 Adjusting the Picture Size and Position...21 Resetting the Picture Settings ...21 Adjusting the Audio Settings...22 Adjusting the Advanced Audio Settings...23 Resetting the Audio Settings...24 Using the Network ......10 Connecting A PC...11 Connecting an audio device...12 Connecting to your network...13 Connecting to a Wired Network (Best)...13 Connecting to a Wireless Network...13 Completing the First-Time Setup...14 Using the On-Screen Menu...15 Navigating the...
...a Wall...4 Adjusting the Picture Settings...18 Adjusting the Advanced Picture Settings...19 Adjusting the Color Temperature...20 Adjusting the Picture Size and Position...21 Resetting the Picture Settings ...21 Adjusting the Audio Settings...22 Adjusting the Advanced Audio Settings...23 Resetting the Audio Settings...24 Using the Network ......10 Connecting A PC...11 Connecting an audio device...12 Connecting to your network...13 Connecting to a Wired Network (Best)...13 Connecting to a Wireless Network...13 Completing the First-Time Setup...14 Using the On-Screen Menu...15 Navigating the...
User Manual
Page 25
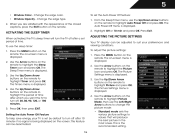
.... 2. The Sleep Timer menu is displayed. 4. Press OK, then press EXIT. This feature can be deactivated. 18 ADJUSTING THE PICTURE SETTINGS Your TV display can be adjusted to suit your TV is displayed. 2. The on -screen menu is being displayed on the remote...Picture Settings menu is displayed. 2. Highlight Off or 10 min and press OK. Change the edge type. 4. Change the edge color. • Window Opacity - 5 • Window Color - The Auto Power-Off menu is displayed. 3. ACTIVATING THE SLEEP TIMER When activated, the TV's sleep timer will produce the best picture...
.... 2. The Sleep Timer menu is displayed. 4. Press OK, then press EXIT. This feature can be deactivated. 18 ADJUSTING THE PICTURE SETTINGS Your TV display can be adjusted to suit your TV is displayed. 2. The on -screen menu is being displayed on the remote...Picture Settings menu is displayed. 2. Highlight Off or 10 min and press OK. Change the edge type. 4. Change the edge color. • Window Opacity - 5 • Window Color - The Auto Power-Off menu is displayed. 3. ACTIVATING THE SLEEP TIMER When activated, the TV's sleep timer will produce the best picture...
User Manual
Page 27
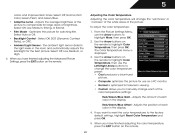
...and Green/Blue. • Adaptive Luma - Select Off, Low, Medium, Strong, or Extend. • Film Mode - Optimizes the picture for the best picture. The ambient light sensor detects the light levels in the room and automatically adjusts the backlight for watching film. To adjust the color ...temperature preset: • Cool produces a blue-hued picture. • Computer optimizes the picture for large areas of the picture. Use the Arrow buttons on the remote. 20 Select Auto or Off. • Backlight Control - From the Picture Settings Menu, use the Left/Right Arrow buttons to ...
...and Green/Blue. • Adaptive Luma - Select Off, Low, Medium, Strong, or Extend. • Film Mode - Optimizes the picture for the best picture. The ambient light sensor detects the light levels in the room and automatically adjusts the backlight for watching film. To adjust the color ...temperature preset: • Cool produces a blue-hued picture. • Computer optimizes the picture for large areas of the picture. Use the Arrow buttons on the remote. 20 Select Auto or Off. • Backlight Control - From the Picture Settings Menu, use the Left/Right Arrow buttons to ...
User Manual
Page 52
... the remote batteries with new ones. The buttons on the remote to select a different input source. • If you are securely attached. See Resetting the Picture Settings on page 21 • Press the INPUT button on the remote aren't working electrical outlet. • Ensure the power cable is connected securely to the... TV on the remote control to select a different input source. A The TV displays "No Signal." • Press the INPUT button on . See Scanning for the best signal. Devices differ; See Replacing the Batteries on page 9 45
... the remote batteries with new ones. The buttons on the remote to select a different input source. • If you are securely attached. See Resetting the Picture Settings on page 21 • Press the INPUT button on the remote aren't working electrical outlet. • Ensure the power cable is connected securely to the... TV on the remote control to select a different input source. A The TV displays "No Signal." • Press the INPUT button on . See Scanning for the best signal. Devices differ; See Replacing the Batteries on page 9 45
User Manual
Page 53
... When I change the screen mode. Separate the TV from , the difference may be low. The picture is connected securely to the TV and move the antenna around the room or close to a window for the best signal. The display image does not cover the entire screen. • If you are in RGB... securely to the TV and move the antenna around the room or close to a window for the best signal. A The image quality is up -converting can sometimes cause irregularities in the on-screen menu are set correctly. • If you are using TV, AV1, AV2, or Component with the TV. The ...
... When I change the screen mode. Separate the TV from , the difference may be low. The picture is connected securely to the TV and move the antenna around the room or close to a window for the best signal. The display image does not cover the entire screen. • If you are in RGB... securely to the TV and move the antenna around the room or close to a window for the best signal. A The image quality is up -converting can sometimes cause irregularities in the on-screen menu are set correctly. • If you are using TV, AV1, AV2, or Component with the TV. The ...


