

E370VT User Manual
Page 4
...'s warranty does not cover user abuse or improper installations. • The power cord must be observed for the installation, use an adapter to ground your TV and any object into your outlet, consult an electrician for your TV and to protect it from being damaged, the following safety instructions before turning on or pinched particularly at your TV close to a power outlet, power...
...'s warranty does not cover user abuse or improper installations. • The power cord must be observed for the installation, use an adapter to ground your TV and any object into your outlet, consult an electrician for your TV and to protect it from being damaged, the following safety instructions before turning on or pinched particularly at your TV close to a power outlet, power...
E370VT User Manual
Page 5
...remote control or injure the operator. If your TV if any abnormality occurs. Operating your TV in an area with heavy dust or high humidity. Incorrect polarities may cause the batteries to persons. Continued use by qualified service personnel only. Pulling on the apparatus. • The mains plug...your dealer. The performance of your TV and easily accessible. • Only power of the marked voltage can result in the operating instructions unless you to repair or service your TV from moisture. E320VT / E370VT / E420VT to constitute a risk of electric shock to dripping...
...remote control or injure the operator. If your TV if any abnormality occurs. Operating your TV in an area with heavy dust or high humidity. Incorrect polarities may cause the batteries to persons. Continued use by qualified service personnel only. Pulling on the apparatus. • The mains plug...your dealer. The performance of your TV and easily accessible. • Only power of the marked voltage can result in the operating instructions unless you to repair or service your TV from moisture. E320VT / E370VT / E420VT to constitute a risk of electric shock to dripping...
E370VT User Manual
Page 6
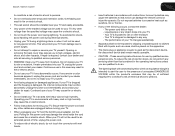
... cable and satellite TV services, gaming consoles, VCRs, DVD players, and similar products. Remember, the screen of processing digital broadcasts. Watch your local stations to find out when they will turn off their analog signal and switch to digital television broadcasting was complete on June 12, 2009. Electric Service Equipment Grounding Conductors (NEC Section 810-21) Ground Clamps Power Service Grounding Electrode System (NEC ART 250, part H) Power...
... cable and satellite TV services, gaming consoles, VCRs, DVD players, and similar products. Remember, the screen of processing digital broadcasts. Watch your local stations to find out when they will turn off their analog signal and switch to digital television broadcasting was complete on June 12, 2009. Electric Service Equipment Grounding Conductors (NEC Section 810-21) Ground Clamps Power Service Grounding Electrode System (NEC ART 250, part H) Power...

E370VT User Manual
Page 7
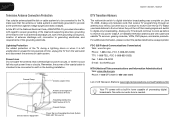
... Installing the TV Stand 1 Installing the TV on a Wall 2 Controls and Connections 3 Rear Panel 3 Front Panel 4 Right Side Panel 4 Remote Control 5 Replacing the Batteries 6 Connecting Your Devices 7 Before You Begin 7 Connecting Your Devices 7 Completing the First-Time Setup 9 Adjusting the TV Settings 10 Setting Up Channels 10 Changing the Signal Source 10 Changing the Input Source 11 Customizing and Removing Input Names 11 Customizing Input Names 11 Removing Unused Inputs from the Input List 12 Customizing the Master Channel List 12 Scanning for New or Additional Channels...
... Installing the TV Stand 1 Installing the TV on a Wall 2 Controls and Connections 3 Rear Panel 3 Front Panel 4 Right Side Panel 4 Remote Control 5 Replacing the Batteries 6 Connecting Your Devices 7 Before You Begin 7 Connecting Your Devices 7 Completing the First-Time Setup 9 Adjusting the TV Settings 10 Setting Up Channels 10 Changing the Signal Source 10 Changing the Input Source 11 Customizing and Removing Input Names 11 Customizing Input Names 11 Removing Unused Inputs from the Input List 12 Customizing the Master Channel List 12 Scanning for New or Additional Channels...
E370VT User Manual
Page 8
... Content Locks 28 Viewing System Info and Resetting to Factory Defaults 28 Displaying System Information 28 Restoring the TV to the Factory Default Settings 29 Restarting the Setup App 29 Setting Up Closed Captioning 29 Changing the Appearance of Digital Closed Captions 30 Troubleshooting & Technical Support 31 The TV displays "No Signal 31 There is no power 31 The power is on, but there is no image on the screen 31 There is no sound...
... Content Locks 28 Viewing System Info and Resetting to Factory Defaults 28 Displaying System Information 28 Restoring the TV to the Factory Default Settings 29 Restarting the Setup App 29 Setting Up Closed Captioning 29 Changing the Appearance of Digital Closed Captions 30 Troubleshooting & Technical Support 31 The TV displays "No Signal 31 There is no power 31 The power is on, but there is no image on the screen 31 There is no sound...
E370VT User Manual
Page 9
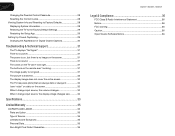
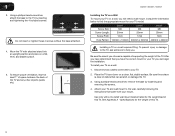
... to ensure nothing is not properly secured To install the TV stand: 1. User Manual and Quick Start Guide Remote Control with Stand Installing the TV After removing the TV from falling over if: • It is placed on a clean, flat surface. Use the images below to inspect the package contents. VIZIO LCD HDTV with Batteries 2. Place the TV screen-down on an uneven, unstable, or non-level...
... to ensure nothing is not properly secured To install the TV stand: 1. User Manual and Quick Start Guide Remote Control with Stand Installing the TV After removing the TV from falling over if: • It is placed on a clean, flat surface. Use the images below to inspect the package contents. VIZIO LCD HDTV with Batteries 2. Place the TV screen-down on an uneven, unstable, or non-level...
E370VT User Manual
Page 10
... is capable of supporting the weight of the TV. Attach your TV and wall mount to the wall, carefully following the instructions that came with a UL-listed wall mount bracket rated for the weight/load of debris that you have determined that can begin the installation. Place the TV face-down on a flat, level, and stable surface. 5. Using a philips-head screwdriver, remove the base by inserting...
... is capable of supporting the weight of the TV. Attach your TV and wall mount to the wall, carefully following the instructions that came with a UL-listed wall mount bracket rated for the weight/load of debris that you have determined that can begin the installation. Place the TV face-down on a flat, level, and stable surface. 5. Using a philips-head screwdriver, remove the base by inserting...

E370VT User Manual
Page 13
...'s audio. Remote Control 5 Exit: Close the on or off. When mute is activated, the TV's audio is turned off or on -screen menu and episode guide. A/V Controls: Control USB photo slideshow. Channel Up/Down: Change the channel. ton, the channel will display a different input. Dash (-): Use with number pad to the channel last viewed. Arrow: Navigate the on . Mute: Turn the sound off . Input: Change the input device. CC: Open the Closed Captioning menu. Menu: Display the on -screen menu options. Back: Go to manually...
...'s audio. Remote Control 5 Exit: Close the on or off. When mute is activated, the TV's audio is turned off or on -screen menu and episode guide. A/V Controls: Control USB photo slideshow. Channel Up/Down: Change the channel. ton, the channel will display a different input. Dash (-): Use with number pad to the channel last viewed. Arrow: Navigate the on . Mute: Turn the sound off . Input: Change the input device. CC: Open the Closed Captioning menu. Menu: Display the on -screen menu options. Back: Go to manually...
E370VT User Manual
Page 15
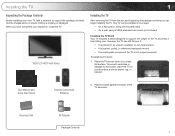
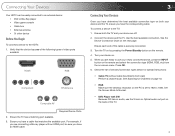
... best available connection. Verify that matches the available port. Ensure each end of video ports available: HDMI RGB Component RF/Antenna Composite AV Required Device Ports 2. Press OK. 6. Connecting Your Devices Your HDTV can be sure you have an HDMI cable. 3 Connecting Your Devices Once you have determined the best available connection type on the remote and select the connection type (HDMI, RGB, etc) from wall) Perform a channel scan. Turn your newly connected device, press the INPUT button...
... best available connection. Verify that matches the available port. Ensure each end of video ports available: HDMI RGB Component RF/Antenna Composite AV Required Device Ports 2. Press OK. 6. Connecting Your Devices Your HDTV can be sure you have an HDMI cable. 3 Connecting Your Devices Once you have determined the best available connection type on the remote and select the connection type (HDMI, RGB, etc) from wall) Perform a channel scan. Turn your newly connected device, press the INPUT button...
E370VT User Manual
Page 17
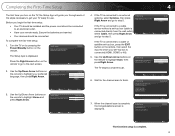
... Power/Standby button on the remote. Next EXIT Exit 2. Initial Setup Please select your input source: Tuner Antenna Cable If the TV is connected to a cable service without a set-top box (cable is connected directly from the wall outlet) select Cable, then press Right Arrow Back and go to which your set-top box is connected to a cable or satellite set-top box, press the EXIT button on the remote, then select the input to step 5. Analog Channels: 0 Digital Channels: 4 Channel Scan 7. When the channel scan...
... Power/Standby button on the remote. Next EXIT Exit 2. Initial Setup Please select your input source: Tuner Antenna Cable If the TV is connected to a cable service without a set-top box (cable is connected directly from the wall outlet) select Cable, then press Right Arrow Back and go to which your set-top box is connected to a cable or satellite set-top box, press the EXIT button on the remote, then select the input to step 5. Analog Channels: 0 Digital Channels: 4 Channel Scan 7. When the channel scan...

E370VT User Manual
Page 24
... -screen menu is displayed. 2. Increase or decrease this menu option, you can be set to highlight Current Tiime. 5. Use the Arrow buttons to highlight individual numbers in the date and time. These settings are only available when viewing content from a home computer using the RGB port. The TV Settings menu is displayed. 3. Adjust the synchronization between the PC and the TV. Use the Arrow buttons on the remote to display output from...
... -screen menu is displayed. 2. Increase or decrease this menu option, you can be set to highlight Current Tiime. 5. Use the Arrow buttons to highlight individual numbers in the date and time. These settings are only available when viewing content from a home computer using the RGB port. The TV Settings menu is displayed. 3. Adjust the synchronization between the PC and the TV. Use the Arrow buttons on the remote to display output from...
E370VT User Manual
Page 26
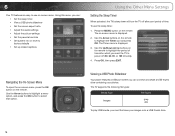
... MENU button on the remote. Press OK, then press EXIT. The TV supports the following file types: Media Type File Types Images .jpeg .jpg To play USB media, you can : • Set the sleep timer • View a USB photo slideshow • Set the screen aspect ratio • Adjust the audio settings • Adjust the picture settings • Set the parental controls • Get system info or reset to factory defaults • Set up closed captions Using the Other Menu Settings Setting the Sleep Timer When activated, the TV's sleep timer will turn...
... MENU button on the remote. Press OK, then press EXIT. The TV supports the following file types: Media Type File Types Images .jpeg .jpg To play USB media, you can : • Set the sleep timer • View a USB photo slideshow • Set the screen aspect ratio • Adjust the audio settings • Adjust the picture settings • Set the parental controls • Get system info or reset to factory defaults • Set up closed captions Using the Other Menu Settings Setting the Sleep Timer When activated, the TV's sleep timer will turn...

E370VT User Manual
Page 33
... or disable the ambient light sensor • Reset the picture mode settings Changing the Picture Mode Your TV display can be difficult to distinguish in the picture. Sets the picture settings to suit your preferences and viewing conditions. Flesh tones should appear more vivid picture. 6 • Photo - When this setting is too high, the picture may be adjusted to values perfect for displaying game console output. • Movie - Adjusts the white level of color before adjusting tint...
... or disable the ambient light sensor • Reset the picture mode settings Changing the Picture Mode Your TV display can be difficult to distinguish in the picture. Sets the picture settings to suit your preferences and viewing conditions. Flesh tones should appear more vivid picture. 6 • Photo - When this setting is too high, the picture may be adjusted to values perfect for displaying game console output. • Movie - Adjusts the white level of color before adjusting tint...
E370VT User Manual
Page 39
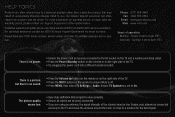
... to turn the TV on page 21. See Scanning for Channels on the remote to the TV, scan for the best signal. 31 Troubleshooting & Technical Support Products are connected correctly. See Scanning for details. • Adjust Brightness, Contrast, or Backlight. Ensure your device's user manual for Channels on page 13. • Press the INPUT button on page 13. • Reset the picture settings. See Resetting the Picture Settings on the screen. • Ensure all cables...
... to turn the TV on page 21. See Scanning for Channels on the remote to the TV, scan for the best signal. 31 Troubleshooting & Technical Support Products are connected correctly. See Scanning for details. • Adjust Brightness, Contrast, or Backlight. Ensure your device's user manual for Channels on page 13. • Press the INPUT button on page 13. • Reset the picture settings. See Resetting the Picture Settings on the screen. • Ensure all cables...

E370VT User Manual
Page 40
A The picture is connected securely to the TV and move the antenna around the room or close to a window for the best signal. The display image does not cover the entire screen. • If you are in RGB mode (computer), ensure that are inherent to this type of the channel may be noticable. • Use the Volume Up/Down buttons on the remote to match your...
A The picture is connected securely to the TV and move the antenna around the room or close to a window for the best signal. The display image does not cover the entire screen. • If you are in RGB mode (computer), ensure that are inherent to this type of the channel may be noticable. • Use the Volume Up/Down buttons on the remote to match your...
E370VT User Manual
Page 43
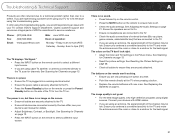
... TO A VIZIO SERVICE CENTER. Replacement parts and Products are not covered. Type of protection. PRE-AUTHORIZATION IS REQUIRED BEFORE SENDING ANY PRODUCT TO A VIZIO SERVICE CENTER FOR WARRANTY SERVICE. Product returns to the VIZIO service center. VIZIO Technical Support will provide instructions for example: cosmetic damage, normal wear and tear, improper operation, improper voltage supply or power surges, signal issues, damages from warranty service or replacement, whichever is within the warranty period, VIZIO will...
... TO A VIZIO SERVICE CENTER. Replacement parts and Products are not covered. Type of protection. PRE-AUTHORIZATION IS REQUIRED BEFORE SENDING ANY PRODUCT TO A VIZIO SERVICE CENTER FOR WARRANTY SERVICE. Product returns to the VIZIO service center. VIZIO Technical Support will provide instructions for example: cosmetic damage, normal wear and tear, improper operation, improper voltage supply or power surges, signal issues, damages from warranty service or replacement, whichever is within the warranty period, VIZIO will...
E370VT Quick Start Guide
Page 3
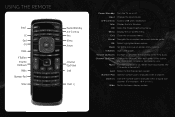
...'s audio is turned off . Menu: Display the on -screen menu and episode guide. Number Pad: Use the number pad to the channel last viewed. Back: Go to manually enter a digital subchannel. (For example, 18-4 or 18-5.) Wide: Switch between display modes. USING THE REMOTE Input CC Exit OK Back V Button Volume Up/Down Mute Number Pad Wide Power/Standby A/V Controls Info Menu Arrow Channel Up/Down Last Dash (-) Power/Standby: Turn the TV on -screen menu options. OK: Select highlighted menu option. Dash (-): Use with number...
...'s audio is turned off . Menu: Display the on -screen menu and episode guide. Number Pad: Use the number pad to the channel last viewed. Back: Go to manually enter a digital subchannel. (For example, 18-4 or 18-5.) Wide: Switch between display modes. USING THE REMOTE Input CC Exit OK Back V Button Volume Up/Down Mute Number Pad Wide Power/Standby A/V Controls Info Menu Arrow Channel Up/Down Last Dash (-) Power/Standby: Turn the TV on -screen menu options. OK: Select highlighted menu option. Dash (-): Use with number...
E370VT Quick Start Guide
Page 9
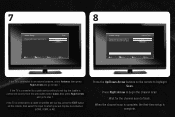
... Scan. Wait for the channel scan to begin the channel scan. Press the Up/Down Arrow buttons on the remote, then select the input to which your cable or antenna to the DTV/TV input Channel Scan Scan Skip Scan Back Select Next EXIT Exit If the TV is connected (HDMI, COMP, or AV). 7 Initial Setup Please select your input source: Tuner Antenna Cable Back Select Next EXIT Exit 8 Initial Setup Please connect your set -top box (cable...
... Scan. Wait for the channel scan to begin the channel scan. Press the Up/Down Arrow buttons on the remote, then select the input to which your cable or antenna to the DTV/TV input Channel Scan Scan Skip Scan Back Select Next EXIT Exit If the TV is connected (HDMI, COMP, or AV). 7 Initial Setup Please select your input source: Tuner Antenna Cable Back Select Next EXIT Exit 8 Initial Setup Please connect your set -top box (cable...
E370VT Quick Start Guide
Page 14
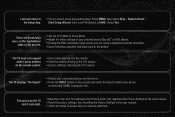
... power cord is securely connected to a window for the best signal. Customer support and quality service are integral parts of VIZIO's commitment to ensure Mute is set to 9 pm (PST) Saturday - Please have your VIZIO model number, serial number, and date of operation: Monday - Ensure TV Speakers is off. • Press MENU, then select TV Settings > Audio. The picture quality seems low. • View high-definition (HD) programs when possible. • Ensure all cables...
... power cord is securely connected to a window for the best signal. Customer support and quality service are integral parts of VIZIO's commitment to ensure Mute is set to 9 pm (PST) Saturday - Please have your VIZIO model number, serial number, and date of operation: Monday - Ensure TV Speakers is off. • Press MENU, then select TV Settings > Audio. The picture quality seems low. • View high-definition (HD) programs when possible. • Ensure all cables...
E370VT Quick Start Guide
Page 15
.... See Adjusting the Picture Settings in the user manual. • Check all cables to ensure they are using a supported desktop resolution. • Some television channels add black bars to Wide or Zoom Mode. • Adjust the video settings of the picture. • Set the TV to the picture. Press MENU, then select Help > System Reset > the Setup App. The TV displays "No Signal" • Ensure your connected devices are turned on. • Press the INPUT button on the remote and...
.... See Adjusting the Picture Settings in the user manual. • Check all cables to ensure they are using a supported desktop resolution. • Some television channels add black bars to Wide or Zoom Mode. • Adjust the video settings of the picture. • Set the TV to the picture. Press MENU, then select Help > System Reset > the Setup App. The TV displays "No Signal" • Ensure your connected devices are turned on. • Press the INPUT button on the remote and...


