
E390-A1 User Manual
Page 3
... at www.VIZIO.com • Complete and mail the enclosed registration card Extended Warranties For peace of electric shock or component damage, switch off the power before connecting other apparatus (including amplifiers) that you see this Manual When you to alert you see this symbol, ...please read the accompanying important warning or notice. A polarized plug has two blades and a third grounding prong. To purchase an extended warranty service plan, visit www.VIZIO.com. Be sure to inspect ...
... at www.VIZIO.com • Complete and mail the enclosed registration card Extended Warranties For peace of electric shock or component damage, switch off the power before connecting other apparatus (including amplifiers) that you see this Manual When you to alert you see this symbol, ...please read the accompanying important warning or notice. A polarized plug has two blades and a third grounding prong. To purchase an extended warranty service plan, visit www.VIZIO.com. Be sure to inspect ...

E390-A1 User Manual
Page 16
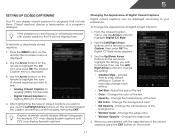
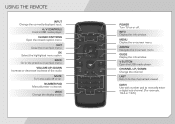
Mute Turn the audio off . Number Pad Manually enter a channel. Info Display the info window. V Button Open the USB photo viewer. Channel Up/Down Change the channel. Last Return to the previous on-... the closed caption menu. Volume Up/Down Increase or decrease loudness of the audio. Guide Display the info window. Dash Use with number pad to manually enter a digital sub-channel. (For example, 18-4 or 18-5.) Remote Control Menu Display the on . A/V Controls Control USB photo viewer.
Mute Turn the audio off . Number Pad Manually enter a channel. Info Display the info window. V Button Open the USB photo viewer. Channel Up/Down Change the channel. Last Return to the previous on-... the closed caption menu. Volume Up/Down Increase or decrease loudness of the audio. Guide Display the info window. Dash Use with number pad to manually enter a digital sub-channel. (For example, 18-4 or 18-5.) Remote Control Menu Display the on . A/V Controls Control USB photo viewer.
E390-A1 User Manual
Page 23
... Closed Caption menu is not being broadcast with the appearance of the text. • Opacity - Change the color of the closed captions you wish to manually change the setting: • Caption Style -
... Closed Caption menu is not being broadcast with the appearance of the text. • Opacity - Change the color of the closed captions you wish to manually change the setting: • Caption Style -
E390-A1 User Manual
Page 25
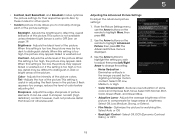
... is too high, the picture may appear faded or washed out. Adjusts the black level of the picture. Contrast - When this setting is set to manually change the setting: • Noise Reduction Diminishes artifacts in dark or bright areas of the picture settings: Backlight - If the setting is displayed. 3. Adjusts the...
... is too high, the picture may appear faded or washed out. Adjusts the black level of the picture. Contrast - When this setting is set to manually change the setting: • Noise Reduction Diminishes artifacts in dark or bright areas of the picture settings: Backlight - If the setting is displayed. 3. Adjusts the...

E390-A1 User Manual
Page 26
... automatically adjusts the backlight for use the Arrow buttons to change the "warmness" or "coolness" of the white areas of the picture. When you to manually change each color in the display. 4. To adjust the color temperature: 1. From the Picture Settings Menu, use as a PC monitor. • Normal is displayed. 3. Adjusts...
... automatically adjusts the backlight for use the Arrow buttons to change the "warmness" or "coolness" of the white areas of the picture. When you to manually change each color in the display. 4. To adjust the color temperature: 1. From the Picture Settings Menu, use as a PC monitor. • Normal is displayed. 3. Adjusts...
E390-A1 User Manual
Page 36
... the CEC Settings The CEC function on the remote to highlight the Settings icon and press OK. Use the Arrow buttons on your device's user manual for details.
... the CEC Settings The CEC function on the remote to highlight the Settings icon and press OK. Use the Arrow buttons on your device's user manual for details.
E390-A1 User Manual
Page 43
... Adjusting the Picture Settings on the TV don't look right. • Adust the Color and Tint settings in the Picture menu. Ensure your device's user manual for channels. See Replacing the Batteries on the remote to turn the TV on. See Resetting the Picture Settings on page 21 Ensure the speakers...
... Adjusting the Picture Settings on the TV don't look right. • Adust the Color and Tint settings in the Picture menu. Ensure your device's user manual for channels. See Replacing the Batteries on the remote to turn the TV on. See Resetting the Picture Settings on page 21 Ensure the speakers...

E390-A1 Quick Start Guide
Page 4
DOWNLOAD THE FULL USER MANUAL AT VIZIO.COM/SUPPORT PACKAGE CONTENTS Power Cord VIZIO LED HDTV with Stand Remote Control with Batteries This Quick Start Guide 6 x M4 14mm Phillips Screws HELP VIZIO REDUCE PAPER WASTE.
DOWNLOAD THE FULL USER MANUAL AT VIZIO.COM/SUPPORT PACKAGE CONTENTS Power Cord VIZIO LED HDTV with Stand Remote Control with Batteries This Quick Start Guide 6 x M4 14mm Phillips Screws HELP VIZIO REDUCE PAPER WASTE.
E390-A1 Quick Start Guide
Page 5
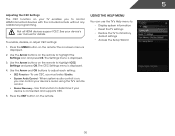
A/V CONTROLS Control USB media player. OK Select the highlighted menu option. NUMBER PAD Manually enter a channel. CLOSED CAPTIONS Open the closed caption menu. INFO Display the info window. MENU Display the on -screen menu. CHANNEL UP/DOWN Change the ...channel. VOLUME UP/DOWN Increase or decrease loudness of the audio. WIDE Change the display mode. ARROW Navigate the on -screen menu. LAST Return to manually enter a digital sub-channel. (For example, 18-4 or 18-5.) DASH Use with number pad to the channel last viewed. GUIDE Display the info window. V BUTTON...
A/V CONTROLS Control USB media player. OK Select the highlighted menu option. NUMBER PAD Manually enter a channel. CLOSED CAPTIONS Open the closed caption menu. INFO Display the info window. MENU Display the on -screen menu. CHANNEL UP/DOWN Change the ...channel. VOLUME UP/DOWN Increase or decrease loudness of the audio. WIDE Change the display mode. ARROW Navigate the on -screen menu. LAST Return to manually enter a digital sub-channel. (For example, 18-4 or 18-5.) DASH Use with number pad to the channel last viewed. GUIDE Display the info window. V BUTTON...

