
E420VO QSG
Page 1
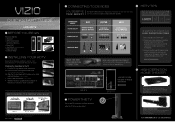
... EVEN HAS EASY TO ACCESS SIDE INPUTS For E420VL, E470VL and E550VL only. 4 POWER THE TV Turn on your TV by VIZIO engineers for High Definition Video and Audio. Visit www.VIZIO.com or call (888) 849.4623 to ensure the BEST possible picture. ® ...1 BEFORE YOU BEGIN What's In the Box • VIZIO HDTV • VIZIO Remote Control (VR15 includes 2 AA batteries) (VUR13 includes 2 AAA batteries) • Power Cord • User Manual (read Safety Guidelines) • Registration Card • Quickstart Guide VR15: E320VL, E370VL, E420VL, E420VO VUR13: E470VL, E550VL 2 INSTALLING...
... EVEN HAS EASY TO ACCESS SIDE INPUTS For E420VL, E470VL and E550VL only. 4 POWER THE TV Turn on your TV by VIZIO engineers for High Definition Video and Audio. Visit www.VIZIO.com or call (888) 849.4623 to ensure the BEST possible picture. ® ...1 BEFORE YOU BEGIN What's In the Box • VIZIO HDTV • VIZIO Remote Control (VR15 includes 2 AA batteries) (VUR13 includes 2 AAA batteries) • Power Cord • User Manual (read Safety Guidelines) • Registration Card • Quickstart Guide VR15: E320VL, E370VL, E420VL, E420VO VUR13: E470VL, E550VL 2 INSTALLING...

E420VO QSG
Page 2
...complete, follow the directions on Extended Warranties LEARN MORE Refer to your VIZIO product with up and down with direct cable hookup from a digital source. Highlight the first option, called Tuner Mode. The Setup Wizard is ON . ® E320VL / E370VL / E420VL / E420VO / E470VL / E550VL LCD HDTV QUICKSTART...seconds Panoramic mode is not available Black or gray bars on top, bottom, and/or sides of picture Make sure the power button is no signal and/or turning off after being run once, but press the button slower this time; Select the input source for 100% completion. 3....
...complete, follow the directions on Extended Warranties LEARN MORE Refer to your VIZIO product with up and down with direct cable hookup from a digital source. Highlight the first option, called Tuner Mode. The Setup Wizard is ON . ® E320VL / E370VL / E420VL / E420VO / E470VL / E550VL LCD HDTV QUICKSTART...seconds Panoramic mode is not available Black or gray bars on top, bottom, and/or sides of picture Make sure the power button is no signal and/or turning off after being run once, but press the button slower this time; Select the input source for 100% completion. 3....
E320VL User Manual
Page 2
... the manufacturer to insure compatibility. • When moving the cart/HDTV combination to a power outlet, power is provided. • Never push any objects on your HDTV. • Your HDTV...to your HDTV and any heat source, such as a radiator, heater, oven, amplifier etc. VIZIO 320VL and E370VL User Manual Important Safety Instructions Your HDTV is equipped with a three-pronged grounded ... third grounding pin). To prevent your HDTV from overheating, be maintained between your HDTV. Wait before turning on the label. When a cart is a safety feature. Do not place your HDTV. Use...
... the manufacturer to insure compatibility. • When moving the cart/HDTV combination to a power outlet, power is provided. • Never push any objects on your HDTV. • Your HDTV...to your HDTV and any heat source, such as a radiator, heater, oven, amplifier etc. VIZIO 320VL and E370VL User Manual Important Safety Instructions Your HDTV is equipped with a three-pronged grounded ... third grounding pin). To prevent your HDTV from overheating, be maintained between your HDTV. Wait before turning on the label. When a cart is a safety feature. Do not place your HDTV. Use...
E320VL User Manual
Page 5
... power, Class A or translator television stations and with cable and satellite TV services, gaming consoles, VCRs, DVD players, and similar products. After the switch, analog-only television sets that receive TV programming through an antenna will turn off their analog signal and switch to digital-only broadcasting. Version 2/10/2010 5 www.VIZIO.com VIZIO E320VL... and Information Administration) http://www.ntia.doc.gov/ 1-888-DTV-2009 Listings of US Television Stations http://www.high-techproductions.com/usTVstations.htm Note: Your VIZIO HDTV is required.
... power, Class A or translator television stations and with cable and satellite TV services, gaming consoles, VCRs, DVD players, and similar products. After the switch, analog-only television sets that receive TV programming through an antenna will turn off their analog signal and switch to digital-only broadcasting. Version 2/10/2010 5 www.VIZIO.com VIZIO E320VL... and Information Administration) http://www.ntia.doc.gov/ 1-888-DTV-2009 Listings of US Television Stations http://www.high-techproductions.com/usTVstations.htm Note: Your VIZIO HDTV is required.
E320VL User Manual
Page 13
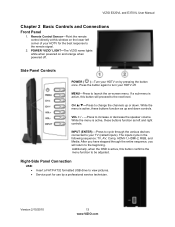
VIZIO E320VL and E370VL User Manual Chapter 2 Basic Controls and Connections Front Panel 1. Press the button again to change the channels up and down . CH ▲/▼-Press to turn your TV (called Inputs). After you will proceed to your HDTV off . INPUT (ENTER) -Press ..., HDMI-1, HDMI-2, RGB, and Media. Side Panel Controls POWER ( )-Turn your HDTV for use by pressing the button once. VOL + / - -Press to the beginning. MENU-Press to the remote signal. 2. POWER 'VIZIO' LIGHT-The VIZIO name lights white when powered on -screen menu. If a sub-menu is active, ...
VIZIO E320VL and E370VL User Manual Chapter 2 Basic Controls and Connections Front Panel 1. Press the button again to change the channels up and down . CH ▲/▼-Press to turn your TV (called Inputs). After you will proceed to your HDTV off . INPUT (ENTER) -Press ..., HDMI-1, HDMI-2, RGB, and Media. Side Panel Controls POWER ( )-Turn your HDTV for use by pressing the button once. VOL + / - -Press to the beginning. MENU-Press to the remote signal. 2. POWER 'VIZIO' LIGHT-The VIZIO name lights white when powered on -screen menu. If a sub-menu is active, ...
E320VL User Manual
Page 16
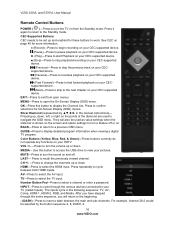
... viewed channel. They will return to the beginning. - (DASH)-Press to cycle through the entire sequence, you have stepped through the various devices connected to turn a feature off . Color Buttons (Yellow, Blue, Red, & Green)-These buttons currently do not operate any functions on your CEC-supported device. VOL ... Press it again to return to select the TV input. TV-Press to the Standby mode. MUTE-Press to turn the TV on from open the On-Screen Display (OSD) menu. VIZIO 320VL and E370VL User Manual Remote Control Buttons POWER ( )-Press to turn the sound on and off or on.
... viewed channel. They will return to the beginning. - (DASH)-Press to cycle through the entire sequence, you have stepped through the various devices connected to turn a feature off . Color Buttons (Yellow, Blue, Red, & Green)-These buttons currently do not operate any functions on your CEC-supported device. VOL ... Press it again to return to select the TV input. TV-Press to the Standby mode. MUTE-Press to turn the TV on from open the On-Screen Display (OSD) menu. VIZIO 320VL and E370VL User Manual Remote Control Buttons POWER ( )-Press to turn the sound on and off or on.
E320VL User Manual
Page 17
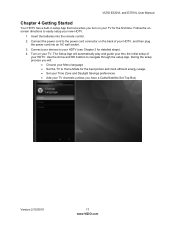
...you will automatically play and guide your thru the initial setup of your TV channels (unless you turn on the back of your HDTV, and then plug the power cord into the remote control. 2. VIZIO E320VL and E370VL User Manual Chapter 4 Getting Started Your HDTV has a built-in setup App that ...runs when you have a Cable/Satellite Set-Top Box) Version 2/10/2010 17 www.VIZIO.com Connect your devices to the power cord connector on your...
...you will automatically play and guide your thru the initial setup of your TV channels (unless you turn on the back of your HDTV, and then plug the power cord into the remote control. 2. VIZIO E320VL and E370VL User Manual Chapter 4 Getting Started Your HDTV has a built-in setup App that ...runs when you have a Cable/Satellite Set-Top Box) Version 2/10/2010 17 www.VIZIO.com Connect your devices to the power cord connector on your...
E320VL User Manual
Page 18
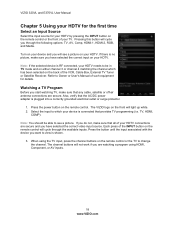
... mode and on either channel 3 or channel 4 matching the channel which your TV. VIZIO 320VL and E370VL User Manual Chapter 5 Using your HDTV for the first time Select an Input Source Select the input source for details. Turn on your device and you will see a picture on your HDTV needs to be... the correct input on your HDTV connections are secure and you do not, make sure that the AC/DC power adapter is shown. 3. When using HDMI, Component, or AV inputs. 18 www.VIZIO.com TV, HDMI, COMP). If there is no picture, make sure that provides TV programming (i.e. Refer to Owner or...
... mode and on either channel 3 or channel 4 matching the channel which your TV. VIZIO 320VL and E370VL User Manual Chapter 5 Using your HDTV for the first time Select an Input Source Select the input source for details. Turn on your device and you will see a picture on your HDTV needs to be... the correct input on your HDTV connections are secure and you do not, make sure that the AC/DC power adapter is shown. 3. When using HDMI, Component, or AV inputs. 18 www.VIZIO.com TV, HDMI, COMP). If there is no picture, make sure that provides TV programming (i.e. Refer to Owner or...
E320VL User Manual
Page 21
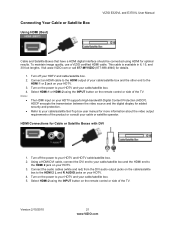
To maintain image quality, use a VIZIO certified HDMI cable. Note: • • Turn off the power to your cable/satellite box. 5. Select HDMI-1 or HDMI-2 using the INPUT button on the remote control or side of the TV. Select HDMI-2 using ... on your HDTV supports High-bandwidth Digital Content Protection (HDCP). Turn off your HDTV. Turn on the power to the HDMI 2 L and R AUDIO jacks on your HDTV. 4. Version 2/10/2010 21 www.VIZIO.com Connecting Your Cable or Satellite Box Using HDMI (Best) VIZIO E320VL and E370VL User Manual Cable and Satellite Boxes that have a HDMI...
To maintain image quality, use a VIZIO certified HDMI cable. Note: • • Turn off the power to your cable/satellite box. 5. Select HDMI-1 or HDMI-2 using the INPUT button on the remote control or side of the TV. Select HDMI-2 using ... on your HDTV supports High-bandwidth Digital Content Protection (HDCP). Turn off your HDTV. Turn on the power to the HDMI 2 L and R AUDIO jacks on your HDTV. 4. Version 2/10/2010 21 www.VIZIO.com Connecting Your Cable or Satellite Box Using HDMI (Best) VIZIO E320VL and E370VL User Manual Cable and Satellite Boxes that have a HDMI...
E320VL User Manual
Page 22
...the INPUT button on your HDTV. 4. Turn on scanning for channels. 22 www.VIZIO.com See Auto Channel Search on page 36 for new channels. Search for more information on the power to the COMPONENT jacks on your HDTV. 4. Turn off your HDTV. 3. Turn on the remote control or side of the... TV. Using Composite Video (Good) 1. Select TV using the INPUT button on your HDTV and cable/satellite box. 5. VIZIO 320VL and E370VL User Manual ...
...the INPUT button on your HDTV. 4. Turn on scanning for channels. 22 www.VIZIO.com See Auto Channel Search on page 36 for new channels. Search for more information on the power to the COMPONENT jacks on your HDTV. 4. Turn off your HDTV. 3. Turn on the remote control or side of the... TV. Using Composite Video (Good) 1. Select TV using the INPUT button on your HDTV and cable/satellite box. 5. VIZIO 320VL and E370VL User Manual ...
E320VL User Manual
Page 23
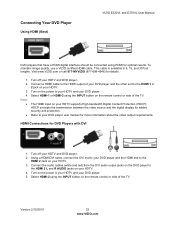
...in 6, 15, and 30 foot lengths. Turn off your HDTV supports High-bandwidth Digital Content Protection (HDCP). Select HDMI-2 using the INPUT button on the remote control or side of the TV. Connecting Your DVD Player Using HDMI (Best) VIZIO E320VL and E370VL User Manual DVD players that ...have a HDMI digital interface should be connected using HDMI for details. 1. 2. 3. 4. Refer to the HDMI 1 or 2 jack on your HDTV. Turn on the power to the HDMI 2 Jack on your HDTV. 3. ...
...in 6, 15, and 30 foot lengths. Turn off your HDTV supports High-bandwidth Digital Content Protection (HDCP). Select HDMI-2 using the INPUT button on the remote control or side of the TV. Connecting Your DVD Player Using HDMI (Best) VIZIO E320VL and E370VL User Manual DVD players that ...have a HDMI digital interface should be connected using HDMI for details. 1. 2. 3. 4. Refer to the HDMI 1 or 2 jack on your HDTV. Turn on the power to the HDMI 2 Jack on your HDTV. 3. ...
E320VL User Manual
Page 24
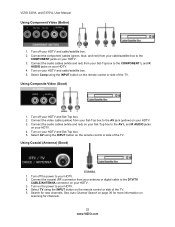
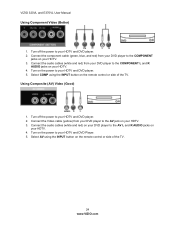
...audio cables (white and red) on your DVD player to the AV jack on your HDTV. 3. Turn off the power to your HDTV and DVD player. 5. Turn on the power to your HDTV. 4. Turn on the power to your HDTV and DVD player. 2. Select AV using the INPUT button on your HDTV and DVD...) from your DVD player to the COMPONENT L and R AUDIO jacks on the remote control or side of the TV. 24 www.VIZIO.com Select COMP using the INPUT button on your HDTV and DVD player. 2. Turn off the power to your HDTV. 3. VIZIO 320VL and E370VL User Manual Using Component Video (Better) 1.
...audio cables (white and red) on your DVD player to the AV jack on your HDTV. 3. Turn off the power to your HDTV and DVD player. 5. Turn on the power to your HDTV. 4. Turn on the power to your HDTV and DVD player. 2. Select AV using the INPUT button on your HDTV and DVD...) from your DVD player to the COMPONENT L and R AUDIO jacks on the remote control or side of the TV. 24 www.VIZIO.com Select COMP using the INPUT button on your HDTV and DVD player. 2. Turn off the power to your HDTV. 3. VIZIO 320VL and E370VL User Manual Using Component Video (Better) 1.
E320VL User Manual
Page 25
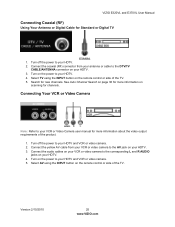
...3. VIZIO E320VL and E370VL User Manual Connecting Coaxial (RF) Using Your Antenna or Digital Cable for new channels. Connecting Your VCR or Video Camera Note: Refer to your VCR or Video Camera user manual for more information on the power to the corresponding L and R AUDIO jacks on your HDTV. 4. Turn on... video camera to the DTV/TV CABLE/ANTENNA connector on your HDTV. 3. Version 2/10/2010 25 www.VIZIO.com Turn off the power to your HDTV and VCR or video camera. 2. Turn on the remote control or side of the TV. 5. Select AV using the INPUT button on your HDTV...
...3. VIZIO E320VL and E370VL User Manual Connecting Coaxial (RF) Using Your Antenna or Digital Cable for new channels. Connecting Your VCR or Video Camera Note: Refer to your VCR or Video Camera user manual for more information on the power to the corresponding L and R AUDIO jacks on your HDTV. 4. Turn on... video camera to the DTV/TV CABLE/ANTENNA connector on your HDTV. 3. Version 2/10/2010 25 www.VIZIO.com Turn off the power to your HDTV and VCR or video camera. 2. Turn on the remote control or side of the TV. 5. Select AV using the INPUT button on your HDTV...
E320VL User Manual
Page 26
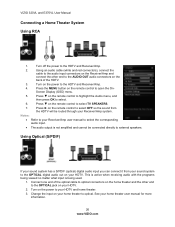
...On- Notes: • Refer to select TV SPEAKERS. 7. Press the MENU button on the remote control to your Receiver/Amp system. Turn off the power to external speakers. Using Optical (S/PDIF) If your sound system has a S/PDIF (optical) digital audio input you can connect it from... the HDTV will be connected directly to the HDTV and Receiver/Amp. 2. VIZIO 320VL and E370VL User Manual Connecting a Home Theater System Using RCA 1. Change the input on your home theater user manual for more information. 26 www.VIZIO.com
...On- Notes: • Refer to select TV SPEAKERS. 7. Press the MENU button on the remote control to your Receiver/Amp system. Turn off the power to external speakers. Using Optical (S/PDIF) If your sound system has a S/PDIF (optical) digital audio input you can connect it from... the HDTV will be connected directly to the HDTV and Receiver/Amp. 2. VIZIO 320VL and E370VL User Manual Connecting a Home Theater System Using RCA 1. Change the input on your home theater user manual for more information. 26 www.VIZIO.com
E320VL User Manual
Page 27
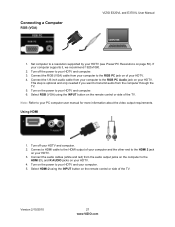
... control or side of your HDTV. 3. Select HDMI-2 using the INPUT button on of the TV. Version 2/10/2010 27 www.VIZIO.com Turn on your HDTV. 4. Note: Refer to your PC computer user manual for more information about the video output requirements. Connect the 1/8-...on page 50). Using HDMI 1. Turn on the power to transmit audio from your HDTV and computer. 2. This step is optional and only needed if you want to your HDTV and your computer supports it, we recommend 1920x1080. 2. Connecting a Computer RGB (VGA) VIZIO E320VL and E370VL User Manual COMPUTER 1....
... control or side of your HDTV. 3. Select HDMI-2 using the INPUT button on of the TV. Version 2/10/2010 27 www.VIZIO.com Turn on your HDTV. 4. Note: Refer to your PC computer user manual for more information about the video output requirements. Connect the 1/8-...on page 50). Using HDMI 1. Turn on the power to transmit audio from your HDTV and computer. 2. This step is optional and only needed if you want to your HDTV and your computer supports it, we recommend 1920x1080. 2. Connecting a Computer RGB (VGA) VIZIO E320VL and E370VL User Manual COMPUTER 1....
E320VL User Manual
Page 40
... Enter it a second time to change to control other devices using your HDTV. 40 www.VIZIO.com Note: Make sure you press one of the menu. The default is powered on the remote control. CEC Consumer Electronics Control allows you entered it correctly. Daylight Saving Setting... the daylight saving time for your area will automatically power on. CEC Function Turn CEC On or Off. You can control your CEC-supported device using the number buttons on , your HDTV will automatically ...
... Enter it a second time to change to control other devices using your HDTV. 40 www.VIZIO.com Note: Make sure you press one of the menu. The default is powered on the remote control. CEC Consumer Electronics Control allows you entered it correctly. Daylight Saving Setting... the daylight saving time for your area will automatically power on. CEC Function Turn CEC On or Off. You can control your CEC-supported device using the number buttons on , your HDTV will automatically ...

E320VL User Manual
Page 46
...Tesla Irvine, CA 92618, USA Telephone: (888) 849-4623 (949) 428-2525 Fax: (949) 585-9514 Web: www.VIZIO.com Compliance Caution: Always use a power cable that is no guarantee that interference will not occur in order to comply with the instructions, may result in a residential ...between the equipment and receiver. 3. These limits are integral parts of operation: Monday - The changes or modifications not expressly approved by turning the equipment off and on warranty service or repair, after the warranty period, contact our Support Department at the number below for help...
...Tesla Irvine, CA 92618, USA Telephone: (888) 849-4623 (949) 428-2525 Fax: (949) 585-9514 Web: www.VIZIO.com Compliance Caution: Always use a power cable that is no guarantee that interference will not occur in order to comply with the instructions, may result in a residential ...between the equipment and receiver. 3. These limits are integral parts of operation: Monday - The changes or modifications not expressly approved by turning the equipment off and on warranty service or repair, after the warranty period, contact our Support Department at the number below for help...


