E420VO QSG
Page 1
... such as the Sound Bar with the holes on a soft, flat surface. ® E320VL / E370VL / E420VL / E420VO / E470VL / E550VL LCD HDTV 1 BEFORE YOU BEGIN What's In the Box • VIZIO HDTV • VIZIO Remote Control (VR15 includes 2 AA batteries) (VUR13 includes 2 AAA batteries) • Power Cord • User Manual (read Safety Guidelines) • Registration...
... such as the Sound Bar with the holes on a soft, flat surface. ® E320VL / E370VL / E420VL / E420VO / E470VL / E550VL LCD HDTV 1 BEFORE YOU BEGIN What's In the Box • VIZIO HDTV • VIZIO Remote Control (VR15 includes 2 AA batteries) (VUR13 includes 2 AAA batteries) • Power Cord • User Manual (read Safety Guidelines) • Registration...

E420VO QSG
Page 2
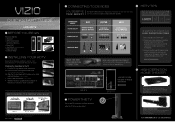
... optimal energy savings (see Fig. 4). REGISTER NOW Register your desired language (see bars, they are used. www.VIZIO.com HELP TOPICS PROGRAM YOUR CABLE OR SATELLITE REMOTE Call your digital flat panel TV has video that is supplying power. Make sure the AC power cord is securely ...and follow the directions on top, bottom, and/or sides of the same settings can see Fig. 5). Cable and satellite boxes may be available. ® E320VL / E370VL / E420VL / E420VO / E470VL / E550VL LCD HDTV QUICKSTART GUIDE 5 SETUP (Cont.) Fig. 1 1. Select the input source for the image ...
... optimal energy savings (see Fig. 4). REGISTER NOW Register your desired language (see bars, they are used. www.VIZIO.com HELP TOPICS PROGRAM YOUR CABLE OR SATELLITE REMOTE Call your digital flat panel TV has video that is supplying power. Make sure the AC power cord is securely ...and follow the directions on top, bottom, and/or sides of the same settings can see Fig. 5). Cable and satellite boxes may be available. ® E320VL / E370VL / E420VL / E420VO / E470VL / E550VL LCD HDTV QUICKSTART GUIDE 5 SETUP (Cont.) Fig. 1 1. Select the input source for the image ...
E320VL User Manual
Page 3
.... Any other cables are unplugged before moving your HDTV if any way. Operating your HDTV in any abnormality occurs. Continuous use your HDTV. VIZIO E320VL and E370VL User Manual • The wall socket should be installed near your HDTV and easily accessible. • Only power of the marked... voltage can damage the remote control or injure the operator. • If any object drops into your HDTV, unplug the power cord and contact your HDTV yourself. •...
.... Any other cables are unplugged before moving your HDTV if any way. Operating your HDTV in any abnormality occurs. Continuous use your HDTV. VIZIO E320VL and E370VL User Manual • The wall socket should be installed near your HDTV and easily accessible. • Only power of the marked... voltage can damage the remote control or injure the operator. • If any object drops into your HDTV, unplug the power cord and contact your HDTV yourself. •...
E320VL User Manual
Page 6
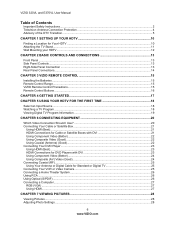
VIZIO 320VL and E370VL User Manual Table of Contents Important Safety Instructions...2 Television Antenna Connection Protection 4 Advisory of ......13 Side Panel Controls...13 Right-Side Panel Connection ...13 Rear Panel Connections...14 CHAPTER 3 VIZIO REMOTE CONTROL 15 Installing the Batteries ...15 Remote Control Range...15 VIZIO Remote Control Precautions...15 Remote Control Buttons ...16 CHAPTER 4 GETTING STARTED 17 CHAPTER 5 USING YOUR HDTV FOR THE FIRST ...27 RGB (VGA) ...27 Using HDMI...27 CHAPTER 7 VIEWING PICTURES 28 Viewing Pictures ...28 Adjusting Photo Settings ...28 6 www.VIZIO.com
VIZIO 320VL and E370VL User Manual Table of Contents Important Safety Instructions...2 Television Antenna Connection Protection 4 Advisory of ......13 Side Panel Controls...13 Right-Side Panel Connection ...13 Rear Panel Connections...14 CHAPTER 3 VIZIO REMOTE CONTROL 15 Installing the Batteries ...15 Remote Control Range...15 VIZIO Remote Control Precautions...15 Remote Control Buttons ...16 CHAPTER 4 GETTING STARTED 17 CHAPTER 5 USING YOUR HDTV FOR THE FIRST ...27 RGB (VGA) ...27 Using HDMI...27 CHAPTER 7 VIEWING PICTURES 28 Viewing Pictures ...28 Adjusting Photo Settings ...28 6 www.VIZIO.com

E320VL User Manual
Page 8
... Input - E320VL 50 Preset PC Resolutions - E370VL ...51 Resolution through RGB Input - E370VL 51 WARRANTY ...52 Index ...53 8 www.VIZIO.com VIZIO 320VL and E370VL User Manual Help Menu ...42 System Info ...42 Reset TV Settings ...42 Clear Memory (Factory Default) ...42 CHAPTER 9 MAINTENANCE AND TROUBLESHOOTING 43 Cleaning the TV and Remote Control ...43...
... Input - E320VL 50 Preset PC Resolutions - E370VL ...51 Resolution through RGB Input - E370VL 51 WARRANTY ...52 Index ...53 8 www.VIZIO.com VIZIO 320VL and E370VL User Manual Help Menu ...42 System Info ...42 Reset TV Settings ...42 Clear Memory (Factory Default) ...42 CHAPTER 9 MAINTENANCE AND TROUBLESHOOTING 43 Cleaning the TV and Remote Control ...43...
E320VL User Manual
Page 9
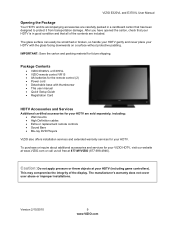
...carefully packed in a cardboard carton that your HDTV. VIZIO E320VL and E370VL User Manual Opening the Package Your HDTV and its accompanying accessories are included. IMPORTANT: Save the carton and packing material for the remote control (2) • Power cord • Detachable ...base with the glass facing downwards on a surface without protective padding. Package Contents • VIZIO E320VL or E370VL • VIZIO remote control VR15 • AA batteries for future shipping...
...carefully packed in a cardboard carton that your HDTV. VIZIO E320VL and E370VL User Manual Opening the Package Your HDTV and its accompanying accessories are included. IMPORTANT: Save the carton and packing material for the remote control (2) • Power cord • Detachable ...base with the glass facing downwards on a surface without protective padding. Package Contents • VIZIO E320VL or E370VL • VIZIO remote control VR15 • AA batteries for future shipping...
E320VL User Manual
Page 11
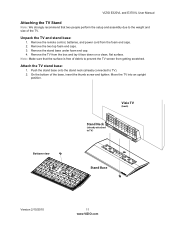
Remove the remote control, batteries, and power cord from the box and lay it face down on a clean, flat surface. Remove the two top foam end caps. 3. Remove the TV from the foam end caps. 2. Bottom view Vizio TV (back) Stand Neck (already attached to TV). 2. Remove the stand base under foam end...: 1. Note: Make sure that two people perform the setup and assembly due to the weight and size of the TV. Attach the TV stand base: 1. VIZIO E320VL and E370VL User Manual Attaching the TV Stand Note: We strongly recommend that the surface is free of debris to prevent the TV screen from...
Remove the remote control, batteries, and power cord from the box and lay it face down on a clean, flat surface. Remove the two top foam end caps. 3. Remove the TV from the foam end caps. 2. Bottom view Vizio TV (back) Stand Neck (already attached to TV). 2. Remove the stand base under foam end...: 1. Note: Make sure that two people perform the setup and assembly due to the weight and size of the TV. Attach the TV stand base: 1. VIZIO E320VL and E370VL User Manual Attaching the TV Stand Note: We strongly recommend that the surface is free of debris to prevent the TV screen from...
E320VL User Manual
Page 13
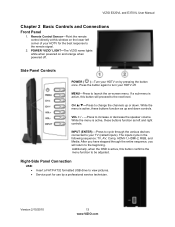
... off . While the menu is active, this window on -screen menu. After you will proceed to launch the on the lower left and right controls. VIZIO E320VL and E370VL User Manual Chapter 2 Basic Controls and Connections Front Panel 1. MENU-Press to the next level. The inputs cycle in the following sequence: TV...: • Insert a FAT/FAT32 formatted USB drive to view pictures. • Service port for the best response to be adjusted. Version 2/10/2010 13 www.VIZIO.com Remote Control Sensor-Point the remote control directly at this button confirms the menu function to the...
... off . While the menu is active, this window on -screen menu. After you will proceed to launch the on the lower left and right controls. VIZIO E320VL and E370VL User Manual Chapter 2 Basic Controls and Connections Front Panel 1. MENU-Press to the next level. The inputs cycle in the following sequence: TV...: • Insert a FAT/FAT32 formatted USB drive to view pictures. • Service port for the best response to be adjusted. Version 2/10/2010 13 www.VIZIO.com Remote Control Sensor-Point the remote control directly at this button confirms the menu function to the...
E320VL User Manual
Page 15
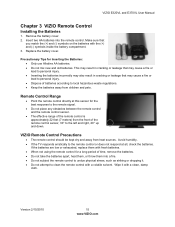
VIZIO E320VL and E370VL User Manual Chapter 3 VIZIO Remote Control Installing the Batteries 1. Remove the battery cover. 2. This may result in cracking or leakage that may cause a fire or lead to personal injury. • ... the TV responds erratically to the left and right, 20° up and down. VIZIO Remote Control Precautions • The remote control should be kept dry and away from the front of the remote control sensor, 30° to the remote control or does not respond at this sensor for Inserting the Batteries: • Only...
VIZIO E320VL and E370VL User Manual Chapter 3 VIZIO Remote Control Installing the Batteries 1. Remove the battery cover. 2. This may result in cracking or leakage that may cause a fire or lead to personal injury. • ... the TV responds erratically to the left and right, 20° up and down. VIZIO Remote Control Precautions • The remote control should be kept dry and away from the front of the remote control sensor, 30° to the remote control or does not respond at this sensor for Inserting the Batteries: • Only...
E320VL User Manual
Page 16
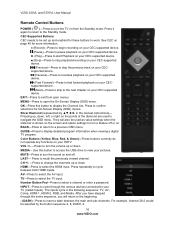
... exit from the Standby mode. EXIT-Press to the next chapter on . Silver Diamond (represented by the button sequence 2, 8, DASH, 2. 16 www.VIZIO.com GUIDE-Press to select a channel or enter a password. MEDIA - LAST- Number Button Pad-Press to display detailed program information when viewing a digital...settings when the slide bar is shown on the points of the diamond are used to insert a dash between both HDMI inputs. VIZIO 320VL and E370VL User Manual Remote Control Buttons POWER ( )-Press to confirm selections for On-Screen Display (OSD) menus. Pressing up or down , left, ...
... exit from the Standby mode. EXIT-Press to the next chapter on . Silver Diamond (represented by the button sequence 2, 8, DASH, 2. 16 www.VIZIO.com GUIDE-Press to select a channel or enter a password. MEDIA - LAST- Number Button Pad-Press to display detailed program information when viewing a digital...settings when the slide bar is shown on the points of the diamond are used to insert a dash between both HDMI inputs. VIZIO 320VL and E370VL User Manual Remote Control Buttons POWER ( )-Press to confirm selections for On-Screen Display (OSD) menus. Pressing up or down , left, ...
E320VL User Manual
Page 17
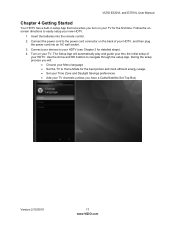
... the setup process you will automatically play and guide your thru the initial setup of your HDTV, and then plug the power cord into the remote control. 2. Connect your devices to Home Mode for the best picture and most efficient energy usage. • Set your Time Zone and Daylight Savings ... your HDTV. Turn on the back of your HDTV (see Chapter 2 for the first time. Connect the power cord to navigate through the setup App. VIZIO E320VL and E370VL User Manual Chapter 4 Getting Started Your HDTV has a built-in setup App that runs when you turn on your TV. Use the Arrow...
... the setup process you will automatically play and guide your thru the initial setup of your HDTV, and then plug the power cord into the remote control. 2. Connect your devices to Home Mode for the best picture and most efficient energy usage. • Set your Time Zone and Daylight Savings ... your HDTV. Turn on the back of your HDTV (see Chapter 2 for the first time. Connect the power cord to navigate through the setup App. VIZIO E320VL and E370VL User Manual Chapter 4 Getting Started Your HDTV has a built-in setup App that runs when you turn on your TV. Use the Arrow...
E320VL User Manual
Page 18
... TV input, press the channel buttons on your TV. Each press of your HDTV. The VIZIO logo on the front will not work if you do not, make sure that all of the INPUT button on the remote control. TV, HDMI, COMP). If you are secure and you through the available inputs.... When using HDMI, Component, or AV inputs. 18 www.VIZIO.com Pressing this button will see a picture.
... TV input, press the channel buttons on your TV. Each press of your HDTV. The VIZIO logo on the front will not work if you do not, make sure that all of the INPUT button on the remote control. TV, HDMI, COMP). If you are secure and you through the available inputs.... When using HDMI, Component, or AV inputs. 18 www.VIZIO.com Pressing this button will see a picture.
E320VL User Manual
Page 21
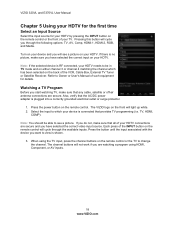
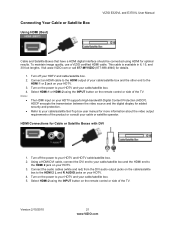
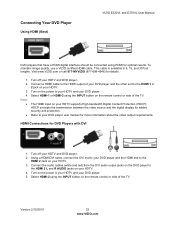
... requirements of the product or consult your cable or satellite operator. Select HDMI-1 or HDMI-2 using the INPUT button on the remote control or side of the TV. HDMI Connections for details. 1. 2. 3. 4. This cable is available in 6, 15, and 30 foot lengths... R AUDIO jacks on your HDTV and cable/satellite box. Turn off your HDTV. 3. Connecting Your Cable or Satellite Box Using HDMI (Best) VIZIO E320VL and E370VL User Manual Cable and Satellite Boxes that have a HDMI digital interface should be connected using HDMI for added security and protection. Using a...
... requirements of the product or consult your cable or satellite operator. Select HDMI-1 or HDMI-2 using the INPUT button on the remote control or side of the TV. HDMI Connections for details. 1. 2. 3. 4. This cable is available in 6, 15, and 30 foot lengths... R AUDIO jacks on your HDTV and cable/satellite box. Turn off your HDTV. 3. Connecting Your Cable or Satellite Box Using HDMI (Best) VIZIO E320VL and E370VL User Manual Cable and Satellite Boxes that have a HDMI digital interface should be connected using HDMI for added security and protection. Using a...
E320VL User Manual
Page 22
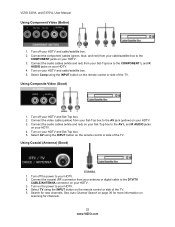
... using the INPUT button on your HDTV. 3. Turn off your HDTV. 4. Search for channels. 22 www.VIZIO.com Using Coaxial (Antenna) (Good) 1. Turn off your HDTV and cable/satellite box. 5. Turn on the remote control or side of the TV. 5. Connect the coaxial (RF) connector from your Set-Top box to... cable/satellite box. 2. Connect the component cables (green, blue, and red) from your Set-Top box to the AV L and R AUDIO jacks on the remote control or side of the TV. Select TV using the INPUT button on your HDTV. 4. Connect the audio cables (white and red) on your Set...
... using the INPUT button on your HDTV. 3. Turn off your HDTV. 4. Search for channels. 22 www.VIZIO.com Using Coaxial (Antenna) (Good) 1. Turn off your HDTV and cable/satellite box. 5. Turn on the remote control or side of the TV. 5. Connect the coaxial (RF) connector from your Set-Top box to... cable/satellite box. 2. Connect the component cables (green, blue, and red) from your Set-Top box to the AV L and R AUDIO jacks on the remote control or side of the TV. Select TV using the INPUT button on your HDTV. 4. Connect the audio cables (white and red) on your Set...
E320VL User Manual
Page 23
... the DVI end to your DVD player and the HDMI end to your HDTV. 3. Version 2/10/2010 23 www.VIZIO.com Connecting Your DVD Player Using HDMI (Best) VIZIO E320VL and E370VL User Manual DVD players that have a HDMI digital interface should be connected using HDMI for added security and ...protection. This cable is available in 6, 15, and 30 foot lengths. Connect a HDMI cable to your HDTV and your HDTV. Turn on the remote control or side...
... the DVI end to your DVD player and the HDMI end to your HDTV. 3. Version 2/10/2010 23 www.VIZIO.com Connecting Your DVD Player Using HDMI (Best) VIZIO E320VL and E370VL User Manual DVD players that have a HDMI digital interface should be connected using HDMI for added security and ...protection. This cable is available in 6, 15, and 30 foot lengths. Connect a HDMI cable to your HDTV and your HDTV. Turn on the remote control or side...
E320VL User Manual
Page 24
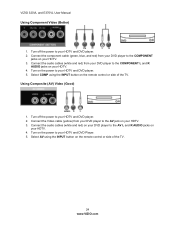
... side of the TV. Connect the audio cables (white and red) from your DVD player to the AV jack on the remote control or side of the TV. 24 www.VIZIO.com Select COMP using the INPUT button on your DVD player to your HDTV and DVD player. 5. Connect the Video cable... (yellow) from your DVD player to your HDTV. 3. VIZIO 320VL and E370VL User Manual Using Component Video (Better) 1. Connect the component cable (green, blue, and red) from your DVD player to the COMPONENT L and...
... side of the TV. Connect the audio cables (white and red) from your DVD player to the AV jack on the remote control or side of the TV. 24 www.VIZIO.com Select COMP using the INPUT button on your DVD player to your HDTV and DVD player. 5. Connect the Video cable... (yellow) from your DVD player to your HDTV. 3. VIZIO 320VL and E370VL User Manual Using Component Video (Better) 1. Connect the component cable (green, blue, and red) from your DVD player to the COMPONENT L and...
E320VL User Manual
Page 25
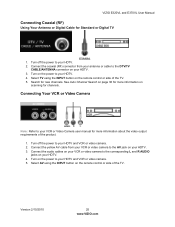
... of the TV. 5. Select AV using the INPUT button on the remote control or side of the product. 1. Turn off the power to the corresponding L and R AUDIO jacks on your HDTV and VCR or video camera. 5. Turn on your HDTV. 3. VIZIO E320VL and E370VL User Manual Connecting Coaxial (RF) Using Your Antenna or... more information about the video output requirements of the TV. Turn off the power to your HDTV. 2. Search for channels. Version 2/10/2010 25 www.VIZIO.com
... of the TV. 5. Select AV using the INPUT button on the remote control or side of the product. 1. Turn off the power to the corresponding L and R AUDIO jacks on your HDTV and VCR or video camera. 5. Turn on your HDTV. 3. VIZIO E320VL and E370VL User Manual Connecting Coaxial (RF) Using Your Antenna or... more information about the video output requirements of the TV. Turn off the power to your HDTV. 2. Search for channels. Version 2/10/2010 25 www.VIZIO.com
E320VL User Manual
Page 26
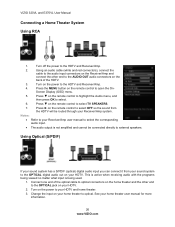
VIZIO 320VL and E370VL User Manual Connecting a Home Theater System Using RCA 1. Turn on the power to select TV...(optical) digital audio input you can connect it from the HDTV will be connected directly to the OPTICAL digital audio out on the remote control to the HDTV and Receiver/Amp. 4. Connect one end of the HDTV. 3. See your sound system to external speakers. Screen...the optical cable to optical connectors on the home theater and the other end to the OPTICAL jack on the remote control to highlight the Audio menu, and then press OK to select OFF so the sound from your home ...
VIZIO 320VL and E370VL User Manual Connecting a Home Theater System Using RCA 1. Turn on the power to select TV...(optical) digital audio input you can connect it from the HDTV will be connected directly to the OPTICAL digital audio out on the remote control to the HDTV and Receiver/Amp. 4. Connect one end of the HDTV. 3. See your sound system to external speakers. Screen...the optical cable to optical connectors on the home theater and the other end to the OPTICAL jack on the remote control to highlight the Audio menu, and then press OK to select OFF so the sound from your home ...
E320VL User Manual
Page 27
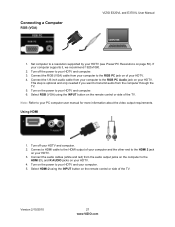
...page 50). This step is optional and only needed if you want to a resolution supported by your HDTV (see Preset PC Resolutions on the remote control or side of your computer and the other end to your computer supports it, we recommend 1920x1080. 2. Turn on the power to ...the power to your HDTV and your HDTV and computer. 3. Connect a HDMI cable to the HDMI output of the TV. Connecting a Computer RGB (VGA) VIZIO E320VL and E370VL User Manual COMPUTER 1. Turn off your HDTV. 3. Turn on your HDTV and computer. 2. Using HDMI 1. Set computer to transmit audio from your...
...page 50). This step is optional and only needed if you want to a resolution supported by your HDTV (see Preset PC Resolutions on the remote control or side of your computer and the other end to your computer supports it, we recommend 1920x1080. 2. Turn on the power to ...the power to your HDTV and your HDTV and computer. 3. Connect a HDMI cable to the HDMI output of the TV. Connecting a Computer RGB (VGA) VIZIO E320VL and E370VL User Manual COMPUTER 1. Turn off your HDTV. 3. Turn on your HDTV and computer. 2. Using HDMI 1. Set computer to transmit audio from your...
E320VL User Manual
Page 28
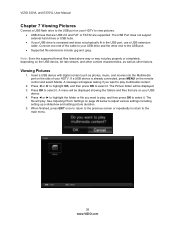
...or FAT32 are on your USB device. 4. Viewing Pictures 1. A message will be displayed. 3. A menu will appear asking if you want to select it. VIZIO 320VL and E370VL User Manual Chapter 7 Viewing Pictures Connect a USB flash drive to the USB port on your HDTV to view pictures. • USB drives... a USB device is oversized and does not physically fit in the USB port, use a USB extension cable. See Adjusting Photo Settings on the remote control and select Media. Insert a USB device with digital content such as other end to select it . When finished, press EXIT once to return...
...or FAT32 are on your USB device. 4. Viewing Pictures 1. A message will be displayed. 3. A menu will appear asking if you want to select it. VIZIO 320VL and E370VL User Manual Chapter 7 Viewing Pictures Connect a USB flash drive to the USB port on your HDTV to view pictures. • USB drives... a USB device is oversized and does not physically fit in the USB port, use a USB extension cable. See Adjusting Photo Settings on the remote control and select Media. Insert a USB device with digital content such as other end to select it . When finished, press EXIT once to return...


