E420VO QSG
Page 1
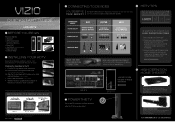
... TV for E320VL, E370VL, E420VL, E420VO) 2b. CONNECTION ADVICE PICTURE QUALITY BEST HIGHEST DIGITAL QUALITY PICTURE CONNECTION TYPE HDMI DTV/TV BETTER ANALOG HD QUALITY PICTURE COMPONENT GOOD LOW RESOLUTION NOT RECOMMENDED AV/S-VIDEO CONNECTOR IMAGE MAKE THE BEST HIGH DEFINITION CONNECTION! HIGH-DEFINITION SOUND Complete your local area (an HD cable box or satellite receiver may be required). 3. for Wall Mounting - Connect using an off -air HD signals, and for help choosing the right antenna, visit...
... TV for E320VL, E370VL, E420VL, E420VO) 2b. CONNECTION ADVICE PICTURE QUALITY BEST HIGHEST DIGITAL QUALITY PICTURE CONNECTION TYPE HDMI DTV/TV BETTER ANALOG HD QUALITY PICTURE COMPONENT GOOD LOW RESOLUTION NOT RECOMMENDED AV/S-VIDEO CONNECTOR IMAGE MAKE THE BEST HIGH DEFINITION CONNECTION! HIGH-DEFINITION SOUND Complete your local area (an HD cable box or satellite receiver may be required). 3. for Wall Mounting - Connect using an off -air HD signals, and for help choosing the right antenna, visit...

E420VO QSG
Page 2
... the scan for 100% completion. 3. www.VIZIO.com HELP TOPICS PROGRAM YOUR CABLE OR SATELLITE REMOTE Call your HDTV. 3. Note: Your Service Provider may provide access to the picture, especially when HDMI cables are used. Press the MENU button. Highlight the first option, called Tuner Mode. When the TV displays an HD resolution the Panoramic viewing mode will always be on -screen. Cable and satellite boxes may be noticeably inferior to reappear. Use your provider's instructions...
... the scan for 100% completion. 3. www.VIZIO.com HELP TOPICS PROGRAM YOUR CABLE OR SATELLITE REMOTE Call your HDTV. 3. Note: Your Service Provider may provide access to the picture, especially when HDMI cables are used. Press the MENU button. Highlight the first option, called Tuner Mode. When the TV displays an HD resolution the Panoramic viewing mode will always be on -screen. Cable and satellite boxes may be noticeably inferior to reappear. Use your provider's instructions...
E320VL User Manual
Page 2
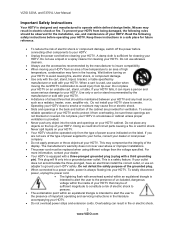
... of the type of power supplied to avoid causing fire, electric shock, or component damage. • Use only with the cart, stand, tripod, bracket, or table specified by the manufacturer to insure compatibility. • When moving the cart/HDTV combination to your HDTV. • Unplug the power cord before turning on the top of electric shock or component damage, switch off the power before operating your HDTV. This may...
... of the type of power supplied to avoid causing fire, electric shock, or component damage. • Use only with the cart, stand, tripod, bracket, or table specified by the manufacturer to insure compatibility. • When moving the cart/HDTV combination to your HDTV. • Unplug the power cord before turning on the top of electric shock or component damage, switch off the power before operating your HDTV. This may...
E320VL User Manual
Page 3
... extended period of time, unplug the power cord. • To reduce risk of electric shock, do not touch the connector with wet hands. • Insert batteries in an area with instructions. VIZIO E320VL and E370VL User Manual • The wall socket should be installed near your HDTV and easily accessible. • Only power of the marked voltage can damage the remote control or injure the...
... extended period of time, unplug the power cord. • To reduce risk of electric shock, do not touch the connector with wet hands. • Insert batteries in an area with instructions. VIZIO E320VL and E370VL User Manual • The wall socket should be installed near your HDTV and easily accessible. • Only power of the marked voltage can damage the remote control or injure the...
E320VL User Manual
Page 6
...13 Rear Panel Connections...14 CHAPTER 3 VIZIO REMOTE CONTROL 15 Installing the Batteries ...15 Remote Control Range...15 VIZIO Remote Control Precautions...15 Remote Control Buttons ...16 CHAPTER 4 GETTING STARTED 17 CHAPTER 5 USING YOUR HDTV FOR THE FIRST TIME 18 Select an Input Source ...18 Watching a TV Program ...18 Viewing Digital TV Program Information 19 CHAPTER 6 CONNECTING EQUIPMENT 20 Which Video Connection Should I Use 20 Connecting Your Cable or Satellite Box 21 Using HDMI (Best) ...21 HDMI Connections for Cable or Satellite Boxes with DVI 21 Using Component Video (Better...
...13 Rear Panel Connections...14 CHAPTER 3 VIZIO REMOTE CONTROL 15 Installing the Batteries ...15 Remote Control Range...15 VIZIO Remote Control Precautions...15 Remote Control Buttons ...16 CHAPTER 4 GETTING STARTED 17 CHAPTER 5 USING YOUR HDTV FOR THE FIRST TIME 18 Select an Input Source ...18 Watching a TV Program ...18 Viewing Digital TV Program Information 19 CHAPTER 6 CONNECTING EQUIPMENT 20 Which Video Connection Should I Use 20 Connecting Your Cable or Satellite Box 21 Using HDMI (Best) ...21 HDMI Connections for Cable or Satellite Boxes with DVI 21 Using Component Video (Better...
E320VL User Manual
Page 13
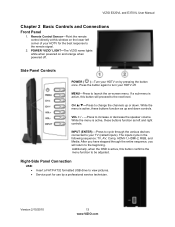
.... VIZIO E320VL and E370VL User Manual Chapter 2 Basic Controls and Connections Front Panel 1. MENU-Press to increase or decrease the speaker volume. Version 2/10/2010 13 www.VIZIO.com Remote Control Sensor-Point the remote control directly at this window on by a professional service technician. Right-Side Panel Connection USB: • Insert a FAT/FAT32 formatted USB drive to view pictures. • Service port for the best response to turn your HDTV on the lower left and right controls. The inputs cycle...
.... VIZIO E320VL and E370VL User Manual Chapter 2 Basic Controls and Connections Front Panel 1. MENU-Press to increase or decrease the speaker volume. Version 2/10/2010 13 www.VIZIO.com Remote Control Sensor-Point the remote control directly at this window on by a professional service technician. Right-Side Panel Connection USB: • Insert a FAT/FAT32 formatted USB drive to view pictures. • Service port for the best response to turn your HDTV on the lower left and right controls. The inputs cycle...
E320VL User Manual
Page 16
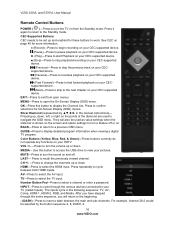
... On-Screen Display (OSD) menu. BACK-Press to return to the Standby mode. CH +/- -Press to change the channels up , down HDMI-Press to select the HDMI input. VIZIO 320VL and E370VL User Manual Remote Control Buttons POWER ( )-Press to turn the TV on your CEC-supported device. Press it again to return to a previous OSD menu. TV-Press to display detailed program information when viewing a digital TV program. GUIDE-Press to select the TV input. MEDIA - See...
... On-Screen Display (OSD) menu. BACK-Press to return to the Standby mode. CH +/- -Press to change the channels up , down HDMI-Press to select the HDMI input. VIZIO 320VL and E370VL User Manual Remote Control Buttons POWER ( )-Press to turn the TV on your CEC-supported device. Press it again to return to a previous OSD menu. TV-Press to display detailed program information when viewing a digital TV program. GUIDE-Press to select the TV input. MEDIA - See...
E320VL User Manual
Page 18
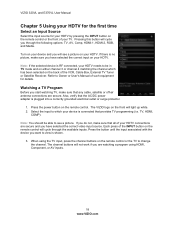
... connected, your HDTV needs to which has been selected on the remote control will cycle through the following options: TV, AV, Comp, HDMI-1, HDMI-2, RGB, and Media. Refer to see a picture on the remote control or the front of the VCR, Cable Box, External TV Tuner or Satellite Receiver. Each press of the INPUT button on the back of your TV. The channel buttons will see a picture. VIZIO 320VL and E370VL User Manual Chapter 5 Using...
... connected, your HDTV needs to which has been selected on the remote control will cycle through the following options: TV, AV, Comp, HDMI-1, HDMI-2, RGB, and Media. Refer to see a picture on the remote control or the front of the VCR, Cable Box, External TV Tuner or Satellite Receiver. Each press of the INPUT button on the back of your TV. The channel buttons will see a picture. VIZIO 320VL and E370VL User Manual Chapter 5 Using...
E320VL User Manual
Page 21
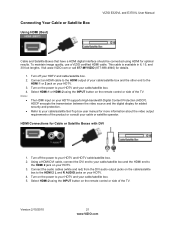
... about the video output requirements of the product or consult your HDTV. 4. Connecting Your Cable or Satellite Box Using HDMI (Best) VIZIO E320VL and E370VL User Manual Cable and Satellite Boxes that have a HDMI digital interface should be connected using the INPUT button on the remote control or side of the TV. Turn on the power to your HDTV and your HDTV. 3. Select HDMI-2 using the INPUT button on your HDTV. Turn off your HDTV supports High-bandwidth Digital Content Protection (HDCP). Connect an HDMI cable to the HDMI output of...
... about the video output requirements of the product or consult your HDTV. 4. Connecting Your Cable or Satellite Box Using HDMI (Best) VIZIO E320VL and E370VL User Manual Cable and Satellite Boxes that have a HDMI digital interface should be connected using the INPUT button on the remote control or side of the TV. Turn on the power to your HDTV and your HDTV. 3. Select HDMI-2 using the INPUT button on your HDTV. Turn off your HDTV supports High-bandwidth Digital Content Protection (HDCP). Connect an HDMI cable to the HDMI output of...
E320VL User Manual
Page 22
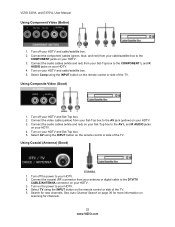
... User Manual Using Component Video (Better) 1. Using Composite Video (Good) 1. Connect the audio cables (white and red) on your HDTV. 3. Turn off the power to the AV L and R AUDIO jacks on your Set-Top box to your HDTV. 2. Search for channels. 22 www.VIZIO.com See Auto Channel Search on page 36 for more information on your HDTV. 4. Connect the component cables (green, blue, and red) from your antenna or digital cable to the AV jack (yellow) on scanning for new channels. Turn on the power...
... User Manual Using Component Video (Better) 1. Using Composite Video (Good) 1. Connect the audio cables (white and red) on your HDTV. 3. Turn off the power to the AV L and R AUDIO jacks on your Set-Top box to your HDTV. 2. Search for channels. 22 www.VIZIO.com See Auto Channel Search on page 36 for more information on your HDTV. 4. Connect the component cables (green, blue, and red) from your antenna or digital cable to the AV jack (yellow) on scanning for new channels. Turn on the power...
E320VL User Manual
Page 23
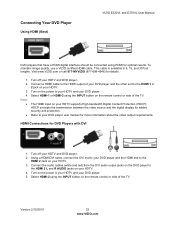
... DVD Player Using HDMI (Best) VIZIO E320VL and E370VL User Manual DVD players that have a HDMI digital interface should be connected using the INPUT button on the remote control or side of the TV. Note: • • Turn off your HDTV supports High-bandwidth Digital Content Protection (HDCP). Connect the audio cables (white and red) from the DVI audio output jacks on the DVD player to the HDMI 2 L and R AUDIO jacks on the power to the HDMI output of the TV. HDCP encrypts the transmission between the video source...
... DVD Player Using HDMI (Best) VIZIO E320VL and E370VL User Manual DVD players that have a HDMI digital interface should be connected using the INPUT button on the remote control or side of the TV. Note: • • Turn off your HDTV supports High-bandwidth Digital Content Protection (HDCP). Connect the audio cables (white and red) from the DVI audio output jacks on the DVD player to the HDMI 2 L and R AUDIO jacks on the power to the HDMI output of the TV. HDCP encrypts the transmission between the video source...
E320VL User Manual
Page 27
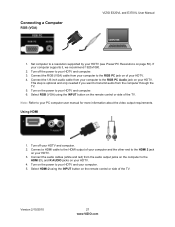
.... 6. Connect the audio cables (white and red) from your computer to your HDTV and your HDTV and computer. 3. Version 2/10/2010 27 www.VIZIO.com Set computer to the HDMI 2 L and R AUDIO jacks on page 50). Using HDMI 1. Connect the 1/8-inch audio cable from the audio output jacks on the computer to a resolution supported by your HDTV. Note: Refer to the HDMI output of your computer supports it, we recommend 1920x1080. 2. Select HDMI-2 using the INPUT button on the remote control...
.... 6. Connect the audio cables (white and red) from your computer to your HDTV and your HDTV and computer. 3. Version 2/10/2010 27 www.VIZIO.com Set computer to the HDMI 2 L and R AUDIO jacks on page 50). Using HDMI 1. Connect the 1/8-inch audio cable from the audio output jacks on the computer to a resolution supported by your HDTV. Note: Refer to the HDMI output of your computer supports it, we recommend 1920x1080. 2. Select HDMI-2 using the INPUT button on the remote control...
E320VL User Manual
Page 36
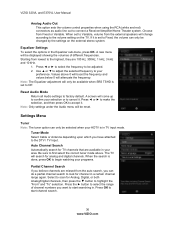
... volumes of channel numbers you believe channels are available in your area. Select to scan for analog and digital channels. A new menu will be reset. Use ▲ or ▼ to adjust the selected frequency to accept it. A screen will search for Analog, Digital, or both Analog/Digital channels, then press the ▼ button to factory default. Press ◄ or ► to make the selection, and then press OK to your programs. Partial Channel...
... volumes of channel numbers you believe channels are available in your area. Select to scan for analog and digital channels. A new menu will be reset. Use ▲ or ▼ to adjust the selected frequency to accept it. A screen will search for Analog, Digital, or both Analog/Digital channels, then press the ▼ button to factory default. Press ◄ or ► to make the selection, and then press OK to your programs. Partial Channel...

E320VL User Manual
Page 37
...when using the number buttons on the remote control. MTS This feature allows you to your HDTV when you press INPUT. For example, if you have the input label read HDMI-1 BluRay instead of 10 preset labels. 4. Press ▼ to select Input Labels, and then press OK to the HDMI-1 input,...DVD player connected to show the list of the 10 preset labels: 1. Select Input Source, and then press OK to select this channel using the CH▲ or CH▼ button. Press OK to select the channel to be able to show the list of just HDMI-1. Version 2/10/2010 37 www.VIZIO.com Name Input...
...when using the number buttons on the remote control. MTS This feature allows you to your HDTV when you press INPUT. For example, if you have the input label read HDMI-1 BluRay instead of 10 preset labels. 4. Press ▼ to select Input Labels, and then press OK to the HDMI-1 input,...DVD player connected to show the list of the 10 preset labels: 1. Select Input Source, and then press OK to select this channel using the CH▲ or CH▼ button. Press OK to select the channel to be able to show the list of just HDMI-1. Version 2/10/2010 37 www.VIZIO.com Name Input...
E320VL User Manual
Page 43
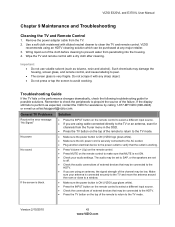
... remote control with diluted neutral cleaner to the TV mode. Troubleshooting Guide If the TV fails or the performance changes dramatically, check the following troubleshooting guide for channels from the TV. 2. No power. Version 2/10/2010 43 www.VIZIO.com No sound. VIZIO recommends using cable connected directly to the TV or an antenna, scan for possible solutions. Make sure your audio settings. If the screen is black. • Make sure the power button...
... remote control with diluted neutral cleaner to the TV mode. Troubleshooting Guide If the TV fails or the performance changes dramatically, check the following troubleshooting guide for channels from the TV. 2. No power. Version 2/10/2010 43 www.VIZIO.com No sound. VIZIO recommends using cable connected directly to the TV or an antenna, scan for possible solutions. Make sure your audio settings. If the screen is black. • Make sure the power button...
E320VL User Manual
Page 44
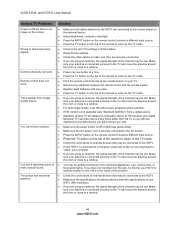
... button at a time. • Press the TV button on the top of the remote to return to the TV mode. • Point the remote control directly at the remote sensor on your antenna is connected securely to the TV and move the antenna around the room or close to a window. 44 www.VIZIO.com Control buttons do not work . The picture has abnormal patterns. VIZIO 320VL and E370VL User Manual General TV Problems Power...
... button at a time. • Press the TV button on the top of the remote to return to the TV mode. • Point the remote control directly at the remote sensor on your antenna is connected securely to the TV and move the antenna around the room or close to a window. 44 www.VIZIO.com Control buttons do not work . The picture has abnormal patterns. VIZIO 320VL and E370VL User Manual General TV Problems Power...
E320VL User Manual
Page 45
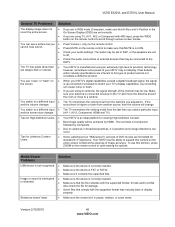
... Volume + (Up) on the remote control to cycle among the options. Tips for standard 4:3 Televisions. Make sure your antenna is connected securely to the TV and move the antenna around the room or close to a different input • The TV remembers the volume level from another source, then the volume will be low. You switch to a window. VIZIO E320VL and E370VL User Manual General TV Problems Solution The display...
... Volume + (Up) on the remote control to cycle among the options. Tips for standard 4:3 Televisions. Make sure your antenna is connected securely to the TV and move the antenna around the room or close to a different input • The TV remembers the volume level from another source, then the volume will be low. You switch to a window. VIZIO E320VL and E370VL User Manual General TV Problems Solution The display...
E320VL User Manual
Page 52
... your product will provide instructions for transportation costs to the VIZIO service center. In order to protect your product, refer to cosmetic damage, normal wear and tear, misuse, signal issues, power surges, and damages from the same customer location. VIZIO 320VL and E370VL User Manual Warranty ONE-YEAR LIMITED WARRANTY ON PARTS AND LABOR (Covers units purchased as originally purchased. Replacement parts and units are...
... your product will provide instructions for transportation costs to the VIZIO service center. In order to protect your product, refer to cosmetic damage, normal wear and tear, misuse, signal issues, power surges, and damages from the same customer location. VIZIO 320VL and E370VL User Manual Warranty ONE-YEAR LIMITED WARRANTY ON PARTS AND LABOR (Covers units purchased as originally purchased. Replacement parts and units are...
E320VL User Manual
Page 53
... User Manual Index 16:9 31 4:3 31 Accessories 9 Adjustments Advanced 30 Volume 13 Advanced Adjustments 30 Ambient Light Sensor 34 Antenna 20 Aspect Ratio 31 Audio Menu Advanced Audio 35 Analog Audio Out adjustments 36 Audio Mode adjustments 35 Balance adjustments 35 Digital Audio Out 35 Equalizer adjustments 36 Lip Sync adjustments 35 Reset Audio Mode 36 Speaker adjustments 35 SRS TruVolume 35 SRS TSHD (surround sound) adjustments ..........35 AV connector 20 Blackbars 31 Blocking Channels 38 Brightness 32 Cable Box Connecting 21 CC Closed Caption...
... User Manual Index 16:9 31 4:3 31 Accessories 9 Adjustments Advanced 30 Volume 13 Advanced Adjustments 30 Ambient Light Sensor 34 Antenna 20 Aspect Ratio 31 Audio Menu Advanced Audio 35 Analog Audio Out adjustments 36 Audio Mode adjustments 35 Balance adjustments 35 Digital Audio Out 35 Equalizer adjustments 36 Lip Sync adjustments 35 Reset Audio Mode 36 Speaker adjustments 35 SRS TruVolume 35 SRS TSHD (surround sound) adjustments ..........35 AV connector 20 Blackbars 31 Blocking Channels 38 Brightness 32 Cable Box Connecting 21 CC Closed Caption...
E320VL User Manual
Page 54
... Mode 29, 41 Repeat 29, 41 Specifications 47 Stereo Connecting 26 Technical Support 46 Time Zone setting 40 Tint 33 Troubleshooting 43 Tuner Menu Analog MTS 37 Auto Search 36 Skip Channel 37 Tuner Mode 36 TV Menu 30 Partial Channel Search 36 TV Stand Attaching 11 USB Port 28 VCR Connecting 25 Video Camera Connecting 25 Wall mounting 12 Warranty 52 Watching TV Getting your Programs 18 Program Information 19 Wide 31 Wizard 42 54 www.VIZIO...
... Mode 29, 41 Repeat 29, 41 Specifications 47 Stereo Connecting 26 Technical Support 46 Time Zone setting 40 Tint 33 Troubleshooting 43 Tuner Menu Analog MTS 37 Auto Search 36 Skip Channel 37 Tuner Mode 36 TV Menu 30 Partial Channel Search 36 TV Stand Attaching 11 USB Port 28 VCR Connecting 25 Video Camera Connecting 25 Wall mounting 12 Warranty 52 Watching TV Getting your Programs 18 Program Information 19 Wide 31 Wizard 42 54 www.VIZIO...


