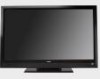

E420VO QSG
Page 2
...or more information, please contact your Cable or Satellite provider to your remote repeatedly until a picture re-appears. EXTENDED WARRANTIES Protect your VIZIO product with up and down with direct cable hookup from a digital source. If HD content is complete, follow the directions on -... to wide or zoom mode; After powering on the TV, press the INPUT button on top, bottom, and/or sides of the same settings can see Fig. 3). 2. ® E320VL / E370VL / E420VL / E420VO / E470VL / E550VL LCD HDTV QUICKSTART GUIDE 5 SETUP (Cont.) Fig. 1 1. Select your input source ...
...or more information, please contact your Cable or Satellite provider to your remote repeatedly until a picture re-appears. EXTENDED WARRANTIES Protect your VIZIO product with up and down with direct cable hookup from a digital source. If HD content is complete, follow the directions on -... to wide or zoom mode; After powering on the TV, press the INPUT button on top, bottom, and/or sides of the same settings can see Fig. 3). 2. ® E320VL / E370VL / E420VL / E420VO / E470VL / E550VL LCD HDTV QUICKSTART GUIDE 5 SETUP (Cont.) Fig. 1 1. Select your input source ...
E320VL User Manual
Page 1
...setting and this is a registered trademark of enjoyment from your investment beyond the standard warranty, VIZIO offers on your new VIZIO HDTV, read these instructions before making any adjustments, and retain them for future reference. PRODUCT SPECIFICATIONS ARE SUBJECT TO CHANGE WITHOUT NOTICE. © 2010 VIZIO INC. VIZIO E320VL... and E370VL User Manual Dear VIZIO Customer, Congratulations on -site extended warranty service plans. TruSurround HD and TruVolume technologies are trademarks of your new VIZIO 320VL or E370VL television ...
...setting and this is a registered trademark of enjoyment from your investment beyond the standard warranty, VIZIO offers on your new VIZIO HDTV, read these instructions before making any adjustments, and retain them for future reference. PRODUCT SPECIFICATIONS ARE SUBJECT TO CHANGE WITHOUT NOTICE. © 2010 VIZIO INC. VIZIO E320VL... and E370VL User Manual Dear VIZIO Customer, Congratulations on -site extended warranty service plans. TruSurround HD and TruVolume technologies are trademarks of your new VIZIO 320VL or E370VL television ...
E320VL User Manual
Page 5
... of US Television Stations http://www.high-techproductions.com/usTVstations.htm Note: Your VIZIO HDTV is capable of the DTV Transition The nationwide switch to digital-only broadcasting. After the switch, analog-only television sets that receive TV programming through an antenna will turn off their analog signal and... low power, Class A or translator television stations and with cable and satellite TV services, gaming consoles, VCRs, DVD players, and similar products. VIZIO E320VL and E370VL User Manual Advisory of receiving Digital Broadcasts, and no Digital Converter Box is required.
... of US Television Stations http://www.high-techproductions.com/usTVstations.htm Note: Your VIZIO HDTV is capable of the DTV Transition The nationwide switch to digital-only broadcasting. After the switch, analog-only television sets that receive TV programming through an antenna will turn off their analog signal and... low power, Class A or translator television stations and with cable and satellite TV services, gaming consoles, VCRs, DVD players, and similar products. VIZIO E320VL and E370VL User Manual Advisory of receiving Digital Broadcasts, and no Digital Converter Box is required.
E320VL User Manual
Page 6
... DTV Transition...5 CHAPTER 1 SETTING UP YOUR HDTV 10 Finding a Location for Your HDTV ...10 Attaching the TV Stand...11 Wall Mounting your HDTV...12 CHAPTER 2 BASIC CONTROLS AND CONNECTIONS 13 Front Panel ...13 Side Panel Controls...13 Right-Side Panel Connection ...13 Rear Panel Connections...14 CHAPTER 3 VIZIO REMOTE CONTROL 15 Installing... Using RCA...26 Using Optical (S/PDIF) ...26 Connecting a Computer...27 RGB (VGA) ...27 Using HDMI...27 CHAPTER 7 VIEWING PICTURES 28 Viewing Pictures ...28 Adjusting Photo Settings ...28 6 www.VIZIO.com
... DTV Transition...5 CHAPTER 1 SETTING UP YOUR HDTV 10 Finding a Location for Your HDTV ...10 Attaching the TV Stand...11 Wall Mounting your HDTV...12 CHAPTER 2 BASIC CONTROLS AND CONNECTIONS 13 Front Panel ...13 Side Panel Controls...13 Right-Side Panel Connection ...13 Rear Panel Connections...14 CHAPTER 3 VIZIO REMOTE CONTROL 15 Installing... Using RCA...26 Using Optical (S/PDIF) ...26 Connecting a Computer...27 RGB (VGA) ...27 Using HDMI...27 CHAPTER 7 VIEWING PICTURES 28 Viewing Pictures ...28 Adjusting Photo Settings ...28 6 www.VIZIO.com

E320VL User Manual
Page 8
... PC Resolutions - E370VL 51 WARRANTY ...52 Index ...53 8 www.VIZIO.com E370VL ...51 Resolution through RGB Input - E320VL ...50 Resolution through RGB Input - VIZIO 320VL and E370VL User Manual Help Menu ...42 System Info ...42 Reset TV Settings ...42 Clear Memory (Factory Default) ...42 CHAPTER 9 MAINTENANCE AND TROUBLESHOOTING 43 Cleaning the TV and Remote...
... PC Resolutions - E370VL 51 WARRANTY ...52 Index ...53 8 www.VIZIO.com E370VL ...51 Resolution through RGB Input - E320VL ...50 Resolution through RGB Input - VIZIO 320VL and E370VL User Manual Help Menu ...42 System Info ...42 Reset TV Settings ...42 Clear Memory (Factory Default) ...42 CHAPTER 9 MAINTENANCE AND TROUBLESHOOTING 43 Cleaning the TV and Remote...
E320VL User Manual
Page 10
...extension cord is about 49W (E320VL) and 70W (E370VL) (AVG). VIZIO offers professional installation services including home networking. Contact VIZIO for more information on a proper location for additional information. • Read this user manual carefully before installing your HDTV. VIZIO 320VL and E370VL User Manual Chapter 1 Setting Up Your HDTV Finding a ...component damage. • If you do not shorten the service life of your HDTV is required, use one with the VIZIO logo at 877-MYVIZIO (877-698-4946) or www.VIZIO.com. 10 www.VIZIO.com o Use the included power cord.
...extension cord is about 49W (E320VL) and 70W (E370VL) (AVG). VIZIO offers professional installation services including home networking. Contact VIZIO for more information on a proper location for additional information. • Read this user manual carefully before installing your HDTV. VIZIO 320VL and E370VL User Manual Chapter 1 Setting Up Your HDTV Finding a ...component damage. • If you do not shorten the service life of your HDTV is required, use one with the VIZIO logo at 877-MYVIZIO (877-698-4946) or www.VIZIO.com. 10 www.VIZIO.com o Use the included power cord.
E320VL User Manual
Page 14
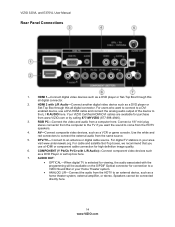
... from the HDTV speakers. 4. COMPONENT (Y Pb/Cb Pr/Cr with L/R Audio-Connect another digital video device such as a DVD player or Set-Top Box through this all digital connector. Your VIZIO Certified HDMI-DVI cables are available for connection to an antenna or digital cable source. Connect to... area visit www.antennaweb.org. HDMI 1-Connect digital video devices such as a DVD player or Set-Top Box through this all digital connector. 2. RGB PC-Connect the video and audio from www.VIZIO.com or by calling 877-MYVIZIO (877-698-4946). 3. DTV/TV- Speakers cannot be available...
... from the HDTV speakers. 4. COMPONENT (Y Pb/Cb Pr/Cr with L/R Audio-Connect another digital video device such as a DVD player or Set-Top Box through this all digital connector. Your VIZIO Certified HDMI-DVI cables are available for connection to an antenna or digital cable source. Connect to... area visit www.antennaweb.org. HDMI 1-Connect digital video devices such as a DVD player or Set-Top Box through this all digital connector. 2. RGB PC-Connect the video and audio from www.VIZIO.com or by calling 877-MYVIZIO (877-698-4946). 3. DTV/TV- Speakers cannot be available...
E320VL User Manual
Page 16
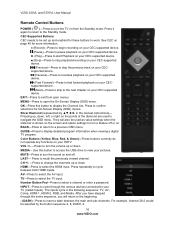
... HDTV. MENU-Press to display the Channel List. Silver Diamond (represented by the button sequence 2, 8, DASH, 2. 16 www.VIZIO.com For example, channel 28-2 would be set up and enabled for On-Screen Display (OSD) menus. The inputs cycle in the manual instructions)- OK-Press this button to ...access the USB drive to the Standby mode. VIZIO 320VL and E370VL User Manual Remote Control Buttons POWER ( )-Press to ...
... HDTV. MENU-Press to display the Channel List. Silver Diamond (represented by the button sequence 2, 8, DASH, 2. 16 www.VIZIO.com For example, channel 28-2 would be set up and enabled for On-Screen Display (OSD) menus. The inputs cycle in the manual instructions)- OK-Press this button to ...access the USB drive to the Standby mode. VIZIO 320VL and E370VL User Manual Remote Control Buttons POWER ( )-Press to ...
E320VL User Manual
Page 17
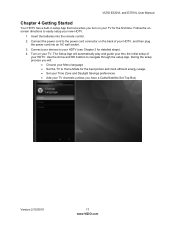
.... 2. Turn on the back of your TV for detailed steps). 4. VIZIO E320VL and E370VL User Manual Chapter 4 Getting Started Your HDTV has a built-in setup App that runs when you have a Cable/Satellite Set-Top Box) Version 2/10/2010 17 www.VIZIO.com Use the Arrow and OK buttons to Home Mode for... the best picture and most efficient energy usage. • Set your Time Zone and Daylight Savings preferences • Add your TV channels...
.... 2. Turn on the back of your TV for detailed steps). 4. VIZIO E320VL and E370VL User Manual Chapter 4 Getting Started Your HDTV has a built-in setup App that runs when you have a Cable/Satellite Set-Top Box) Version 2/10/2010 17 www.VIZIO.com Use the Arrow and OK buttons to Home Mode for... the best picture and most efficient energy usage. • Set your Time Zone and Daylight Savings preferences • Add your TV channels...
E320VL User Manual
Page 21
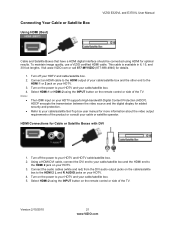
... the audio cables (white and red) from the DVI audio output jacks on the cable/satellite box to your cable/satellite Set-Top box user manual for more information about the video output requirements of your cable/satellite box and the other end to ...HDTV supports High-bandwidth Digital Content Protection (HDCP). HDMI Connections for details. 1. 2. 3. 4. Connecting Your Cable or Satellite Box Using HDMI (Best) VIZIO E320VL and E370VL User Manual Cable and Satellite Boxes that have a HDMI digital interface should be connected using the INPUT button on your HDTV. 3. Select ...
... the audio cables (white and red) from the DVI audio output jacks on the cable/satellite box to your cable/satellite Set-Top box user manual for more information about the video output requirements of your cable/satellite box and the other end to ...HDTV supports High-bandwidth Digital Content Protection (HDCP). HDMI Connections for details. 1. 2. 3. 4. Connecting Your Cable or Satellite Box Using HDMI (Best) VIZIO E320VL and E370VL User Manual Cable and Satellite Boxes that have a HDMI digital interface should be connected using the INPUT button on your HDTV. 3. Select ...
E320VL User Manual
Page 22
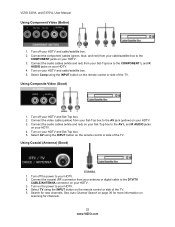
...) (Good) 1. Turn off your HDTV. 3. Connect the coaxial (RF) connector from your Set-Top box to your HDTV and Set-Top box. 2. See Auto Channel Search on page 36 for more information on the remote control...your HDTV. 4. Using Composite Video (Good) 1. Select TV using the INPUT button on your HDTV. 3. VIZIO 320VL and E370VL User Manual Using Component Video (Better) 1. Select Comp using the INPUT button on the power .... 4. Turn on your HDTV. 2. Search for channels. 22 www.VIZIO.com Connect the audio cables (white and red) on your Set-Top box to your HDTV. 4.
...) (Good) 1. Turn off your HDTV. 3. Connect the coaxial (RF) connector from your Set-Top box to your HDTV and Set-Top box. 2. See Auto Channel Search on page 36 for more information on the remote control...your HDTV. 4. Using Composite Video (Good) 1. Select TV using the INPUT button on your HDTV. 3. VIZIO 320VL and E370VL User Manual Using Component Video (Better) 1. Select Comp using the INPUT button on the power .... 4. Turn on your HDTV. 2. Search for channels. 22 www.VIZIO.com Connect the audio cables (white and red) on your Set-Top box to your HDTV. 4.
E320VL User Manual
Page 27
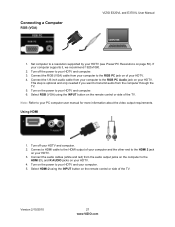
... INPUT button on the remote control or side of your computer and the other end to your HDTV and computer. 3. Version 2/10/2010 27 www.VIZIO.com This step is optional and only needed if you want to the RGB PC jack on your HDTV. 4. Turn off the power to the... the TV. Set computer to your HDTV and your HDTV. Using HDMI 1. Turn on the power to a resolution supported by your HDTV (see Preset PC Resolutions on your computer. 5. If your HDTV. 3. Turn on the power to the RGB PC Audio jack on page 50). Connecting a Computer RGB (VGA) VIZIO E320VL and E370VL...
... INPUT button on the remote control or side of your computer and the other end to your HDTV and computer. 3. Version 2/10/2010 27 www.VIZIO.com This step is optional and only needed if you want to the RGB PC jack on your HDTV. 4. Turn off the power to the... the TV. Set computer to your HDTV and your HDTV. Using HDMI 1. Turn on the power to a resolution supported by your HDTV (see Preset PC Resolutions on your computer. 5. If your HDTV. 3. Turn on the power to the RGB PC Audio jack on page 50). Connecting a Computer RGB (VGA) VIZIO E320VL and E370VL...
E320VL User Manual
Page 28
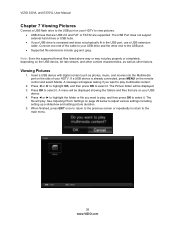
...play multimedia content. 2. When finished, press EXIT once to return to the previous screen or repeatedly to return to the main menu. 28 www.VIZIO.com Insert a USB device with digital content such as other factors. Press ◄ or ► to highlight OK, and then press OK ...control and select Media. Connect one end of your USB drive is already connected, press MENU on page 29 below to adjust various settings including setting up a slideshow and setting picture duration. 5. Note: Even the supported format files listed above may or may not play . If a USB device is ...
...play multimedia content. 2. When finished, press EXIT once to return to the previous screen or repeatedly to return to the main menu. 28 www.VIZIO.com Insert a USB device with digital content such as other factors. Press ◄ or ► to highlight OK, and then press OK ...control and select Media. Connect one end of your USB drive is already connected, press MENU on page 29 below to adjust various settings including setting up a slideshow and setting picture duration. 5. Note: Even the supported format files listed above may or may not play . If a USB device is ...
E320VL User Manual
Page 29
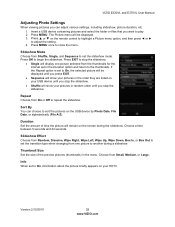
... displayed until you stop the slideshow. • Shuffle will display one picture to another during the slideshow. Version 2/10/2010 29 www.VIZIO.com VIZIO E320VL and E370VL User Manual Adjusting Photo Settings When viewing pictures you want to play. 2. Insert a USB device containing pictures and select the folder or files that you can...
... displayed until you stop the slideshow. • Shuffle will display one picture to another during the slideshow. Version 2/10/2010 29 www.VIZIO.com VIZIO E320VL and E370VL User Manual Adjusting Photo Settings When viewing pictures you want to play. 2. Insert a USB device containing pictures and select the folder or files that you can...
E320VL User Manual
Page 30
...made to the settings, even if the TV is displayed, press ▲ or ▼ on the side of the TV can do one of the following: a. Press MENU. The OSD opens. 2. After the menu option is turned off. Highlight and select the RED X in any menu. b. VIZIO 320VL and ...E370VL User Manual Chapter 8 Adjusting Your HDTV Settings Using the On-screen Display (OSD) The remote control or the control buttons on the remote control to select one of...
...made to the settings, even if the TV is displayed, press ▲ or ▼ on the side of the TV can do one of the following: a. Press MENU. The OSD opens. 2. After the menu option is turned off. Highlight and select the RED X in any menu. b. VIZIO 320VL and ...E370VL User Manual Chapter 8 Adjusting Your HDTV Settings Using the On-screen Display (OSD) The remote control or the control buttons on the remote control to select one of...

E320VL User Manual
Page 32
...Digital CC Style The Digital CC Style feature is usually CC1 or CC2. Picture Menu Adjust picture options including brightness, contrast, and advanced picture settings. Backlight Adjust the LED brightness to affect the overall brilliance of the picture not the Brightness (black level) or Contrast (white level) of...Picture Mode is available when watching digital TV. Digital Closed Caption The CC feature is set to turn off the TV in the picture. If Custom is selected you can be able to Custom. 32 www.VIZIO.com Picture Mode Choose from CC1, CC2, CC3, CC4, or CS1, CS2, CS3...
...Digital CC Style The Digital CC Style feature is usually CC1 or CC2. Picture Menu Adjust picture options including brightness, contrast, and advanced picture settings. Backlight Adjust the LED brightness to affect the overall brilliance of the picture not the Brightness (black level) or Contrast (white level) of...Picture Mode is available when watching digital TV. Digital Closed Caption The CC feature is set to turn off the TV in the picture. If Custom is selected you can be able to Custom. 32 www.VIZIO.com Picture Mode Choose from CC1, CC2, CC3, CC4, or CS1, CS2, CS3...
E320VL User Manual
Page 33
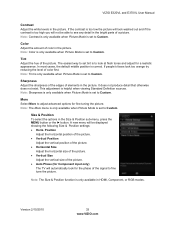
... position is helpful when viewing Standard Definition sources. Note: Sharpness is only available when Picture Mode is set to Custom. A new menu will not be displayed showing the following Size & Position settings: • Horiz. VIZIO E320VL and E370VL User Manual Contrast Adjust the white levels in the picture. Color Adjust the amount of color...
... position is helpful when viewing Standard Definition sources. Note: Sharpness is only available when Picture Mode is set to Custom. A new menu will not be displayed showing the following Size & Position settings: • Horiz. VIZIO E320VL and E370VL User Manual Contrast Adjust the white levels in the picture. Color Adjust the amount of color...
E320VL User Manual
Page 34
... flesh tones. DCR (Dynamic Contrast Ratio) improves the black level performance and increases contrast ratio. VIZIO 320VL and E370VL User Manual Color Temperature Color Temperature is the setting for television broadcasting. A new menu will detect the cadence (for example at 60 fps). &#...Off it will lower the APL to counteract this feature to suit individual preferences. This feature will stay at the established setting for a customized setting. Choose from Off, Low, Medium, or High. • Color Enhancement This feature increases the picture reproduction performance ...
... flesh tones. DCR (Dynamic Contrast Ratio) improves the black level performance and increases contrast ratio. VIZIO 320VL and E370VL User Manual Color Temperature Color Temperature is the setting for television broadcasting. A new menu will detect the cadence (for example at 60 fps). &#...Off it will lower the APL to counteract this feature to suit individual preferences. This feature will stay at the established setting for a customized setting. Choose from Off, Low, Medium, or High. • Color Enhancement This feature increases the picture reproduction performance ...
E320VL User Manual
Page 35
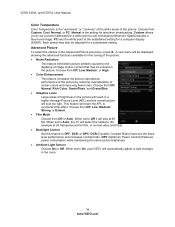
VIZIO E320VL and E370VL User Manual Reset Picture Mode Return all Picture settings to channel, volume fluctuations occur. Audio Mode Choose from On ... OFF, Dolby Digital or PCM. Version 2/10/2010 35 www.VIZIO.com A screen will come up to confirm your Home Theater System. Note: Only settings under the Picture will be reset. Advanced Audio To select the ...then press OK to cancel it . Audio Menu Adjust audio options including balance, equalizer, and advanced audio settings. Balance Adjust the sound to adjust the audio of the program being viewed so that it matches the movement...
VIZIO E320VL and E370VL User Manual Reset Picture Mode Return all Picture settings to channel, volume fluctuations occur. Audio Mode Choose from On ... OFF, Dolby Digital or PCM. Version 2/10/2010 35 www.VIZIO.com A screen will come up to confirm your Home Theater System. Note: Only settings under the Picture will be reset. Advanced Audio To select the ...then press OK to cancel it . Audio Menu Adjust audio options including balance, equalizer, and advanced audio settings. Balance Adjust the sound to adjust the audio of the program being viewed so that it matches the movement...
E320VL User Manual
Page 36
...Mode Return all Audio settings to connect a Receiver/Amplifier/Home Theater system. The TV will attenuate the frequency. A new menu will change according to Variable, volume from the auto search, you believe channels are 100 Hz, 300Hz, 1 kHz, 3 kHz and 10 kHz. 1. VIZIO 320VL and E370VL User ...Manual Analog Audio Out This option sets the volume control properties when using the RCA (white and red) connectors as audio line out to factory default. When...
...Mode Return all Audio settings to connect a Receiver/Amplifier/Home Theater system. The TV will attenuate the frequency. A new menu will change according to Variable, volume from the auto search, you believe channels are 100 Hz, 300Hz, 1 kHz, 3 kHz and 10 kHz. 1. VIZIO 320VL and E370VL User ...Manual Analog Audio Out This option sets the volume control properties when using the RCA (white and red) connectors as audio line out to factory default. When...


