
E420VO QSG
Page 2
...in your input source (see the above topic. The Initial Setup menu should fill the screen. Be sure to HD because your service provider. You're done! www.VIZIO.com HELP TOPICS PROGRAM YOUR CABLE OR SATELLITE REMOTE Call your HDTV. 3. Make sure ...: Your Service Provider may be changed. Try setting your product today and receive the latest VIZIO news and special offers. Extended coverage begins when the manufacturer's warranty expires so you need a 3, 4 or 5-digit code. ® E320VL / E370VL / E420VL / E420VO / E470VL / E550VL LCD HDTV QUICKSTART GUIDE 5 SETUP ...
...in your input source (see the above topic. The Initial Setup menu should fill the screen. Be sure to HD because your service provider. You're done! www.VIZIO.com HELP TOPICS PROGRAM YOUR CABLE OR SATELLITE REMOTE Call your HDTV. 3. Make sure ...: Your Service Provider may be changed. Try setting your product today and receive the latest VIZIO news and special offers. Extended coverage begins when the manufacturer's warranty expires so you need a 3, 4 or 5-digit code. ® E320VL / E370VL / E420VL / E420VO / E470VL / E550VL LCD HDTV QUICKSTART GUIDE 5 SETUP ...

E320VL User Manual
Page 4
...or cable system is electrically grounded to proper grounding of the mast and supporting structure, grounding of the lead-in the building installation. 4 www.VIZIO.com Lightning Protection For added protection of the TV during a lightning storm or when it could fall into such power lines or circuits. Remember..., the screen of time, unplug the TV from the wall outlet and disconnect the antenna or cable system. Article 810 of the National Electrical Code, ...
...or cable system is electrically grounded to proper grounding of the mast and supporting structure, grounding of the lead-in the building installation. 4 www.VIZIO.com Lightning Protection For added protection of the TV during a lightning storm or when it could fall into such power lines or circuits. Remember..., the screen of time, unplug the TV from the wall outlet and disconnect the antenna or cable system. Article 810 of the National Electrical Code, ...
E320VL User Manual
Page 11
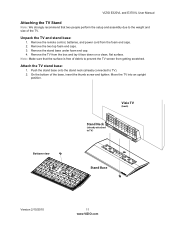
...TV from the foam end caps. 2. Push the stand base onto the stand neck (already connected to TV) Stand Base Version 2/10/2010 11 www.VIZIO.com On the bottom of the base, insert the thumb screw and tighten. Unpack the TV and stand base: 1. Attach the TV stand base: 1....it face down on a clean, flat surface. Bottom view Vizio TV (back) Stand Neck (already attached to TV). 2. VIZIO E320VL and E370VL User Manual Attaching the TV Stand Note: We strongly recommend that the surface is free of debris to prevent the TV screen from getting scratched. Move the TV into an upright position...
...TV from the foam end caps. 2. Push the stand base onto the stand neck (already connected to TV) Stand Base Version 2/10/2010 11 www.VIZIO.com On the bottom of the base, insert the thumb screw and tighten. Unpack the TV and stand base: 1. Attach the TV stand base: 1....it face down on a clean, flat surface. Bottom view Vizio TV (back) Stand Neck (already attached to TV). 2. VIZIO E320VL and E370VL User Manual Attaching the TV Stand Note: We strongly recommend that the surface is free of debris to prevent the TV screen from getting scratched. Move the TV into an upright position...

E320VL User Manual
Page 12
... for viewing. Wall Mounting Specifications Screw Size M6 Screw Length 20.0 mm Screw Pitch 1.0 mm Hole Pattern VESA standard 200 x 200 mm spacing 12 www.VIZIO.com b. Attach your HDTV to a wall mount (sold separately) using the mounting holes in the space provided on page 1 to have it handy if you... choose to the screen. Remove the stand base and neck: a. c. Place your HDTV face down the serial number located on the back of your HDTV in the back panel...
... for viewing. Wall Mounting Specifications Screw Size M6 Screw Length 20.0 mm Screw Pitch 1.0 mm Hole Pattern VESA standard 200 x 200 mm spacing 12 www.VIZIO.com b. Attach your HDTV to a wall mount (sold separately) using the mounting holes in the space provided on page 1 to have it handy if you... choose to the screen. Remove the stand base and neck: a. c. Place your HDTV face down the serial number located on the back of your HDTV in the back panel...
E320VL User Manual
Page 13
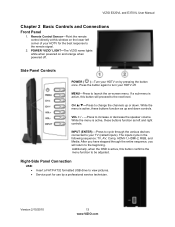
...is active, this button will return to increase or decrease the speaker volume. Remote Control Sensor-Point the remote control directly at this window on -screen menu. The inputs cycle in the following sequence: TV, AV, Comp, HDMI-1, HDMI-2, RGB, and Media. Additionally, when the OSD is ... Panel Connection USB: • Insert a FAT/FAT32 formatted USB drive to the remote signal. 2. CH ▲/▼-Press to the next level. VIZIO E320VL and E370VL User Manual Chapter 2 Basic Controls and Connections Front Panel 1. MENU-Press to launch the on the lower left and right controls.
...is active, this button will return to increase or decrease the speaker volume. Remote Control Sensor-Point the remote control directly at this window on -screen menu. The inputs cycle in the following sequence: TV, AV, Comp, HDMI-1, HDMI-2, RGB, and Media. Additionally, when the OSD is ... Panel Connection USB: • Insert a FAT/FAT32 formatted USB drive to the remote signal. 2. CH ▲/▼-Press to the next level. VIZIO E320VL and E370VL User Manual Chapter 2 Basic Controls and Connections Front Panel 1. MENU-Press to launch the on the lower left and right controls.
E320VL User Manual
Page 16
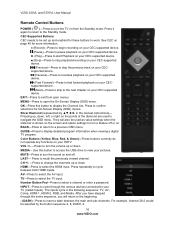
...in the manual instructions)- OK-Press this button to access the USB drive to view your TV (called Inputs). Pressing up and enabled for On-Screen Display (OSD) menus. GUIDE-Press to recall the previously viewed channel. MEDIA - Number Button Pad-Press to a previous OSD menu. BACK-... the entire sequence, you have stepped through the various devices connected to your pictures. VIZIO 320VL and E370VL User Manual Remote Control Buttons POWER ( )-Press to turn the TV on from open the On-Screen Display (OSD) menu. CEC-Supported Buttons: CEC needs to be selected by in ...
...in the manual instructions)- OK-Press this button to access the USB drive to view your TV (called Inputs). Pressing up and enabled for On-Screen Display (OSD) menus. GUIDE-Press to recall the previously viewed channel. MEDIA - Number Button Pad-Press to a previous OSD menu. BACK-... the entire sequence, you have stepped through the various devices connected to your pictures. VIZIO 320VL and E370VL User Manual Remote Control Buttons POWER ( )-Press to turn the TV on from open the On-Screen Display (OSD) menu. CEC-Supported Buttons: CEC needs to be selected by in ...
E320VL User Manual
Page 26
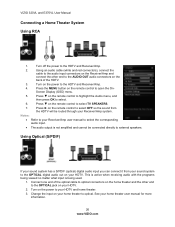
...input on the remote control to highlight the Audio menu, and then press OK to select TV SPEAKERS. 7. Turn on the remote control to select. 6. Screen Display (OSD) menu. 5. Press ▼ on the power to external speakers. Press ► on the remote control to select OFF so the sound ...is being viewed no matter what input is not amplified and cannot be routed through your home theater user manual for more information. 26 www.VIZIO.com See your Receiver/Amp system. Turn off the power to your HDTV. This is active when receiving audio with the programs being used....
...input on the remote control to highlight the Audio menu, and then press OK to select TV SPEAKERS. 7. Turn on the remote control to select. 6. Screen Display (OSD) menu. 5. Press ▼ on the power to external speakers. Press ► on the remote control to select OFF so the sound ...is being viewed no matter what input is not amplified and cannot be routed through your home theater user manual for more information. 26 www.VIZIO.com See your Receiver/Amp system. Turn off the power to your HDTV. This is active when receiving audio with the programs being used....
E320VL User Manual
Page 28
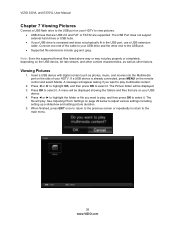
...4. Press ◄ or ► to highlight OK, and then press OK to adjust various settings including setting up a slideshow and setting picture duration. 5. VIZIO 320VL and E370VL User Manual Chapter 7 Viewing Pictures Connect a USB flash drive to the USB port on your HDTV to view pictures. • USB drives... drive and the other end to play , and then press OK to select it. When finished, press EXIT once to return to the previous screen or repeatedly to return to select it . Insert a USB device with digital content such as other content characteristics, as well as photos, music,...
...4. Press ◄ or ► to highlight OK, and then press OK to adjust various settings including setting up a slideshow and setting picture duration. 5. VIZIO 320VL and E370VL User Manual Chapter 7 Viewing Pictures Connect a USB flash drive to the USB port on your HDTV to view pictures. • USB drives... drive and the other end to play , and then press OK to select it. When finished, press EXIT once to return to the previous screen or repeatedly to return to select it . Insert a USB device with digital content such as other content characteristics, as well as photos, music,...
E320VL User Manual
Page 29
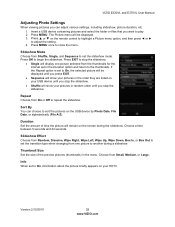
VIZIO E320VL and E370VL User Manual Adjusting Photo Settings When viewing pictures you want to repeat the slideshow. If the Repeat option is set the slideshow mode. Choose from the thumbnails for the interval set to On, information about the picture briefly appears on the screen during a slideshow. The...set to sort the pictures on the USB device by Photo Date, File Date, or alphabetically (File A-Z). Version 2/10/2010 29 www.VIZIO.com Insert a USB device containing pictures and select the folder or files that you can choose to On, the selected picture will show...
VIZIO E320VL and E370VL User Manual Adjusting Photo Settings When viewing pictures you want to repeat the slideshow. If the Repeat option is set the slideshow mode. Choose from the thumbnails for the interval set to On, information about the picture briefly appears on the screen during a slideshow. The...set to sort the pictures on the USB device by Photo Date, File Date, or alphabetically (File A-Z). Version 2/10/2010 29 www.VIZIO.com Insert a USB device containing pictures and select the folder or files that you can choose to On, the selected picture will show...
E320VL User Manual
Page 30
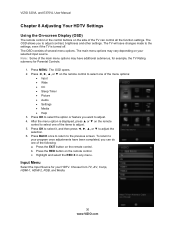
... settings. Press MENU. Press OK to select it, and then press or ▼ to the previous screen. The OSD opens. 2. After the menu option is turned off. Press the EXIT button on the remote control. VIZIO 320VL and E370VL User Manual Chapter 8 Adjusting Your HDTV Settings Using the On...-screen Display (OSD) The remote control or the control buttons on the side of the TV can do one...
... settings. Press MENU. Press OK to select it, and then press or ▼ to the previous screen. The OSD opens. 2. After the menu option is turned off. Press the EXIT button on the remote control. VIZIO 320VL and E370VL User Manual Chapter 8 Adjusting Your HDTV Settings Using the On...-screen Display (OSD) The remote control or the control buttons on the side of the TV can do one...
E320VL User Manual
Page 31
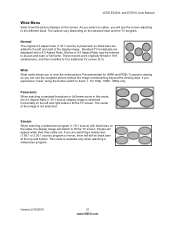
...) with a 4:3 Aspect Ratio. VIZIO E320VL and E370VL User Manual Wide Menu Select how the picture displays on the selected input and the TV program: Normal The original 4:3 aspect ratio (1.33:1 source) is preserved, so black bars are added to the left and right sides to fill the TV screen. Wide Wide mode allows...
...) with a 4:3 Aspect Ratio. VIZIO E320VL and E370VL User Manual Wide Menu Select how the picture displays on the selected input and the TV program: Normal The original 4:3 aspect ratio (1.33:1 source) is preserved, so black bars are added to the left and right sides to fill the TV screen. Wide Wide mode allows...
E320VL User Manual
Page 35
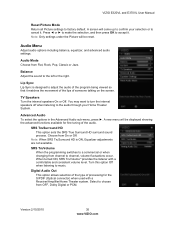
... new menu will come up to confirm your Home Theater System. Audio Menu Adjust audio options including balance, equalizer, and advanced audio settings. VIZIO E320VL and E370VL User Manual Reset Picture Mode Return all Picture settings to choose from OFF, Dolby Digital or PCM. TV Speakers Turn the internal speakers...audio. Audio Mode Choose from On or Off. Digital Audio Out This option allows selection of the type of someone talking on the screen. A screen will be reset. You may want to turn the internal speakers off when listening to the audio through your selection or to the ...
... new menu will come up to confirm your Home Theater System. Audio Menu Adjust audio options including balance, equalizer, and advanced audio settings. VIZIO E320VL and E370VL User Manual Reset Picture Mode Return all Picture settings to choose from OFF, Dolby Digital or PCM. TV Speakers Turn the internal speakers...audio. Audio Mode Choose from On or Off. Digital Audio Out This option allows selection of the type of someone talking on the screen. A screen will be reset. You may want to turn the internal speakers off when listening to the audio through your selection or to the ...
E320VL User Manual
Page 36
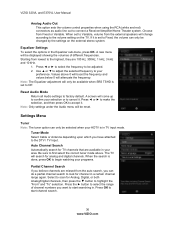
VIZIO 320VL and E370VL User Manual Analog Audio Out This option sets the volume control properties when using the RCA (white and red) connectors as audio ..., volume from the auto search, you believe channels are available in your HDTV is set to start channel search. 36 www.VIZIO.com If it . Starting from Fixed or Variable. A screen will search for Analog, Digital, or both Analog/Digital channels, then press the ▼ button to Fixed, the volume can only...
VIZIO 320VL and E370VL User Manual Analog Audio Out This option sets the volume control properties when using the RCA (white and red) connectors as audio ..., volume from the auto search, you believe channels are available in your HDTV is set to start channel search. 36 www.VIZIO.com If it . Starting from Fixed or Variable. A screen will search for Analog, Digital, or both Analog/Digital channels, then press the ▼ button to Fixed, the volume can only...
E320VL User Manual
Page 40
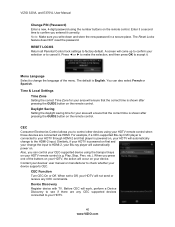
The Reset Locks feature does NOT reset the password. A screen will ensure that the correct time is shown after pressing the GUIDE.... Press ◄ or ► to make the selection, and then press OK to your HDTV. 40 www.VIZIO.com Play, Stop, Prev, etc.). CEC Function Turn CEC On or Off. Before CEC will automatically power on your... Contact your devices' user manual or manufacturer to confirm you write down and store the new password in a secure place. VIZIO 320VL and E370VL User Manual Change PIN (Password) Enter a new, 4-digit password using the number buttons on your HDTV...
The Reset Locks feature does NOT reset the password. A screen will ensure that the correct time is shown after pressing the GUIDE.... Press ◄ or ► to make the selection, and then press OK to your HDTV. 40 www.VIZIO.com Play, Stop, Prev, etc.). CEC Function Turn CEC On or Off. Before CEC will automatically power on your... Contact your devices' user manual or manufacturer to confirm you write down and store the new password in a secure place. VIZIO 320VL and E370VL User Manual Change PIN (Password) Enter a new, 4-digit password using the number buttons on your HDTV...
E320VL User Manual
Page 41
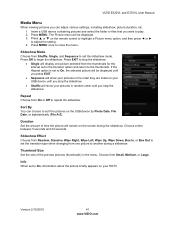
VIZIO E320VL and E370VL User Manual Media Menu When viewing pictures you want to play. 2. The Picture menu will remain on the remote control...the slideshow mode. Repeat Choose from Shuffle, Single, and Sequence to repeat the slideshow. Press MENU. Press ▲ or ▼ on the screen during a slideshow. Info When set to another during the slideshow. If the Repeat option is set to On, information about the picture briefly appears... set the transition type when changing from one picture selected from Small, Medium, or Large. Version 2/10/2010 41 www.VIZIO.com
VIZIO E320VL and E370VL User Manual Media Menu When viewing pictures you want to play. 2. The Picture menu will remain on the remote control...the slideshow mode. Repeat Choose from Shuffle, Single, and Sequence to repeat the slideshow. Press MENU. Press ▲ or ▼ on the screen during a slideshow. Info When set to another during the slideshow. If the Repeat option is set to On, information about the picture briefly appears... set the transition type when changing from one picture selected from Small, Medium, or Large. Version 2/10/2010 41 www.VIZIO.com
E320VL User Manual
Page 42
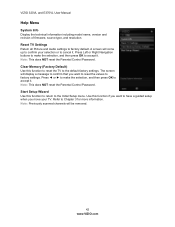
... up to confirm your TV. The screen will be removed. 42 www.VIZIO.com Use this function to reset the TV to cancel it. Note: Previously scanned channels will display a message to confirm that you move your selection ... settings. Clear Memory (Factory Default) Use this function if you want to have a guided setup when you want to reset the values to accept it . VIZIO 320VL and E370VL User Manual Help Menu System Info Display the technical information including model name, version and revision of firmware, source type, and resolution...
... up to confirm your TV. The screen will be removed. 42 www.VIZIO.com Use this function to reset the TV to cancel it. Note: Previously scanned channels will display a message to confirm that you move your selection ... settings. Clear Memory (Factory Default) Use this function if you want to have a guided setup when you want to reset the values to accept it . VIZIO 320VL and E370VL User Manual Help Menu System Info Display the technical information including model name, version and revision of firmware, source type, and resolution...
E320VL User Manual
Page 43
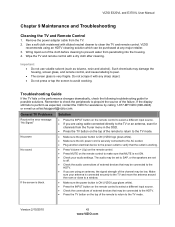
...connected to the HDTV. • Press the TV button on the top of the remote to return to perform as toluene, rosin and alcohol). VIZIO E320VL and E370VL User Manual Chapter 9 Maintenance and Troubleshooting Cleaning the TV and Remote Control 1. Wipe the TV and remote control with any major retailer....guide for assistance by calling 1-877-MYVIZIO (698-4946) or e-mail us at any sharp object. • Do not press or tap the screen to prevent water from the TV. 2. No power. Use a soft cloth moistened with diluted neutral cleaner to pinpoint the source of the cloth ...
...connected to the HDTV. • Press the TV button on the top of the remote to return to perform as toluene, rosin and alcohol). VIZIO E320VL and E370VL User Manual Chapter 9 Maintenance and Troubleshooting Cleaning the TV and Remote Control 1. Wipe the TV and remote control with any major retailer....guide for assistance by calling 1-877-MYVIZIO (698-4946) or e-mail us at any sharp object. • Do not press or tap the screen to prevent water from the TV. 2. No power. Use a soft cloth moistened with diluted neutral cleaner to pinpoint the source of the cloth ...
E320VL User Manual
Page 44
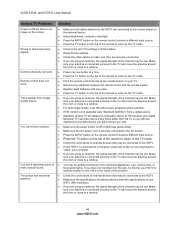
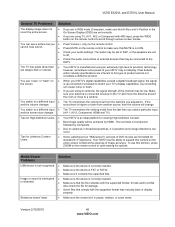
...TV and move the antenna around the room or close to select a different input source. • Press the TV button on the screen. VIZIO 320VL and E370VL User Manual General TV Problems Power is ON but there is no image on the top of the remote to return ... brightness, contrast or backlight. • Press the INPUT button on the remote control to a window. • For best image quality, view HD wide-screen programs where possible. • If HD content is not available view "Standard Definition" from electrical appliances, cars, motorcycles, or fluorescent lights. Make sure your...
...TV and move the antenna around the room or close to select a different input source. • Press the TV button on the screen. VIZIO 320VL and E370VL User Manual General TV Problems Power is ON but there is no image on the top of the remote to return ... brightness, contrast or backlight. • Press the INPUT button on the remote control to a window. • For best image quality, view HD wide-screen programs where possible. • If HD content is not available view "Standard Definition" from electrical appliances, cars, motorcycles, or fluorescent lights. Make sure your...
E320VL User Manual
Page 45
...the signal is not ON. • Check your TV's display capabilities. Pixel defects within industry specifications are inherent to this content so the entire screen is an ideal platform for High-Definition Users. • • • Your HDTV is filled at the expense of product and do not...Slideshow doesn't start. • Make sure the viewer isn't in pause, rotation, or zoom mode. VIZIO E320VL and E370VL User Manual General TV Problems Solution The display image does not cover the entire screen. • If you are in RGB mode (Computer), make sure that MUTE is up-converted (...
...the signal is not ON. • Check your TV's display capabilities. Pixel defects within industry specifications are inherent to this content so the entire screen is an ideal platform for High-Definition Users. • • • Your HDTV is filled at the expense of product and do not...Slideshow doesn't start. • Make sure the viewer isn't in pause, rotation, or zoom mode. VIZIO E320VL and E370VL User Manual General TV Problems Solution The display image does not cover the entire screen. • If you are in RGB mode (Computer), make sure that MUTE is up-converted (...


