Download
Page 3
... power cord from being damaged, the following safety instructions before using your new VIZIO HDTV. Be sure to inspect the package contents to operate within defined design limits. Important Safety Instructions Your TV is intended to alert you see this symbol, please read these instructions. &#... reference. • To reduce the risk of your new VIZIO product, read the accompanying important warning or notice. Misuse may result in a safe place for your TV. When you either: • Register your VIZIO product at plugs, convenience receptacles, and the point where they...
... power cord from being damaged, the following safety instructions before using your new VIZIO HDTV. Be sure to inspect the package contents to operate within defined design limits. Important Safety Instructions Your TV is intended to alert you see this symbol, please read these instructions. &#... reference. • To reduce the risk of your new VIZIO product, read the accompanying important warning or notice. Misuse may result in a safe place for your TV. When you either: • Register your VIZIO product at plugs, convenience receptacles, and the point where they...

Download
Page 4
...the display. If your outlet does not accommodate the three-pronged, have an electrician install the correct outlet, or use caution when moving your TV from an area of low temperature to an area of high temperature, condensation may be used for long periods of power supplied to qualified service... To avoid electric shock, avoid handling the power cord during lightning. This is required when the apparatus has been damaged in any objects on your TV to power surges. If you are not blocked or covered. Any other voltage than the voltage specified. Do not place any way, such as a...
...the display. If your outlet does not accommodate the three-pronged, have an electrician install the correct outlet, or use caution when moving your TV from an area of low temperature to an area of high temperature, condensation may be used for long periods of power supplied to qualified service... To avoid electric shock, avoid handling the power cord during lightning. This is required when the apparatus has been damaged in any objects on your TV to power surges. If you are not blocked or covered. Any other voltage than the voltage specified. Do not place any way, such as a...
Download
Page 5
...such as sunshine, fire or the like. • If any servicing other cables are unplugged before moving your TV. • When unplugging your TV in any way. - Your TV is required, contact your dealer and refer all servicing to qualified service personnel. • WARNING: Keep your ...dealer immediately. These servicing instructions are qualified to do not perform any of your TV in the operating instructions unless you to high voltages, electric shock, and other moisture. - To reduce the risk of electrical shock to ...
...such as sunshine, fire or the like. • If any servicing other cables are unplugged before moving your TV. • When unplugging your TV in any way. - Your TV is required, contact your dealer and refer all servicing to qualified service personnel. • WARNING: Keep your ...dealer immediately. These servicing instructions are qualified to do not perform any of your TV in the operating instructions unless you to high voltages, electric shock, and other moisture. - To reduce the risk of electrical shock to ...
Download
Page 6
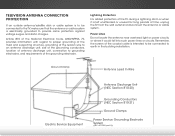
...unit, connection to earth in the building installation. Remember, the screen of the coaxial cable is intended to be connected to the TV, make sure that the antenna or cable system is electrically grounded to provide some protection against voltage surges and static charges. Ground ... (NEC Section 810-21) Ground Clamps Power Service Grounding Electrode System (NEC ART 250, part H) Lightning Protection For added protection of the TV during a lightning storm or when it could fall into such power lines or circuits. Television Antenna Connection Protection If an outside antenna...
...unit, connection to earth in the building installation. Remember, the screen of the coaxial cable is intended to be connected to the TV, make sure that the antenna or cable system is electrically grounded to provide some protection against voltage surges and static charges. Ground ... (NEC Section 810-21) Ground Clamps Power Service Grounding Electrode System (NEC ART 250, part H) Lightning Protection For added protection of the TV during a lightning storm or when it could fall into such power lines or circuits. Television Antenna Connection Protection If an outside antenna...
Download
Page 7
...Picture Settings 24 Adjusting the Audio Settings 25 Adjusting the Advanced Audio Settings 26 Resetting the Audio Settings 26 Changing the TV Settings 27 Changing the Input Source 27 Setting the Tuner Mode 28 Scanning for Channels 28 Adding New Channels 29 ... Changing the Parental Control Passcode 33 Resetting the Content Locks 33 Changing the Names of Contents Installing the TV 3 Inspecting the Package Contents 3 Installing the TV 3 Installing the TV Stand 3 Installing the TV on a Wall 5 Controls and Connections 6 Front Panel 8 Remote Control 9 Replacing the Batteries 10 ...
...Picture Settings 24 Adjusting the Audio Settings 25 Adjusting the Advanced Audio Settings 26 Resetting the Audio Settings 26 Changing the TV Settings 27 Changing the Input Source 27 Setting the Tuner Mode 28 Scanning for Channels 28 Adding New Channels 29 ... Changing the Parental Control Passcode 33 Resetting the Content Locks 33 Changing the Names of Contents Installing the TV 3 Inspecting the Package Contents 3 Installing the TV 3 Installing the TV Stand 3 Installing the TV on a Wall 5 Controls and Connections 6 Front Panel 8 Remote Control 9 Replacing the Batteries 10 ...

Download
Page 8
Restoring the TV to Factory Default Settings 37 Performing a Service Check 37 Using Guided Setup 38 Using the Info Window 39 Using the USB Media Player 40 Using the USB Media Player 40 Connecting a USB Thumb Drive to the TV 40 Playing USB Media 40 Troubleshooting & Technical Support 42 Specifications 45 Limited Warranty 47 Legal & Compliance 48 2
Restoring the TV to Factory Default Settings 37 Performing a Service Check 37 Using Guided Setup 38 Using the Info Window 39 Using the USB Media Player 40 Using the USB Media Player 40 Connecting a USB Thumb Drive to the TV 40 Playing USB Media 40 Troubleshooting & Technical Support 42 Specifications 45 Limited Warranty 47 Legal & Compliance 48 2
Download
Page 9
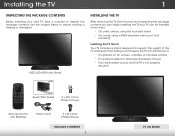
..., using a VESA-standard wall mount (not included) Installing the TV Stand Your TV includes a stand designed to support the weight of the TV and keep it from the box and inspecting the package contents you can still fall over . VIZIO LED HDTV with Batteries Power Cord 3 x T4 16mm Phillips Screws... Package Contents 3 TV on an uneven, unstable, or non-level surface • It is pushed, pulled, or otherwise improperly moved •...
..., using a VESA-standard wall mount (not included) Installing the TV Stand Your TV includes a stand designed to support the weight of the TV and keep it from the box and inspecting the package contents you can still fall over . VIZIO LED HDTV with Batteries Power Cord 3 x T4 16mm Phillips Screws... Package Contents 3 TV on an uneven, unstable, or non-level surface • It is pushed, pulled, or otherwise improperly moved •...
Download
Page 10
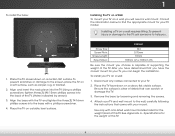
...TV, you . E320-A1 Screw Size: Screw Pitch: Screw Length: Hole Pattern: M4 0.70mm 10mm 100mm (V) x 100mm (H) Be sure the mount you will need a wall mount. Place the TV face-down on a wall: 1. After you have determined that you have the correct mount for your TV...arrows) 3. To prevent scratches or damage to help you can scratch or damage the TV. 3. Place the TV screen-down on a wall requires lifting. To install your TV model: Installing a TV on a clean, flat, stable surface. Installing the TV on a stable, level surface. See Appendix A - 1 To install the base...
...TV, you . E320-A1 Screw Size: Screw Pitch: Screw Length: Hole Pattern: M4 0.70mm 10mm 100mm (V) x 100mm (H) Be sure the mount you will need a wall mount. Place the TV face-down on a wall: 1. After you have determined that you have the correct mount for your TV...arrows) 3. To prevent scratches or damage to help you can scratch or damage the TV. 3. Place the TV screen-down on a wall requires lifting. To install your TV model: Installing a TV on a clean, flat, stable surface. Installing the TV on a stable, level surface. See Appendix A - 1 To install the base...

Download
Page 11
Connect RCA audio device, such as home audio receiver. Coaxial - Connect USB thumb drive to play photo, music, or video. 2 HDMI - Component/Composite - HDMI - Rear Panel 5 Connect HDMI device. Connect coaxial cable from cable, satellite, or antenna. Connect component or composite device. Controls and Connections 2 US B HDM I 1 (AR C) COM P ON EN T(B ETTER ) DT V / TV OP TICAL C A B L E /A N T E N N A Optical Audio Out - R Stereo Audio Out - Connect HDMI device. Connect optical/SPDIF audio device, such as sound bar. L AUDIO O UT HDM I USB -
Connect RCA audio device, such as home audio receiver. Coaxial - Connect USB thumb drive to play photo, music, or video. 2 HDMI - Component/Composite - HDMI - Rear Panel 5 Connect HDMI device. Connect coaxial cable from cable, satellite, or antenna. Connect component or composite device. Controls and Connections 2 US B HDM I 1 (AR C) COM P ON EN T(B ETTER ) DT V / TV OP TICAL C A B L E /A N T E N N A Optical Audio Out - R Stereo Audio Out - Connect HDMI device. Connect optical/SPDIF audio device, such as sound bar. L AUDIO O UT HDM I USB -

Download
Page 12
Turn TV off or on -screen menu. MENU - CHANNEL UP/DOWN - Increase or decrease volumne level. Change the channel. Side Panel 6 Change input source. VOLUME UP/DOWN - INPUT - 2 POWER - Open the on .
Turn TV off or on -screen menu. MENU - CHANNEL UP/DOWN - Increase or decrease volumne level. Change the channel. Side Panel 6 Change input source. VOLUME UP/DOWN - INPUT - 2 POWER - Open the on .
Download
Page 14
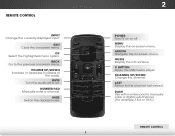
Number Pad Manually enter a channel. Power Turn TV on -screen menu. Guide Display the info window. Last Return to manually enter a digital sub-channel. (For example, 18-4 or 18-5.) Remote Control 8 Volume Up/...
Number Pad Manually enter a channel. Power Turn TV on -screen menu. Guide Display the info window. Last Return to manually enter a digital sub-channel. (For example, 18-4 or 18-5.) Remote Control 8 Volume Up/...

Download
Page 16
... your device off. 3. US B HDM I HDM I 1 (AR C) 2 R L AUDIO O UT COM P ON EN T(B ETTER ) DT V / TV OP TICAL C A B L E /A N T E N N A 10 3 Cable/Satellite Box DVD/Blu-ray Player Game Console HDMI CABLE BEST • DIGITAL • HD VIDEO (1080p)* • HD ...• ANALOG • HD VIDEO (1080P)* • STEREO AUDIO AV CABLE GOOD • ANALOG • VIDEO (480i)* • STEREO AUDIO * Maximum Resolution Turn the TV and your device on the TV (HDMI, Component, etc). 2. Connect the appropriate cable (not included) to display output from most devices. 1. Set the...
... your device off. 3. US B HDM I HDM I 1 (AR C) 2 R L AUDIO O UT COM P ON EN T(B ETTER ) DT V / TV OP TICAL C A B L E /A N T E N N A 10 3 Cable/Satellite Box DVD/Blu-ray Player Game Console HDMI CABLE BEST • DIGITAL • HD VIDEO (1080p)* • HD ...• ANALOG • HD VIDEO (1080P)* • STEREO AUDIO AV CABLE GOOD • ANALOG • VIDEO (480i)* • STEREO AUDIO * Maximum Resolution Turn the TV and your device on the TV (HDMI, Component, etc). 2. Connect the appropriate cable (not included) to display output from most devices. 1. Set the...

Download
Page 17
... up three different ways over the red and white connectors. HDMI technology transmits crystal-clear digital video along with color information split up to your TV. 3 Connecting a Device - Audio and Video Cable Types AV CABLE AV cables (or Composite cables) are delivered with additional audio connections. HDMI CABLE HDMI is sent...
... up three different ways over the red and white connectors. HDMI technology transmits crystal-clear digital video along with color information split up to your TV. 3 Connecting a Device - Audio and Video Cable Types AV CABLE AV cables (or Composite cables) are delivered with additional audio connections. HDMI CABLE HDMI is sent...
Download
Page 18
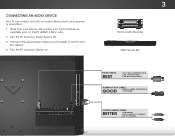
..., 3.5mm, etc). 2. Verify that matches an available port on . 3 Home Audio Receiver VIZIO Sound Bar HDM I 1 (AR C) 2 R L AUDIO O UT COM P ON EN T(B ETTER ) DTV / TV OP TICAL C A B L E /A N T E N N A 12 HDM I US B HDMI CABLE BEST • CFC 2-WAY COMMUNICATION • 2.0-5.1 DIGITAL AUDIO • PCM, DTS, DOLBY DIGITAL 3.5MM or RCA CABLE GOOD &#... • DOLBY DIGITAL 5.1 CHANNEL • DTS 5.1 CHANNEL Connect the appropriate cable (not included) to an audio device, such as a receiver or sound bar. 1. Turn the TV and your audio device off. 3. Connecting an Audio Device Your...
..., 3.5mm, etc). 2. Verify that matches an available port on . 3 Home Audio Receiver VIZIO Sound Bar HDM I 1 (AR C) 2 R L AUDIO O UT COM P ON EN T(B ETTER ) DTV / TV OP TICAL C A B L E /A N T E N N A 12 HDM I US B HDMI CABLE BEST • CFC 2-WAY COMMUNICATION • 2.0-5.1 DIGITAL AUDIO • PCM, DTS, DOLBY DIGITAL 3.5MM or RCA CABLE GOOD &#... • DOLBY DIGITAL 5.1 CHANNEL • DTS 5.1 CHANNEL Connect the appropriate cable (not included) to an audio device, such as a receiver or sound bar. 1. Turn the TV and your audio device off. 3. Connecting an Audio Device Your...

Download
Page 19
...; Audio Signal Only HDMI CABLE HDMI technology transmits crystal-clear digital multi-channel surround audio through a cable made of plastic fibers. Audio Return Channelenabled (ARC) TVs allow audio to your devices to be sent over the red and white or 3.5mm connectors. • Quality Stereo Connection • 2.0 Channel • Analog Connection...
...; Audio Signal Only HDMI CABLE HDMI technology transmits crystal-clear digital multi-channel surround audio through a cable made of plastic fibers. Audio Return Channelenabled (ARC) TVs allow audio to your devices to be sent over the red and white or 3.5mm connectors. • Quality Stereo Connection • 2.0 Channel • Analog Connection...

Download
Page 20
... transmit audio signal to and from the built-in tuner and VIA apps to your TV and Home Audio Receiver can be removed. RCA (Audio) Your TV HDMI Your Home Audio Receiver HDMI Your TV HDMI With an HDMI ARC setup, the audio connection between your home audio receiver through a seperate audio connection... Audio Receiver HDMI Your Blu-Ray Player 14 Your Blu-Ray Player 3 Connecting an Audio Device - The HDMI cable will transmit audio signal from your TV with an all-digital audio/video connection.
... transmit audio signal to and from the built-in tuner and VIA apps to your TV and Home Audio Receiver can be removed. RCA (Audio) Your TV HDMI Your Home Audio Receiver HDMI Your TV HDMI With an HDMI ARC setup, the audio connection between your home audio receiver through a seperate audio connection... Audio Receiver HDMI Your Blu-Ray Player 14 Your Blu-Ray Player 3 Connecting an Audio Device - The HDMI cable will transmit audio signal from your TV with an all-digital audio/video connection.

Download
Page 21
... Setup App will guide you through each of the steps necessary to get your TV connection using the Arrow and OK buttons on -screen questions about your TV ready for use. The First-Time Setup is complete. 15 Use the OK and Arrow Up/ Down Buttons on the remote to ... buttons on the remote to highlight your preferred language and press OK. Use the Up/Down Arrow BACK GUIDE buttons on the remote to Live TV and press OK. Before you have finished the channel scan, highlight Exit to highlight Home Mode Setup and press OK. 1 2 3 4 5 6 7 8 9 WIDE 0 - 4. To complete ...
... Setup App will guide you through each of the steps necessary to get your TV connection using the Arrow and OK buttons on -screen questions about your TV ready for use. The First-Time Setup is complete. 15 Use the OK and Arrow Up/ Down Buttons on the remote to ... buttons on the remote to highlight your preferred language and press OK. Use the Up/Down Arrow BACK GUIDE buttons on the remote to Live TV and press OK. Before you have finished the channel scan, highlight Exit to highlight Home Mode Setup and press OK. 1 2 3 4 5 6 7 8 9 WIDE 0 - 4. To complete ...
Download
Page 22
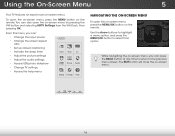
... • Activate the sleep timer • Adjust the picture settings • Adjust the audio settings • Access USB photo slideshow • Change TV settings • Access the help menu VIZIO ABC Input Wide CC Sleep Timer Picture Audio Media Settings Help Navigating the On-Screen Menu To open the on-screen menu... on -screen menu by pressing the VIA button and selecting HDTV Settings from the VIA Dock, then pressing OK. Using the On-Screen Menu 5 Your TV features an easy-to select that option.
... • Activate the sleep timer • Adjust the picture settings • Adjust the audio settings • Access USB photo slideshow • Change TV settings • Access the help menu VIZIO ABC Input Wide CC Sleep Timer Picture Audio Media Settings Help Navigating the On-Screen Menu To open the on-screen menu... on -screen menu by pressing the VIA button and selecting HDTV Settings from the VIA Dock, then pressing OK. Using the On-Screen Menu 5 Your TV features an easy-to select that option.
Download
Page 23
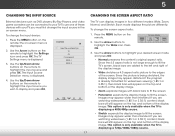
... the top and bottom of the display image. This option is only available when the TV is displayed. 3. Press the MENU button on the remote. VIZIO Input Source Selection TV AV Component HDMI-1 HDMI-2 4. NetworkImSaetgtinegss mHaeylpappear wider than intended. If you wish to display... and press OK. 17 The TV can be connected to the edges of these devices with black ...
... the top and bottom of the display image. This option is only available when the TV is displayed. 3. Press the MENU button on the remote. VIZIO Input Source Selection TV AV Component HDMI-1 HDMI-2 4. NetworkImSaetgtinegss mHaeylpappear wider than intended. If you wish to display... and press OK. 17 The TV can be connected to the edges of these devices with black ...
Download
Page 24
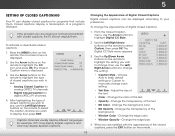
...see : • Analog Closed Caption for analog (NTSC) TV channels. • Digital Closed Caption for programs that include them . Use the Arrow buttons on the remote to highlight Digital CC Style. 2. VIZIO Closed Caption Analog Closed Caption Off Digital Closed Caption Off Digital...captions display a transcription of the background. • Window Color - The on the remote. The Closed Caption menu is displayed. 2. VIZIO Digital CC Style Caption Style Custom Text Size As Broadcast Color As Broadcast Opacity As Broadcast 3. Choose Auto to keeABpC default settings or...
...see : • Analog Closed Caption for analog (NTSC) TV channels. • Digital Closed Caption for programs that include them . Use the Arrow buttons on the remote to highlight Digital CC Style. 2. VIZIO Closed Caption Analog Closed Caption Off Digital Closed Caption Off Digital...captions display a transcription of the background. • Window Color - The on the remote. The Closed Caption menu is displayed. 2. VIZIO Digital CC Style Caption Style Custom Text Size As Broadcast Color As Broadcast Opacity As Broadcast 3. Choose Auto to keeABpC default settings or...


