
E291-A1 User Manual
Page 5
... AC/DC power adapter, not the cord. Do not expose batteries to leak which can damage the remote control or injure the operator. Your TV is used for moving your TV. • When unplugging your TV. Opening or removing the back cover may damage the wires inside the cord and cause fire or electric shock. These servicing instructions are qualified...
... AC/DC power adapter, not the cord. Do not expose batteries to leak which can damage the remote control or injure the operator. Your TV is used for moving your TV. • When unplugging your TV. Opening or removing the back cover may damage the wires inside the cord and cause fire or electric shock. These servicing instructions are qualified...

E291-A1 User Manual
Page 6
... earth in wire to an antenna discharge unit, size of the grounding conductors, location of antenna discharge unit, connection to grounding electrodes, and requirements of the grounding electrode. Remember, the screen of time, unplug the TV from the wall outlet and disconnect the antenna or cable system. Television Antenna Connection Protection If an outside antenna/satellite dish or cable system is electrically grounded to...
... earth in wire to an antenna discharge unit, size of the grounding conductors, location of antenna discharge unit, connection to grounding electrodes, and requirements of the grounding electrode. Remember, the screen of time, unplug the TV from the wall outlet and disconnect the antenna or cable system. Television Antenna Connection Protection If an outside antenna/satellite dish or cable system is electrically grounded to...
E291-A1 User Manual
Page 7
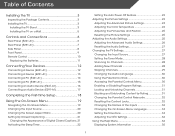
... TV Stand 3 Installing the TV on a Wall 5 Controls and Connections 6 Rear Panel (E241-A1 6 Rear Panel (E291-A1 7 Side Panel 8 Front Panel 9 Remote Control 10 Replacing the Batteries 11 Connecting Your Devices 12 Connecting A Device (E241-A1 12 Connecting A Device (E291-A1 13 Connecting A PC (E241-A1 14 Connecting A PC (E291-A1 15 Connecting an Audio Device (E241-A1 16 Connecting an Audio Device (E291-A1 17 Completing the First-Time Setup 18 Using the On-Screen Menu 19 Navigating the On-Screen Menu 19 Changing the Input Source 20 Changing the Screen Aspect Ratio 20 Setting...
... TV Stand 3 Installing the TV on a Wall 5 Controls and Connections 6 Rear Panel (E241-A1 6 Rear Panel (E291-A1 7 Side Panel 8 Front Panel 9 Remote Control 10 Replacing the Batteries 11 Connecting Your Devices 12 Connecting A Device (E241-A1 12 Connecting A Device (E291-A1 13 Connecting A PC (E241-A1 14 Connecting A PC (E291-A1 15 Connecting an Audio Device (E241-A1 16 Connecting an Audio Device (E291-A1 17 Completing the First-Time Setup 18 Using the On-Screen Menu 19 Navigating the On-Screen Menu 19 Changing the Input Source 20 Changing the Screen Aspect Ratio 20 Setting...

E291-A1 User Manual
Page 8
Resetting the TV Settings 35 Restoring the TV to Factory Default Settings 35 Using the Setup Wizard 36 Using the Info Window 37 Using USB Photo Slideshow 38 Using USB photo slideshow 38 Connecting a USB Thumb Drive to the TV 38 Playing USB Media 39 Troubleshooting & Technical Support 41 Specifications 44 Limited Warranty 46 Legal & Compliance 47 2
Resetting the TV Settings 35 Restoring the TV to Factory Default Settings 35 Using the Setup Wizard 36 Using the Info Window 37 Using USB Photo Slideshow 38 Using USB photo slideshow 38 Connecting a USB Thumb Drive to the TV 38 Playing USB Media 39 Troubleshooting & Technical Support 41 Specifications 44 Limited Warranty 46 Legal & Compliance 47 2

E291-A1 User Manual
Page 11
... TV model: Installing a TV on a wall requires lifting. Disconnect any cables connected to the wall, carefully following the instructions that came with a UL-listed wall mount bracket rated for your TV, you choose is clear of this TV. Remove the base by loosening and removing the screws. 4. See Appendix A - After you have determined that can begin the installation. Attach your TV and wall mount to your mount. E241-A1 E291-A1 Screw Size: Screw Length: Screw...
... TV model: Installing a TV on a wall requires lifting. Disconnect any cables connected to the wall, carefully following the instructions that came with a UL-listed wall mount bracket rated for your TV, you choose is clear of this TV. Remove the base by loosening and removing the screws. 4. See Appendix A - After you have determined that can begin the installation. Attach your TV and wall mount to your mount. E241-A1 E291-A1 Screw Size: Screw Length: Screw...
E291-A1 User Manual
Page 13
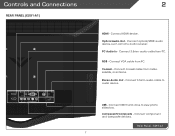
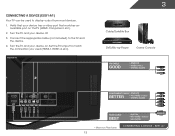
Optical Audio Out - RGB - Connect 3.5mm audio cable to view photo slideshow. Connect 3.5mm audio cable from cable, satellite, or antenna. Stereo Audio Out - E291-A1 7 Connect USB thumb drive to audio device. PC Audio In - Coaxial - Connect coaxial cable from PC. Connect component and composite devices. Rear Panel - Connect optical/SPDIF audio device, such as home audio receiver. Connect VGA cable from PC. Controls and Connections Rear Panel (E291-A1) 2 HDMI - Connect HDMI device. USB - Component/Composite -
Optical Audio Out - RGB - Connect 3.5mm audio cable to view photo slideshow. Connect 3.5mm audio cable from cable, satellite, or antenna. Stereo Audio Out - E291-A1 7 Connect USB thumb drive to audio device. PC Audio In - Coaxial - Connect coaxial cable from PC. Connect component and composite devices. Rear Panel - Connect optical/SPDIF audio device, such as home audio receiver. Connect VGA cable from PC. Controls and Connections Rear Panel (E291-A1) 2 HDMI - Connect HDMI device. USB - Component/Composite -

E291-A1 User Manual
Page 16
...V Button Open the USB photo viewer. Remote Control Input Change the currently-displayed input. Mute Turn the audio off . Menu Display the on or off or on -screen menu. Dash Use with number pad to the previous on -screen menu. Back Go to manually enter a digital sub-channel. (For example, 18-4 or 18-5.) Remote Control Number Pad Manually enter a channel. A/V Controls Control USB photo viewer. Closed Captions Open the closed caption menu. Guide Display the info window. WIDE Switch the display mode. 10 2 Power Turn TV on -screen menu. Arrow Navigate the on -screen menu. Volume...
...V Button Open the USB photo viewer. Remote Control Input Change the currently-displayed input. Mute Turn the audio off . Menu Display the on or off or on -screen menu. Dash Use with number pad to the previous on -screen menu. Back Go to manually enter a digital sub-channel. (For example, 18-4 or 18-5.) Remote Control Number Pad Manually enter a channel. A/V Controls Control USB photo viewer. Closed Captions Open the closed caption menu. Guide Display the info window. WIDE Switch the display mode. 10 2 Power Turn TV on -screen menu. Arrow Navigate the on -screen menu. Volume...
E291-A1 User Manual
Page 18
... available port on . Set the TV's input to the TV and the device. 4. Turn the TV and your device on the TV (HDMI, Component, etc). 2. E241-A1 12 BACK OF TV 3 Cable/Satellite Box DVD/Blu-ray Player Game Console AV CABLE GOOD • ANALOG • VIDEO (480i)* • STEREO AUDIO COMPONENT CABLE • ANALOG BETTER • HD VIDEO (1080i)* • STEREO AUDIO HDMI CABLE BEST • DIGITAL • HD VIDEO (1080p)* • HD AUDIO * Maximum Resolution CONNECTING A DEVICE...
... available port on . Set the TV's input to the TV and the device. 4. Turn the TV and your device on the TV (HDMI, Component, etc). 2. E241-A1 12 BACK OF TV 3 Cable/Satellite Box DVD/Blu-ray Player Game Console AV CABLE GOOD • ANALOG • VIDEO (480i)* • STEREO AUDIO COMPONENT CABLE • ANALOG BETTER • HD VIDEO (1080i)* • STEREO AUDIO HDMI CABLE BEST • DIGITAL • HD VIDEO (1080p)* • HD AUDIO * Maximum Resolution CONNECTING A DEVICE...
E291-A1 User Manual
Page 19
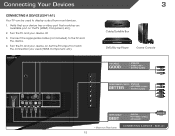
... (HDMI, Component, etc). 2. BACK OF TV 3 Cable/Satellite Box DVD/Blu-ray Player Game Console AV CABLE GOOD • ANALOG • VIDEO (480i)* • STEREO AUDIO COMPONENT CABLE • ANALOG BETTER • HD VIDEO (1080i)* • STEREO AUDIO HDMI CABLE BEST • DIGITAL • HD VIDEO (1080p)* • HD AUDIO * Maximum Resolution CONNECTING A DEVICE - Connect the appropriate cable (not included) to display output from most devices. 1. Turn the TV and your device has a video port that matches an available port on . E291-A1 13...
... (HDMI, Component, etc). 2. BACK OF TV 3 Cable/Satellite Box DVD/Blu-ray Player Game Console AV CABLE GOOD • ANALOG • VIDEO (480i)* • STEREO AUDIO COMPONENT CABLE • ANALOG BETTER • HD VIDEO (1080i)* • STEREO AUDIO HDMI CABLE BEST • DIGITAL • HD VIDEO (1080p)* • HD AUDIO * Maximum Resolution CONNECTING A DEVICE - Connect the appropriate cable (not included) to display output from most devices. 1. Turn the TV and your device has a video port that matches an available port on . E291-A1 13...
E291-A1 User Manual
Page 26
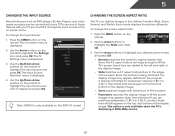
...-wall. Press OK. Each mode displays the picture differently. Since the 4:3 aspect ratio is displayed. 2. 5 Changing the Input Source External devices such as DVD players, Blu-Ray Players, and video game consoles can display images in the on-screen menu. The TV Settings menu is already formatted for widescreen viewing (1.85:1 or 2.35:1), then black bars will still appear on the remote to highlight the Settings icon and press OK. Use the Up/Down Arrow buttons...
...-wall. Press OK. Each mode displays the picture differently. Since the 4:3 aspect ratio is displayed. 2. 5 Changing the Input Source External devices such as DVD players, Blu-Ray Players, and video game consoles can display images in the on-screen menu. The TV Settings menu is already formatted for widescreen viewing (1.85:1 or 2.35:1), then black bars will still appear on the remote to highlight the Settings icon and press OK. Use the Up/Down Arrow buttons...
E291-A1 User Manual
Page 29
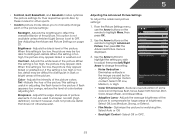
... unless Ambient Light Sensor is useful in adjusting the flesh tones in dark or bright areas of the picture. 5 • Football, Golf, Basketball, and Baseball modes optimize the picture settings for watching film. From the Picture Settings menu, use the Arrow buttons on the remote to manually change the setting: Ambient Light Sensor Medium • Noise Reduction Diminishes artifacts in the image caused by the digitizing of the picture settings: Backlight - Select...
... unless Ambient Light Sensor is useful in adjusting the flesh tones in dark or bright areas of the picture. 5 • Football, Golf, Basketball, and Baseball modes optimize the picture settings for watching film. From the Picture Settings menu, use the Arrow buttons on the remote to manually change the setting: Ambient Light Sensor Medium • Noise Reduction Diminishes artifacts in the image caused by the digitizing of the picture settings: Backlight - Select...
E291-A1 User Manual
Page 31
... Arrow buttons on the remote. Adjusts the loudness of the audio output from the HDMI or RGB input, the size and position of the display image. (RGB input only.) 5. Automatically adjusts display image to the factory default settings: 1. Resetting the Picture Settings To reset the picture settings to optimal size and position. (RGB input only.) Auto Sync EXIT • Horiz. The on the Fine Tune 8 remote to highlight Audio and press OK. From the Picture Settings menu, use the Arrow buttons...
... Arrow buttons on the remote. Adjusts the loudness of the audio output from the HDMI or RGB input, the size and position of the display image. (RGB input only.) 5. Automatically adjusts display image to the factory default settings: 1. Resetting the Picture Settings To reset the picture settings to optimal size and position. (RGB input only.) Auto Sync EXIT • Horiz. The on the Fine Tune 8 remote to highlight Audio and press OK. From the Picture Settings menu, use the Arrow buttons...
E291-A1 User Manual
Page 32
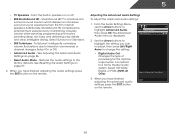
... remote. 26 5 • TV Speakers - StudioSound HD™ is displayed. 2. See Resetting the Audio Settings on page 26. • Reset Audio Mode - Select Off, Dolby Digital, or PCM. (E291-A1 Only) Select the Digital Audio Output Mode 3. Select On or Off. • Advanced Audio - Select Surround or Standard. • SRS TruVolume - TruVolume® intelligently normalizes volume fluctuations due to the factory defaults. The Advanced Digital Audio Out Off Audio menu is a feature-rich surround sound...
... remote. 26 5 • TV Speakers - StudioSound HD™ is displayed. 2. See Resetting the Audio Settings on page 26. • Reset Audio Mode - Select Off, Dolby Digital, or PCM. (E291-A1 Only) Select the Digital Audio Output Mode 3. Select On or Off. • Advanced Audio - Select Surround or Standard. • SRS TruVolume - TruVolume® intelligently normalizes volume fluctuations due to the factory defaults. The Advanced Digital Audio Out Off Audio menu is a feature-rich surround sound...

E291-A1 User Manual
Page 33
...8226; Set up parental controls • Change the on-screen menu language • Set the time • Adjust the CEC settings Settings Input Source Tuner Name Input Parental Controls Menu Language Time & Local Settings CEC Settings Power LED TV English On Changing the Input Source Select input source EXIT To quickly access the Input Source menu, press the INPUT button on -screen menu is displayed. 2. 5 Resetting the Audio Settings To reset the audio settings to highlight Reset Audio Mode and press OK. Changing the TV Settings Using the settings menu, you want to the factory defaults...
...8226; Set up parental controls • Change the on-screen menu language • Set the time • Adjust the CEC settings Settings Input Source Tuner Name Input Parental Controls Menu Language Time & Local Settings CEC Settings Power LED TV English On Changing the Input Source Select input source EXIT To quickly access the Input Source menu, press the INPUT button on -screen menu is displayed. 2. 5 Resetting the Audio Settings To reset the audio settings to highlight Reset Audio Mode and press OK. Changing the TV Settings Using the settings menu, you want to the factory defaults...
E291-A1 User Manual
Page 34
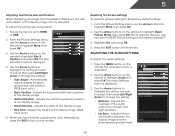
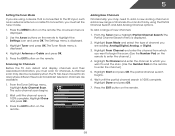
... external antenna or cable TV connection, you must scan for Channels Before the TV can do this by using a device that is displayed. 2. Highlight Antenna or Cable and press OK. 5. The Partial Channel Search menu is connected to begin the scan. (Use the Number Pad on the remote. The auto channel scan begins. 2. Scanning for channels. Press the MENU button on the remote to finish 28 5 Setting the Tuner Mode If you are using the Partial Channel Search and Add Analog Channel...
... external antenna or cable TV connection, you must scan for Channels Before the TV can do this by using a device that is displayed. 2. Highlight Antenna or Cable and press OK. 5. The Partial Channel Search menu is connected to begin the scan. (Use the Number Pad on the remote. The auto channel scan begins. 2. Scanning for channels. Press the MENU button on the remote to finish 28 5 Setting the Tuner Mode If you are using the Partial Channel Search and Add Analog Channel...
E291-A1 User Manual
Page 48
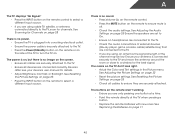
...; Adust the Color and Tint settings in the Picture menu. See Resetting the Picture Settings on the remote to ensure mute is no headphones are connected to the TV. • Check the audio connections of external devices (Blu-ray player, game console, cable/satellite box) that are connected to the TV. • If you are using cable TV, satellite, or antenna connected directly to the TV, scan for details. • Adjust Brightness, Contrast...
...; Adust the Color and Tint settings in the Picture menu. See Resetting the Picture Settings on the remote to ensure mute is no headphones are connected to the TV. • Check the audio connections of external devices (Blu-ray player, game console, cable/satellite box) that are connected to the TV. • If you are using cable TV, satellite, or antenna connected directly to the TV, scan for details. • Adjust Brightness, Contrast...
E291-A1 User Manual
Page 49
... the remote to adjust the volume. Connect your TV's display capabilities. A The image quality is not good. • For the best image quality, view high-definition programs using TV, AV1, AV2, or Component with 480i input, press the WIDE button on the remote to change input source, the display image changes size. • The TV remembers the viewing mode on the source you switch from electrical appliances, cars, or flourescent lights. • Ensure all cables...
... the remote to adjust the volume. Connect your TV's display capabilities. A The image quality is not good. • For the best image quality, view high-definition programs using TV, AV1, AV2, or Component with 480i input, press the WIDE button on the remote to change input source, the display image changes size. • The TV remembers the viewing mode on the source you switch from electrical appliances, cars, or flourescent lights. • Ensure all cables...
E291-A1 User Manual
Page 52
... for parts or labor during the warranty period. Product returns to the "DETAILS" tab of the model's product information page (www.VIZIO.com) or look for the "zero bright pixel" guarantee on select new product purchases. This warranty does not cover, for example: cosmetic damage, normal wear and tear, improper operation, improper voltage supply or power surges, signal issues, damages...
... for parts or labor during the warranty period. Product returns to the "DETAILS" tab of the model's product information page (www.VIZIO.com) or look for the "zero bright pixel" guarantee on select new product purchases. This warranty does not cover, for example: cosmetic damage, normal wear and tear, improper operation, improper voltage supply or power surges, signal issues, damages...
E291-A1 Quick Start Guide
Page 2
... component damage, switch off the power before connecting other components to your TV. • Read these instructions. • Keep these instructions. • Heed all warnings. • Follow all instructions. • Do not use attachments/accessories specified by the manufacturer. • Use only with the cart, stand, tripod, bracket, or table specified by qualified service personnel only. The manufacturer's warranty does not cover user abuse or improper installations...
... component damage, switch off the power before connecting other components to your TV. • Read these instructions. • Keep these instructions. • Heed all warnings. • Follow all instructions. • Do not use attachments/accessories specified by the manufacturer. • Use only with the cart, stand, tripod, bracket, or table specified by qualified service personnel only. The manufacturer's warranty does not cover user abuse or improper installations...
E291-A1 Quick Start Guide
Page 15
..., improper operation, improper voltage supply or power surges, signal issues, damages from warranty service or replacement, whichever is determined to be no charge for the "zero bright pixel" guarantee on select new product purchases. To determine if this occurs, your personal information, VIZIO recommends that affords an equal degree of the limited "ONE YEAR WARRANTY" on the box. CHECK WWW.VIZIO.COM...
..., improper operation, improper voltage supply or power surges, signal issues, damages from warranty service or replacement, whichever is determined to be no charge for the "zero bright pixel" guarantee on select new product purchases. To determine if this occurs, your personal information, VIZIO recommends that affords an equal degree of the limited "ONE YEAR WARRANTY" on the box. CHECK WWW.VIZIO.COM...


