

E291-A1 User Manual
Page 2
Manufactured under license from Dolby Laboratories. StudioSound HD and TruVolume technologies are incorporated under license from SRS Labs, Inc. Changing the factory default picture settings or enabling other features will be achieved. Dolby and the double-D symbol are trademarks of Dolby Laboratories. ® HDMI, the HDMI logo and High-...
Manufactured under license from Dolby Laboratories. StudioSound HD and TruVolume technologies are incorporated under license from SRS Labs, Inc. Changing the factory default picture settings or enabling other features will be achieved. Dolby and the double-D symbol are trademarks of Dolby Laboratories. ® HDMI, the HDMI logo and High-...
E291-A1 User Manual
Page 7
...the Batteries 11 Connecting Your Devices 12 Connecting A Device (E241-A1 12 Connecting A Device (E291-A1 13 Connecting A PC (E241-A1 14 Connecting A PC (E291-A1 15 Connecting an Audio Device (E241-A1 16 Connecting an Audio Device (E291-A1 17 Completing the First-Time Setup 18 Using the On-Screen... 22 Setting the Auto Power Off Feature 22 Adjusting the Picture Settings 22 Adjusting the Advanced Picture Settings 23 Adjusting the Color Temperature 24 Adjusting the Picture Size and Position 25 Resetting the Picture Settings 25 Adjusting the Audio Settings 25 Adjusting the Advanced ...
...the Batteries 11 Connecting Your Devices 12 Connecting A Device (E241-A1 12 Connecting A Device (E291-A1 13 Connecting A PC (E241-A1 14 Connecting A PC (E291-A1 15 Connecting an Audio Device (E241-A1 16 Connecting an Audio Device (E291-A1 17 Completing the First-Time Setup 18 Using the On-Screen... 22 Setting the Auto Power Off Feature 22 Adjusting the Picture Settings 22 Adjusting the Advanced Picture Settings 23 Adjusting the Color Temperature 24 Adjusting the Picture Size and Position 25 Resetting the Picture Settings 25 Adjusting the Audio Settings 25 Adjusting the Advanced ...
E291-A1 User Manual
Page 25
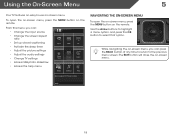
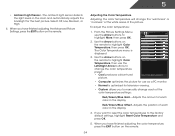
... Change the input source • Change the screen aspect ratio • Set up closed captioning • Activate the sleep timer • Adjust the picture settings • Adjust the audio settings • Change TV settings • Access USB photo slideshow • Access the help menu ABC Input Wide... CC Sleep Timer Picture Audio ? Media Settings Help Menu to the previous menu screen. The EXIT button will close the on the remote. To open the on...
... Change the input source • Change the screen aspect ratio • Set up closed captioning • Activate the sleep timer • Adjust the picture settings • Adjust the audio settings • Change TV settings • Access USB photo slideshow • Access the help menu ABC Input Wide... CC Sleep Timer Picture Audio ? Media Settings Help Menu to the previous menu screen. The EXIT button will close the on the remote. To open the on...
E291-A1 User Manual
Page 26
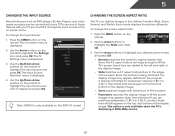
... menu. 5 Changing the Input Source External devices such as DVD players, Blu-Ray Players, and video game consoles can display images in the on the E291-A1 model. To change the screen aspect ratio: 1. Input Source Selection TV AV Component HDMI 1 HDMI 2 RGB 4. EXIT Note: HDMI 2 is displayed. 2. ... the content's original aspect ratio. Since the 4:3 aspect ratio is not large enough to highlight the Settings icon and press OK. Since the picture is displaying a 480i/480p source. 20 Use the Up/Down Arrow buttons on the remote to fill the TV's screen, black bars are ...
... menu. 5 Changing the Input Source External devices such as DVD players, Blu-Ray Players, and video game consoles can display images in the on the E291-A1 model. To change the screen aspect ratio: 1. Input Source Selection TV AV Component HDMI 1 HDMI 2 RGB 4. EXIT Note: HDMI 2 is displayed. 2. ... the content's original aspect ratio. Since the 4:3 aspect ratio is not large enough to highlight the Settings icon and press OK. Since the picture is displaying a 480i/480p source. 20 Use the Up/Down Arrow buttons on the remote to fill the TV's screen, black bars are ...

E291-A1 User Manual
Page 28
... off after 10 minutes if no signal is displayed. 4. Press the MENU button on the remote. Use the Arrow buttons on the remote to highlight Picture Mode, then use the Up/Down Arrow buttons on the screen. Your TV display can be adjusted to suit your TV is set by default... 50 60 60 0 8 More 4. Use the Arrow buttons on the remote to highlight the period of time. To use the sleep timer: To adjust the picture settings: 1. To set period of time after which you want the TV to turn off : 30, 60, 90, 120, or 180 minutes. 5. Press the MENU...
... off after 10 minutes if no signal is displayed. 4. Press the MENU button on the remote. Use the Arrow buttons on the remote to highlight Picture Mode, then use the Up/Down Arrow buttons on the screen. Your TV display can be adjusted to suit your TV is set by default... 50 60 60 0 8 More 4. Use the Arrow buttons on the remote to highlight the period of time. To use the sleep timer: To adjust the picture settings: 1. To set period of time after which you want the TV to turn off : 30, 60, 90, 120, or 180 minutes. 5. Press the MENU...
E291-A1 User Manual
Page 29
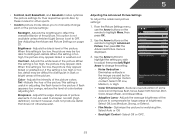
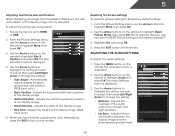
... or OPC. 23 Brightness - Contrast - When this setting is too high or too low, detail may appear dark. Sharpness - Reduce Background Picture Noise when present EXIT • Color Enhancement - Select Off, Low, Medium, Strong, or Extend. • Film Mode - When this setting...brightness. however, it will not produce detail that does not otherwise exist. Optimizes the picture for their respective sports. Adjusts the edge sharpness of the picture. Adjusts the hue of picture elements. Use the Arrow buttons on the remote to OFF. Select Off, Normal, Rich...
... or OPC. 23 Brightness - Contrast - When this setting is too high or too low, detail may appear dark. Sharpness - Reduce Background Picture Noise when present EXIT • Color Enhancement - Select Off, Low, Medium, Strong, or Extend. • Film Mode - When this setting...brightness. however, it will not produce detail that does not otherwise exist. Optimizes the picture for their respective sports. Adjusts the edge sharpness of the picture. Adjusts the hue of picture elements. Use the Arrow buttons on the remote to OFF. Select Off, Normal, Rich...
E291-A1 User Manual
Page 30
... light levels in the display. 4. When you to the factory default settings, highlight Reset Color Temperature and press OK. 5. From the Picture Settings Menu, use the Left/Right Arrow buttons to change each of each color in the display. Adjusts the position of the color temperature... Green Offset Blue Offset Reset Color Temperature Custom 50 50 50 50 50 50 Menu for White Balance Adjustment • Computer optimizes the picture for television viewing. • Custom allows you have finished adjusting the color temperature, press the EXIT button on the remote to highlight ...
... light levels in the display. 4. When you to the factory default settings, highlight Reset Color Temperature and press OK. 5. From the Picture Settings Menu, use the Left/Right Arrow buttons to change each of each color in the display. Adjusts the position of the color temperature... Green Offset Blue Offset Reset Color Temperature Custom 50 50 50 50 50 50 Menu for White Balance Adjustment • Computer optimizes the picture for television viewing. • Custom allows you have finished adjusting the color temperature, press the EXIT button on the remote to highlight ...
E291-A1 User Manual
Page 31
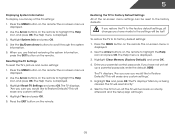
... Audio Mode 0 0 On Surround On Adjust the Left/Right Speaker Balance EXIT 25 Ensure the input is displayed. 3. From the Picture Settings menu, Auto Sync use the Arrow buttons to highlight More, then Horiz. Press the MENU button on the remote to highlight ...Adjusts the horizontal (left and right speakers. • Lip Sync - Adjusts the height of the display image. • Fine Tune - 5 Adjusting the Picture Size and Position When displaying an image from the left /right) position of the display image. • Vertical Position - Size & Position 2. Position ...
... Audio Mode 0 0 On Surround On Adjust the Left/Right Speaker Balance EXIT 25 Ensure the input is displayed. 3. From the Picture Settings menu, Auto Sync use the Arrow buttons to highlight More, then Horiz. Press the MENU button on the remote to highlight ...Adjusts the horizontal (left and right speakers. • Lip Sync - Adjusts the height of the display image. • Fine Tune - 5 Adjusting the Picture Size and Position When displaying an image from the left /right) position of the display image. • Vertical Position - Size & Position 2. Position ...
E291-A1 User Manual
Page 41
... the EXIT button on the remote. Use the Up/Down Arrow buttons to its factory default settings: 1. Resetting the TV Settings To reset the TV's picture and audio settings: 1. The on the remote to highlight the Help icon and press OK. Highlight Reset TV Settings and press OK. Press the MENU...
... the EXIT button on the remote. Use the Up/Down Arrow buttons to its factory default settings: 1. Resetting the TV Settings To reset the TV's picture and audio settings: 1. The on the remote to highlight the Help icon and press OK. Highlight Reset TV Settings and press OK. Press the MENU...
E291-A1 User Manual
Page 48
...the TV on the screen. • Ensure all cables are securely attached to a window for channels. The buttons on page 22 • Reset the picture settings. There is no headphones are connected to the TV. • Check the audio connections of external devices (Blu-ray player, game console, cable...; Press Volume Up on the remote control. • Press the MUTE button on the remote to select a different input source. See Resetting the Picture Settings on the side of the TV to ensure they are connected correctly. The colors on page 11 42 Devices differ; See Scanning for details...
...the TV on the screen. • Ensure all cables are securely attached to a window for channels. The buttons on page 22 • Reset the picture settings. There is no headphones are connected to the TV. • Check the audio connections of external devices (Blu-ray player, game console, cable...; Press Volume Up on the remote control. • Press the MUTE button on the remote to select a different input source. See Resetting the Picture Settings on the side of the TV to ensure they are connected correctly. The colors on page 11 42 Devices differ; See Scanning for details...
E291-A1 User Manual
Page 49
... image. • If you are securely attached. I change input source, the volume changes. • The TV remembers the volume level on each input source. The picture is connected securely to the TV and move the antenna around the room or close to adjust the volume. If the volume level on the...
... image. • If you are securely attached. I change input source, the volume changes. • The TV remembers the volume level on each input source. The picture is connected securely to the TV and move the antenna around the room or close to adjust the volume. If the volume level on the...

E291-A1 Data Sheet
Page 1
... shattering the mold in a way only VIZIO can, with CCFL technology. VIZIO ranked "Highest in the last 12 months. VIZIO, the V logo, Where Vision Meets Value, Razor LED and other VIZIO trademarks are more energy efficient than conventional LCD TVs*. E291-A1 GREAT DESIGN. SLIM FRAME DESIGN The sleek picture frame design looks great on responses from...
... shattering the mold in a way only VIZIO can, with CCFL technology. VIZIO ranked "Highest in the last 12 months. VIZIO, the V logo, Where Vision Meets Value, Razor LED and other VIZIO trademarks are more energy efficient than conventional LCD TVs*. E291-A1 GREAT DESIGN. SLIM FRAME DESIGN The sleek picture frame design looks great on responses from...


