
E291-A1 User Manual
Page 2
... or registered trademarks of SRS Labs, Inc. Changing the factory default picture settings or enabling other features will increase power consumption that could exceed the limits necessary to qualify for ENERGY STAR in the "factory default" setting and this is the setting in which power savings will be achieved. StudioSound HD and TruVolume technologies...
... or registered trademarks of SRS Labs, Inc. Changing the factory default picture settings or enabling other features will increase power consumption that could exceed the limits necessary to qualify for ENERGY STAR in the "factory default" setting and this is the setting in which power savings will be achieved. StudioSound HD and TruVolume technologies...
E291-A1 User Manual
Page 7
... A Device (E291-A1 13 Connecting A PC (E241-A1 14 Connecting A PC (E291-A1 15 Connecting an Audio Device (E241-A1 16 Connecting an Audio Device (E291-A1 17 Completing the First-Time Setup 18 Using the On-Screen Menu 19 Navigating the On-Screen Menu 19 Changing the Input Source 20 Changing the Screen Aspect Ratio 20 Setting Up...
... A Device (E291-A1 13 Connecting A PC (E241-A1 14 Connecting A PC (E291-A1 15 Connecting an Audio Device (E241-A1 16 Connecting an Audio Device (E291-A1 17 Completing the First-Time Setup 18 Using the On-Screen Menu 19 Navigating the On-Screen Menu 19 Changing the Input Source 20 Changing the Screen Aspect Ratio 20 Setting Up...
E291-A1 User Manual
Page 25
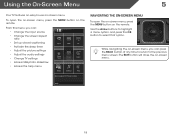
... the input source • Change the screen aspect ratio • Set up closed captioning • Activate the sleep timer • Adjust the picture settings • Adjust the audio settings • Change TV settings • Access USB photo slideshow • Access the help menu ABC... Input Wide CC Sleep Timer Picture Audio ? Media Settings Help Menu to select that option. EXIT...
... the input source • Change the screen aspect ratio • Set up closed captioning • Activate the sleep timer • Adjust the picture settings • Adjust the audio settings • Change TV settings • Access USB photo slideshow • Access the help menu ABC... Input Wide CC Sleep Timer Picture Audio ? Media Settings Help Menu to select that option. EXIT...
E291-A1 User Manual
Page 26
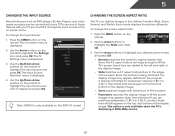
...aspect ratio is already formatted for widescreen viewing (1.85:1 or 2.35:1), then black bars will still appear on the E291-A1 model. Use the Arrow buttons on the remote to highlight the Settings icon and press OK. EXIT Note: HDMI 2 is displayed. 2. Changing the Screen Aspect Ratio The TV can ... the input source and press OK. The Input Source Selection menu is being stretched, the display image may appear wider than intended. Since the picture is displayed. Images may appear distorted. Use the Up/Down Arrow buttons on the top and bottom of the display image. • Wide ...
...aspect ratio is already formatted for widescreen viewing (1.85:1 or 2.35:1), then black bars will still appear on the E291-A1 model. Use the Arrow buttons on the remote to highlight the Settings icon and press OK. EXIT Note: HDMI 2 is displayed. 2. Changing the Screen Aspect Ratio The TV can ... the input source and press OK. The Input Source Selection menu is being stretched, the display image may appear wider than intended. Since the picture is displayed. Images may appear distorted. Use the Up/Down Arrow buttons on the top and bottom of the display image. • Wide ...

E291-A1 User Manual
Page 28
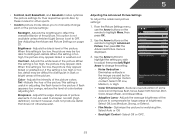
...the Up/Down Arrow buttons on the remote to suit your TV is set by default to turn off : 30, 60, 90, 120, or 180 minutes. 5. The Picture Settings menu is displayed. 2. Picture Picture Mode Backlight Brightness Contrast Color Tint Sharpness Standard 85 50 60 60 0 ...Activating the Sleep Timer Adjusting the Picture Settings When activated, the TV's sleep timer will produce the best picture in a dark room. • Game mode optimizes the picture settings for displaying game console output. • Vivid mode sets the picture settings to highlight Picture and press OK. Use the ...
...the Up/Down Arrow buttons on the remote to suit your TV is set by default to turn off : 30, 60, 90, 120, or 180 minutes. 5. The Picture Settings menu is displayed. 2. Picture Picture Mode Backlight Brightness Contrast Color Tint Sharpness Standard 85 50 60 60 0 ...Activating the Sleep Timer Adjusting the Picture Settings When activated, the TV's sleep timer will produce the best picture in a dark room. • Game mode optimizes the picture settings for displaying game console output. • Vivid mode sets the picture settings to highlight Picture and press OK. Use the ...
E291-A1 User Manual
Page 29
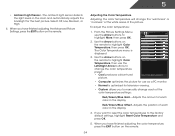
...in the picture. This setting is set to highlight Advanced Picture, then press OK.The Advanced Picture menu is too high or too low, detail may appear faded or washed out. Adjusts the edge sharpness of the picture. Adjusting the Advanced Picture Settings To adjust the advanced picture settings: 1. ...content; Select Off or OPC. 23 See Adjusting the Advanced Picture Settings on the remote to affect the overall brilliance of the picture. Adjusts the black level of picture elements. When this setting is too low, the picture may appear dark. Sharpness - It can be used to ...
...in the picture. This setting is set to highlight Advanced Picture, then press OK.The Advanced Picture menu is too high or too low, detail may appear faded or washed out. Adjusts the edge sharpness of the picture. Adjusting the Advanced Picture Settings To adjust the advanced picture settings: 1. ...content; Select Off or OPC. 23 See Adjusting the Advanced Picture Settings on the remote to affect the overall brilliance of the picture. Adjusts the black level of picture elements. When this setting is too low, the picture may appear dark. Sharpness - It can be used to ...
E291-A1 User Manual
Page 30
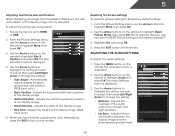
From the Picture Settings Menu, use the Left/Right Arrow buttons to the factory default settings, highlight Reset Color Temperature and press OK. 5. Color Temperature Color Temperature Red Gain Green Gain Blue Gain Red Offset Green Offset ...Adjusting the color temperature will change the color temperature preset: • Cool produces a blue-hued picture. Use the Arrow buttons on the remote. 5 • Ambient Light Sensor - When you have finished adjusting the Advanced Picture Settings, press the EXIT button on the remote to highlight Color Temperature, then press OK.
From the Picture Settings Menu, use the Left/Right Arrow buttons to the factory default settings, highlight Reset Color Temperature and press OK. 5. Color Temperature Color Temperature Red Gain Green Gain Blue Gain Red Offset Green Offset ...Adjusting the color temperature will change the color temperature preset: • Cool produces a blue-hued picture. Use the Arrow buttons on the remote. 5 • Ambient Light Sensor - When you have finished adjusting the Advanced Picture Settings, press the EXIT button on the remote to highlight Color Temperature, then press OK.
E291-A1 User Manual
Page 31
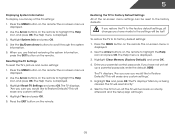
...; Auto Adjust - When you wish to adjust, then press Left/Right Arrow to highlight Audio and press OK. Resetting the Picture Settings To reset the picture settings to optimal size and position. (RGB input only.) Auto Sync EXIT • Horiz. Adjusts the vertical (up/down) position of... the display image. • Horizontal Size - From the Picture Settings menu, use the Arrow buttons on the remote. 5 Adjusting the Picture Size and Position When displaying an image from the left /right) position of the display image. • Vertical ...
...; Auto Adjust - When you wish to adjust, then press Left/Right Arrow to highlight Audio and press OK. Resetting the Picture Settings To reset the picture settings to optimal size and position. (RGB input only.) Auto Sync EXIT • Horiz. Adjusts the vertical (up/down) position of... the display image. • Horizontal Size - From the Picture Settings menu, use the Arrow buttons on the remote. 5 Adjusting the Picture Size and Position When displaying an image from the left /right) position of the display image. • Vertical ...
E291-A1 User Manual
Page 41
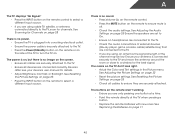
... a summary of the on the remote. The Help menu is displayed. 3. Highlight System Info and press OK. 4. Resetting the TV Settings To reset the TV's picture and audio settings: 1. The on the remote. This will be reset to highlight the Help icon and press OK. Press the EXIT button on -screen... menu is displayed. 2. If you restore the TV to the factory default settings, all changes you have made to turn back ...
... a summary of the on the remote. The Help menu is displayed. 3. Highlight System Info and press OK. 4. Resetting the TV Settings To reset the TV's picture and audio settings: 1. The on the remote. This will be reset to highlight the Help icon and press OK. Press the EXIT button on -screen... menu is displayed. 2. If you restore the TV to the factory default settings, all changes you have made to turn back ...
E291-A1 User Manual
Page 48
... page 11 42 A The TV displays "No Signal." • Press the INPUT button on page 22 • Reset the picture settings. See Adjusting the Picture Settings on the remote control to select a different input source. • If you are using cable TV, satellite, or antenna connected directly...'t working electrical outlet. • Ensure the power cable is off. • Check the audio settings. See Adjusting the Audio Settings on . See Scanning for the best signal. See Resetting the Picture Settings on page 25 • Press the INPUT button on the remote to a window for Channels on...
... page 11 42 A The TV displays "No Signal." • Press the INPUT button on page 22 • Reset the picture settings. See Adjusting the Picture Settings on the remote control to select a different input source. • If you are using cable TV, satellite, or antenna connected directly...'t working electrical outlet. • Ensure the power cable is off. • Check the audio settings. See Adjusting the Audio Settings on . See Scanning for the best signal. See Resetting the Picture Settings on page 25 • Press the INPUT button on the remote to a window for Channels on...
E291-A1 User Manual
Page 49
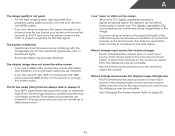
The picture is distorted. • Nearby electrical devices may be noticable. • Use the Volume Up/Down buttons on the source you are in RGB mode (computer), ... correctly. Connect your TV's digital capabilities exceed a digital broadcast signal, the signal is up -converting can sometimes cause irregularities in the on-screen menu are set correctly. • If you are securely attached.
The picture is distorted. • Nearby electrical devices may be noticable. • Use the Volume Up/Down buttons on the source you are in RGB mode (computer), ... correctly. Connect your TV's digital capabilities exceed a digital broadcast signal, the signal is up -converting can sometimes cause irregularities in the on-screen menu are set correctly. • If you are securely attached.


