
Download
Page 15
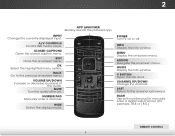
... -screen menu. V Button Open the VIA dock. Back Go to the previous on -screen menu. 2 Remote Control App launcher Quickly launch the pictured app. Last Return to manually enter a digital sub-channel. (For example, 18-4 or 18-5.) Remote Control 9 Info Display the info window. A/V Controls Control USB media player. Wide Switch the display mode...
... -screen menu. V Button Open the VIA dock. Back Go to the previous on -screen menu. 2 Remote Control App launcher Quickly launch the pictured app. Last Return to manually enter a digital sub-channel. (For example, 18-4 or 18-5.) Remote Control 9 Info Display the info window. A/V Controls Control USB media player. Wide Switch the display mode...

Download
Page 23
...you are finished, highlight Next and press OK. 5. Use the Left/Right Arrow buttons on the remote to highlight Home Mode Setup and press OK. 4. TV Widgets. Press the Power/Standby button on and the Setup App starts. 2. Select the name of your TV ready for Yahoo! Highlight Next and press OK.... 7. Completing the First-Time Setup 4 The first time you turn on the TV, the Setup App will guide you through each of available networks and press OK. The TV powers on the remote. Enter your First Name, Last Name, Phone Number, ZIP Code, and E-mail Address using the on the...
...you are finished, highlight Next and press OK. 5. Use the Left/Right Arrow buttons on the remote to highlight Home Mode Setup and press OK. 4. TV Widgets. Press the Power/Standby button on and the Setup App starts. 2. Select the name of your TV ready for Yahoo! Highlight Next and press OK.... 7. Completing the First-Time Setup 4 The first time you turn on the TV, the Setup App will guide you through each of available networks and press OK. The TV powers on the remote. Enter your First Name, Last Name, Phone Number, ZIP Code, and E-mail Address using the on the...

Download
Page 43
... the EXIT button on -screen menu is often used by VIA Apps to highlight Time & Local Settings and press OK. Press the EXIT button on -screen menu language: 1. InUpuste theWidAerrowCbC uttons on the remote to highlight Menu Language and press OK. Highlight your ZIP code using...the TV's time zone: To have the TV display the correct time, you the most accurate location-based information, such as weather or news. 8. VIZIO Exit 2D 3D 2. The Settings menu is displayed. The Time & Local Settings menu STlim eiseepdr ispPlicatuyree d. Time Zone Alaska (US) Hawaii (US...
... the EXIT button on -screen menu is often used by VIA Apps to highlight Time & Local Settings and press OK. Press the EXIT button on -screen menu language: 1. InUpuste theWidAerrowCbC uttons on the remote to highlight Menu Language and press OK. Highlight your ZIP code using...the TV's time zone: To have the TV display the correct time, you the most accurate location-based information, such as weather or news. 8. VIZIO Exit 2D 3D 2. The Settings menu is displayed. The Time & Local Settings menu STlim eiseepdr ispPlicatuyree d. Time Zone Alaska (US) Hawaii (US...

Download
Page 46
... Restore Defaults? This will be reset to Restore Defaults? Press the EXIT button on the remote. If you restore the TV to the factory default settings, all changes you would like to highlight the Help icon and press OK. Enter your ..., enter the default, 0000. Press the MENU button on -screen menu settings can be lost! Use the Arrow buttons on shortly afterward and the Setup App will erase any custom settings." 4. Highlight Clear Memory (Factory Default) and press OK. 4. This will begin. 40 The TV will turn off. The Help menu...
... Restore Defaults? This will be reset to Restore Defaults? Press the EXIT button on the remote. If you restore the TV to the factory default settings, all changes you would like to highlight the Help icon and press OK. Enter your ..., enter the default, 0000. Press the MENU button on -screen menu settings can be lost! Use the Arrow buttons on shortly afterward and the Setup App will erase any custom settings." 4. Highlight Clear Memory (Factory Default) and press OK. 4. This will begin. 40 The TV will turn off. The Help menu...

Download
Page 47
Press the MENU button on -screen instructions. VIZIO Guided Setup Tuner Setup Network Setup 3. Follow the on the remote. The on the remote. Set up the TV tuner or to connect the TV with your network. 5. When finished, press the EXIT button on -screen menu is displayed. To ... ABC Input Wide CC Sleep Timer Picture Audio Network Settings Help 41 Use the Arrow buttons on the remote to access and press OK: • Tuner Setup - 5 Using Guided Setup The TV's Setup App can be used to easily set up the TV tuner. • Network Setup - The Help menu is displayed...
Press the MENU button on -screen instructions. VIZIO Guided Setup Tuner Setup Network Setup 3. Follow the on the remote. The on the remote. Set up the TV tuner or to connect the TV with your network. 5. When finished, press the EXIT button on -screen menu is displayed. To ... ABC Input Wide CC Sleep Timer Picture Audio Network Settings Help 41 Use the Arrow buttons on the remote to access and press OK: • Tuner Setup - 5 Using Guided Setup The TV's Setup App can be used to easily set up the TV tuner. • Network Setup - The Help menu is displayed...

Download
Page 49
... not designed to turn it on . Connect your USB thumb drive to change. Highlight the Media App and press OK. Highlight the type of media you wish to the USB port on the USB ...USB PORT Connecting a USB Thumb Drive to your USB device in fullscreen. Press the Power/Standby button on the remote or touch the Power control on the model. Remember: • The USB thumb drive must be subject to... the USB port on the back of ports and their locations may damage the drive. The Media App launches. 3. Highlight your TV and play media from external hard drives or mp3 players. Use the ...
... not designed to turn it on . Connect your USB thumb drive to change. Highlight the Media App and press OK. Highlight the type of media you wish to the USB port on the USB ...USB PORT Connecting a USB Thumb Drive to your USB device in fullscreen. Press the Power/Standby button on the remote or touch the Power control on the model. Remember: • The USB thumb drive must be subject to... the USB port on the back of ports and their locations may damage the drive. The Media App launches. 3. Highlight your TV and play media from external hard drives or mp3 players. Use the ...

Download
Page 51
.... 5. Press the Yellow VIA Shortcut button. 4. Exit from the VIA Dock. To move the App to the new location on the remote. 2. Using VIZIO Internet Apps 7 VIZIO Internet Apps (VIA) delivers popular online content to your TV.VIA features a selection of Apps that allow you to watch movies and TV shows, listen to music, get weather and...
.... 5. Press the Yellow VIA Shortcut button. 4. Exit from the VIA Dock. To move the App to the new location on the remote. 2. Using VIZIO Internet Apps 7 VIZIO Internet Apps (VIA) delivers popular online content to your TV.VIA features a selection of Apps that allow you to watch movies and TV shows, listen to music, get weather and...

Download
Page 52
...right using the Left/Right Arrow buttons on the remote. (The highlighted App is in the Profile App. The Owner PIN menu is displayed. 5. Press OK. 46 Highlight the Widget Gallery App by scrolling left corner of the screen.) 3. Highlight the App you to restrict access to the Widget Gallery.... is displayed. 4. Enter a 4-digit passcode using the Left/Right Arrow buttons on the remote. (The highlighted App is in the lower left and right using the Number Pad on the remote or the on the remote. 2. Highlight OK and press OK. Press the V Button on -screen number pad. ...
...right using the Left/Right Arrow buttons on the remote. (The highlighted App is in the Profile App. The Owner PIN menu is displayed. 5. Press OK. 46 Highlight the Widget Gallery App by scrolling left corner of the screen.) 3. Highlight the App you to restrict access to the Widget Gallery.... is displayed. 4. Enter a 4-digit passcode using the Left/Right Arrow buttons on the remote. (The highlighted App is in the lower left and right using the Number Pad on the remote or the on the remote. 2. Highlight OK and press OK. Press the V Button on -screen number pad. ...

Download
Page 53
.... 10. Creating a New User Profile To create a new user profile: 1. Highlight the Profile App by pressing the OK button. Highlight a picture for your security answer using the Number Pad on the remote or the on -screen keyboard, then press OK. The Create Profile menu is displayed. 11. ... OK. 47 Highlight Avatar and press OK. Select the App by scrolling left corner of this new profile from installing new Apps, turn Limit Profile to On. (You need an Owner PIN. Press the V Button on the remote. (The highlighted App is displayed. 5. Highlight Administrative Controls and press OK. ...
.... 10. Creating a New User Profile To create a new user profile: 1. Highlight the Profile App by pressing the OK button. Highlight a picture for your security answer using the Number Pad on the remote or the on -screen keyboard, then press OK. The Create Profile menu is displayed. 11. ... OK. 47 Highlight Avatar and press OK. Select the App by scrolling left corner of this new profile from installing new Apps, turn Limit Profile to On. (You need an Owner PIN. Press the V Button on the remote. (The highlighted App is displayed. 5. Highlight Administrative Controls and press OK. ...

Download
Page 54
...to delete this profile? 7 Removing a User Profile To remove a user profile: 1. Highlight the Profile App by scrolling left and right using the Left/Right Arrow buttons on the remote. (The highlighted App is displayed. 5. The Remove Profile menu is displayed. 4. Restoring the VIA Dock to the Factory ...48 Highlight the name of the screen.) 3. Press the V Button on the remote. 2. Highlight the Profile App by scrolling left and right using the Left/Right Arrow buttons on the remote. (The highlighted App is in the lower left corner of the profile you want to the factory default...
...to delete this profile? 7 Removing a User Profile To remove a user profile: 1. Highlight the Profile App by scrolling left and right using the Left/Right Arrow buttons on the remote. (The highlighted App is displayed. 5. The Remove Profile menu is displayed. 4. Restoring the VIA Dock to the Factory ...48 Highlight the name of the screen.) 3. Press the V Button on the remote. 2. Highlight the Profile App by scrolling left and right using the Left/Right Arrow buttons on the remote. (The highlighted App is in the lower left corner of the profile you want to the factory default...

Download
Page 7
... the audio off . MENU Display the on . WIDE Switch the display mode. NUMBER PAD Manually enter a channel. CHANNEL UP/DOWN Change the channel. USING THE REMOTE APP LAUNCHER Quickly launch the pictured...
... the audio off . MENU Display the on . WIDE Switch the display mode. NUMBER PAD Manually enter a channel. CHANNEL UP/DOWN Change the channel. USING THE REMOTE APP LAUNCHER Quickly launch the pictured...

Download
Page 9
... shown. Note: The image shown above is displayed. The Setup App is for illustrative purposes only and may vary, depending on the model. Use the Arrow buttons on the remote. Turn the TV on by pressing the Power button on the remote to the back of ports and their locations may be subject...
... shown. Note: The image shown above is displayed. The Setup App is for illustrative purposes only and may vary, depending on the model. Use the Arrow buttons on the remote. Turn the TV on by pressing the Power button on the remote to the back of ports and their locations may be subject...

Download
Page 11
... the USB Media Player Using the USB Media Player Using VIZIO Internet Apps Troubleshooting & Technical Support Specifications Limited Warranty Legal & Compliance LCD HDTV WITH VIZIO INTERNET APPS® Press the EXIT button to page, use Number Pad, then press OK. USER MANUAL USER YOUR REMOTE Previous Page Next Page Menu Open TV Menu PAGE NUMBER...
... the USB Media Player Using the USB Media Player Using VIZIO Internet Apps Troubleshooting & Technical Support Specifications Limited Warranty Legal & Compliance LCD HDTV WITH VIZIO INTERNET APPS® Press the EXIT button to page, use Number Pad, then press OK. USER MANUAL USER YOUR REMOTE Previous Page Next Page Menu Open TV Menu PAGE NUMBER...

Download
Page 14
Highlighted App Be sure your TV is displayed on the remote to highlight an app, then press OK to open it. For the best V.I .A. Dock is connected to the Internet. The V.I .A. Use an Ethernet cable or connect wirelessly. GETTING STARTED WITH VIZIO INTERNET APPS 1 2 V.I .A. Use the Arrow buttons on the bottom of the screen. Dock. Press this button to open the V.I .A. experience, a high-speed Internet connection is recommended.
Highlighted App Be sure your TV is displayed on the remote to highlight an app, then press OK to open it. For the best V.I .A. Dock is connected to the Internet. The V.I .A. Use an Ethernet cable or connect wirelessly. GETTING STARTED WITH VIZIO INTERNET APPS 1 2 V.I .A. Use the Arrow buttons on the bottom of the screen. Dock. Press this button to open the V.I .A. experience, a high-speed Internet connection is recommended.
Download
Page 17
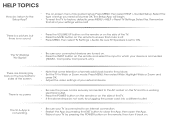
...; Press MENU, then select TV Settings > Audio. There are turned on. • Press the INPUT button on the remote and select the input to which your TV is set to the Setup App? • The on the side of your external device There is no sound. • Press the VOLUME UP button... Yes. Be sure TV Speakers is connected to an Internet connection. • Restart the App by pressing the EXIT button to close the App, then open the App. • Reboot your TV by pressing the POWER button on the remote, then turn it back on the side of the screen. • Note that all...
...; Press MENU, then select TV Settings > Audio. There are turned on. • Press the INPUT button on the remote and select the input to which your TV is set to the Setup App? • The on the side of your external device There is no sound. • Press the VOLUME UP button... Yes. Be sure TV Speakers is connected to an Internet connection. • Restart the App by pressing the EXIT button to close the App, then open the App. • Reboot your TV by pressing the POWER button on the remote, then turn it back on the side of the screen. • Note that all...
Download
Page 1
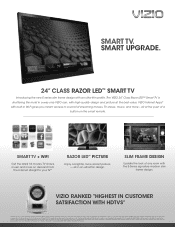
...to same size 2012 LCD HDTVs lighted with CCFL technology. SMART TV + WIFI Get the latest hit movies, TV shows, music and more - VIZIO Internet Apps® with high-quality design and picture at the push of a button on demand from 1,009 consumers measuring 8 brands and measures opinions of... streaming movies, TV shows, music, and more on the smart remote. SMART UPGRADE. 24" CLASS RAZOR LED™ SMART TV Introducing the new E-series ...
...to same size 2012 LCD HDTVs lighted with CCFL technology. SMART TV + WIFI Get the latest hit movies, TV shows, music and more - VIZIO Internet Apps® with high-quality design and picture at the push of a button on demand from 1,009 consumers measuring 8 brands and measures opinions of... streaming movies, TV shows, music, and more on the smart remote. SMART UPGRADE. 24" CLASS RAZOR LED™ SMART TV Introducing the new E-series ...


