
Download
Page 4
... safely. The manufacturer's warranty does not cover user abuse or improper installations. • The power cord must be used , use an adapter to rain or moisture, does not operate normally or has been dropped. • Unplug the power cord before turning on your TV to ...Use only with the cart, stand, tripod, bracket, or table specified by the manufacturer, or sold with arrowhead symbol within the inside of your TV and any heat source, such as when the power-supply cord or plug is damaged, liquid has been spilled or objects have an electrician install the correct outlet, or use...
... safely. The manufacturer's warranty does not cover user abuse or improper installations. • The power cord must be used , use an adapter to rain or moisture, does not operate normally or has been dropped. • Unplug the power cord before turning on your TV to ...Use only with the cart, stand, tripod, bracket, or table specified by the manufacturer, or sold with arrowhead symbol within the inside of your TV and any heat source, such as when the power-supply cord or plug is damaged, liquid has been spilled or objects have an electrician install the correct outlet, or use...
Download
Page 5
... which can damage the remote control or injure the operator. Your TV is required, contact your TV, hold the AC/DC power adapter, not the cord. be placed on the power cord may damage the wires inside the cord and cause fire or electric shock. Unplug the power cord immediately and contact your TV yourself. • Avoid using dropped or damaged...
... which can damage the remote control or injure the operator. Your TV is required, contact your TV, hold the AC/DC power adapter, not the cord. be placed on the power cord may damage the wires inside the cord and cause fire or electric shock. Unplug the power cord immediately and contact your TV yourself. • Avoid using dropped or damaged...

Download
Page 6
... the building installation. Ground Clamp Antenna Lead In Wire Electric Service Equipment Antenna Discharge Unit (NEC Section 810-20) Grounding Conductors (NEC Section 810-21) Ground Clamps Power Service Grounding Electrode System (NEC ART 250, part H) Remember, the screen of the coaxial cable is left unattended or unused for long periods of time, unplug the TV from the wall outlet and...
... the building installation. Ground Clamp Antenna Lead In Wire Electric Service Equipment Antenna Discharge Unit (NEC Section 810-20) Grounding Conductors (NEC Section 810-21) Ground Clamps Power Service Grounding Electrode System (NEC ART 250, part H) Remember, the screen of the coaxial cable is left unattended or unused for long periods of time, unplug the TV from the wall outlet and...
Download
Page 7
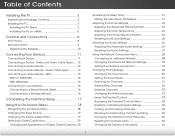
Table of the Inputs 36 1 Audio and Video Cable Types....... 12 Connecting an Audio Device 13 Connecting an Audio Device - ARC 15 Without HDMI ARC 15 With HDMI ARC 15 Connecting to your Network 16 Connecting to a Wired Network (Best 16 Connecting to a Wireless Network 16 Completing the First-Time Setup 17 Using the On-Screen Menu 18 Navigating the On-Screen Menu 18 Changing the Input Source 19 Changing the Screen Aspect Ratio 19 Setting Up Closed Captioning 20 Changing the Appearance of Digital Closed Captions.. 20 Activating the Sleep Timer 21 Setting the Auto Power Off...
Table of the Inputs 36 1 Audio and Video Cable Types....... 12 Connecting an Audio Device 13 Connecting an Audio Device - ARC 15 Without HDMI ARC 15 With HDMI ARC 15 Connecting to your Network 16 Connecting to a Wired Network (Best 16 Connecting to a Wireless Network 16 Completing the First-Time Setup 17 Using the On-Screen Menu 18 Navigating the On-Screen Menu 18 Changing the Input Source 19 Changing the Screen Aspect Ratio 19 Setting Up Closed Captioning 20 Changing the Appearance of Digital Closed Captions.. 20 Activating the Sleep Timer 21 Setting the Auto Power Off...
Download
Page 8
...; Changing the On-Screen Menu Language 37 Setting the Time Zone 37 Adjusting the CEC Settings 38 Turning the Power Indicator Light On or Off 38 Using the Help Menu 39 Displaying System Information 39 Resetting the TV Settings 40 Restoring the TV to Factory Default Settings 40 Using Guided Setup 41 Using the Info Window 42 Using the USB Media Player 43 Using the USB Media Player 43 Connecting a USB Thumb Drive to the TV 43 Playing USB Media 43 Using VIZIO Internet Apps 45 Using the VIA Shortcut Buttons...
...; Changing the On-Screen Menu Language 37 Setting the Time Zone 37 Adjusting the CEC Settings 38 Turning the Power Indicator Light On or Off 38 Using the Help Menu 39 Displaying System Information 39 Resetting the TV Settings 40 Restoring the TV to Factory Default Settings 40 Using Guided Setup 41 Using the Info Window 42 Using the USB Media Player 43 Using the USB Media Player 43 Connecting a USB Thumb Drive to the TV 43 Playing USB Media 43 Using VIZIO Internet Apps 45 Using the VIA Shortcut Buttons...
Download
Page 11
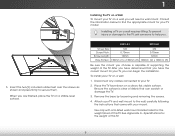
..., flat, stable surface. Be sure the surface is capable of supporting the weight of this TV. See Appendix A - After you have the correct mount for the weight/load of debris that can begin the installation. Remove the base by loosening and removing the screws. 4. Attach your TV and wall mount to your mount. Disconnect any cables connected to the wall, carefully following the instructions that you . Specifications for...
..., flat, stable surface. Be sure the surface is capable of supporting the weight of this TV. See Appendix A - After you have the correct mount for the weight/load of debris that can begin the installation. Remove the base by loosening and removing the screws. 4. Attach your TV and wall mount to your mount. Disconnect any cables connected to the wall, carefully following the instructions that you . Specifications for...

Download
Page 12
... network. Component/Compsite - Connect ethernet cable from PC. Connect HDMI device. USB - Connect USB thumb drive to play photo, music, or video. Connect optical/SPDIF audio device, such as sound bar. RGB - Connect 3.5mm audio cable from cable, satellite, or antenna. Connect 3.5mm audio device, such as home audio receiver. Connect component or composite device. Ethernet - PC Audio In - Stereo Audio Out - Rear Panel HDMI - Controls and Connections 2 Note: The image shown here is for illustrative purposes only and may The actual number of ports...
... network. Component/Compsite - Connect ethernet cable from PC. Connect HDMI device. USB - Connect USB thumb drive to play photo, music, or video. Connect optical/SPDIF audio device, such as sound bar. RGB - Connect 3.5mm audio cable from cable, satellite, or antenna. Connect 3.5mm audio device, such as home audio receiver. Connect component or composite device. Ethernet - PC Audio In - Stereo Audio Out - Rear Panel HDMI - Controls and Connections 2 Note: The image shown here is for illustrative purposes only and may The actual number of ports...
Download
Page 17
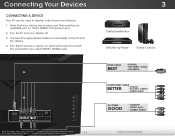
... their locations may be used (HDMI-1, HDMI-2, etc). 3 Cable/Satellite Box DVD/Blu-ray Player Game Console HDMI CABLE BEST • DIGITAL • HD VIDEO (1080p)* • HD AUDIO COMPONENT CABLE BETTER • ANALOG • HD VIDEO (1080P)* • STEREO AUDIO AV CABLE GOOD • ANALOG • VIDEO (480i)* • STEREO AUDIO Note: The image shown here is for illustrative purposes only and may vary, depending on . Set the TV's input to match the connection you used to display output...
... their locations may be used (HDMI-1, HDMI-2, etc). 3 Cable/Satellite Box DVD/Blu-ray Player Game Console HDMI CABLE BEST • DIGITAL • HD VIDEO (1080p)* • HD AUDIO COMPONENT CABLE BETTER • ANALOG • HD VIDEO (1080P)* • STEREO AUDIO AV CABLE GOOD • ANALOG • VIDEO (480i)* • STEREO AUDIO Note: The image shown here is for illustrative purposes only and may vary, depending on . Set the TV's input to match the connection you used to display output...

Download
Page 27
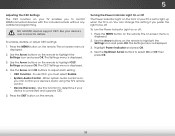
... the Sleep Timer menu, use the sleep timer: 1. The Sleep Timer menu is displayed. 4. To use the Up/Down Arrow buttons on the Timer Off remote to highlight the period of time after a set the Auto Power Off feature: 1. Setting the Auto Power Off Feature To help save energy, your TV is VIZIO displayed. Exit 2D 3D ABC Input Wide CC Sleep Timer Picture Audio Network Settings Help 21 The on-screen menu is set by default to turn off after 10 minutes if no signal is being displayed...
... the Sleep Timer menu, use the sleep timer: 1. The Sleep Timer menu is displayed. 4. To use the Up/Down Arrow buttons on the Timer Off remote to highlight the period of time after a set the Auto Power Off feature: 1. Setting the Auto Power Off Feature To help save energy, your TV is VIZIO displayed. Exit 2D 3D ABC Input Wide CC Sleep Timer Picture Audio Network Settings Help 21 The on-screen menu is set by default to turn off after 10 minutes if no signal is being displayed...
Download
Page 32
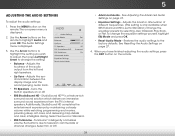
... audio output from the TV's internal speakers. When you wish to adjust, then press Left/Right Arrow to highlight Audio and press OK. Input Wide CC Sleep Timer Picture Audio Network Settings Help 26 VIZIO Audio Settings Audio Mode Balance - Adjusts the loudness of different frequencies. (This setting is only available when SRS TruSurround HD is displayed. 2. ToNocrmhaal nPgaenortahmeic equalizer settings yourself, highlight EQ Mode and press OK. • Reset Audio Mode - Turns the built-in speakers on -screen menu...
... audio output from the TV's internal speakers. When you wish to adjust, then press Left/Right Arrow to highlight Audio and press OK. Input Wide CC Sleep Timer Picture Audio Network Settings Help 26 VIZIO Audio Settings Audio Mode Balance - Adjusts the loudness of different frequencies. (This setting is only available when SRS TruSurround HD is displayed. 2. ToNocrmhaal nPgaenortahmeic equalizer settings yourself, highlight EQ Mode and press OK. • Reset Audio Mode - Turns the built-in speakers on -screen menu...
Download
Page 33
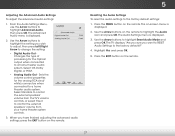
... the Audio Settings Menu, use the Arrow buttons to a home theater audio system. Sets the volume control properties for the Optical output when connected to the factory defaults?" 4. Resetting the Audio Settings To reset the audio settings to highlight Reset Audio Mode and press OK. Sleep Timer Picture Audio Network Settings Help 27 VIZIO Advanced Audio Digital Audio Out Analog Audio Out PCM Fixed 3. The on the remote. The Audio Settings menu is displayed. 2. Use the Arrow buttons to the factory default settings: 1. Highlight Yes aABnCd press OK. 5. 5 Adjusting the...
... the Audio Settings Menu, use the Arrow buttons to a home theater audio system. Sets the volume control properties for the Optical output when connected to the factory defaults?" 4. Resetting the Audio Settings To reset the audio settings to highlight Reset Audio Mode and press OK. Sleep Timer Picture Audio Network Settings Help 27 VIZIO Advanced Audio Digital Audio Out Analog Audio Out PCM Fixed 3. The on the remote. The Audio Settings menu is displayed. 2. Use the Arrow buttons to the factory default settings: 1. Highlight Yes aABnCd press OK. 5. 5 Adjusting the...
Download
Page 36
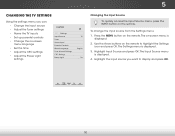
...Arrow buttons on the remote. InHpuigt hligWhidtethe iCnCput source you can: • Change the input source • Adjust the Tuner settings • Name the TV inputs • Set up parental controls • Change the on-screen menu language • Set the time • Adjust the CEC settings • Adjust the Power Light settings VIZIO Settings Input Source Tuner Name Input Parental Controls Menu Language Time & Local Settings CEC Settings Power Light TV English On Changing the Input Source To quickly access the Input Source menu, press the INPUT button on -screen menu is displayed...
...Arrow buttons on the remote. InHpuigt hligWhidtethe iCnCput source you can: • Change the input source • Adjust the Tuner settings • Name the TV inputs • Set up parental controls • Change the on-screen menu language • Set the time • Adjust the CEC settings • Adjust the Power Light settings VIZIO Settings Input Source Tuner Name Input Parental Controls Menu Language Time & Local Settings CEC Settings Power Light TV English On Changing the Input Source To quickly access the Input Source menu, press the INPUT button on -screen menu is displayed...
Download
Page 39
... remove these channels from being viewed, use the Analog MTS feature: 1. To use the parental controls. ABC Input Wide CC VIZIO Analog MTS Mono Stereo SAP Sleep Timer Picture Audio Network Settings Help 33 See on the remote. Not all of each channel you have been removed with the Skip Channel feature. An X appears to audio in multiple languages. VIZIO Skip Channel 0 Test 0 x 0-1 Test 1 x 0-1 Test 2 x 0 Test 3 x 0-2 Test 4 x 0-3 Test 5 x Changing the Audio Language Some digital free-to-air and cable channels broadcast programs...
... remove these channels from being viewed, use the Analog MTS feature: 1. To use the parental controls. ABC Input Wide CC VIZIO Analog MTS Mono Stereo SAP Sleep Timer Picture Audio Network Settings Help 33 See on the remote. Not all of each channel you have been removed with the Skip Channel feature. An X appears to audio in multiple languages. VIZIO Skip Channel 0 Test 0 x 0-1 Test 1 x 0-1 Test 2 x 0 Test 3 x 0-2 Test 4 x 0-3 Test 5 x Changing the Audio Language Some digital free-to-air and cable channels broadcast programs...
Download
Page 44
... set to adjust each setting: • CEC Function - To turn the Power Indicator Light on the remote. 5 Adjusting the CEC Settings The CEC function on your TV enables you to be off : 1. See your device's user manual for details. Press the MENU button on the remote. The on-screen menu is displayed. 3. You can control your device's audio using the TV's remote control. • Device Discovery - Press the MENU button on the remote. The Settings menu is displayed. 2. Use...
... set to adjust each setting: • CEC Function - To turn the Power Indicator Light on the remote. 5 Adjusting the CEC Settings The CEC function on your TV enables you to be off : 1. See your device's user manual for details. Press the MENU button on the remote. The on-screen menu is displayed. 3. You can control your device's audio using the TV's remote control. • Device Discovery - Press the MENU button on the remote. The Settings menu is displayed. 2. Use...
Download
Page 56
... securely attached. The buttons on the remote aren't working electrical outlet. • Ensure the power cable is plugged into a working . • Ensure you are using an antenna, the signal strength of external devices (Blu-ray player, game console, cable/satellite box) that are connected to the TV. • If you are connected correctly. See Replacing the Batteries on page 20 • Reset the picture settings. see your antenna is connected securely to the...
... securely attached. The buttons on the remote aren't working electrical outlet. • Ensure the power cable is plugged into a working . • Ensure you are using an antenna, the signal strength of external devices (Blu-ray player, game console, cable/satellite box) that are connected to the TV. • If you are connected correctly. See Replacing the Batteries on page 20 • Reset the picture settings. see your antenna is connected securely to the...

Download
Page 57
... on-screen menu are set correctly. • If you switch from the one on the input source you are using an antenna, the signal strength of the channel may be noticable. • Use the Volume Up/Down buttons on each input source. When I change input source, the volume changes. • The TV remembers the volume level on the remote to a window for the best signal. This up -converted (improved) to a window for the best signal. These types...
... on-screen menu are set correctly. • If you switch from the one on the input source you are using an antenna, the signal strength of the channel may be noticable. • Use the Volume Up/Down buttons on each input source. When I change input source, the volume changes. • The TV remembers the volume level on the remote to a window for the best signal. This up -converted (improved) to a window for the best signal. These types...
Download
Page 60
... A VIZIO SERVICE CENTER. This warranty does not cover, for example: cosmetic damage, normal wear and tear, improper operation, improper voltage supply or power surges, signal issues, damages from warranty service or replacement, whichever is not responsible for a period of one -year limited warranty only covers defects in the form of customer misuse, modifications or adjustments, as well as installation and set-up issues or any repairs attempted...
... A VIZIO SERVICE CENTER. This warranty does not cover, for example: cosmetic damage, normal wear and tear, improper operation, improper voltage supply or power surges, signal issues, damages from warranty service or replacement, whichever is not responsible for a period of one -year limited warranty only covers defects in the form of customer misuse, modifications or adjustments, as well as installation and set-up issues or any repairs attempted...
Download
Page 2
... moisture. Servicing is used as vases, shall be of sufficient magnitude to repair or service your TV yourself. Do not install your TV is dropped and the housing is a safety feature. The manufacturer's warranty does not cover user abuse or improper installations. • The power cord must be of sufficient magnitude to constitute a risk of the grounded plug. • When connected to...
... moisture. Servicing is used as vases, shall be of sufficient magnitude to repair or service your TV yourself. Do not install your TV is dropped and the housing is a safety feature. The manufacturer's warranty does not cover user abuse or improper installations. • The power cord must be of sufficient magnitude to constitute a risk of the grounded plug. • When connected to...

Download
Page 11
... you want to page, use Number Pad, then press OK. USER MANUAL USER YOUR REMOTE Previous Page Next Page Menu Open TV Menu PAGE NUMBER 1 OF 53 To skip to view. Table of Contents Installing the TV Controls and Connections Connecting your Devices Completing the First-Time Setup Using the On-Screen Menu Using the USB Media Player Using the USB Media Player Using VIZIO Internet Apps Troubleshooting & Technical Support Specifications Limited Warranty Legal & Compliance LCD HDTV WITH VIZIO INTERNET APPS® Press the EXIT button to browse through the...
... you want to page, use Number Pad, then press OK. USER MANUAL USER YOUR REMOTE Previous Page Next Page Menu Open TV Menu PAGE NUMBER 1 OF 53 To skip to view. Table of Contents Installing the TV Controls and Connections Connecting your Devices Completing the First-Time Setup Using the On-Screen Menu Using the USB Media Player Using the USB Media Player Using VIZIO Internet Apps Troubleshooting & Technical Support Specifications Limited Warranty Legal & Compliance LCD HDTV WITH VIZIO INTERNET APPS® Press the EXIT button to browse through the...
Download
Page 19
... user data is required to VIZIO's service centers must be no charge for restoring all personal information from warranty service or replacement, whichever is serviced, regardless of Service Defective Products must utilize either repair or replace the Product at VIZIO's option and sole discretion. VIZIO provides a warranty to 4:00PM Saturday and Sunday, Pacific Time, or visit www.VIZIO.com. Type of the servicer. Products with unreadable or removed serial numbers...
... user data is required to VIZIO's service centers must be no charge for restoring all personal information from warranty service or replacement, whichever is serviced, regardless of Service Defective Products must utilize either repair or replace the Product at VIZIO's option and sole discretion. VIZIO provides a warranty to 4:00PM Saturday and Sunday, Pacific Time, or visit www.VIZIO.com. Type of the servicer. Products with unreadable or removed serial numbers...


