User Manual English
Page 2
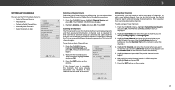
... Reset & Admin Menu 34 Resetting a Picture Mode 17 Restoring the TV to Factory Default Settings 34 Adjusting the Color Tuner Settings 18 Using the Guided Setup Menu 35 Adjusting the Audio Settings 20 Using the Info Window 35 Changing the Equalizer Settings 20 Deleting the Custom Audio Mode 21 Setting Timers 22 Setting the Sleep Timer 22 Setting the Auto Power Off Feature 22 Setting Up Channels 23 Using the USB Media Player 36 Preparing Your USB Drive to Play USB Media 36 Displaying USB Media 36 Removing the USB Drive from the TV 36 Troubleshooting & Technical Support...
... Reset & Admin Menu 34 Resetting a Picture Mode 17 Restoring the TV to Factory Default Settings 34 Adjusting the Color Tuner Settings 18 Using the Guided Setup Menu 35 Adjusting the Audio Settings 20 Using the Info Window 35 Changing the Equalizer Settings 20 Deleting the Custom Audio Mode 21 Setting Timers 22 Setting the Sleep Timer 22 Setting the Auto Power Off Feature 22 Setting Up Channels 23 Using the USB Media Player 36 Preparing Your USB Drive to Play USB Media 36 Displaying USB Media 36 Removing the USB Drive from the TV 36 Troubleshooting & Technical Support...
User Manual English
Page 3
... ensure reliable operation of electric shock or component damage, switch off the power before turning on -site extended warranty service plans. To get the most out of your new VIZIO product, read these openings are not sure of the type of the polarized or grounding-type plug. We recommend that produce heat. • Do not defeat the safety purpose of power supplied to...
... ensure reliable operation of electric shock or component damage, switch off the power before turning on -site extended warranty service plans. To get the most out of your new VIZIO product, read these openings are not sure of the type of the polarized or grounding-type plug. We recommend that produce heat. • Do not defeat the safety purpose of power supplied to...
User Manual English
Page 4
... discourages television viewing for repair. The performance of your TV if any way. - Do not try to do so. TV yourself. • CAUTION - Continued use your TV changes substantially. • This apparatus shall not be placed on the power cord may function abnormally. Overloading can result in fire or electric shock. • The wall socket should be installed near...
... discourages television viewing for repair. The performance of your TV if any way. - Do not try to do so. TV yourself. • CAUTION - Continued use your TV changes substantially. • This apparatus shall not be placed on the power cord may function abnormally. Overloading can result in fire or electric shock. • The wall socket should be installed near...
User Manual English
Page 5
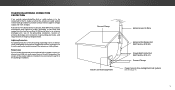
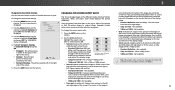
... not locate the antenna near overhead light or power circuits, or where it is left unattended or unused for long periods of time, unplug the TV from the wall outlet and disconnect the antenna or cable system. Lightning Protection For added protection of the TV during a lightning storm or when it could fall into such power lines or circuits. TELEVISION ANTENNA CONNECTION...
... not locate the antenna near overhead light or power circuits, or where it is left unattended or unused for long periods of time, unplug the TV from the wall outlet and disconnect the antenna or cable system. Lightning Protection For added protection of the TV during a lightning storm or when it could fall into such power lines or circuits. TELEVISION ANTENNA CONNECTION...
User Manual English
Page 9
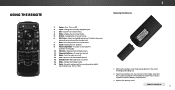
... number pad. 7. Turn the audio on -screen menu. 5. REMOTE CONTROL 9 Turn TV on -screen menu. 4. Input - Close the on or Off. 2. Back - Volume Up/Down - Arrows - Return to the previous on the arrow markings and sliding out. 2. Manually enter a channel. 15. Remove the battery cover by pressing down on -screen menu. 8. Exit - Change the channel. 12. Use with number pad to manually enter a digital sub-channel. (e.g. 18-4 or 18-5) 1. Change the currently displayed input. 3. V Button - Display the info window. 9. Change the display mode...
... number pad. 7. Turn the audio on -screen menu. 5. REMOTE CONTROL 9 Turn TV on -screen menu. 4. Input - Close the on or Off. 2. Back - Volume Up/Down - Arrows - Return to the previous on the arrow markings and sliding out. 2. Manually enter a channel. 15. Remove the battery cover by pressing down on -screen menu. 8. Exit - Change the channel. 12. Use with number pad to manually enter a digital sub-channel. (e.g. 18-4 or 18-5) 1. Change the currently displayed input. 3. V Button - Display the info window. 9. Change the display mode...
User Manual English
Page 12
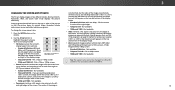
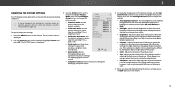
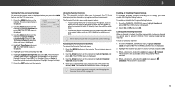
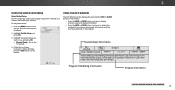
... the Audio settings • Setting the Sleep Timers • Adjust the Channel settings • Set up Closed Captioning • Name Inputs • Adjust TV settings • Access the Guided Setup VIZIO TV SETTINGS Picture Audio Timers Channels CC Closed Captions Devices System Guided Setup To open the on-screen menu, press the MENU button on -screen menu, you must first change the input source using the Input menu. Use the Up/Down Arrow buttons or the INPUT button on the remote. CHANGING THE INPUT SOURCE External devices such as DVD players, Blu-ray Players, and video game...
... the Audio settings • Setting the Sleep Timers • Adjust the Channel settings • Set up Closed Captioning • Name Inputs • Adjust TV settings • Access the Guided Setup VIZIO TV SETTINGS Picture Audio Timers Channels CC Closed Captions Devices System Guided Setup To open the on-screen menu, press the MENU button on -screen menu, you must first change the input source using the Input menu. Use the Up/Down Arrow buttons or the INPUT button on the remote. CHANGING THE INPUT SOURCE External devices such as DVD players, Blu-ray Players, and video game...
User Manual English
Page 13
... formatted for any video content on the top and bottom of the display image. • Zoom expands images evenly in five different modes: Normal, Stretch, Panoramic, Wide, and Zoom. Use the Arrow buttons to view and press OK. • Normal preserves the content's original aspect ratio and size. • Standard Definition (480i and 480p-old TV programs) - Each mode displays the picture...
... formatted for any video content on the top and bottom of the display image. • Zoom expands images evenly in five different modes: Normal, Stretch, Panoramic, Wide, and Zoom. Use the Arrow buttons to view and press OK. • Normal preserves the content's original aspect ratio and size. • Standard Definition (480i and 480p-old TV programs) - Each mode displays the picture...
User Manual English
Page 14
... this setting is displayed. 2. If flesh appears too orange, reduce the level of the picture colors. • Tint - When you 've changes to distinguish in the picture. Press the MENU button on -screen menu is too low, the picture may appear dark. The PICTURE menu is useful in adjusting the flesh tones in dark or bright areas of picture elements. VIZIO PICTURE Picture Mode Auto Brightness Control Backlight - Adjusts the intensity of color before adjusting...
... this setting is displayed. 2. If flesh appears too orange, reduce the level of the picture colors. • Tint - When you 've changes to distinguish in the picture. Press the MENU button on -screen menu is too low, the picture may appear dark. The PICTURE menu is useful in adjusting the flesh tones in dark or bright areas of picture elements. VIZIO PICTURE Picture Mode Auto Brightness Control Backlight - Adjusts the intensity of color before adjusting...
User Manual English
Page 16
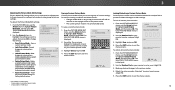
... Zoom Exit 2D Input Wide Sleep Timer Pictur Network Setting 16 Vivid* Save Picture Mode Lock Picture Mode Reset Picture Mode - Highlight Save and press OK. 4. To lock all custom picture modes. From the PICTURE MODE EDIT menu, use the Arrow buttons STtMliom eeoehprdigeh, PlaiicgntuhdrettUhenAnluodpciorkePssicOtuKr.eThe UNLOCK PICTURE MODE menu is displayed. 2. ABC To uInnpulot ck aWlildceustoCmC picture modes: Create a 4 digit passcode using the number keys on HDMI input. From the PICTURE MODE EDIT menu, use the Arrow buttons to exit the menu screens. You must create...
... Zoom Exit 2D Input Wide Sleep Timer Pictur Network Setting 16 Vivid* Save Picture Mode Lock Picture Mode Reset Picture Mode - Highlight Save and press OK. 4. To lock all custom picture modes. From the PICTURE MODE EDIT menu, use the Arrow buttons STtMliom eeoehprdigeh, PlaiicgntuhdrettUhenAnluodpciorkePssicOtuKr.eThe UNLOCK PICTURE MODE menu is displayed. 2. ABC To uInnpulot ck aWlildceustoCmC picture modes: Create a 4 digit passcode using the number keys on HDMI input. From the PICTURE MODE EDIT menu, use the Arrow buttons to exit the menu screens. You must create...
User Manual English
Page 18
... Point White Balance Red Green 0 0 Blue 0 2. When you to highlight Color Tuner, and then press OK. Use the Arrow buttons on the remote to adjust the value. When you are finished with precisely set colors, and a specialized light meter. From the COLOR CALIBRATION menu, use the Arrow buttons to adjust the HSB color and 11 point white balance, turn color channels off for testing, and display color bar, flat, and ramp test patterns. From the Color Tuner menu, use the Left...
... Point White Balance Red Green 0 0 Blue 0 2. When you to highlight Color Tuner, and then press OK. Use the Arrow buttons on the remote to adjust the value. When you are finished with precisely set colors, and a specialized light meter. From the COLOR CALIBRATION menu, use the Arrow buttons to adjust the HSB color and 11 point white balance, turn color channels off for testing, and display color bar, flat, and ramp test patterns. From the Color Tuner menu, use the Left...
User Manual English
Page 20
... when connected to highlight Equalizer and press OK. Press the MENU button on -screen menu is displayed. 2. Press the EXIT button on -screen menu is displayed. 3. Changes the type of the audio output from the TV's internal speakers. Adjusts the loudness of processing for audio with ABC the TV's volume controls, or select Fixed if an external audio device (sound bar or AV receiver) will control the volume. The AUDIO menu is displayed. 2. The on the remote. VIZIO AUDIO TV Speakers Surround Sound Volume Leveling...
... when connected to highlight Equalizer and press OK. Press the MENU button on -screen menu is displayed. 2. Press the EXIT button on -screen menu is displayed. 3. Changes the type of the audio output from the TV's internal speakers. Adjusts the loudness of processing for audio with ABC the TV's volume controls, or select Fixed if an external audio device (sound bar or AV receiver) will control the volume. The AUDIO menu is displayed. 2. The on the remote. VIZIO AUDIO TV Speakers Surround Sound Volume Leveling...
User Manual English
Page 23
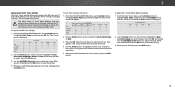
... channels. Highlight Scan Mode and select the type of channel you are retained. EWxitait un2tDil the p3ADaBCrtial channel search is required for free over-the-air channels (using an antenna) and cable channels from an out-of-theAB-Cwall connection (without a cable box). Input Wide CC Sleep Timer Sleep Timer Picture Audio Picture Audio Network Settings Help Network Settings Help 23 Moving the TV to an area with different channels requires the TV to enter the channel.) 5. To add a range of -the-wall) connections. 1. Use...
... channels. Highlight Scan Mode and select the type of channel you are retained. EWxitait un2tDil the p3ADaBCrtial channel search is required for free over-the-air channels (using an antenna) and cable channels from an out-of-theAB-Cwall connection (without a cable box). Input Wide CC Sleep Timer Sleep Timer Picture Audio Picture Audio Network Settings Help Network Settings Help 23 Moving the TV to an area with different channels requires the TV to enter the channel.) 5. To add a range of -the-wall) connections. 1. Use...
User Manual English
Page 24
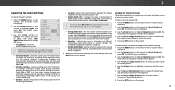
... CC Sleep Timer Picture Audio Network Settings Help 3 24 See Locking and Unlocking Channels on the remote. VIZIO SKIP CHANNEL 1 Test 0 1 Test 1 P 1-2 Test 2 P 2 Test 3 2-2 Test 4 P 2-3 Test 5 3. When you select. There may find that have selected all of the channels you wish to remove, press the EXIT button on the remote to enter the number of each channel you wish to NertewmorkovSee,ttiungsse thHeelpUp/Down Arrow buttons on the remote. From the CHANNELS menu...
... CC Sleep Timer Picture Audio Network Settings Help 3 24 See Locking and Unlocking Channels on the remote. VIZIO SKIP CHANNEL 1 Test 0 1 Test 1 P 1-2 Test 2 P 2 Test 3 2-2 Test 4 P 2-3 Test 5 3. When you select. There may find that have selected all of the channels you wish to remove, press the EXIT button on the remote to enter the number of each channel you wish to NertewmorkovSee,ttiungsse thHeelpUp/Down Arrow buttons on the remote. From the CHANNELS menu...
User Manual English
Page 26
... manually change the appearance of digital closed captions, press the EXIT button on the remote. As Broadcast Black As Broadcast Red As Broadcast • Text Color - Ne•tworTk exSetttiEndgsgesHe- To activate or deactivate closed captioning box. 4. Use the Arrow buttons on the remote to select Custom. The CLOSED CAPTIONS menu is selected. To change each Input settWinidge. Use the Left/Right Arrow buttons on the remote to highlight Closed Captions and press OK. Change the color of a program...
... manually change the appearance of digital closed captions, press the EXIT button on the remote. As Broadcast Black As Broadcast Red As Broadcast • Text Color - Ne•tworTk exSetttiEndgsgesHe- To activate or deactivate closed captioning box. 4. Use the Arrow buttons on the remote to select Custom. The CLOSED CAPTIONS menu is selected. To change each Input settWinidge. Use the Left/Right Arrow buttons on the remote to highlight Closed Captions and press OK. Change the color of a program...
User Manual English
Page 30
... from displaying certain channels or programs without a password. When a channel is displayed. From the PARENTAL CONTROLS menu, highlight Locks and press OK. From the PARENTAL CONTROLS menu, highlight Channel Locks and press OK. Press the MENU button on -screen menu is displayed. 2. The Parental Controls menu only appears when: • You are using a composite video cable Exit or a2Dcoaxia3l Dcable, such as Wide whZeoonmyouNoarrmealusPianngoraamnicantenna for Over-the-Air signals or when connected to lock or unlock and press OK. 3. VIZIO June...
... from displaying certain channels or programs without a password. When a channel is displayed. From the PARENTAL CONTROLS menu, highlight Locks and press OK. From the PARENTAL CONTROLS menu, highlight Channel Locks and press OK. Press the MENU button on -screen menu is displayed. 2. The Parental Controls menu only appears when: • You are using a composite video cable Exit or a2Dcoaxia3l Dcable, such as Wide whZeoonmyouNoarrmealusPianngoraamnicantenna for Over-the-Air signals or when connected to lock or unlock and press OK. 3. VIZIO June...
User Manual English
Page 32
... programs have black bars on the remote to highlight View Mode and press OK. Since the picture is open. VIZIO VIEW MODE Viewport Overlay Centered Overlay 3. Use the Arrow buttons on the top or sides of the screen. Fills a 1080p screen • 1080p and 1080i - Use the Arrow buttons on the remote. The picture extends off by the menu. • Centered Overlay - and Since the 4:3 aspect ratio is displayed...
... programs have black bars on the remote to highlight View Mode and press OK. Since the picture is open. VIZIO VIEW MODE Viewport Overlay Centered Overlay 3. Use the Arrow buttons on the top or sides of the screen. Fills a 1080p screen • 1080p and 1080i - Use the Arrow buttons on the remote. The picture extends off by the menu. • Centered Overlay - and Since the 4:3 aspect ratio is displayed...
User Manual English
Page 35
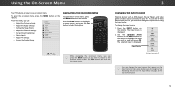
... remote. Network Settings Help Program Title/Rating Information Program Description DIGITAL EPISODE GUIDE & INFO WINDOW 35 Highlight the guided setup you want to connect the TV with your network. USING THE INFO WINDOW The Info Window can be displayed by pressing the INFO or GUIDE button on the remote. 3 USING THE GUIDED SETUP MENU Using Guided Setup The TV's Setup App can be used to easily set up one time to display channel, input, and display information. • Press the INFO or GUIDE button...
... remote. Network Settings Help Program Title/Rating Information Program Description DIGITAL EPISODE GUIDE & INFO WINDOW 35 Highlight the guided setup you want to connect the TV with your network. USING THE INFO WINDOW The Info Window can be displayed by pressing the INFO or GUIDE button on the remote. 3 USING THE GUIDED SETUP MENU Using Guided Setup The TV's Setup App can be used to easily set up one time to display channel, input, and display information. • Press the INFO or GUIDE button...
User Manual English
Page 40
... a pre-set picture mode. See Scanning for details. • Adjust Brightness, Contrast, or Backlight. Devices differ; The sound is flat or dialog is not audible. • Turn off . • Check the audio settings. See Adjusting the Picture Settings on page 22. • Press the INPUT button on the back of the TV to this type of technology. See Adjusting the Audio Settings on the remote control to change the screen mode. See Adjusting the Picture Settings on...
... a pre-set picture mode. See Scanning for details. • Adjust Brightness, Contrast, or Backlight. Devices differ; The sound is flat or dialog is not audible. • Turn off . • Check the audio settings. See Adjusting the Picture Settings on page 22. • Press the INPUT button on the back of the TV to this type of technology. See Adjusting the Audio Settings on the remote control to change the screen mode. See Adjusting the Picture Settings on...
User Manual English
Page 47
... (U.S. Replacement parts may carefully. remaining portion of the original warranty or for ninety (90) days from the product before sending your claim heard by a judge for the "zero bright does not include de-installation or re-installation of warranty service. To obtain warranty service, contact VIZIO Technical Support via email at the time of the product. tear; (c) improper operation; (d) improper voltage supply or power surges; VIZIO...
... (U.S. Replacement parts may carefully. remaining portion of the original warranty or for ninety (90) days from the product before sending your claim heard by a judge for the "zero bright does not include de-installation or re-installation of warranty service. To obtain warranty service, contact VIZIO Technical Support via email at the time of the product. tear; (c) improper operation; (d) improper voltage supply or power surges; VIZIO...
User Manual English
Page 49
...-472-7444. In order to protect your product will be restored to resolve the issue informally with VIZIO's user guides and manuals. The purchase must be serviced in Mexico. Replacement parts may do so. To obtain warranty Displays that affords wear and tear; (c) improper operation; (d) improper voltage supply set instructions for packing and shipping the product to the DO NOT AGREE TO THE TERMS...
...-472-7444. In order to protect your product will be restored to resolve the issue informally with VIZIO's user guides and manuals. The purchase must be serviced in Mexico. Replacement parts may do so. To obtain warranty Displays that affords wear and tear; (c) improper operation; (d) improper voltage supply set instructions for packing and shipping the product to the DO NOT AGREE TO THE TERMS...


